Canon Legria mini Instruction Manual
Canon legria mini hd camcorder instruction manual
Hide thumbs
Also See for Legria mini:
- Instruction manual (304 pages) ,
- Getting started (2 pages) ,
- User manual (10 pages)

Related Manuals for Canon Legria mini


Summary of Contents for Canon Legria mini
- Page 1 PUB. DIE-0445-000 HD Camcorder Instruction Manual Instruction Manual Instruction Manual...
-
Page 2: Important Usage Instructions
For more information about the recycling of this product, please contact your local city office, waste authority, approved scheme or your household waste disposal service or visit www.canon-europe.com/weee, or www.canon-europe.com/battery. - Page 3 REGIONS OF USE The LEGRIA mini is in compliance (as of June 2013) with the radio signal regulations of the regions listed below. For details on other regions where it can be used, make inquiries with the contacts listed at the end of this instruction manual (A 245).
- Page 4 • This device incorporates exFAT technology licensed from Microsoft. • This device incorporates exFAT technology licensed from Microsoft. • “Full HD 1080” refers to Canon camcorders compliant with high-definition video com- • “Full HD 1080” refers to Canon camcorders compliant with high-definition video com- •...
-
Page 5: About This Manual
About this Manual Thank you for purchasing the Canon LEGRIA mini. Please read this manual carefully before you use the camcorder and retain it for future reference. Should your camcorder fail to operate cor- rectly, refer to Troubleshooting (A 196). - Page 6 • The photos included in this manual are simulated pictures taken with a still camera. • Illustrations of the camcorder’s screen or a computer’s screen included in this manual may show only relevant parts of the screen. • Navigation buttons: The navigation bar at the bottom of the page offers up to four buttons to let you get quickly to the information you want to find.
-
Page 7: Table Of Contents
Table of Contents Important Usage Instructions........2 Important Usage Instructions........2 Important Usage Instructions........2 About this Manual ............5 About this Manual ............5 About this Manual ............5 The Camcorder’s Functions in Real-Life The Camcorder’s Functions in Real-Life The Camcorder’s Functions in Real-Life Situations .............. - Page 8 Inserting and Removing a Memory Card....34 First Time Settings ............ 36 Basic Setup ............. 36 Changing the Time Zone .......... 39 Initializing a Memory Card......... 40 Basic Operation of the Camcorder ......42 Using the Touch Screen ........... 42 Using the Menus ............
- Page 9 Advanced Functions ........... 83 Video Quality and Shooting Modes ......85 Selecting the Video Quality ........85 Selecting the Photo Size .......... 87 Selecting the Shooting Mode ........88 Special Recording Modes......... 92 Interval Recording ............ 92 Slow and Fast Motion..........96 Slow and Fast Motion..........
- Page 10 Wireless Connections Using an Access Point ..152 Wireless Connections Using an Access Point ..152 Wireless Connections Using an Access Point ..152 Sharing Recordings with CANON iMAGE GATEWAY ............. 152 Wireless Playback on a Computer......159 Wi-Fi Connection Using an Access Point....161...
- Page 11 Additional Information ........174 Appendix: Menu Options Lists........ 176 [1 Other Settings] Menus ........178 Appendix: Onscreen Icons and Displays ....189 Trouble? ..............196 Troubleshooting ............. 196 List of Messages ............ 207 Do’s and Don’ts ............223 Do’s and Don’ts ............223 Do’s and Don’ts ............
-
Page 12: The Camcorder's Functions In Real-Life Situations
The Camcorder’s Functions in Real-Life Situations Unique functions for special cases Record a mirror image of your dance training so you can practice dance training so you can practice dance training so you can practice along with the playback scene. Automatic Image Rotation and Automatic Image Rotation and Automatic Image Rotation and... -
Page 13: Getting The Look You Want
Create a dynamic montage sequence with short cuts. Video Snapshot (A 98) Getting the look you want Get gorgeous video and photos without bothering with settings. N mode (A 52) Make the image brighter or darker than the exposure set by the camcorder. -
Page 14: Challenging Subjects And Shooting Conditions
Challenging subjects and shooting conditions Shoot great video of special scene situations with minimal settings. Shooting Modes (A 88) Obtain natural-looking colors even under special lighting conditions. White Balance (A 110) Optimize the exposure for the desired subject just by touch- Optimize the exposure for the desired subject just by touch- Optimize the exposure for the desired subject just by touch- ing the screen. - Page 15 Save parts of your video as photos or short video snapshot scenes. Capturing Photos/Video Snapshot Scenes (A 118) Convert your scenes into a smaller file size to upload to the Web. Converting and Resizing Movies (A 126) Play a slideshow of your photos. Slideshow (A 82) Enjoy your recordings on a TV.
-
Page 16: Wireless Functions
Wireless functions Use your smartphone or tablet as a remote control while recording. Wi-Fi Remote Control (CameraAccess) (A 143) Use a Web browser on your smartphone or tablet to access and play back the recordings in the camcorder. Remote Browse/Playback via Browser (A 146) 146) 146) Use an iOS app to wirelessly transfer recordings to your... - Page 17 Share your recordings with Web albums using CANON iMAGE GATEWAY. CANON iMAGE GATEWAY (A 152) Connect the camcorder to your home network and wire- lessly stream your recordings. Media Server (A 159) Wi-Fi Connection to an Access Point (A 161)
-
Page 18: Getting To Know The Camcorder
NB-4L Battery Pack IFC-400PCU USB Cable IFC-400PCU USB Cable IFC-400PCU USB Cable WS-DC11 Wrist Strap WS-DC11 Wrist Strap WS-DC11 Wrist Strap Getting Started Leaflet Getting Started Leaflet Getting Started Leaflet Canon LEGRIA mini CD-ROM Canon LEGRIA mini CD-ROM Canon LEGRIA mini CD-ROM... - Page 19 An Internet connection is required for full installation of the software. * CANON iMAGE GATEWAY is an online service that allows you to * CANON iMAGE GATEWAY is an online service that allows you to * CANON iMAGE GATEWAY is an online service that allows you to share movies and photos, make photo albums, and more.
-
Page 20: Names Of Parts
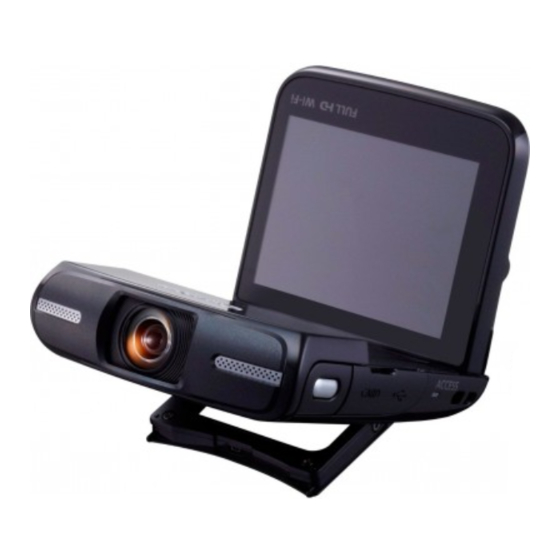
Names of Parts Left side view Photo button (A 59) Memory card slot cover (A 34) Memory card slot cover ( Memory card slot cover ACCESS indicator (A 52, 59) ACCESS indicator ( ACCESS indicator LCD panel (A 24) LCD panel ( LCD panel Adjustable stand (A 24) Adjustable stand (... - Page 21 Right side view 10 11 12 (playback mode) button (A 63, 68) (playback mode) button ( (playback mode) button 63, 68) 63, 68) 10 Terminal cover 11 Power indicator 12 Power switch (ON/OFF) (A 52, 59) Power switch (ON/OFF) ( Power switch (ON/OFF) ( 13 Strap mount (A 24) Strap mount (...
- Page 22 Front view Top view 16 Lens cover 17 Stereo microphone (A 108) 108) 108) 18 Speaker (A 65) 19 LCD touch screen (A 25, 42) LCD touch screen ( LCD touch screen...
- Page 23 Bottom view Back view 24 25 20 Serial number 21 Tripod socket (A 225) Tripod socket ( Tripod socket 22 Battery compartment cover (A 29) Battery compartment cover ( Battery compartment cover ( 23 Wi-Fi antenna (A 136) 24 Battery release latch (A 29) 25 Battery compartment (A 29)
- Page 24 Adjusting the camcorder’s position The camcorder has an adjustable stand (5) and an articu- lated LCD panel (4) that allow you to easily adjust its position to match your recording conditions. Here are typical shooting positions (all degree measure- ments are approximate): 80°...
- Page 25 19 LCD touch screen • The screen is produced using extremely high-precision manufacturing techniques, with more than 99.99% of the pixels operating to specification. Less than 0.01% of the pixels may occasionally misfire or appear as black, red, blue or green dots. This has no effect on the recorded image and does not constitute a malfunction.
-
Page 26: Preparations
Preparations Charging and Inserting the Battery Pack The first step for using your camcorder is to prepare the The first step for using your camcorder is to prepare the The first step for using your camcorder is to prepare the power supply. - Page 27 Basic Operation of the Camcorder In this section you can learn more about basic operations, such as using the touch screen, changing operating modes and using the menus.
-
Page 28: Charging And Inserting The Battery Pack
Charging and Inserting the Battery Pack Charging and Inserting the Battery Pack Charge the supplied battery pack in advance, using the supplied battery charger. ■ Charging the Battery Pack Charging the Battery Pack Charging the Battery Pack Attach the battery pack to the battery charger, aligning Attach the battery pack to the battery charger, aligning Attach the battery pack to the battery charger, aligning the triangle marks. -
Page 29: Inserting The Battery Pack
Insert the battery pack with the Canon label facing the Insert the battery pack with the Canon label facing the Insert the battery pack with the Canon label facing the bottom of the camcorder. - Page 30 Charging and Inserting the Battery Pack To remove the battery pack Open the battery compartment cover and slide the battery release latch in the direction of the arrow so the battery pack springs out. Remove the battery pack and close the cover. 1, 4 •...
- Page 31 Charging and Inserting the Battery Pack • To prevent equipment breakdowns and excessive heating, do not connect the supplied battery charger to voltage converters for overseas travels or special power sources such as those on aircraft and ships, DC-AC inverters, etc. •...
-
Page 32: Using A Memory Card
Toshiba and SanDisk. For the latest information on mem- sonic, Toshiba and SanDisk. For the latest information on mem- ory cards that can be used, visit your local Canon Web site. ory cards that can be used, visit your local Canon Web site. - Page 33 Using a Memory Card • After repeatedly recording, deleting and editing scenes (fragmented memory), it will take longer to write data on the memory card and recording may stop. Save your recordings and initialize the memory card using the [Complete Initialization] option. •...
-
Page 34: Inserting And Removing A Memory Card
Using a Memory Card Inserting and Removing a Memory Card Make sure to initialize all memory cards with the camcorder, using the [Complete Initialization] option, before using them for the first time. When you turn on the camcorder for the first time, you will need to complete the basic setup first (A 36), and then initialize the memory card (A 40). - Page 35 Using a Memory Card Close the memory card slot cover. • Do not force the cover closed if the memory card is not correctly inserted. To remove the memory card Push the memory card once to release it. When the memory card springs out, pull it all the way out.
-
Page 36: First Time Settings
First Time Settings First Time Settings Basic Setup The first time you turn on the camcorder, you will be guided by the camcorder’s basic setup screens to select the camcorder’s language and set the date and time. For details on how to use the touch screen, refer to Using the Touch Screen (A 42). - Page 37 First Time Settings Touch [æ] after selecting a language Touch [Y.M.D], [M.D,Y] or [D.M.Y] to select the date for- Touch [Y.M.D], [M.D,Y] or [D.M.Y] to select the date for- Touch [Y.M.D], [M.D,Y] or [D.M.Y] to select the date for- mat you prefer and then touch [æ]. •...
- Page 38 First Time Settings Set the correct date and time by changing all the fields in the same way. • Touch [24H] to use 24-hour clock or leave it unselected to use 12-hour clock (AM/PM). Touch [OK] to complete the basic setup and close the setup screen.
-
Page 39: Changing The Time Zone
First Time Settings Changing the Time Zone Change the time zone to match your location. The default set- ting is Paris. In addition, the camcorder is able to retain the date and time of another location. This is convenient when you travel so that you can set the camcorder to match the time of your home location or that of your destination. -
Page 40: Initializing A Memory Card
First Time Settings Initializing a Memory Card Initialize memory cards when you use them with this camcorder for the first time. You can also initialize a memory card to perma- nently delete all the recordings it contains. Shooting mode Playback I J L K ’... - Page 41 First Time Settings Initialize the memory card. > > > > Other Settings] [Initialize > > > [Initialize] [Complete Initialization] [Yes] [OK] > Touch this option if you want to physically erase all the data rather than just clear the file allocation table of the memory card. If you selected the [Complete Initialization] option, you can touch If you selected the [Complete Initialization] option, you can touch If you selected the [Complete Initialization] option, you can touch...
-
Page 42: Basic Operation Of The Camcorder
Basic Operation of the Camcorder Basic Operation of the Camcorder Using the Touch Screen The buttons and menu items that appear on the touch screen change dynamically depending on the operating mode and the task you are performing. With the intuitive touch screen interface you have all the controls at your fingertips. -
Page 43: Using The Menus
Basic Operation of the Camcorder • In the following cases, you may not be able to perform touch operations correctly. - Using your fingernails or hard-tipped objects, such as ballpoint pens. - Operating the touch screen with wet or gloved hands. - Applying excessive force with your finger. - Page 44 Basic Operation of the Camcorder ■ 0 (Home) Menu Recording mode Playback mode Playback mode Playback mode Touch [0] on the bottom left corner (recording mode) ] on the bottom left corner (recording mode) ] on the bottom left corner (recording mode) or top left corner (playback mode) of the screen to or top left corner (playback mode) of the screen to or top left corner (playback mode) of the screen to...
- Page 45 Basic Operation of the Camcorder Menu item Description [1 Other Settings] (A 48, 178) Opens the [1 Other Settings] menus, which give you access to various camcorder settings. [Audio Scene]* (recording mode only) (A 108) Optimize audio settings for your surroundings to get the Optimize audio settings for your surroundings to get the Optimize audio settings for your surroundings to get the best possible sound.
- Page 46 Basic Operation of the Camcorder Menu item Description [< Self Timer] (recording mode only) (A 100) Convenient function to give you time to get in the picture after setting up the camcorder. [4 Remote Control+Streaming] (recording mode only) (A 143) Use your smartphone or tablet as a remote control to Use your smartphone or tablet as a remote control to Use your smartphone or tablet as a remote control to...
- Page 47 Basic Operation of the Camcorder Menu item Description [— Wi-Fi] (playback mode only) (A 136) Allows you to access the various Wi-Fi functions, such as uploading recordings to the Web or playing back record- ings using a smartphone. ■ Using the Menus Changing the camcorder’s various settings using the menus is Changing the camcorder’s various settings using the menus is Changing the camcorder’s various settings using the menus is...
- Page 48 Basic Operation of the Camcorder The [1 Other Settings] Menu The [1 Other Settings] menus offer many options to control various aspects of the camcorder’s operation. For details, refer to the complete list of settings in the appendix [1 Other Set- tings] Menus (A 178).
-
Page 49: Operating Modes
Basic Operation of the Camcorder Touch the tab of the desired menu. Drag your finger up/down to bring the setting you want to change into the orange selection bar. • You can also use the [Í] and [Î] icons for scrolling. •... - Page 50 Basic Operation of the Camcorder ■ Recording When you set the power switch to ON, the camcorder will turn on in recording mode. In recording mode, the camcorder’s oper- ating mode is determined by the selected shooting mode (A 88). The shooting mode icons are the same icons used in the shooting mode selection screen.
-
Page 51: Basic Recording And Playback
Basic Recording and Playback Basic Recording This section covers how to easily record video and photos This section covers how to easily record video and photos This section covers how to easily record video and photos in N mode. To record using other shooting modes, use mode. -
Page 52: Basic Recording
Basic Recording Basic Recording Recording Video With N mode, you can take great-looking videos by letting the camcorder automatically adjust settings. N mode is therefore used as an example in the following procedure. You can select a different shooting mode according to the shooting conditions (A 88). - Page 53 Basic Recording Set the power switch to ON to turn on the camcorder. • The lens cover will open. • Place and adjust the camcorder as necessary. If shooting with the camcorder hand-held, be careful not to obstruct the lens. Set the camcorder to mode.
- Page 54 Basic Recording Touch [Ü] to begin recording. • Movies have an aspect ratio of 16:9. When the recording • Movies have an aspect ratio of 16:9. When the recording • Movies have an aspect ratio of 16:9. When the recording starts, the onscreen display will change to letterbox mode.
-
Page 55: Changing The Field Of View
Basic Recording ■ Changing the Field of View The camcorder features a ultra wide angle lens so you can cap- ture a vast field of view (about 160° for video, about 170° for photos), for example to include a large group in a fisheye-like image. - Page 56 Basic Recording About AUTO mode • Only the following functions are available in N mode. - Video snapshot (A 98). - Face detection and tracking (A 115) to get the best exposure when a person’s face is detected. - Decoration (A 101) to add a fun personal touch using stamps and drawings.
- Page 57 Basic Recording Smart AUTO icons Background Subject Bright* Blue skies* Vivid colors* People (stationary) People (moving) Subjects other than peo- ple, such as landscapes * The icon in parentheses appears under backlight conditions. * The icon in parentheses appears under backlight conditions. * The icon in parentheses appears under backlight conditions.
- Page 58 • Be sure to save your recordings regularly (A 129), • Be sure to save your recordings regularly ( • Be sure to save your recordings regularly ( especially after making important recordings. Canon especially after making important recordings. Canon especially after making important recordings. Canon shall not be liable for any loss or corruption of data.
-
Page 59: Taking Photos
Basic Recording • When recording in bright places, it may be difficult to use the LCD screen. In such cases, you can adjust the LCD backlight with the 1 > > [LCD Back- light] setting or adjust the brightness of the LCD screen with the 1 >... - Page 60 Basic Recording Set the power switch to ON to turn on the camcorder. • The lens cover will open. • Place and adjust the camcorder as necessary. If shooting with the camcorder hand-held, be careful not to obstruct the lens. Shooting mode button Set the camcorder to N mode.
- Page 61 Basic Recording 4, 5 4, 5 Press the photo button halfway to lock the exposure. Press the photo button halfway to lock the exposure. Press the photo button halfway to lock the exposure. • The camcorder will beep and automatically adjust the •...
- Page 62 Basic Recording The information in the sidebars, (important precau- tions) and (additional notes) sections in the previous pages (A 56-59) apply also to photo shooting. • Photos can only be recorded in record standby mode.
-
Page 63: Basic Playback
Basic Playback Basic Playback Playing Back Video Shooting mode Playback I J L K ’ Press the ^ button to turn on the camcorder in play- button to turn on the camcorder in play- button to turn on the camcorder in play- back mode. - Page 64 Basic Playback Visual bar shows the relative loca- tion of the cur- rent index screen. Folder name. The last four digits represent the recording digits represent the recording digits represent the recording date (1103 = 3 November). date (1103 = 3 November). date (1103 = 3 November).
- Page 65 Basic Playback To adjust the volume During playback, touch the screen to display the play- back controls. Touch [ ], drag your finger along the [Speaker Volume] bar, or repeatedly touch the speaker icon on either end of it, to adjust the volume and touch [K]. Playback controls Playback Playback pause...
- Page 66 Basic Playback Volume control. Decoration (A 101). Capture a video snapshot scene (A 118). Fast playback* backward/forward. 10 Recording date. 11 Jump to the beginning of the next scene. 12 Resume the playback. 13 Capture the displayed frame as a photo (A 120). Capture the displayed frame as a photo ( Capture the displayed frame as a photo 14 Slow playback** backward/forward.
-
Page 67: Repeat Playback
Basic Playback Touch [K] twice to return to the index screen. ■ Repeat Playback During playback of the desired scene: > > Touch the screen to display the playback controls [Ý] > [Ð] • The same scene will be played back in a loop. Repeat the pro- •... - Page 68 Basic Playback The ^ button When the camcorder is turned on, press the ^ button to switch back and forth between playback and recording mode. • When the camcorder is off, you can press the ^ button • When the camcorder is off, you can press the •...
- Page 69 Basic Playback • Observe the following precautions while the ACCESS indicator is on or flashing. Failing to do so may result in permanent data loss. - Do not remove the memory card. - Do not disconnect the power source or turn off the camcorder.
-
Page 70: Viewing Photos
Basic Playback • Sound will not be output from the built-in speaker while the optional HTC-100 High Speed HDMI cable is con- nected to the camcorder. Viewing Photos Shooting mode Playback I J L K ’ y ’ ’ Press the ^ button to turn on the camcorder in play- button to turn on the camcorder in play- button to turn on the camcorder in play- back mode. - Page 71 Basic Playback > [} Photo Playback] Visual bar shows the relative loca- tion of the cur- rent index screen. Folder name. The last four Folder name. The last four Folder name. The last four digits represent the recording digits represent the recording digits represent the recording date (1103 = 3 November).
-
Page 72: Photo Jump Function
Basic Playback ■ Photo Jump Function When you have recorded a large number of photos, you can jump easily through the photos using a scroll bar. In single photo view, display the [Photo Jump] scroll bar. > Touch the screen to display the playback controls Touch the screen to display the playback controls Touch the screen to display the playback controls Touch [Ï] or [Ð], or drag your finger along the scroll... - Page 73 Basic Playback • Touch [ ] to magnify the image further. Touch [ ] to reduce the magnification. • Drag your finger along the magnified area to check other parts of the photo. The white square within the frame rep- resents the approximate location of the portion of the photo that is shown magnified.
-
Page 74: Deleting Scenes
Basic Playback Deleting Scenes You can delete those scenes that you are not interested in keep- ing. Deleting scenes allows you also to free up space on the memory card. Shooting mode Playback I J L K ’ ■ Deleting a Single Scene Play back the scene you want to delete (A 63). -
Page 75: Deleting Scenes From The Index Screen
Basic Playback ■ Deleting Scenes from the Index Screen Open the [y] or [¦] index screen (A 63). • To delete all the scenes saved in the same folder (recorded on the same date), drag your finger left/right until a scene you want to delete appears. - Page 76 Basic Playback Options [<folder name>]: Delete all the scenes recorded on a particular date that are stored in the same folder. The last four digits of the folder name that appears in the button indicate the date the folder was cre- ated (ex.
-
Page 77: Trimming Scenes
Basic Playback • To delete all movies and make all recordable space available again you may prefer to initialize the memory card (A 40). Trimming Scenes You can trim scenes by removing everything up to a certain point or everything after a certain point. By doing so, you leave point or everything after a certain point. - Page 78 Basic Playback • Playback controls will appear on the screen (A 65). Use any special playback modes (fast playback, frame reverse/ advance) as necessary to locate the desired point. Trim the scene. > > [Trim] [Trim Before Marker] or [Trim After Marker] [Save as New] or [Overwrite] •...
-
Page 79: Deleting Photos
Basic Playback Deleting Photos You can delete those photos that you are not interested in keep- ing. Shooting mode Playback I J L K ’ y ■ Deleting a Single Photo In single photo view, select the photo you want to In single photo view, select the photo you want to In single photo view, select the photo you want to delete. -
Page 80: Deleting Photos From The Index Screen
Basic Playback ■ Deleting Photos from the Index Screen Open the [}] index screen (A 70). • To delete all the photos saved in the same folder (recorded on the same date), drag your finger left/right until a photo you want to delete appears. Delete the photos. - Page 81 Basic Playback Options [<folder name>]: Delete all the photos taken on a particular date. The last four digits of the folder name that appears in the button indicate the date the folder was created (ex. 1103 = 3 November). [Select]: Select individual photos to delete.
-
Page 82: Slideshow
Basic Playback Slideshow You can play a slideshow of all the photos. Shooting mode Playback I J L K ’ y Open the [}] index screen (A 70). Touch the photo that will open the slideshow to display Touch the photo that will open the slideshow to display Touch the photo that will open the slideshow to display it in single photo view. -
Page 83: Advanced Functions
Advanced Functions Video Quality and Shooting Modes This section explains how to change the video quality of This section explains how to change the video quality of This section explains how to change the video quality of your recordings and how to use the camcorder’s various your recordings and how to use the camcorder’s various your recordings and how to use the camcorder’s various shooting modes to get perfect recordings when you are... - Page 84 When You Want More Control This section explains functions you can use when you want more control over how your recordings look. It is more oriented for advanced users and covers functions such as white balance and exposure compensation.
-
Page 85: Video Quality And Shooting Modes
Video Quality and Shooting Modes Video Quality and Shooting Modes Selecting the Video Quality The camcorder offers three video quality options (bit rates*) for recording movies. Select 24 Mbps for higher video quality; select 4 Mbps for longer recording times or smaller file sizes. The table fol- lowing the procedure (A 86) gives approximate recording times. - Page 86 Video Quality and Shooting Modes Approximate recording times Video quality (Resolution) Memory card 24 Mbps 17 Mbps 4 Mbps (1920x1080) (1920x1080) (1280x720) 8 GB 40 min. 1 hr. 4 hr. 20 min. 16 GB 1 hr. 25 min. 2 hr. 5 min. 8 hr.
-
Page 87: Selecting The Photo Size
Video Quality and Shooting Modes Selecting the Photo Size Photos are recorded as JPG files. The camcorder offers three photo sizes but the photo quality cannot be changed. As a gen- eral rule, select a larger photo size for higher quality. Shooting mode Playback I J L K... -
Page 88: Selecting The Shooting Mode
Video Quality and Shooting Modes Selecting the Shooting Mode In addition to N mode, the camcorder features a number of shooting modes that offer the most appropriate settings for a variety of special scenes. You can also use the ’ shooting mode when you want the camcorder to set the exposure auto- matically but control manually some advanced settings. - Page 89 Video Quality and Shooting Modes Drag your finger up/down to bring the desired shooting mode to the center and then touch [OK]. Options ( Default value; ƒ - special scene shooting mode) [N Auto] Let the camcorder take care of most of the set- tings while you concentrate on recording (A 52).
- Page 90 Video Quality and Shooting Modes [L Beach] (ƒ) To record on a sunny beach without the subject being underexposed. [K Snow] (ƒ) To record in bright ski resorts without the sub- ject being underexposed. Macro] (ƒ) The camcorder can focus at a shorter distance, The camcorder can focus at a shorter distance, The camcorder can focus at a shorter distance, allowing you to get closer shots of flowers or...
- Page 91 Video Quality and Shooting Modes • [I Sports]/[L Beach]/[K Snow]: The picture may not appear smooth during playback. • [L Beach]/[K Snow]: The subject may become over- exposed on cloudy days or in shaded places. Check the image on the screen. •...
-
Page 92: Special Recording Modes
Special Recording Modes Special Recording Modes Interval Recording You can easily set the camcorder to record half a second of video or a photo at fixed intervals from 5 seconds to 10 minutes. When recording video using interval recording, you can join all these short bits of video (interval scenes) into a single time-lapse scene that captures the passage of time. - Page 93 Special Recording Modes • and the selected interval length will appear on the screen. Also, the remaining video recording time will auto- matically be reduced by about half. Start recording with interval recording. • Movies: Touch [Ü] to record the first video. Photos: Press the photo button, first halfway, then fully.
- Page 94 Special Recording Modes Touch [Yes] to delete the original interval scenes. • If you prefer to keep the original interval scenes even after they were successfully joined, touch [No] instead. • You can touch [Stop] to interrupt the operation while it is in progress.
- Page 95 Special Recording Modes Touch [Join] and continue from step 5 in the previous procedure (A 93). • Face detection and tracking, decoration, exposure adjustment and Wi-Fi functions cannot be used during interval recording. In N mode, the Smart AUTO function that automatically adjusts the brightness or color will be disabled as well.
-
Page 96: Slow And Fast Motion
Special Recording Modes • When you select a recording interval of 30 seconds or longer, the camcorder will enter standby mode when it is not recording in order to save power. In standby mode the screen will turn off and the power indicator will light up in red. - Page 97 Special Recording Modes Touch [Ü]/[Ñ] to record scenes in slow/fast motion. To change the playback speed You can change the playback speed while activating slow/fast motion (from the [ Slow Motion]/[ Fast Motion] selection screen) or from the record standby screen after slow/fast motion is activated.
-
Page 98: Video Snapshot
Special Recording Modes Video Snapshot You can record a series of short scenes, each a few seconds long. When you play the video snapshot scenes one after the other, this will result in fast-paced, dynamic video. You can also record a video snapshot scene every time you record a photo. Shooting mode Playback I J L K... - Page 99 Special Recording Modes To record a photo along with a video snapshot scene: Press the photo button, first halfway, then fully. • The camcorder records a photo and about 4 seconds of video after that. Then, the camcorder returns to record standby mode.
-
Page 100: Convenient Functions
Convenient Functions Convenient Functions Self Timer Shooting mode Playback I J L K ’ > > > [< Self Timer] [C 2 sec] or [G 10 sec] 10 sec] 10 sec] > • • • will appear on the screen. will appear on the screen. -
Page 101: Decoration: Adding A Personal Touch
Convenient Functions • Once the countdown has begun, any of the following actions will cancel the self timer. - Touching [Ü] again, when recording movies. - Pressing the photo button, when recording photos. - Turning off the camcorder. - Pressing the ^ button. Decoration: Adding a Personal Touch Decoration: Adding a Personal Touch Decoration: Adding a Personal Touch... -
Page 102: Decorating Scenes While Recording
Convenient Functions ■ Decorating Scenes while Recording Shooting mode Playback I J L K ’ In record standby mode, touch [Ò] to open the deco- ration screen. Use a tool from the toolbar as explained in the follow- as explained in the follow- as explained in the follow- ing procedures. - Page 103 Convenient Functions [Ó Pens and Stamps] Select the type of pen or stamp and its color. You can also save a single canvas or load a previ- ously saved canvas. [× Animated Stamps] Select animated stamps to add to your decoration. [ß] Minimize the toolbar to the top of the screen to view almost all of the canvas.
- Page 104 Convenient Functions Select the desired pen or stamp from [Tools]. • The main decoration screen will appear again. Draw freely on the canvas with your fingertip. • To select a different pen or stamp: Repeat steps 1 and 2. • To change color: Touch [Ó] and then touch the white or >...
-
Page 105: Decorating Scenes During Playback
Convenient Functions Touch one of the buttons. Touch anywhere on the canvas to place the selected animated stamp. You can also drag some animated stamps to a different location. ■ Decorating Scenes during Playback Have fun decorating movies while playing them back with Have fun decorating movies while playing them back with Have fun decorating movies while playing them back with friends and family. -
Page 106: Image Rotation And Image Flipping
Convenient Functions Decorate the scene using the tools from the toolbar as explained in the previous sections. • In playback mode, the [Ü]/[Ñ] button is replaced by [Ý]/ [Ð]. Touch [Ý] to pause the playback; touch [Ð] to resume. Image Rotation and Image Flipping Image Rotation and Image Flipping Image Rotation and Image Flipping The camcorder offers two functions to manipulate how the... - Page 107 Convenient Functions Example of image flipping Mirror Image] set to [Off] Mirror Image] set to [On] Mirror Image] set to [On] Mirror Image] set to [On] Examples of image rotation when [ Examples of image rotation when [ Examples of image rotation when [ Detect Orientation] is Detect Orientation] is Detect Orientation] is...
-
Page 108: Audio Scenes
Convenient Functions Recording Playback Camcorder’s Onscreen Movies** Photos*** orientation* icon * As seen from the back of the camcorder, with the lens pointing for- rder, with the lens pointing for- rder, with the lens pointing for- ward. ** Even when orientation detection is turned on, movies recorded with turned on, movies recorded with turned on, movies recorded with the camcorder turned sideways cannot be played back in vertical ori-... - Page 109 Convenient Functions > > > [Audio Scene] Desired audio scene [OK] Options ( Default value) Standard] To record most general situations. The camcorder records with standard settings. Music] To vibrantly record music performances and singing indoors. To vibrantly record music performances and singing indoors. To vibrantly record music performances and singing indoors.
-
Page 110: When You Want More Control
When You Want More Control When You Want More Control White Balance The white balance function helps you to accurately reproduce colors under different lighting conditions so that white objects will always look truly white in your recordings. Shooting mode Playback I J L K ’... - Page 111 When You Want More Control To set the custom white balance Point the camcorder at a white object, so it fills the frame at the center of the screen. Touch [Set WB]. When the adjustment is completed, Å stops flashing and disappears.
-
Page 112: Exposure
When You Want More Control • When you select the custom white balance: - Reset the white balance when you change locations or the lighting or other conditions change. - Depending on the light source, Å may keep flash- ing. The result will still be better than with [Ã... -
Page 113: Exposure Compensation
When You Want More Control Shooting mode Playback I J L K ’ • Select a shooting mode other than [N Auto]. Select the desired shooting mode (A 88), but do not touch [OK]. Touch [y] to open the exposure adjustment screen. ] to open the exposure adjustment screen. - Page 114 When You Want More Control • The compensation range may vary depending on the initial brightness of the image, and some values may be grayed out. Touch [X] to apply the selected shooting mode and exposure compensation value. • During exposure lock, y and the exposure compensation value will appear on the screen.
-
Page 115: Face Detection
When You Want More Control • If the shooting mode is changed during exposure com- pensation, the camcorder will return to automatic expo- sure. • By default, the camcorder corrects for backlight condi- tions. You can turn off the automatic correction with the >... - Page 116 When You Want More Control Point the camcorder at a person. • If there is more than one person in the picture, the cam- corder will automatically select one person it determines is the main subject. The main subject is indicated by a white frame and the camcorder will optimize the settings for that person.
- Page 117 When You Want More Control • In certain cases, faces may not be detected correctly. Typical examples include: - Faces extremely small, large, dark or bright in relation to the overall picture. - Faces turned to the side, at a diagonal or partially hid- den.
-
Page 118: Capturing Video Snapshot Scenes And Photos From A Movie
When You Want More Control Capturing Video Snapshot Scenes and Pho- tos from a Movie You can capture video snapshot scenes or photos from a previ- ously recorded scene. For example, you may want to print pho- tos from video recorded at a party or create a small video clip using video snapshot scenes from the highlights of an event. - Page 119 When You Want More Control Touch [Ñ] to stop the playback. • The new video snapshot scene will be saved in a folder corresponding to the date when it was captured. • You can change the length of the video snapshot scenes you capture to 2 or 8 seconds with the 1 >...
-
Page 120: Capturing Photos
When You Want More Control ■ Capturing Photos Shooting mode Playback I J L K ’ Play back the scene from which you want to capture the photo (A 63). At the point you want to capture, pause the playback At the point you want to capture, pause the playback At the point you want to capture, pause the playback and capture the photo. -
Page 121: External Connections
External Connections Terminals on the Camcorder This section gives more details about the camcorder’s output This section gives more details about the camcorder’s output This section gives more details about the camcorder’s output terminals and presents connection diagrams for connecting terminals and presents connection diagrams for connecting terminals and presents connection diagrams for connecting your camcorder to other devices. -
Page 122: Terminals On The Camcorder
Terminals on the Camcorder Terminals on the Camcorder Open the side terminal covers to access the terminals on the camcorder. HDMI Terminal The HDMI terminal offers a high-quality digital connection The HDMI terminal offers a high-quality digital connection The HDMI terminal offers a high-quality digital connection that combines audio and video in a single convenient cable. -
Page 123: Connection Diagrams
Terminals on the Camcorder Connection Diagrams In the following connection diagrams, the left side shows the ter- minals on the camcorder and the right side shows (for reference only) an example of terminals on a connected device. Connection HDMI Type: Digital Quality: High definition Output only Connect to a high-definition TV (HDTV) with an HDMI input termi- Connect to a high-definition TV (HDTV) with an HDMI input termi- Connect to a high-definition TV (HDTV) with an HDMI input termi-... - Page 124 Terminals on the Camcorder Connection Type: Digital data connection · Output only Connect to a computer to save your recordings. USB Cable (supplied) Mini-B Standard-A (computer) • The HDMI terminal on the camcorder is for output only. • The HDMI terminal on the camcorder is for output only. •...
-
Page 125: Playback On A Tv Screen
Terminals on the Camcorder Playback on a TV Screen Connect the camcorder to a TV to enjoy your recordings with family and friends. Shooting mode Playback I J L K ’ Turn off the camcorder and the TV. Connect the camcorder to the TV. •... -
Page 126: Saving And Sharing Your Recordings
Saving and Sharing Your Recordings Saving and Sharing Your Recordings Converting and Resizing Movies You can convert scenes to a lower video quality (down-conver- sion) to obtain smaller file sizes. This is convenient, for example, when you want to upload videos to the Web, as smaller video files will upload faster. - Page 127 Saving and Sharing Your Recordings • A checkmark ! will appear on the scenes you touch. The total number of selected scenes will appear next to the " icon. • Touch a selected scene to remove the checkmark. To > remove all checkmarks at once, touch [Remove All] [Yes].
- Page 128 Saving and Sharing Your Recordings Touch [START] to convert the scene. • Touch [STOP] to interrupt the operation while it is in progress. Touch [OK]. Options for converting and resizing movies Video quality Video quality and resolution of the converted scene Video quality and resolution of the converted scene Video quality and resolution of the converted scene and resolu-...
-
Page 129: Saving Recordings On A Computer
Saving and Sharing Your Recordings • The following scenes cannot be converted/resized using MP4 conversion. - Slow motion scenes recorded using 3 Mbps video quality ([x1/4] speed). - Interval scenes with the icon. Saving Recordings on a Computer Saving Recordings on a Computer Saving Recordings on a Computer Make sure to save your recordings on a computer on a regular Make sure to save your recordings on a computer on a regular... - Page 130 Saving and Sharing Your Recordings • Before installing the software, make sure your computer is connected to the Internet. Insert the LEGRIA mini CD-ROM into the computer’s disc drive. Windows: Use Windows Explorer to open the drive into which you inserted the CD-ROM.
- Page 131 Saving and Sharing Your Recordings Follow the onscreen instructions to complete the Follow the onscreen instructions to complete the Follow the onscreen instructions to complete the installation. • During the installation process, you may be prompted to • During the installation process, you may be prompted to •...
-
Page 132: Connecting The Camcorder To A Computer
Saving and Sharing Your Recordings First-time connection to a computer running Windows The first time you connect the camcorder to the computer, you also need to select the CameraWindow auto-launch setting. Connecting the Camcorder to a Computer Shooting mode Playback I J L K ’... - Page 133 Saving and Sharing Your Recordings • When the camcorder is connected to a computer: - Do not remove the memory card. - Do not change or delete any of the memory card’s folders or files directly from the computer as this may result in permanent data loss.
- Page 134 Saving and Sharing Your Recordings • Regardless of the charge conditions of the battery pack in the camcorder, Battery Capacity on the camcorder’s details area of CameraWindow’s main screen will always appear as ‘Full’. • Long scenes, whose video data exceeds 4 GB, will be recognized as multiple files on other devices.
-
Page 135: Uploading Recordings To The Web
With the supplied software ImageBrowser EX, you can also upload your movies to YouTube and photos to Facebook from your computer. Additionally, you can use CANON iMAGE GATE- WAY* to make photo albums and more. * This service may not be available in all countries/regions. -
Page 136: Wi-Fi Functions
Connect the camcorder to an access point on your home Connect the camcorder to an access point on your home network to share recordings on CANON iMAGE GATEWAY. network to share recordings on CANON iMAGE GATEWAY. network to share recordings on CANON iMAGE GATEWAY. - Page 137 ** The availability of this Web service varies from area to area. For ** The availability of this Web service varies from area to area. For the latest information, visit your local Canon Web site. the latest information, visit your local Canon Web site.
-
Page 138: The Camcorder's Wi-Fi Functions
The Camcorder’s Wi-Fi Functions The Camcorder’s Wi-Fi Functions You can use the camcorder’s Wi-Fi functions to connect wire- lessly to Wi-Fi enabled devices* like smartphones or tablets and save, play back and upload your recordings. Refer to Glossary (A 173) for a definition of the frequently used terms in this text. * “iOS device”... - Page 139 The Camcorder’s Wi-Fi Functions Android Devices • Install the CameraAccess app and use your smartphone or tab- let as a remote control to record with the camcorder (A 143). You can even stream video from the camcorder and record it directly on your Android device.
- Page 140 Internet, you can also share recordings on connected to the Internet, you can also share recordings on CANON iMAGE GATEWAY and enjoy a number of Web ser- CANON iMAGE GATEWAY and enjoy a number of Web ser-...
- Page 141 The Camcorder’s Wi-Fi Functions ■ Before Using Wi-Fi Functions Based on the function, the camcorder will wirelessly connect directly to a Wi-Fi-enabled device, such as a smartphone, or to a Wi-Fi network via an access point (wireless router)*. After select- ing the function you want to use, follow the onscreen directions to connect the camcorder.
- Page 142 The Camcorder’s Wi-Fi Functions • We recommend inserting a fully charged battery pack or using the optional CA-110E Compact Power Adapter when using Wi-Fi functions. • When using the camcorder’s Wi-Fi functions, do not cover the front left corner of the camcorder with your hand or other object.
-
Page 143: Wireless Connections Without An Access Point
Wireless Connections Without an Access Point Wireless Connections Without an Access Point Using an iOS or Android Device as a Remote Control Using the CameraAccess app* for iOS devices and Android™ devices, you can control the camcorder from a distance while devices, you can control the camcorder from a distance while devices, you can control the camcorder from a distance while you view the camcorder’s image on the device’s screen. - Page 144 Wireless Connections Without an Access Point • Before you perform this procedure for the first time, download and install the CameraAccess app on your iOS/Android device. The app can be downloaded for free from the following Web sites. App Store: http://appstore.com/cameraaccess Google Play™: http://play.google.com/store/apps/...
- Page 145 Wireless Connections Without an Access Point iOS/Android device: In the Wi-Fi settings screen, turn on Wi-Fi and select the network name that appears on the camcorder’s screen (step 2). If necessary, enter the password that appears on the camcorder’s screen. •...
-
Page 146: Remote Browse: Viewing Recordings Using A Web Browser On An Ios Or Android Device
Web browser and even save local copies of them on your device*. * Depending on the device, OS, browser and video quality, you may not be able to play back or save recordings. For details, visit your local Canon Web site. - Page 147 Wireless Connections Without an Access Point Shooting mode Playback I J L K ’ Camcorder: From any index screen, activate the Remote Browse mode. > > > [— Wi-Fi] [5 Playback via Browser] Playback via Browser] Playback via Browser] [OK] •...
- Page 148 Wireless Connections Without an Access Point iOS/Android device: Enter the URL that appears on the camcorder’s screen into the Web browser’s address bar. • When the Wi-Fi connection is correctly established, the Remote Browse screen will appear. • The URL is always the same so you may find it convenient to bookmark the URL.
-
Page 149: Saving Recordings And Uploading Movies To The Web Using An Ios Device
Wireless Connections Without an Access Point • Long scenes, whose video data exceeds 4 GB, will be recognized as multiple files on other devices. • For details about Wi-Fi connections on computers and other devices, refer to the instruction manual of the OS, computer or device used. - Page 150 Wireless Connections Without an Access Point Camcorder: From any index screen, set the camcorder to connect with the iOS device. > > > [— Wi-Fi] [6 Movie Uploader] [OK] • The camcorder’s SSID (network name) and password will appear. • The camcorder will be ready to connect with the iOS •...
- Page 151 • For details about the Movie Uploader app, visit PIXELA’s Web site. PIXELA’s Web site. PIXELA’s Web site. http://www.pixela.co.jp/oem/canon/e/movieuploader/ http://www.pixela.co.jp/oem/canon/e/movieuploader/ http://www.pixela.co.jp/oem/canon/e/movieuploader/ • Long scenes, whose video data exceeds 4 GB, will be • Long scenes, whose video data exceeds 4 GB, will be •...
-
Page 152: Wireless Connections Using An Access Point
Access Point Sharing Recordings with CANON iMAGE GATEWAY After you register for CANON iMAGE GATEWAY*, you will be able to access various Web services**. You will be able to able to access various Web services**. You will be able to able to access various Web services**. - Page 153 Wireless Connections Using an Access Point CANON iMAGE GATEWAY CANON iMAGE GATEWAY is a Web site that provides vari- ous photo-related services for owners of qualified Canon products. After you complete the free registration online, you can use the Web services, create online photo albums, and more.
- Page 154 ■ Setting the Desired Web Services in the Cam- corder Using the supplied software CameraWindow, log in to CANON iMAGE GATEWAY and set the Web services you want to use. Refer to ‘CameraWindow User Guide’ for details on using the software.
- Page 155 • Follow the onscreen instructions to register the services you want to use. You will need the account information (user name, password, etc.) to register some services. • CANON iMAGE GATEWAY and all other selected Web services will be set in the camcorder and the CameraWin- menu screen will appear.
-
Page 156: Sharing Your Recordings Using Web Services
Wireless Connections Using an Access Point • You cannot set multiple accounts for Web services other than e-mail. ■ Sharing Your Recordings Using Web Services Conveniently share your recordings with family and friends using Web services. Shooting mode Playback I J L K ’... - Page 157 Wireless Connections Using an Access Point Select the desired Web service. • When you select (e-mail), the list of registered e-mail addresses will appear. Select the e-mail addresses to which you want to send an e-mail notification. Select whether you want to upload MP4 movies, pho- tos or video snapshot scenes.
- Page 158 Wireless Connections Using an Access Point Checking your uploads using CANON iMAGE GATEWAY Library You can use the CANON iMAGE GATEWAY Library screen to see the movies and photos you uploaded. You can also check what files you have sent and the various settings for the Web services.
-
Page 159: Wireless Playback On A Computer
Wireless Connections Using an Access Point Wireless Playback on a Computer Using the Media Server function, you can wirelessly view your movies and photos on your computer or similar device. You will need an access point connected to your home network and software installed on your computer that can play back movies and photos from a media server. - Page 160 Computer: Start your preferred media player software Computer: Start your preferred media player software Computer: Start your preferred media player software and select your camcorder’s model name (Canon LEG- and select your camcorder’s model name (Canon LEG- and select your camcorder’s model name (Canon LEG- RIA mini) from the list of media servers.
-
Page 161: Wi-Fi Connection Using An Access Point
Wireless Connections Using an Access Point > Camcorder: Touch [End] [OK] when finished. • Depending on the access point’s (wireless router’s) set- tings and capabilities, playback may take time to start or may not appear smooth. For details, refer to Trou- bleshooting (A 204). - Page 162 Wireless Connections Using an Access Point Shooting mode Playback I J L K ’ From any index screen, open the [— Network Setup] screen. > > > [— Wi-Fi] [w Check/Edit Settings] [Access > Point Connection Settings] [Not configured] [Not configured] [Not configured] Touch the desired setup method.
- Page 163 Wireless Connections Using an Access Point [WPS: PIN Code]* Access the access point’s configuration screen using your Web browser. The camcorder will give you a PIN code, which you will enter into the browser. You will need a WPS-compatible router and a computer or other device connected to it.
- Page 164 Wireless Connections Using an Access Point ■ Wi-Fi Protected Setup (WPS) If your access point is WPS-compatible (bears the logo shown below), connecting the camcorder to it can be very easy. If you cannot successfully connect the camcorder using WPS, try using the [Search for Access Points] method.
- Page 165 Wireless Connections Using an Access Point Within 2 minutes, touch [OK] on the camcorder’s screen. • The camcorder will connect to the access point. • You can touch [Stop] and then [OK] to interrupt the Wi-Fi Protected Setup while it is in progress. •...
-
Page 166: Searching For Access Points
Wireless Connections Using an Access Point ■ Searching for Access Points After you touch [Search for Access Points], the camcorder will take a few seconds to detect access points available in the vicinity and will display the first one. Make a note in advance of the network name (SSID) and password (encryption key) of the access point you want to use. - Page 167 Wireless Connections Using an Access Point • If you were in the process of performing another proce- dure, the camcorder will automatically connect to the access point. Return to the procedure of the function you were previously using: Step 2 in Sharing Your Recordings Using Web Services (A 157);...
-
Page 168: Using The Virtual Keyboard
Wireless Connections Using an Access Point Using the virtual keyboard When you need to enter text for various settings, touch the text field and a virtual keyboard will appear on the screen. The illustration below explains the various keys you can use. Switch between letters and numbers/special charac- Switch between letters and numbers/special charac- Switch between letters and numbers/special charac-... -
Page 169: Manual Setup
Wireless Connections Using an Access Point ■ Manual Setup Perform this procedure to manually configure the wireless con- nection settings. This may be necessary, for example, if your access point’s network name (SSID) cannot be detected due to the stealth function being enabled. Manual setup is for advanced users of Wi-Fi networks. - Page 170 Wireless Connections Using an Access Point To enter the [IP Address] field, touch [0.0.0.0]. Touch the first field and touch [Í]/[Î] to change the value. Change the rest of the fields in the same way and touch [OK]. Enter the [Subnet Mask] field in the same way and touch [Next].
-
Page 171: Viewing And Changing Wi-Fi Settings
Wireless Connections Using an Access Point • The Wi-Fi functions available and the setup method will vary depending on the specifications and characteris- tics of the Wi-Fi network you want to use. Viewing and Changing Wi-Fi Settings When the camcorder is connected to an access point or to a Wi-Fi-enabled device, you can view the Wi-Fi connection set- Wi-Fi-enabled device, you can view the Wi-Fi connection set- Wi-Fi-enabled device, you can view the Wi-Fi connection set-... - Page 172 Wireless Connections Using an Access Point > > [Edit] [OK] [OK] • The next time you make a wireless connection, you will need to change the Wi-Fi settings on the iOS/Android device. > Touch [K] [X] to close the menu. To view the access point’s connection settings To view the access point’s connection settings To view the access point’s connection settings...
- Page 173 Wireless Connections Using an Access Point > Touch [K] [X] to close the menu. Glossary This is a glossary of some of the basic terms used fre- quently in this chapter. The documentation for your access point may also contain a glossary you can refer to. Access Point A wireless access point (WAP) is a device that allows wire- A wireless access point (WAP) is a device that allows wire-...
-
Page 174: Additional Information
Additional Information Appendix: Menu Options Lists This section contains tables of all the camcorder’s menu set- This section contains tables of all the camcorder’s menu set- This section contains tables of all the camcorder’s menu set- tings and setting options for your reference. tings and setting options for your reference. - Page 175 General Information This section contains information about optional accesso- ries that can be used with the camcorder and ends with the comprehensive list of technical specifications.
-
Page 176: Appendix: Menu Options Lists
Appendix: Menu Options Lists Appendix: Menu Options Lists The functions that are available depend on the camcorder’s oper- ating mode. On the camcorder’s screen, menu items not available appear grayed out. For details about how to select an item, refer Using the Menus (A 43). - Page 177 Appendix: Menu Options Lists 0 (Home) Menu (cont.) Menu item Setting options [Shooting Mode] (A 88) Auto], [ Food and Fashion], [I Sports], [J Night Scene], [L Beach], [K Snow], [ Macro], [’ Programmed AE] Flip/Rotate Image] (A 106) Mirror Image]: [On], [Off] Detect Orientation]: [On], [Off] , [Off]...
-
Page 178: [1 Other Settings] Menus
Appendix: Menu Options Lists [Edit] Functions in Playback Modes Button Setting options [Convert to MP4] (A 126) [Delete] (A 74, 79) [y] or [¦] index screen: <folder name>, [Select], [All Scenes] [}] index screen: <folder name>, [Select], [All Photos] ] index screen: <folder name>, [Select], [All Photos] ] index screen: <folder name>, [Select], [All Photos] During playback pause: [This Scene] During playback pause: [This Scene]... - Page 179 Appendix: Menu Options Lists p Camera Setup (recording mode only) (cont.) Menu item Setting options [Face Detection & Tracking] (A 115) }], [j Off] [i On [Auto Backlight Correction] – On], [j Off] [Flicker Reduction] – Off], [: 50 Hz], [; 60 Hz] 60 Hz] 60 Hz] [Video Snapshot Length]...
- Page 180 Appendix: Menu Options Lists [Flicker Reduction]: If the screen starts to flicker when record- ing movies under fluorescent lights, change the setting to reduce the effect. • This function is only available when the shooting mode is set to ’. [Photo Review Time]: Selects the time to display a photo after it is recorded.
-
Page 181: Display Setup
Appendix: Menu Options Lists t Display Setup Menu item Setting options [Onscreen Markers] – Off], [ 16:9 (White)], [ 16:9 (Gray)], [3 Level (White)], [4 Level (Gray)], [5 Grid (White)], [6 Grid (Gray)] [Display Date/Time] – [i On], [j Off] [Output Onscreen Displays] –... - Page 182 Appendix: Menu Options Lists [Onscreen Markers] (recording mode only): You can display 16:9 area markers, a grid, or a horizontal line at the center of the screen. Use the markers as a reference to make sure your sub- ject is framed correctly (vertically and/or horizontally). •...
- Page 183 Appendix: Menu Options Lists • Changing the brightness of the LCD screen does not affect the brightness of your recordings or the brightness of the play- back image on a TV. • Using the [H Bright] setting will shorten the effective usage time of the battery pack.
-
Page 184: System Setup
Appendix: Menu Options Lists q System Setup Menu item Setting options [Language H] (A 36) ], [Dansk], [Deutsch], [ ], [English], [Español], [Français], [Italiano], [Magyar], [Melayu], [Nederlands], [Norsk], [Polski], [Português], [ [Polski], [Português], [ [Polski], [Português], [ ], [Suomi], [Svenska], [Türkçe], ], [Suomi], [Svenska], [Türkçe], ], [Suomi], [Svenska], [Türkçe], ], [... - Page 185 Appendix: Menu Options Lists q System Setup (cont.) Menu item Setting options [Notification Sounds] – [÷ High Volume], [ø Low Volume], [j Off] [File Numbering] – [m Reset], [n Continuous] [Auto Power Off] – On], [j Off] [SP-V1 Mode] – [i On], [j Off] [Initialize...
- Page 186 Appendix: Menu Options Lists [Available Space in Memory] (recording mode only)/ [Used Space in Memory] (playback mode only): Displays a screen where you can verify how much of the memory card is currently available for recording or how much is in use (ª indi- cates photos).
- Page 187 Appendix: Menu Options Lists • We recommend using the [n Continuous] setting. • Folders can contain up to 500 files (movies and photos com- bined). • File numbers consist of 7 digits, for example “101-0107”. The 3 digits before the hyphen indicate the folder where the file is saved and can range from 100 to 999.
- Page 188 Appendix: Menu Options Lists • Approximately 30 seconds before the camcorder shuts off, [Auto Power Off] will appear. Operating any of the camcorder’s controls while the message is displayed will prevent the cam- corder from shutting off. [SP-V1 Mode]: Activates an alternative operation mode that allows the camcorder to be used when it is protected by the optional SP-V1 Splashproof Case.
-
Page 189: Appendix: Onscreen Icons And Displays
Appendix: Onscreen Icons and Displays Appendix: Onscreen Icons and Dis- plays Recording Scene counter (hours : minutes : seconds, only while Scene counter (hours : minutes : seconds, only while Scene counter (hours : minutes : seconds, only while recording) Shooting mode button (A 88) Shooting mode button ( Shooting mode button (... - Page 190 Appendix: Onscreen Icons and Displays Mirror image recording (A 106) White balance (A 110) Memory card operation (A 195) 10 User-selected main subject frame (A 115) 11 Self timer and countdown (A 100) 12 Frame rate 13 Remaining battery charge (A 195) 14 Memory card 15 Remaining video recording time (A 195) 195)
- Page 191 Appendix: Onscreen Icons and Displays Recording Photos and Special Recording Modes 25 Special recording modes - Interval recording and selected interval (A 92) - Interval recording and selected interval ( - Interval recording and selected interval ( - Slow motion and selected speed (A 96) - Slow motion and selected speed ( - Slow motion and selected speed ( - Fast motion and selected speed (A 96)
- Page 192 Appendix: Onscreen Icons and Displays Only while recording photos (A 59) 29 Exposure locked 30 Aperture value and shutter speed Only when 1 > > [SP-V1 Mode] is set to [i On] (A 188) 31 [ ] button: Cancel the splashproof case mode 32 [PHOTO] button: Record a photo when the camcorder is in [PHOTO] button: Record a photo when the camcorder is in [PHOTO] button: Record a photo when the camcorder is in...
- Page 193 Appendix: Onscreen Icons and Displays Playing Movies (during playback) 33 Mirror image playback (A 67) 34 Repeat playback (A 67) 35 Slow/Fast motion and playback speed (A 96) Slow/Fast motion and playback speed ( Slow/Fast motion and playback speed ( - Interval scenes that have not yet been joined (A 92) - Interval scenes that have not yet been joined ( - Interval scenes that have not yet been joined (...
- Page 194 Appendix: Onscreen Icons and Displays Viewing Photos 46 8 51 52 51 52 51 52 44 [Edit] button: Open the [Edit] panel (A 178) [Edit] button: Open the [Edit] panel ( [Edit] button: Open the [Edit] panel ( 45 Shooting information 46 Shooting mode (A 88) 47 Current photo / Total number of photos Current photo / Total number of photos...
- Page 195 Appendix: Onscreen Icons and Displays 9 Memory card operation Ü Record, Ñ Record standby, Ð Playback, Ý Playback pause, × Fast playback, Ø Fast reverse playback, Õ Slow playback, Ö Slow reverse playback, Ó Frame advance, Ô Frame reverse. 13 Remaining battery charge (in red) (in red) (in red)
-
Page 196: Trouble
Sometimes what you think is a malfunction of the camcorder may have the simplest of solutions - please read the “CHECK THIS FIRST” box before going on to the more detailed problems and solutions. Consult your dealer or a Canon Service Center if the problem persists. CHECK THIS FIRST Power supply •... -
Page 197: Power Source
- Charge the battery pack in temperatures between approxi- mately 0 °C and 40 °C. - If you are using a battery pack recommended by Canon for - If you are using a battery pack recommended by Canon for - If you are using a battery pack recommended by Canon for... - Page 198 Trouble? Recording Touching [Ü] will not start recording. - You cannot record while the camcorder is writing previous recordings onto the memory card (while the ACCESS indica- tor is on or flashing). Wait until the camcorder has finished. - The memory card is full. Delete some recordings (A 74, 79) or initialize the memory card (A 40) to free some space.
- Page 199 Consult a Canon Service Center. camcorder. Consult a Canon Service Center. camcorder. Consult a Canon Service Center.
- Page 200 Trouble? Deleting scenes takes longer than usual. - When the memory card contains a large number of scenes, some operations may take longer than usual. Save your recordings (A 129) and initialize the memory card (A 40). Cannot capture a video snapshot scene from a movie. - You cannot capture video snapshot scenes from scenes recorded or edited using another device and then trans- ferred to a memory card connected to the computer.
- Page 201 Trouble? appears (in red) on the screen. - A memory card error occurred. Turn off the camcorder. Remove and reinsert the memory card. Initialize the memory card if the display does not change back to normal. and [End] appear (in red) on the screen. - The memory card is full.
- Page 202 Trouble? - Remove the battery pack and insert it correctly. Abnormal characters appear on the screen and the cam- corder does not operate properly. - Remove the battery pack and insert it after a few moments. Video noise appears on screen. - Keep a distance between the camcorder and devices that emit strong electromagnetic fields (plasma TVs, cellular phones, etc.).
- Page 203 Trouble? Memory Card and Accessories Cannot insert the memory card. - The memory card was not facing the correct direction. Turn the memory card over and insert it. Cannot record on the memory card. - The memory card is full. Delete some recordings (A 74, 79) to free some space or replace the memory card.
- Page 204 Trouble? - The camcorder may be set to recording mode. Disconnect the optional HTC-100 High Speed HDMI cable, set the cam- corder to playback mode and then restore the connection. - Video and audio will not be output from the camcorder while Wi-Fi functions are in use.
- Page 205 Trouble? - The effective communication range between the camcorder and access point may vary depending on the strength of the wireless signal. Try using the camcorder closer to the access point. - Cordless phones, microwave ovens, refrigerators and other appliances in the line of sight between the access point and the camcorder may interfere with the wireless signal.
- Page 206 The Remote Browse screen does not appear correctly on the Web browser. - The device, operating system or Web browser used may not be supported. For the latest information about supported systems, visit your local Canon Web site.
-
Page 207: List Of Messages
(A 220) for messages related to 220) for messages related to 220) for messages related to Web services when using CANON iMAGE GATEWAY. Web services when using CANON iMAGE GATEWAY. Web services when using CANON iMAGE GATEWAY. Back up recordings regularly... - Page 208 - There is a problem with the memory card. If this message - There is a problem with the memory card. If this message appears often without apparent reason, contact a Canon appears often without apparent reason, contact a Canon appears often without apparent reason, contact a Canon Service Center.
- Page 209 - There is a problem with the memory card. If this message - There is a problem with the memory card. If this message appears often without apparent reason, contact a Canon appears often without apparent reason, contact a Canon appears often without apparent reason, contact a Canon Service Center.
- Page 210 Trouble? Cannot record movies on this memory card Initialize only using the camcorder - The memory card in the camcorder was initialized using a computer. Initialize the memory card with this camcorder (A 40). Cannot save the canvas - Cannot save your [Pens and Stamps] drawings on the memory card.
- Page 211 Trouble? Check the memory card - Cannot access the memory card. Check the memory card and make sure it is inserted correctly. - A memory card error occurred. The camcorder cannot record or display the image. Try removing and reinserting the memory card, or use a different memory card.
- Page 212 Trouble? LCD Screen has been dimmed Use the [LCD Backlight] set- ting to change the brightness - Change the 1 > > [LCD Backlight] setting to [Normal] or [Bright]. May not be possible to record movies on this memory card - You may not be able to record movies on a memory card without a Speed Class rating or with one rated SD Speed Class 2, 4 or 6.
- Page 213 Trouble? No memory card - Insert a compatible memory card into the camcorder (A 34). - The memory card may not be inserted correctly. Insert the memory card all the way into the memory card slot until it clicks. Not enough available space - Delete some recordings on the memory card (A 74, 79) or - Delete some recordings on the memory card ( - Delete some recordings on the memory card (...
- Page 214 Trouble? Select the desired scene number - A number of scenes have the same recording date but dif- ferent file control information. This can occur for example when you record movies in the area of the international date line. Select a number to display the corresponding group of scenes.
- Page 215 Trouble? Too many photos and MP4 movies. Disconnect the USB cable. - Disconnect the USB cable. Try using a memory card reader or decrease the number of photos and movies on the mem- ory card to fewer than 2,500 (Windows), or 1,000 (Mac OS). - If a dialog box appeared on the computer screen, close it.
- Page 216 MAC address in the access point’s configura- camcorder’s MAC address in the access point’s configura- tion screen. Unable to access configuration files - Turn off the camcorder. After a short while, turn it on again. If the problem persists contact a Canon Service Center.
- Page 217 Trouble? Unable to complete WPS. - Turn off the camcorder and access point (wireless router). After a short while, turn them on again and try again. If the problem persists, perform setup using the [Search for Access Points] option (A 161). Unable to complete WPS.
- Page 218 Trouble? Unable to obtain an IP address - If you are not using a DHCP server, connect using the [Man- ual Setup] option and enter the IP address using the [Man- ual] option (A 169). - Turn on the DHCP server. If it is already on, make sure it is functioning properly.
- Page 219 Trouble? Wi-Fi connection terminated - Cordless phones, microwave ovens, refrigerators and other appliances may interfere with the wireless signal. Try using the camcorder in a location farther away from such appli- ances. - The camcorder may not be able to connect to the access point if too many devices are accessing it.
- Page 220 Fi network setup again. If the problem persists contact a Fi network setup again. If the problem persists contact a Fi network setup again. If the problem persists contact a Canon Service Center. Canon Service Center. Canon Service Center. List of Messages for Web Services...
- Page 221 Server busy Try again later - The CANON iMAGE GATEWAY server is busy due to a high number of users trying to connect to the server. End the Wi- Fi connection and try again later.
- Page 222 Web service. Check the recording before sending. Try again - An error occurred when connecting to the CANON iMAGE GATEWAY server or the server is temporarily down. End the Wi-Fi connection and try again.
-
Page 223: Do's And Don'ts
Canon shall not be liable for free space on the memory card. Canon shall not be liable for free space on the memory card. - Page 224 Do’s and Don’ts blistering. The use of a tripod is recommended for people with circulation problems or very sensitive skin, or when using the camcorder in very hot places. • Do not leave the camcorder in places subject to high tempera- tures (like the inside of a car parked under direct sunlight), or high humidity.
- Page 225 Do’s and Don’ts • Do not disassemble the camcorder. If the camcorder does not function properly, consult qualified service personnel. • Handle the camcorder with care. Do not subject the cam- corder to shocks or vibration as this may cause damage. •...
-
Page 226: Battery Pack
Do’s and Don’ts Battery Pack DANGER! Treat the battery pack with care. • Keep it away from fire (or it might explode). • Do not expose the battery pack to temperature higher than 60 °C. Do not leave it near a heater or inside a car in hot weather. -
Page 227: Memory Card
Data may be corrupted or lost due to memory card defects or exposure to static electricity. Canon shall not be liable for lost or corrupted data. • Do not touch or expose the terminals to dust or dirt. - Page 228 Do’s and Don’ts Built-in Rechargeable Lithium Battery The camcorder has a built-in rechargeable lithium battery to keep the date/time and other settings. The built-in lithium battery is recharged while you use the camcorder; however, it will dis- charge completely if you do not use the camcorder for about 3 months.
-
Page 229: Maintenance/Others
Maintenance/Others Maintenance/Others Cleaning Camcorder Body • Use a soft, dry cloth to clean the camcorder body. Never use chemically treated cloths or volatile solvents such as paint thinner. Lens • Remove any dust or dirt particles using a non-aerosol type •... -
Page 230: Condensation
Maintenance/Others Condensation Moving the camcorder rapidly between hot and cold tempera- tures may cause condensation (water droplets) to form on its internal surfaces. Stop using the camcorder if condensation is detected. Continued use may damage the camcorder. Condensation may form in the following cases: •... -
Page 231: Using The Camcorder Abroad
You can use the supplied battery charger to charge battery packs in any country with power supply between 100 and 240 V AC, 50/60 Hz. Consult a Canon Service Center for infor- mation on plug adapters for overseas use. Playback on a TV Screen... -
Page 232: General Information
General Information General Information Optional Accessories The following optional accessories are compatible with this cam- corder but their availability may differ from area to area. Select accessories are described in more detail in the following pages. NB-4L Battery Pack NB-4L Battery Pack NB-4L Battery Pack CB-2LVE Battery CB-2LVE Battery... - Page 233 This product is designed to achieve excellent performance This product is designed to achieve excellent performance when used with genuine Canon accessories. Canon shall not when used with genuine Canon accessories. Canon shall not when used with genuine Canon accessories. Canon shall not...
- Page 234 * Approximate times for recording with * Approximate times for recording with start/stop, and power on/off. This mark identifies genuine Canon video acces- sories. When you use Canon video equipment, we recommend Canon-brand accessories or products bearing the same mark.
-
Page 235: Specifications
General Information Specifications LEGRIA mini — Values given are approximate figures. System • Recording System Movies: Video: MPEG-4 AVC/H.264 Audio: MPEG-2 AAC-LC (2ch) Photos: DCF (Design rule for Camera File system), compatible with DCF (Design rule for Camera File system), compatible with DCF (Design rule for Camera File system), compatible with Exif* Ver. - Page 236 General Information • Maximum Recording Time Commercially available 16 GB memory card 24 Mbps: 1 hr. 25 min. 17 Mbps: 2 hr. 5 min. 4 Mbps: 8 hr. 40 min. Commercially available 32 GB memory card 24 Mbps: 2 hr. 55 min. 17 Mbps: 4 hr.
- Page 237 General Information • Lens f=2.7 mm, F/2.8 35mm-equivalent focal length (ultra wide) : Movies: 16.8 mm Photos: 15.4 mm 35mm-equivalent focal length (close-up) : Movies: 35.0 mm Photos: 32.1 mm • Lens Configuration 6 elements in 5 groups (1 double-sided aspheric element) 6 elements in 5 groups (1 double-sided aspheric element) 6 elements in 5 groups (1 double-sided aspheric element) •...
- Page 238 General Information • Size of Photos 4000x3000 pixels, n 1920x1440 pixels, 640x480 pixels Photos captured from movies: 1920x1080 pixels Terminals • USB Terminal: mini-B, Hi-Speed USB; output only • HDMI Terminal: HDMI Mini Connector; output only Wi-Fi • Standard Complies with the IEEE 802.11b/g/n protocol; Wi-Fi Protected Complies with the IEEE 802.11b/g/n protocol;...
- Page 239 General Information • Dimensions [W x H x D] (excluding the wrist strap) 76 x 22 x 96 mm • Weight (camcorder body only) 160 g NB-4L Battery Pack • Battery type Rechargeable lithium ion battery • Rated voltage: 3.7 V DC •...
- Page 240 General Information • Operating temperature : 0 – 40 °C • Dimensions : 53.0 x 86.0 x 19.5 mm • Weight : 55 g Weight and dimensions are approximate. Errors and omissions excepted. The information in this manual is verified as of June 2013. Spec- The information in this manual is verified as of June 2013.
-
Page 241: Index
Index CANON iMAGE CANON iMAGE CANON iMAGE ....152 ....152 ....152 GATEWAY GATEWAY GATEWAY Abroad, using the Capturing photos/video Capturing photos/video Capturing photos/video ....231 camcorder snapshot scenes from a snapshot scenes from a snapshot scenes from a ....52 AUTO mode ...... - Page 242 ......79 Photos Initializing a ....40 memory card ..... 92 Interval recording .....178 Edit panel .....207 Error messages ..182 LCD screen dimmer Exposure .....112 ... 42 compensation LCD touch screen ....115 ..88 Face detection Macro (shooting mode) Macro (shooting mode) Macro (shooting mode) , 149 .....135...
- Page 243 ..106 Orientation detection Other Settings ..129 Saving recordings , 178 ....47 menus ..... 100 Self timer ....23 Serial number ....88 Shooting mode P (Programmed AE shooting ..88 Shooting mode button ......88 mode) ...... 82 Slideshow ..180 Photo review time ....
- Page 244 Video , 118 ....98 snapshot ....55 Ultra wide angle ......65 Volume Uploading , 149 , 152 ..135 movies , 124 ..122 USB terminal ....110 White balance ....136 Wi-Fi functions ....85 Video quality , 152 ....135 ....
- Page 245 19/F, The Metropolis Tower, 10 Metropolis Drive, Hunghom, Kowloon, Hong Kong Tel: +852 3191 2333, Fax: +852 2428 3963 CENTRO Y SURAMÉRICA Canon Latin America, Inc. Sales & Enquiries: One Canon Park, Melville, NY 11747 USA © CANON INC. 2013 30-2, Shimomaruko 3-chome, Ohta-ku, Tokyo 146-8501, Japan PUB. DIE-0445-000...
Need help?
Do you have a question about the Legria mini and is the answer not in the manual?
Questions and answers