Table of Contents
Advertisement
Advertisement
Table of Contents

Related Manuals for SHOWTEC LED Light Bar 8


Summary of Contents for SHOWTEC LED Light Bar 8
- Page 1 LED Light Bar 8 ORDERCODE 42199...
- Page 2 For more information: iwant@showtec.info You can get some of the best quality, best priced products on the market from Showtec. So next time, turn to Showtec for more great lighting equipment. Always get the best -- with Showtec ! Thank you!
-
Page 3: Table Of Contents
Control Modes ................................7 One LED Light Bar 8 (Manual Control) ......................... 7 One LED Light Bar 8 (Built-in Programs, Macro Colors) ..................7 One LED Light Bar 8 (Sound-control) ........................8 Multiple LED Light Bars (Master/Slave control) ....................8 Multiple LED Light Bars (DMX Control) ........................ -
Page 4: Warning
Save the carton and all packing materials. In the event that a fixture must be returned to the factory, it is important that the fixture be returned in the original factory box and packing. Your shipment includes: • Showtec LED Light Bar 8 • 2 brackets and screws • Volex IEC powercable 1,5m •... - Page 5 If your Showtec device fails to work properly, discontinue use immediately. Pack the unit securely (preferably in the original packing material), and return it to your Showtec dealer for service.
-
Page 6: Operating Determinations
Always let the installation be carried out by an authorized dealer ! Procedure: If the LED Light Bar 8 is lowered from the ceiling or high joists, professional trussing systems have to be used. Use a clamp to mount the LED Light Bar 8, with the mounting-bracket, to the trussing system. -
Page 7: Return Procedure
Return Procedure Returned merchandise must be sent prepaid and in the original packing, call tags will not be issued. Package must be clearly labeled with a Return Authorization Number (RMA number). Products returned without an RMA number will be refused. Highlite will not accept the returned goods or any responsibility. Call Highlite 0031-455667723 or mail aftersales@highlite.nl and request an RMA prior to shipping the fixture. -
Page 8: Description Of The Device
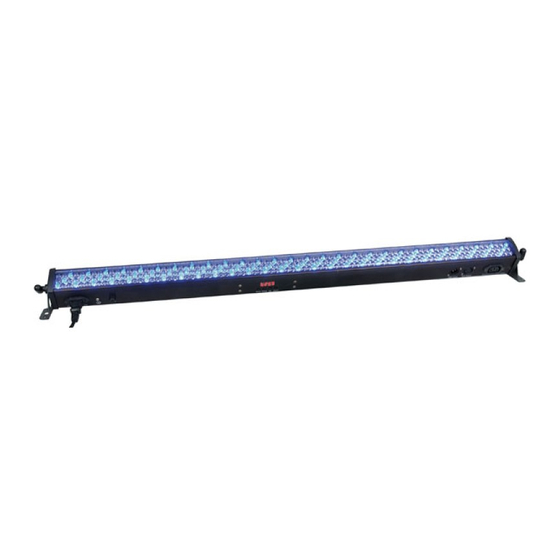
Description of the device Features LED Light Bar 8 is a LED system from Showtec. • LEDs: 240 RGB high intensity 10mm LEDs (Red 96, Green 72, Blue 72) • Beam angle: 30 º • Inexpensive batten effect • 8 sections •... -
Page 9: Backside
, then the fixture can be manually controlled. Please see page 14 for more information about manual control Mode. One LED Light Bar 8 (Built-in Programs, Macro Colors) 1. Fasten the effect light onto firm trussing. Leave at least 0,5 meter on all sides for air circulation. -
Page 10: Showtec Led Light Bar
One LED Light Bar 8 (Sound-control) 1. Fasten the effect light onto firm trussing. Leave at least 0,5 meter on all sides for air circulation. 2. When the LED Light Bar 8 is not connected by a DMX-cable, it functions as a stand-alone device. -
Page 11: Fixture Linking
Link the units as shown in (figure 4), Connect a DMX signal cable from the first unit's DMX "out" socket to the second unit's "in" socket. Repeat this process to link the second, third, and fourth units. Supply electric power: Plug electric mains power cords into each unit's IEC socket, then plug the other end of the mains power cord into proper electric power supply sockets, starting with the first unit. -
Page 12: Control Panel
Control Panel When the indicator light is on, means the LED Bar is working. Fig. 5 A. LED Display D. Up Button B. MODE Button E. Down Button C. SETUP Button DMX Control Mode The fixtures are individually addressed on a data-link and connected to the controller. The fixtures respond to the DMX signal from the controller. -
Page 13: Menu Overview
Menu Overview... -
Page 14: Main Menu Options
Main Menu Options DMX address Slave Sound controlled Color Built-in Programs Auto... -
Page 15: Dmx Mode
1. DMX Mode With this menu you can set the DMX address. 1) Press the MODE button, until the display shows 2) You can choose 512 different DMX addresses. Use the Up / Down buttons to select the required address from 3) You can also press the SETUP button to set a different DMX Mode 3 Channels 4 Channels... -
Page 16: Static Color Mode
4. Static Color Mode With this menu you can set the DMX address. 1) Press the MODE button, until the display shows 2) With this menu you can set 3 Static colors of the LED Light Bar. You can choose Red, Green or Blue by pressing the Setup button. Use the Up / Down buttons to select the values of each individual color from 000-255. - Page 17 5. Built-in Programs Red Flash from 00-99 Red-Green Flash from 00-99 Green Flash from 00-99 Green-Blue Flash from 00-99 Blue Flash from 00-99 Red-Blue Flash from 00-99 Red-Green-Blue Flash from 00-99 Speed from 01-99, Full Flash Frequency 00-99 Fade Time from 00-99 Speed from 01-99, Full Flash Frequency 00-99 Fade Time from 00-99...
- Page 18 The specialty about menu 21 and 22 is, that you can combine both menus!!!! Example Menu 21 Menu 22...
-
Page 19: Auto Run Program
6. Auto Run Program 1) Press the MODE button on the device, until the display shows 2) With this menu you can set the Auto Mode of the LED Light Bar. 3) Press Setup to enter the AUTO Menu. You can choose 4 different sub menus. Number of Loops from 01-100 Speed from 01-99 and FL Fade Time from 00-99... -
Page 20: Dmx Channels (D-P3)
14 DMX Channels (d-P3) Channel 1 – Red Section 1 0-255 Gradual adjustment Red from 0 – 100% Channel 2 – Green Section 1 0-255 Gradual adjustment Green from 0 – 100% Channel 3 – Blue Section 1 0-255 Gradual adjustment Blue from 0 – 100% Channel 4 –... -
Page 21: Dmx Channels (D-P4)
26 DMX Channels (d-P4) Channel 1 – Red Section 1 0-255 Gradual adjustment Red from 0 – 100% Channel 2 – Green Section 1 0-255 Gradual adjustment Green from 0 – 100% Channel 3 – Blue Section 1 0-255 Gradual adjustment Blue from 0 – 100% Channel 4 –... - Page 22 Channel 18 – Blue Section 6 0-255 Gradual adjustment Blue from 0 – 100% Channel 19 – Red Section 7 0-255 Gradual adjustment Red from 0 – 100% Channel 20 – Green Section 7 0-255 Gradual adjustment Green from 0 – 100% Channel 21 –...
-
Page 23: Dmx Channels (D-P5)
2 DMX Channels (d-P5) Channel 1 – Color No Function 8-15 16-23 Yellow 24-31 Green 32-39 Cyan 40-47 Blue 48-55 Purple 56-63 White 64-71 Program 1 72-79 Program 2 80-87 Program 3 88-95 Program 4 96-103 Program 5 104-111 Program 6 112-119 Program 7 120-127... -
Page 24: Dmx Channels (D-P6)
7 DMX Channels (d-P6) Channel 1 – Red 0-255 Gradual adjustment Red from 0 – 100% Channel 2 – Green 0-255 Gradual adjustment Green from 0 – 100% Channel 3 – Blue 0-255 Gradual adjustment Blue from 0 – 100% Channel 4 –... -
Page 25: Maintenance
3. Mechanically moving parts like axles, eyes and others may not show any traces of wearing. 4. The electric power supply cables must not show any damages or material fatigue. The LED Light Bar 8 requires almost no maintenance. However, you should keep the unit clean. Otherwise, the fixture’s light-output will be significantly reduced. - Page 26 Problem Probable cause(s) Remedy No power to the fixture • Check that power is switched on One or more and cables are plugged in. fixtures are Primary fuse blown. • Replace fuse. completely dead. Fixtures reset The controller is not connected. •...
-
Page 27: Product Specification
Product Specification Model: Showtec LED Light Bar 8 LEDs: 240 RGB high intensity 10mm LEDs (Red 96, Green 72, Blue 72) Beam angle: 30 º Inexpensive batten effect 8 sections Compact size Output: 800Lumen Lux @2m: 613,3 Max. Distance: 15m...
Need help?
Do you have a question about the LED Light Bar 8 and is the answer not in the manual?
Questions and answers