Table of Contents
Advertisement
Advertisement
Table of Contents

Related Manuals for MGI NAVIGATOR GPS


Summary of Contents for MGI NAVIGATOR GPS
- Page 1 NAVIGATOR GPS MAINTENANCE/SERVICE MANUAL INSTRUCTION MANUAL...
- Page 2 Centre soft Left soft Right soft key On/off Up arrow & mark ball key Left, right & Scroll within down keys Buggy Mode Speed control dial, stop/go Menu key Remote Sureshot/Buggy dock Mode toggle Navigating around your Sureshot Homepage Play Golf >...
-
Page 3: Table Of Contents
Welcome to your NavigatorGPS, golf course green and hazard distance finder and buggy controls. Please read the following information in this booklet to ensure you gain the full benefit of all the features on your NavigatorGPS buggy. Section 1. Top Box Instruction Manual Page 1.1 Charging your remote control 1.2 Registering online... - Page 4 3.11 Correcting the alignment of your NavigatorGPS 3.12 NavigatorGPS top handle protection 3.13 Charging and caring for your remote control lithium ion battery 3.14 MGI Service Schedule 3.15 Service record for your NavigatorGPS 3.16 Technical and product support 3.17 Frequently asked questions 3.18 Who can help me with technical questions and...
-
Page 5: Charging Your Remote Control
Section 1 Top Box Instruction Manual 1.1 Charging your remote control Before you start using your NavigatorGPS buggy you must fully charge the remote control internal lithium ion battery for approximately 6 hours or overnight with the AC charger. The Nav On key will flash during charging. Connect the AC world charger to a suitable power source, using the compatible AC pin plug. -
Page 6: How To Download A Course Map
Secure payments online Protégé Sport Pty Ltd T/As MGI uses Secure Pay as their payment gateway for secure payment over the internet. Secure Pay is the safe way to make transaction on the internet. For more information on Secure Pay please visit www.securepay.com.au. -
Page 7: Setting The Date Format And Time
Go to Sureshot Homepage > Features > Setup > Date/Time > Set Local Time Choose dd/mm/yy or mm/dd/yy The Navigator GPS unit has a real time clock and receives the time from satellites. To adjust the time for daylight saving use the up/down arrows to change the hours displayed time to the correct time. -
Page 8: Buggy Mode
1.15 Buggy Mode Buggy mode displays statistics. View buggy mode by selecting the “Mode” key. To view all statistics scroll through the menu using the “Scroll” key. Buggy mode displays: Distance travelled in time and kilometres Life and round time of the buggy Shot measuring distance Remote control and buggy remote control capacities Speed in km/h or mph, and selected speed level between 1 –... - Page 9 h. Press the View soft key to change between the Green Screen and the Hazard Screen. Press and hold the Mark Ball (up arrow key) key to mark the position of the ball at the beginning of a drive. Press the Back soft key to return to the Play Screen. Press and hold the Mark Ball (up arrow key) key to view the drive distance.
-
Page 10: Understanding The Icons
mapped hazards. The distance from you to the centre of the green is shown on the left side. Second View The second viewing screen, to the left, displays the distance from you to the front, centre and back of the green. -
Page 11: Scoring
1.18 Scoring This feature is switched On or Off from the: Sureshot Homepage > Features > Setup > Scoring To begin scoring first select the hole you are hitting off from. If hitting from the hole press the left arrow key until Hole 5 is displayed then follow the following steps: If scoring is switched Off the Fairway, Green, Putts and Sand soft keys are not displayed. -
Page 12: Editing A Course
After the last hazard use the up/down arrow keys to select the Green icon and press Select. m. Walk to the front of the green, press the Front soft key. The Sureshotgps™ will count down from 10 seconds while it locks in the GPS position. n. -
Page 13: Demo
g. To delete a game use the up/down arrows to select the desired Game and then press the Delete soft key. When prompted press the Yes soft key to delete the game or the No soft key to return to the game list without deleting the game. 1.23 Demo To view the demonstration screen on the NavigatorGPS, Go to Sureshot Homepage >... -
Page 14: Section 2. Buggy Instruction Manual
Section 2 Buggy Instruction Manual Charging and care of the battery 2.1 Charge and care of the battery Prior to the first and after every use charge the battery. The battery and charger comes with an easy connection system, red to red and black to black. Important: - The battery must be charged at least overnight before its first use. -
Page 15: Fitting The Battery
2.2 Fitting the battery Once charged, the battery can be fitted to the buggy. The battery comes with a battery cover, carry handle and battery leads. a. Place your battery in the tray with the leads facing to the front of the buggy. b. -
Page 16: Fail Safe Connection
In the unlikely event of your buggy stopping, the reason could be the fuse has blown. Check and replace if necessary. The replacement of the fuse will allow you to continue using your buggy. If the fuse blows, contact your service centre. 2.4 Fail Safe Connection Your buggy has been equipped with fail safe battery connection. -
Page 17: Understanding The Electronics Of The Navigatorgps
If for some reason your buggy stops operating during your golf round, your buggy can free wheel. Simply depress the quick release tag and at the same time move the wheel outwards about 10mm from its current position. Release the tag and allow the wheel to click into its outer position. -
Page 18: Fitting Your Golf Bag
Sand bottle and holder off Disengage 4 wheel after having removed and wiped it down Fold down buggy and place into the boot of the car 2.8 Fitting your golf bag Separate the clip located on the top bag support Expand the strap so it fits around the golf bag Place your golf bag on the buggy Clip the top bag support strap in place... -
Page 19: Assembling The Umbrella Holder
Please note MGI does not warrant any seat support brackets that are damaged or bent. 2.10 Assembling the umbrella holder Your buggy comes with an umbrella holder. The umbrella holder needs to be bolted into position. Simply follow the pictures above. When not in use the umbrella holder can be turned to its side. -
Page 20: Sand Bottle And Holder
2.11 Sand bottle and holder Your buggy comes with a sand bottle and holder, place this in position at the rear of the buggy. 2.12 Engaging the 4 wheel Important: To avoid damage to your buggy always engage the 4 wheel prior to playing golf, regardless of the terrain you are playing on. -
Page 21: Top Handle Control Box Features
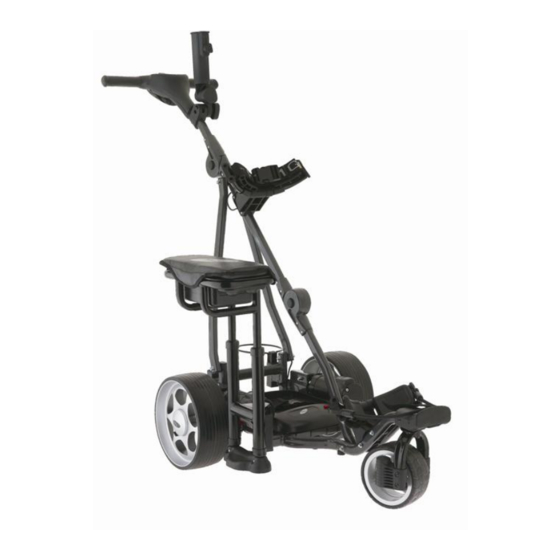
2.14 Top box control features On/Off Speed Control On/Off – Press the on/off button to turn the buggy on and off Speed Control – Turn speed control clockwise to set the desired speed [S1 to S9 – the higher the number the higher the speed] and press the speed control to start the buggy. To accelerate speed, turn the speed control clockwise. -
Page 22: Remote Control Features
Soft Braking - The Navigator GPS is equipped with electronic soft braking. This means when you apply a left or right turn for less than a second, braking will be soft. This is most useful when you are using your buggy to make small or part turns. -
Page 23: The Navigation System - How It Works
The Navigation System – How it works 2.16 Navigation on [Nav On] – By pressing Nav On the navigation system is turned on. The indicator light under the Nav On button will illuminate green each time you use a command whilst navigation is on. The navigation system ensures the buggy maintains its direction regardless of the terrain. -
Page 24: Useful Hints When Using The Navigatorgps
Your NavigatorGPS has a range of up to 80 metres. Golf etiquette is essential at all times. Do not operate your Navigator GPS in the vicinity of people playing their shots. Trust your NavigatorGPS – When operating in “Nav On” mode, you do not need to constantly adjust the NavigatorGPS‟s direction. -
Page 25: Frequently Asked Questions And Answers
„Nav On‟ white button. If the remote still does not operate, contact your MGI service agent. Situation 2: The buggy remote range is not up to expectation or has reduced over time. - Page 26 You must register your purchase as soon as possible with MGI. You can register online at www.mgikaddy.com. The serial number for your buggy is located underneath the top handle scorecard compartment. Question: How often should my battery be charged? Answer: Your battery should be left charging between uses.
- Page 27 1300 644 523. Thank you for your assistance and continued support. Most importantly please provide us with your email address so that we can forward to you technical updates and other information. Please email MGI on support@mgikaddy.com...
-
Page 28: Important Information About Your Navigatorgps
MGI on 1300 644 523. 3.4 Warranty policy MGI NavigatorGPS - For a period of 12 months or 1000kms, whichever comes first, in respect of the electronics, remote control, wheels, clutches, drive dogs, axles, battery,... -
Page 29: Parts Installed During Warranty
To properly maintain the warranty of your MGI motorised buggy, it is essential that this work is carried out. If the work carried out by the authorised service centre is to replace parts that are part of the maintenance schedule, the owner will be charged for the parts and labour. -
Page 30: Correcting The Alignment Of Your Navigatorgps
Undo and remove the screws holding the strap in position on the bag support. Remove and replace both bag straps. Insert bag strap securing screws. The lower bag strap can be replaced by unclipping it from the bag support and installing the new bag strap. -
Page 31: Charging And Caring For Your Remote Control Lithium Ion Battery
normal temperature, moisture can form inside and damage electronic circuit boards. Do not use chemicals, cleaning solvents or detergents to clean the device. Use a soft, clean, dry cloth to clean your top handle. Rough handling can break internal boards and fine mechanics. Dropping the buggy on its top box control housing can permanently damage the electronics and is not covered under the terms of the limited warranty. -
Page 32: Mgi Service Schedule
It is the owner‟s responsibility to ensure that all periodical checks, necessary adjustments and services are carried out. If in doubt please contact the MGI service centre on 1300 644 523. Any work performed on your buggy should be recorded on your service record regardless of the work. - Page 33 As part of MGI‟s Preventative Maintenance Program, the six monthly services are carried out by an authorised service centre and you will be charged for that service. Each yearly service should also include the six monthly service.
-
Page 34: Service Record For Your Navigatorgps
3.15 Service record for NavigatorGPS DATE: SERVICED BY: SIX MONTH INSPECTION INVOICE NO: SIGNATURE: DATE: SERVICED BY: ONE YEAR INSPECTION INVOICE NO: SIGNATURE: DATE: SERVICED BY: 1½ YEAR INSPECTION INVOICE NO: SIGNATURE: DATE: SERVICED BY: TWO YEAR INSPECTION INVOICE NO: SIGNATURE: DATE: SERVICED BY:... -
Page 35: Technical And Product Support
3.16 Technical and product support For prompt response to all technical support and advice, please contact MGI directly rather than returning to the place of purchase. For all technical support email: support@mgikaddy.com Frequently Asked Questions – Top Box 3.17 Is the top box component easy to use? The NavigatorGPS has been designed specifically for the golfer and is therefore simple in its operation. -
Page 36: Software Licensing
The contents of this document are provided “as is”. Except as required by applicable law, no warranties of any kind, either express or implied, including, but not limited to, the implied warranties of merchantability and fitness for a particular purpose, are made in relation to the accuracy, reliability or contents of this document.
Need help?
Do you have a question about the NAVIGATOR GPS and is the answer not in the manual?
Questions and answers