Table of Contents
Advertisement
Advertisement
Table of Contents

Related Manuals for Philips Selecon PL1 Series


Summary of Contents for Philips Selecon PL1 Series
-
Page 2: Philips Selecon Offices
Information contained in this document may not be duplicated in full or in part by any person without prior written approval of Philips Selecon. Its sole purpose is to provide the user with conceptual information on the equipment mentioned. The use of this document for all other purposes is specifically prohibited. -
Page 3: Important Information
Philips Selecon offers a three-year limited warranty of its luminaires against defects in materials or workmanship from the date of delivery. A copy of Philips Selecon three-year limited warranty containing specific terms and conditions can be obtained from the Philips Selecon web site at www.seleconlight.com or by contacting your local Philips Selecon office. -
Page 4: Table Of Contents
About this Manual..........................................3 Product Descriptions .......................................... 3 PL1 LED Luminaire Spot with Local / DMX512 / IR Control (North American Market) ..................3 PL1 LED Luminaire Spot with Local / DMX512 / IR Control (International Markets)..................3 ACCESSORIES ..........................................4 PL1 LED Luminaire IR Remote.................................... -
Page 5: Preface
PL1 LED Luminaire, Spot, Lightolier Track Adapter fitted, White PL1RC01TLSI01 PL1 LED Luminaire, Spot, LSI Track Adapter fitted, White PL1 LED Luminaire, Spot, fitted with a Half Coupler, 39-inch AC Input Cable with Specified Connector "PL1 LED Luminaire Connectors (North American Market)" on page 4 PL1RHC01... -
Page 6: Accessories
Installation & User’s Manual 3. ACCESSORIES Contact your Authorized Philips Selecon Dealer for price and availability of all accessories for PL1 LED Luminaires. Additional information can be found on the Philips Selecon web site at www.seleconlight.com. PL1 LED Luminaire IR Remote... -
Page 7: Pl1 Led Luminaire Overview
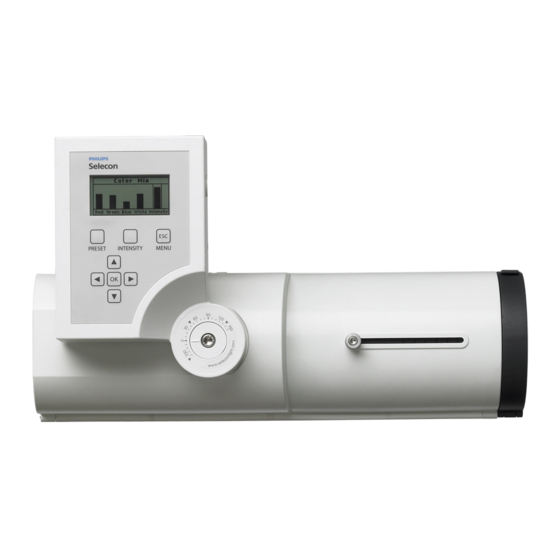
PL1 LED Luminaires Installation & User’s Manual PL1 LED LUMINAIRE OVERVIEW 1. PL1 LED Luminaire Components Luminaire Components "LCD Display / Menu" 1) LCD Display Menu (see on page 5 for more information) 2) Tilt Axis Point (see detail) 3) Lens Barrel... -
Page 8: Installation And Set Up Power Requirements
2. Connecting Power If the unit is supplied with an AC input cable, Table 2 describes how to connect power to your PL1 LED Luminaire . Field wiring of the PL1 LED Luminaire is straight forward. A total of 3 wires/conductors need to be brought to the unit. -
Page 9: Mounting
DMX512 (XLR) Female LED Luminaire DMX512 Cables" on page 4. Mounting There are several ways to mount PL1 LED Luminaires (depending on mounting option purchased). Below are the various mounting options from Philips Selecon. Refer to "Product Descriptions" on page 3 for additional information. -
Page 10: Pl1 Led Luminaire - Track Mounted Models
PL1 LED Luminaire PL1 LED Luminaire with with Ceiling Rose Mount Canopy Mount WARNING! All PL1 LED Luminaires must be mounted - vertically - as shown above to allow proper cooling. Luminaire head may be positioned as desired. INSTALLATION AND SET UP... -
Page 11: Pl1 Led Luminaire - With Ac Input Cable And Half-Coupler Mount
Half-Coupler Mount* Note: *Models with Half-Coupler mounting hardware includes a 39-inch (1 meter) AC input cable. WARNING! All PL1 LED Luminaires must be mounted - vertically - as shown above to allow proper cooling. Luminaire head may be positioned as desired. -
Page 12: Operation And Programming
OPERATION AND PROGRAMMING 1. LCD Menu Operation The PL1 LED Luminaire’s LCD Display and Menu System provides local control for accessing all the fixture’s status information, menu options, and settings. Note: If there are multiple luminaires in a system, changes would need to be made at each LCD Menu as desired. -
Page 13: Lcd Menu System
PL1 LED Luminaires Installation & User’s Manual 2. LCD Menu System The LCD Display Menu system consists of several categories. Use the four arrow buttons as required (refer to Figure 2 on page 10) to access and make changes to the menu items. When the desired menu item is reached, press [OK] to display the menu options. -
Page 14: Menu Structure
PL1 LED Luminaires Installation & User’s Manual Menu Structure PHILIPS ENTERTAINMENT V. 0.01 PRESET INTENSITY MENU MAIN MENU Save as Preset Sub Menu Options Comments Users can: • Save the current settings (look) to a specific recallable Preset in the Scratch Pad fixture’s memory. - Page 15 PL1 LED Luminaires Installation & User’s Manual Menu Structure (continued) Continued from previous page Edit a Preset Sub Menu Options Comments Users can: • Edit the current settings (look) to a specific recallable Preset in the fix- ture’s memory. •...
-
Page 16: Security
PL1 luminaires are shipped with default passwords. Users may set their own password (four-digit number). When setting a password, write it down and keep it in a secure location. Note, Philips Selecon does not have records of passwords established by users or owners. -
Page 17: Security Levels
PL1 LED Luminaires Installation & User’s Manual Step 3. Select a Level to change ( Level 1 PIN / Level 2 PIN / Level 3 PIN). Step 4. Press [OK] to edit using the [UP ARROW], [DOWN ARROW], [LEFT ARROW] or [RIGHT ARROW] keys to enter a four-digit password (using 0 to 9). -
Page 18: Editing Preset Names
PL1 LED Luminaires Installation & User’s Manual Preset 0, the "off" preset is also Locked to the OFF value. Protected Protected Presets are also Factory Calibrated, and by default are Protected from changes to their Color Mix. Their Intensity can be changed. Protected Presets are Presets 5-25. They can be Un-Protected by setting "Protected" to "No";... - Page 19 PL1 LED Luminaires Installation & User’s Manual General 30W, 40W, 50W, 70W, Sets the maximum power setting of the Power Limit 120W 90W, 100W, 120W LED engine. When the Fixture Powers-Up what does it Off, Scratch Pad, output. Scratch Pad is an automatically Warm White, Cool saved Preset.
-
Page 20: Dmx Control
1 function and other functions follow in sequence. 1. 16-Bit Mode Table 3 provides DMX channel mapping of all DMX512 control values when the PL1 LED Luminaire is in 16-bit DMX512 mode (as set by the luminaire’s menu system). - Page 21 PL1 LED Luminaires Installation & User’s Manual Table 3: PL1 LED Luminaire DMX Channel Mapping (16-Bit Mode) Allows for luminaire timing of intensity. Profile should default to DMX 255 for smoothest Intensity Time 0 - 255 0 - 100% console fade times. Refer to "PL1 Luminaire...
-
Page 22: 8-Bit Mode
Installation & User’s Manual 2. 8-Bit Mode Table 2-1 provides DMX channel mapping of all DMX512 control values when the PL1 LED Luminaire is in 8-bit DMX512 mode (as set by the luminaire’s menu system). Table 2-1: PL1 LED Luminaire DMX Channel Mapping (8-Bit Mode) - Page 23 PL1 LED Luminaires Installation & User’s Manual Table 2-1: PL1 LED Luminaire DMX Channel Mapping (8-Bit Mode) Used to set different modes, parameters, and functions of the luminaire. Set control channel value for desired action. Hold value for at least 3 seconds.
-
Page 24: Dmx 3-Channel (3-Chan) Mode
Installation & User’s Manual 3. DMX 3-Channel (3-Chan) Mode Table 2-2 provides DMX channel mapping of all DMX512 control values when the PL1 LED Luminaire is in 3- Channel (3-Chan) DMX512 mode (as set by the luminaire’s menu system). Table 2-2: PL1 LED Luminaire DMX Channel Mapping (3-Chan Mode) -
Page 25: Lighting Console Settings For Preset White
5. PL1 Luminaire DMX Timing Channel Detail Timing channel control improves the timed moves of certain groups of parameters. The PL1 LED Luminaire provides two timing channels in 16-bit mode (one for intensity time and one for color time) and one timing channel in 8-bit (color and intensity timing combined). - Page 26 PL1 LED Luminaires Installation & User’s Manual Table 3: PL1 Luminaire Timing Channel Detail % Value = Seconds 0 (Full Speed) 10.2 DMX CONTROL...
- Page 27 11.6 11.8 12.2 12.4 12.6 12.8 13.2 13.4 13.6 13.8 14.2 14.4 14.6 14.8 15.2 15.4 15.6 15.8 16.2 16.4 16.6 16.8 17.2 17.4 17.6 17.8 18.2 18.4 18.6 18.8 19.2 19.4 19.6 19.8 PL1 Luminaire DMX Timing Channel Detail...
- Page 28 PL1 LED Luminaires Installation & User’s Manual % Value = Seconds DMX CONTROL...
- Page 29 PL1 LED Luminaires Installation & User’s Manual % Value = Seconds PL1 Luminaire DMX Timing Channel Detail...
- Page 30 PL1 LED Luminaires Installation & User’s Manual % Value = Seconds 250* 60mS 251* 80mS 252* 100mS 253* 120mS 254* 140mS 255* 160mS (default) Note: * DMX values 250 to 255 provide smoothing when using console fade timing. DMX value 255 (recommended default) will provide the smoothest timing.
-
Page 31: Infrared Remote Control
• Presets 1 through 6 on remote con- trol (equate to) Presets 5 through 10 on PL1 LED luminaire display. LASER RADIATION DO NOT STARE INTO BEAM WARNING! THIS DEVICE IS A CLASS 2 LASER. DO NOT STARE OR LOOK... - Page 32 To select and program PL1 LED luminaire with PL1IRR remote: Note: The IR, on the PL1 LED luminaire, must be set to "Enabled" in order for the PL1IRR remote to communicate and control the fixture. Refer to PL1 LED Luminaire Installation & User’s Manual on luminaire menu settings.
-
Page 33: Cleaning And Care
This section covers portions of the luminaire that can be removed for cleaning. The PL1 Luminaire requires special care when it comes to cleaning front lens assembly. Additional care needs to be taken with the plastic components because they are much easier to scratch or damage than glass. -
Page 34: Service And Maintenance
Step 12. Reinstall lens tube by perform Steps 3 to 6 in reverse order. 3. Service and Maintenance For all other service and maintenance issues, please contact your local Philips Selecon office or an Authorized Service Center. CLEANING AND CARE... -
Page 35: Accessories
Contact your local Philips Selecon office or an Authorized Service Center for technical support and service. 4. Accessories Only Philips Selecon approved accessories should be used with your PL1 LED Luminaire. For a list of available accessories from Philips Selecon, please see "ACCESSORIES" on page 4. -
Page 36: Troubleshooting Troubleshooting Guide
1. Troubleshooting Guide The chart below provides possible causes and remedies for various error messages and/or symptoms. WARNING! Any service and maintenance (including troubleshooting), other than described herein should be performed by an Authorized Philips Selecon Dealer or Service Center. Description Symptom Possible Cause/Remedy Unit is set to Preset Off... -
Page 37: Technical Specifications
ETL / cETL Listed (North America models) and CE Marked (International models) Note: Common model specifications shown. For specific model specifications, features, and accessories, refer to the product specification sheet or visit the Philips Selecon web site at www.seleconlight.com for more details. 2. PL1 LED Luminaire Dimensions 4.6 in /...
Need help?
Do you have a question about the Selecon PL1 Series and is the answer not in the manual?
Questions and answers