Table of Contents
Advertisement
Advertisement
Table of Contents

Related Manuals for John Lewis JLWD 1408


Summary of Contents for John Lewis JLWD 1408
- Page 1 JLWD 1408 1400 spin washer-dryer Instruction manual...
-
Page 2: Important Safety Information
These warnings have been provided in the interest of safety. You MUST read them carefully before use or installation by a qualified person. If you are unsure of the meanings of these warnings contact the John Lewis branch from which you purchased the appliance. -
Page 3: Ecological Hints
Maintenance and Cleaning ● Leave the porthole door slightly ajar between washes to preserve the door seal. ● For information on maintenance and cleaning your washing machine see page 25 of this instruction manual. Service ● This product should only be repaired or serviced by an authorised Service Engineer and only genuine approved spare parts should be used. -
Page 4: Table Of Contents
Contents For the User Important Safety Information Description of the Appliance The Control Panel Programme information Using your washing machine Drying Hints & Tips on Washing and Drying Wash Care Symbols Washing Programmes Drying Programmes Maintenance and Cleaning Descaling After each wash Maintenance Wash External cleaning Cleaning the dispenser drawer... -
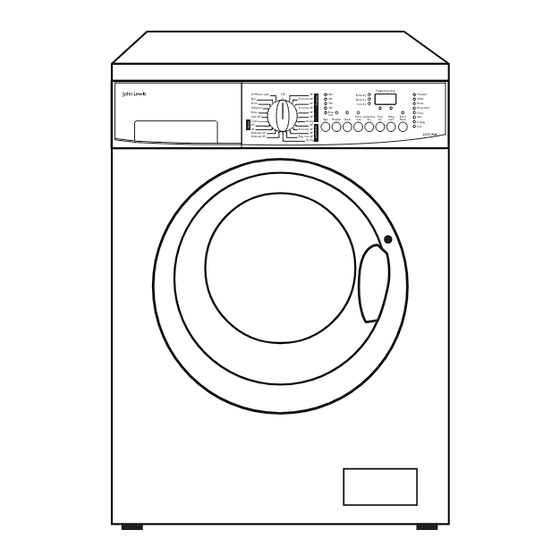
Page 5: Description Of The Appliance
Description of the Appliance 1 Detergent dispenser drawer 2 Control panel 3 Door locked light 4 Door opening handle 5 Drain pump 6 Adjustable feet Door locked light It stays on during the whole programme indicating that the door is locked. When the light goes out, the door can be opened. -
Page 6: Installation
Installation It is dangerous to alter the specifications or attempt to modify this product in any way. Care must be taken to ensure that the appliance does not stand on the electrical supply cable. Any electrical work required to install this appliance should be carried out by a qualified electrician or competent person. -
Page 7: Unpacking
Unpacking All transit bolts and packing must be removed before using the appliance. You are advised to keep all transit devices so that the they can be refitted if the machine ever has to be transported again. 1. Using the supplied spanner unscrew and remove the two rear bottom screws. -
Page 8: Installation On A Suspended Floor
Installation on a Suspended Floor Suspended wooden floors are particularly susceptible to vibration. To help prevent vibration we recommend you place a waterproof wood panel, at least 15 mm thick under the appliance, secured to at least 2 floor beams with screws. If possible install the appliance in one of the corners of the room, where the floor is more stable. -
Page 9: Levelling
2. Onto a sink outlet spigot. If the outlet spigot has not been used before, remove any blanking plug that may be in place. Push the drain hose onto the spigot and secure with a clip if required, ensure a loop is formed in the drain hose (see diagram) to prevent waste from the sink entering the washing machine. -
Page 10: Electrical Connection
Electrical connection Any electrical work required to install this appliance should be carried out by a qualified electrician or competent person. WARNING: THIS APPLIANCE MUST BE EARTHED. The manufacturer declines any liability should this safety measure not be observed. Should the appliance power supply cable need to be replaced, this must be carried out by a Service Force agent (see page 28). -
Page 11: Programme Selector Dial
The control panel 1 Detergent dispenser drawer 2 Programme selector dial The programme selector dial is divided into the following sections: • Cottons, • Synthetics, • Delicates • Wool / Hand washing • Special programmes from “Soak 30°” to “30 Minute wash”... -
Page 12: Option Buttons
4 “Option” buttons Depending on the programme, different functions can be combined. These must be selected after choosing the desired programme and before depressing the “Start/Pause” button. When these buttons are pressed, the corresponding pilot lights illuminate. When they are pressed again, the pilot lights go out. -
Page 13: Start/Pause Button
8 “Start/Pause” button This button has two functions: • Start: after you have selected the desired programme and options, press this button to start the washer- dryer. The light above the button will stop flashing and remain lit. If you have selected a delay time, the countdown will begin and will be shown on the display. - Page 14 • Delay start, a time value indicated in hours (23 hours max) and selected by means of the relevant button. The delay time is displayed for 3 seconds, then the duration of the selected programme reappears. After you have pressed the Start/Pause button, the countdown is updated every hour, and, for the last two hours, every 30 minutes.
-
Page 15: Programme Information
Programme information Easy iron 40° This programme at 40'C reduces creasing on synthetic garments and therefore reduces the amount of ironing required. The laundry is gently washed and spun to prevent the fabrics creasing. Max. load 1.5 kg. Final spin speed 900 r.p.m. Soak 30°... -
Page 16: Measure Out The Fabric Softener
Using the washing machine Before the first wash, we recommend that you run a cotton cycle at 90°C, without any laundry in the machine, to remove any manufacturing residue from the drum and tub. Pour 1/2 a measure of detergent into the dispenser drawer and start the machine. -
Page 17: Start The Programme
The relevant light will light up. 7. Select the desired options If your laundry is very dirty, it may be advisable to select the “Prewash” option. If your laundry is only slightly soiled, select the “Quick” option. If you wish the laundry to undergo an extra rinse, select the “Extra Rinse”... -
Page 18: End Of Programme
Should it not be possible to open the door, and should it be absolutely necessary to do so, switch the machine off by turning the selector dial to “Off”. After approximately 3 minutes, you can open the door. Pay attention to the level and temperature of the water in the machine! When you close the door to restart the programme turn the dial to the previous programme repeating the... -
Page 19: Drying
Drying DRYING 3.5 KG OF COTTON You have for example just machine-washed and spun at 1400 rpm 7 kg of laundry. They are cotton fabrics of medium weight which you want to iron as soon as they are dry. Remove the laundry from the appliance and divide the items to obtain two loads of approx. -
Page 20: Hints & Tips On Washing And Drying
Hints & Tips on Washing and Drying Do NOT overload the machine. Weigh the laundry the first few times you use the appliance. The average weights of the most common items are listed below as a guide: 1000g = 1 kg Sheet Pillow case Tablecloth... -
Page 21: Wash Care Symbols
Wash Care Symbols Wash care labels inside garments recommend how to launder your clothes with the best results. The care labelling code is in line with care labelling used in the rest of Europe. The symbols used make it easy to select the correct programme on your washing machine. -
Page 22: Washing Programmes
Washing programmes Programme/ Type of laundry Fabrics temperature Sheets, household 90° White linen, towels, cotton Cottons tablecloths Economy Sheets, household White 60° linen, towels, cotton tablecloths Cottons Fast coloured and non-fast items, for 60° White and example hand towels, 40° - 30° coloured sheets, underwear, cotton... -
Page 23: Washing Programmes
Washing programmes Programme Programme description Soak for about 20 Soak 30° minutes at 30°C 3 rinses Rinse Long spin at the max speed 1 rinse with liquid additive Softeners Long spin at max. speed Drain For emptying out at the Water draining end of the programme “Soak 30°”... -
Page 24: Drying Programmes
Drying Programmes Timed drying Degree of Type of fabric drying Extra dry Cotton and linen Ideal for towelling (bathrobes, bath materials towels, etc.) Cotton and linen (towels, T-shirts, bathrobes) Store dry (*) Suitable for items to put away without ironing Synthetics and mixed fabrics (jumpers, blouses, underwear,... -
Page 25: Maintenance And Cleaning
Maintenance and Cleaning You must DISCONNECT the appliance from the electricity supply, before you can carry out any cleaning or maintenance work. Descaling The water we use normally contains lime. It is a good idea to periodically use a water softening powder in the machine. -
Page 26: Cleaning The Water Inlet Filter
• Pull out the emergency emptying hose, place it in a container and remove its cap. • When no more water comes out, unscrew the pump cover and remove it. Always keep a rag nearby to dry up spillage of water when removing the cover. Remove any objects from the pump impeller by •... -
Page 27: Emergency Emptying Out
Emergency emptying out If the water is not drained, proceed as follows to empty out the machine: • Pull out the plug from the power socket; • Close the water tap; • If necessary, wait until the water has cooled down; •... -
Page 28: Something Not Working
Something Not Working If the washing machine is not working correctly, please carry out the following checks before contacting your local Service Force agent. IMPORTANT: if you call out an engineer to a fault listed below, or to repair a fault caused by incorrect use or installation, a charge will be made even if the appliance is under guarantee. - Page 29 Symptom The machine vibrates when spinning The door will not open Spinning starts late or the machine does not spin The machine makes an unusual noise No water is visible in the drum The machine does not dry or does not dry properly Possible causes ●...
-
Page 30: Repairs - After Sales Service
Repairs - After Sales Service In the event of your appliance requiring service, or if you wish to purchase spare parts, please contact our extended warranty administrators by telephoning: 0870 01 07887 They will give you details for your local Service Force Centre. - Page 31 John Lewis Partnership 171 Victoria Street London SW1E 5NN 132 973 110 www.johnlewis.com 03/07...
Need help?
Do you have a question about the JLWD 1408 and is the answer not in the manual?
Questions and answers