Table of Contents
Advertisement
Advertisement
Table of Contents

Related Manuals for John Lewis JLWD 1610


Summary of Contents for John Lewis JLWD 1610
- Page 1 JLWD 1610 1600 spin washer-dryer Instruction manual...
-
Page 2: Safety Information
These warnings have been provided in the interest of safety. You MUST read them carefully before installing or using the appliance. If you are unsure of the meanings of these warnings contact the John Lewis branch from which you purchased the appliance. -
Page 3: Installation
• Wash small items such as socks, laces, washable belts etc in a washing bag or pillow case as it is possible for such items to slip down between the tub and the inner drum. • Do not use your washing machine to wash articles with whalebones, material without hems or torn material. -
Page 4: Child Safety
• The users should always check that they have not left their gas lighters (disposable or otherwise) in their clothing. • Never tumble dry items that have had contact with chemicals such as dry cleaning fluid. These are of a volatile nature and could cause an explosion. -
Page 5: Table Of Contents
Contents Operating instructions Safety information General safety Installation Child safety Product description Detergent dispenser drawer Control panel Programme Dial (2) Spin (3) Automatic dry (4) Time dry (5) Prewash (6) Extra Rinse (7) Start Pause (8) Door lock light (9) Delay Start (10) Display First use... - Page 6 End of programme Use - Drying Drying only Use - Washing & Drying NON-STOP programme - Washing and Automatic Drying NON-STOP programme - Washing and Timed Drying Helpful hints and tips Drying Hints Preparing the drying cycle Laundry not suitable for drying Garment labels Drying cycle duration Additional drying...
-
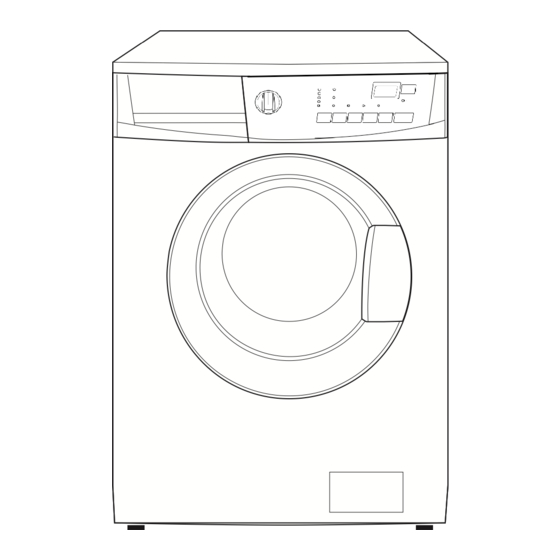
Page 7: Product Description
Product description Detergent dispenser drawer Control panel Door opening handle Rating plate Drain pump Adjustable feet... -
Page 8: Detergent Dispenser Drawer
Detergent dispenser drawer Compartment for detergent used for prewash and soak phase or for stain remover used during the stain action phase (if available). The prewash and soak detergent is added at the beginning of the wash programme. The stain remover is added during the stain action phase. -
Page 9: Programme Dial
Detergent dispenser drawer Programme selector dial Spin button Automatic dry button Time dry button Prewash button Programme Dial (2) It allows you to switch the appliance on/off and/or to select a programme. Spin (3) By pressing this button you can change the spin speed of the selected programme or to select the available function (s). -
Page 10: Extra Rinse
Extra Rinse (7) This appliance is designed to save energy. If it necessary to rinse the laundry using an extra quantity of water (extra rinse), select this option. Some additional rinses will be performed. This option is recommended for people who are allergic to detergents, and in areas where the water is very soft. -
Page 11: First Use
• Selection of drying time in minutes. After starting the programme, the remaining time is updated every minute. If you select a drying time longer than 55 minutes, after a few seconds, the display will show it in hours and minutes. -
Page 12: Child Lock
Child lock This function works in two different ways: • If enabled before the «Start/Pause» button is pressed, it prevents the machine from being started. • If enabled after pressing the «Start/ Pause» button, it prevents any changes being made to the programmes or options selected Daily use Load the laundry... -
Page 13: Select The Required Programme
Select the required programme Turn the programme dial to the required programme. The washing machine will automatically select the maximum spin value provided for the programme you have chosen and the display will show the duration, calculated on the basis of the maximum load for each type of fabric. -
Page 14: Start The Programme
programme will appear again. The wash programme can be delayed from 30 min - 60 min - 90 min, 2 hours and then by 1 hour up to a maximum of 20 hours. You can cancel the delay time at any moment, before you press the «Start/ Pause»... -
Page 15: How To Open The Door During The Cycle Of A Programme
How to open the door during the cycle of a programme You can open the door, after having set the washing machine to Pause, provided the following conditions exist: • The washing machine is not in the heating phase • The level of the water is not high; If these requirements are met, when you pause the washing machine, the «Door lock»... -
Page 16: Use - Drying
Use - Drying Drying only Warning! The recommended load size is 4 kg for cottons and linen and 3 kg for synthetic items. By pressing Drying Time button it is also possible to dry up to 6 kg of cotton items (see the «Drying Programme »... -
Page 17: Use - Washing & Drying
Use - Washing & Drying NON-STOP programme - Washing and Automatic Drying The maximum load size is 4 kg for cotton and 3 kg for synthetic. Caution! Do not use a dosing device/ball when carrying out a washing and drying programme. -
Page 18: Helpful Hints And Tips
5. Start the programme by pressing button 8. The time remaining is updated every minute on the display. Helpful hints and tips Sorting out the laundry Follow the wash code symbols on each garment label and the manufacturer’s washing instructions. Sort the laundry as follows: whites, coloureds, synthetics, delicates, woollens. -
Page 19: Detergents And Additives
Tar stains: first treat with stain remover, methylated spirits or benzine, then rub with detergent paste. Detergents and additives Good washing results also depend on the choice of detergent and use of the correct quantities to avoid waste and protect the environment. -
Page 20: Drying Hints
Drying Hints Preparing the drying cycle As a dryer, the appliance works on the condensation principle. Therefore, the water tap must be open and the drain hose must drain water into a sink or into the drain pipe, even during the drying cycle. Attention! Before starting the drying programme, reduce the loads of washed laundry, in order... -
Page 21: Additional Drying
according to the different fabrics. Take note of the duration drying time of the already performed cycles. Additional drying If the laundry is still damp at the end of the drying programme, select a short drying cycle again. Washing programmes Programme - Maximum and Minimum Temperature - Cycle Description - Maximum Spin Speed - Maximum Fabrics Load - Type of... - Page 22 Programme - Maximum and Minimum Temperature - Cycle Description - Maximum Spin Speed - Maximum Fabrics Load - Type of Laundry Economy 40° Main wash - Rinses Maximum spin speed at 1600 rpm Max. load 8 kg Colour cotton (normally or slightly soiled items). This programme can be selected for slightly or normally soiled cotton items.
- Page 23 Programme - Maximum and Minimum Temperature - Cycle Description - Maximum Spin Speed - Maximum Fabrics Load - Type of Laundry Wool - Hand wash 40° - 30° Main wash - Rinses Maximum spin speed at 900 Max. load 2 kg Washing programme for machine washable wool as well as for hand washable woollens and delicate fabrics.
-
Page 24: Drying Programmes
Programme - Maximum and Minimum Temperature - Cycle Description - Maximum Spin Speed - Maximum Fabrics Load - Type of Laundry Spin Drain and long spin Maximum spin speed at 1600 rpm Max. load 8 kg Separate spin for hand washed cotton garments and after programmes with the set option, which ends with water left in the tub. -
Page 25: Automatic Programmes
Automatic Programmes Degree of Drying Extra dry Ideal for towelling materials Cupboard dry Suitable for items to put away without ironing Cupboard dry Suitable for items to put away without ironing Iron dry Suitable for ironing Timed Programmes Degree of Drying Extra dry Ideal for towelling materials Cupboard dry... -
Page 26: Technical Data
Technical data Dimensions Electrical connection Voltage - Overall power - Fuse Water Supply Pressure Maximum Load Maximum Dry Load Spin Speed Consumption values Programme White Cottons 95° Cottons 60° Cotton Energy Saving Programme 60° Cottons 40° Synthetics 40° Delicates 40° Wool/ Handwash 30°... -
Page 27: Care And Cleaning
The consumption data shown on this chart is to be considered purely indicative, as it may vary depending on the quantity and type of laundry, on the inlet water temperature and on the ambient temperature. Care and cleaning You must DISCONNECT the appliance from the electricity supply, before you can carry out any cleaning or maintenance work. -
Page 28: Washing Drum
To aid cleaning, the top part of the additive compartment should be removed. Cleaning the drawer recess Having removed the drawer, use a small brush to clean the recess, ensuring that all washing powder residue is removed from the upper and lower part of the recess. Replace the drawer and run the rinse programme without any clothes in the drum. -
Page 29: Cleaning The Pump
Cleaning the pump The pump should be inspected regularly and particularly if: • the appliance does not empty and/or spin; • the appliance makes an unusual noise during draining due to objects such as safety pins, coins etc. blocking the pump. •... -
Page 30: Cleaning The Water Inlet Filters
Remove foreign bodies and fluff from the pump seat and from the pump impeller. Check carefully whether the pump impeller rotates (it rotates jerkily). If it doesn’t rotate, please contact your Service Centre. 10. Replace the filter into the pump by inserting it correctly into the special guides. -
Page 31: Emergency Emptying Out
4. Screw the hose back onto the tap. 5. Unscrew the hose from the machine. Keep a rug nearby because some water may flow. 6. Clean the filter in the valve with a stiff brush or with the piece of cloth. 7. -
Page 32: Installation
Installation Unpacking All transit bolts and packing must be removed before using the appliance. You are advised to keep all transit devices so that they can be refitted if the machine ever has to be transported again. 1. After removing all the packaging, carefully lay machine on it’s back to remove the polystyrene base from the bottom. -
Page 33: Positioning And Levelling
5. Open the porthole and remove the polystyrene block fitted on the door seal. 6. Fill the smaller upper hole and the two large ones with the corresponding plastic plug caps supplied in the bag containing the instruction booklet. Positioning and levelling Install the machine on a flat hard floor. -
Page 34: Water Inlet
of connectors are available from good hardware stores and plumbers merchants to suit most domestic plumbing. Any alteration to your existing plumbing must be carried out by a competent person, or qualified plumber. Water inlet An inlet hose is supplied and can been found inside the machine drum. -
Page 35: Water Drainage
Warning! Installation should comply with local water authority and building regulations’ requirements. The appliance must be connected to a cold water supply. A minimum water pressure of 0.05 MPa (0.5 bar) is required for safe operation of the appliance. If you cannot make the cold water connection direct from the rising mains, you may be able to operate the appliance from your cold water... -
Page 36: Special Conditions
If the outlet spigot has not been used before, remove any blanking plug that may be in place. Push the drain hose onto the spigot and secure with a clip, ensure a loop is formed in the drain hose (see diagram) to prevent waste from the sink entering the appliance. -
Page 37: Electrical Connection
RAINWATER ‘RUN-OFF’ SURFACE WATER DRAINS & SEWERS UNTREATED DISCHARGE Electrical connection Any electrical work required to install this appliance should be carried out by a qualified electrician or competent person. SHOWER SINK BATH WASHING MACHINE DISHWASHER RIVER TOILET BIDET FOUL DRAIN FOUL SEWERS SEWAGE TREATMENT... -
Page 38: Permanent Connection
Important! Information on the electrical connection is given on the rating plate on the inner edge of the appliance door. The appliance is supplied with a 13 amp plug fitted. In the event of having to change the fuse in the plug supplied, a 13 amp ASTA approved (BS1363/A) fuse must be used. -
Page 39: Troubleshooting
What to do if… Certain problems are due to lack of simple maintenance or oversights, which can be solved easily without calling out an engineer. Before contacting your local Service Centre, please carry out the checks listed below. Important! if you call out an engineer to a fault listed below, or to repair a fault caused by incorrect use or installation, a charge will be made even if the appliance is under... - Page 40 Problem The machine does not fill: The machine does not empty and/or does not spin: The machine fills than empties out immediately: There is water on the floor: Possible cause/Solution The water tap is closed (E10). • Open the water tap. The inlet hose is squashed or kinked (E10).
- Page 41 Problem Unsatisfactory washing results: The door will not open: The machine vibrates / The machine is noisy: Spinning starts late or the machine does not spin: The machine makes an unusual noise: No water is visible in the drum: Possible cause/Solution Too little detergent or unsuitable detergent has been used.
-
Page 42: Repairs - After Sales Service
Problem The machine does not dry or does not dry properly: The display shows the alarm code EFO: Repairs - After Sales Service Repairs - After Sales Service Your appliance comes with a three year warranty. If it is not working correctly; consult the fault finding guides within this instruction book ("What to do if ..."). -
Page 43: Environment Concerns
Repairs carried out by inexperienced persons may cause injury or serious malfunctioning. Contact your local John Lewis Branch. This means that they can be recycled by disposing of them properly in appropriate collection containers. - Page 44 John Lewis Partnership 171 Victoria Street London SW1E 5NN www. johnlewis.com 132939140-A-022011...
Need help?
Do you have a question about the JLWD 1610 and is the answer not in the manual?
Questions and answers