
Related Manuals for Worx WG168


Summary of Contents for Worx WG168
- Page 1 2-in-1 Grass Trimmer/Edger Coupe gazon/Taille-bordure 2 en 1 2 en 1 Cortadora de cesped/Ribeteadora WG168 HElPliNE NumBER HElPliNE NumBER 1-866-354-woRx (9679)
- Page 5 WRONG RIGHT...
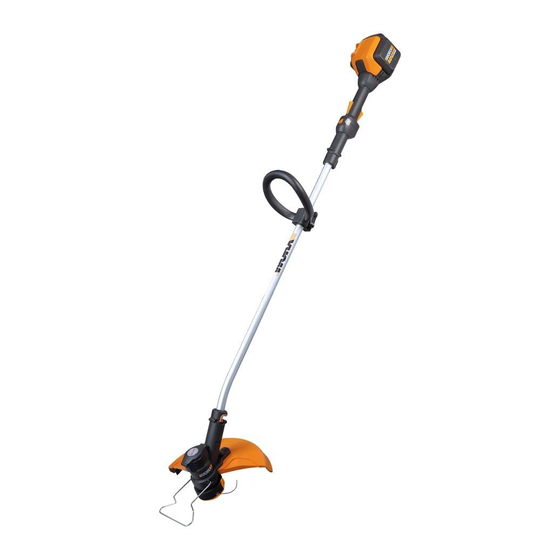
- Page 6 1. AuxiliARy HANdlE 2. THREE SPEEd SETTiNGS 3. loCk oFF SwiTCH 4. BATTERy PACk 5. oN/oFF lEvER 6. SHAFT loCkiNG kNoB 7. AuxiliARy HANdlE loCkiNG ClAmP 8. SAFETy GuARd 9. EdGE GuidE 10. liNE CuTTER 11. TRimmER HEAd CovER (See Fig. i2) 12.
-
Page 7: Technical Data
TECHNICAL DATA Voltage Max* No load speed 8300/min Cutting diameter 13”(330mm) Line diameter 0.08”(2.0mm) Charging time Machine weight 7 .7 lbs(3.5kg) * Voltage measured without workload. Initial battery voltage reaches maximum of 40 volts. Nominal voltage is 36 volts. ACCEssorIEs Charger (wA3734) Battery pack (wA3536) Spool (wA0014) -
Page 8: General Safety Warnings
GENErAL sAFETY handles dry, clean, and free from oil and grease. WArNINGs 12) Check Damaged Parts - Before further use imPoRTANT SAFETy iNSTRuCTioNS of the appliance, a guard or other part that is damaged should be carefully checked wARNiNG! When using electric to determine that it will operate properly gardening appliances, basic safety and perform its intended function. - Page 9 sYMBoLs 3) Do not open or mutilate the battery(ies). Released electrolyte is corrosive and may cause damage to the eyes or skin. It may BATTERY PACK REMOVAL AND be toxic if swallowed. PREPARATION FOR RECYCLING 4) Exercise care in handling batteries in order To preserve natural resources, not to short the battery with conducting please recycle or dispose of...
- Page 10 AssEMBLY only charge the Li-Ion battery also supplied. Do not use another battery charger. 1. ASSEmBly oF THE mAiN HANdlE (See Fig. A1, A2) 2. CHARGiNG youR BATTERy PACk Align and insert the shaft into the upper The Li-Ion battery is protected against deep housing until a click can be heard.
-
Page 11: Operation
prevent accidental starting. Depress the Lock wARNiNG: use only 0.08”(2.0mm) OFF switches and the On/OFF lever (5) to start diameter cutting line. Other sizes of your trimmer. To switch off, just release the on/ line will not feed properly and will result in off switch. -
Page 12: Maintenance
Repeat above until you hear the lines hitting To mANuAlly wiNd liNE against the line cutter. (See Fig. k1-k4) Take approximately 20ft (6m) of line. Insert To mANuAlly FEEd THE liNE 0.8”(2mm )of line into the Spool holes and (See Fig. i1) wind line in the direction of the arrows on the AlwAyS REmovE THE BATTERy top of the Spool. -
Page 13: Troubleshooting
TroUBLEsHooTING The following table gives checks and actions that you can perform if your machine does not operate correctly. If these do not identify and correct the problem, contact your service agent. wARNiNG: Switch the machine off and remove the battery prior to any troubleshooting. Problems Possible Causes Corrective Action...
Need help?
Do you have a question about the WG168 and is the answer not in the manual?
Questions and answers