
Related Manuals for Seltron ST+


Summary of Contents for Seltron ST+
- Page 1 Room Thermostat ST+ Raumthermostat ST+ Θεξκνζηάηεο Υώξνπ ST+ Instructions Anleitungen Οδεγηεζ...
- Page 2 Internet: www.seltron.eu E- mail: info@seltron.eu...
-
Page 3: Table Of Contents
User manual ..........4 Setting manual ..........10 Installation manual ........16 Technical data, statements .......20 Bedienungsanleitungen ......23 Betriebsanleitungen ........28 Montageanleitungen .........34 Technische Daten, Stellungsnahme ..38 Οδεγίεο ρξήζεσο ........40 Σερληθά ραξαθηεξηζηηθά, δειώζεηο ... 53... -
Page 4: Gb User Manual
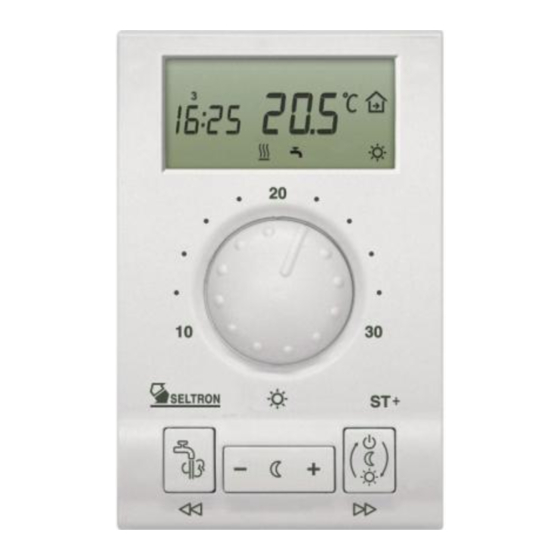
USER MANUAL Room Thermostat ST+ ST+ is a powerful and modern designed room thermostat. Heating opera- tion can be managed manually (day or night temperature mode) or by a weekly time program. ST+ also allows d. h. w. warming control, which is set independently from room heating. - Page 5 Thermostat description Display: Day of the week (1-7) Program timer activated Day temperature mode Night temperature mode Frost protection Heating is active D. h. w. warming is active Operating mode manual change Measured room temperature display Day temperature setting D. h. w. warming ON/OFF Night temperature or d.
- Page 6 Setting the accurate time and day Hours: Hold key Minutes: Hold key and press key and press key Hold both keys , then press to set the day. The days are marked from 1 to 7. Monday is marked as 1 and Sunday as 7. If the ST, by battery exchange, isn’t functional for a while, is the time set to Monday, 20:00.
-
Page 7: Operating Mode Selection
Operating mode selection By pressing you can change the operating mode. - comfort mode (day temperature), display shows - economic mode (night temperature), display shows - operating by selected time program, display shows , depends on active mode (day/night) set in the program - frost protection (OFF) display shows Default operating mode after inserting or change of batteries is the »Day temperature«... - Page 8 A flashing symbol on the display means, that the requested room temperature is shown. 10 seconds after the last change of the re- quested temperature the flashing stops and the display is showing the measured room temperature. Ogrevanje sanitarne vode Operating mode (time program) - manual change If a time program is active, you can manually change the operating mode from day temperature to night temperature mode and vice versa.
- Page 9 Batterie exchange Empty batteries are indicated with the low contrast display. We suggest the battery re- placement every 2 years. ST is supplied with two alkaline batteries 1.5 V type AAA. Bat- tery socket is inside the ST. To remove ther- mostat from the wall plate, do the following.
-
Page 10: Setting Manual
SETTING MANUAL Pre- setted time programs Program selection Hold the key and by pressing the key select the wanted program. You can choose between Pr1, Pr2, Pr3, Pr4, Pr5, Pr6 and - - -. Selected time program always replaces the active program. Pre- setted time program tables. - Page 11 Modifying the time program Pr6 Time program Pr6 can be individualy altered and suited to your needs. This can be done like that: hold the key and press the key for so many times that the display shows Pr6. Press key to select the program place that you wish to modify.
- Page 12 Now press key . On the display starts to flash day. Press key set day, then press key . On the display starts to flash hours. Press key to set hours, then press key . On the display starts to flash min- utes.
- Page 13 Menu navigation In menu, keys have new meaning, marked bellow them (Picture a). To move between the groups press key to move to the left and key to move to the right (Picture b). To move within the group press key move down between the lines and key to move up between the lines.
- Page 14 Room thermostat data d1 This group is sort of ST+ ID. In this group are information about ST+, modifying isn’t possible. The information are displayed in the following order: - [d1.1] Room thermostat type (ST.) - [d1.2] program version - [d1.3] heating (HEA) - [d1.4] value of ED constant - [d1.5] temperature sensor calibration - [d1.6] reserved...
- Page 15 Temperature sensor calibration To make a correction to the measured temperature display, hold the key for about 10 seconds. After the beep release the keys and then alter the display value with 10 seconds after the last made change to the temperature display value the flashing stops and the display shows the measured room temperature again.
-
Page 16: Installation Manual
INSTALLATION MANUAL Place of mount Place of mount is very important for proper ST+ operation. Suitable places are inner walls, which aren’t sun lighted or exposed to sources of heat and wind. ST2 should be mounted approximately 150 cm above the floor. Wall plate mount Remove the ST+ from the wall plate, by doing the... - Page 17 Unscrew and temporarily remove the protection cover (Picture a). Room thermostat is intended for wall mounting. In case you don’t have installed a flush box, tear away the drilling template from the package and mark drilling holes. Use enclosed screws to fasten the wall plate on the wall (Picture b). After you have done connecting the wires (see chapter Connecting the wires), screw back the protection cover.
- Page 18 Direct heating circuit and d. h. w. warming Module for Module for d. h w. warming room heating INSTALLATION MANUAL...
- Page 19 Indirect heating circuit and d. h. w. warming Module for Module for d. h. w. warming. room heating INSTALLATION MANUAL...
-
Page 20: Technical Data, Statements
Weight: ..........150 g Conformity with standards and directives Seltron d.o.o. declares, with full responsibility, that room thermostat ST+ meet the requirements and rules for the electrical equipment, designed to use within certain voltage levels (EC directive for low voltage (LVD) 73/23... - Page 21 This guarantee is valid in every country, where the product was supplied by company SELTRON or its authorised dealer. Disposal of Old Electrical & Electronic Equipment Disposal of Old Electrical & Electronic Equipment (Applicable in the...
- Page 22 BEDIENUNGSANLEITUNG Raumthermostat ST+ ST+ ist ein elektronischer Raumthermostat mit Wochen- Programmuhr, der uns erlaubt, eine Tag- und Nacht- Solltemperatur einzustellen, es erlaubt auch die Brauchwassererwärmung. ST+ ermöglicht auch eine von Raum- heizung unabhängige Brauchwasservorbereitung. LEGENDE Man muss die Taste gedrückt halten und erst dann die andere Tasten drücken.
-
Page 23: D Bedienungsanleitungen
Aussehen des Thermostats Anzeige: Tag der Woche (1-7) Programmuhr Tagestemperatur Nachttemperatur Frostschutz Heizung Aktiv Brauchwasservorbereitung Aktiv Betriebsmodus - manuelles wechseln Ist- Temperatur Tagestemperatur Einstellung Brauchwasservorbereitung EIN/AUS Nachttemperatur und Betriebsmodus Auswahl: Brauchwasservorbereitung- - Tagestemperatur Zeitdauer Einstellung - Nachttemperatur - Frostschutz Thermostat Schließung Ungefähr 15 s lang halten Sie die Taste gedrückt. -
Page 24: Einstellung Der Genauen Zeit
Einstellung der genauen Zeit Die Stunden: Die minuten: Sie halten die Taste Sie halten die Taste gedrückt und drücken die gedrückt und drücken die Taste oder Taste oder Der Tag Sie halten die Taste gedrückt, und mit drücken der Taste oder stellen Sie den Tag ein, wobei der Montag 1 und der Sonntag 7 ist. -
Page 25: Auswahl Der Betriebsart
Auswahl der Betriebsart: Mit drücken der Taste wählen Sie den gewünschten Betriebsart. Ausgewählte Betriebsart wird auf der An- zeige dargestellt. - Programmuhr - Tagestemperatur - Nachttemperatur - Heizung AUS (Frostschutz) Werkseingestellte betriebsart beim Baterrienwechsell ist »Tagestemperatur« und Brauchwassererwärmung AUS. Einstellung der Tages– und Nachttemperatur Wenn die Raumtemperatur Ihren Erwartungen nicht Entspricht, dann können Sie die Eingestellte Temperatur Einfach ändern: Tagestemperatur:... - Page 26 Blinkendes symbol an der Anzeige bedeutet, das der Solltemperatur gezeigt wird. 10 Ss nach der letzte Veränderung hört das blinken auf und die Anzeige zeigt wieder die gemessene Raumtemperatur an. Betriebsart (Programmuhr) - Handwechsel Wenn Ein Zeitprogramm aktiv ist, dann können Sie die Betriebsart manu- ell wechseln von Tagestemperatur- nach Nachttemperatur- Betriebsart und Umgekehrt.
-
Page 27: Einsetzen Und Wechsel Der Batterie
Einsetzen und Wechsel der Batterie Für die Versorgung des Raumthermostaten werden zwei Batterien 1.5V Typ AAA ge- braucht. Der Batteriebehälter befindet sich im Thermos- tat. Den Thermostat nehmen Sie von dem Untergestell so, dass Sie ihn in der Höhe der Tasten greifen und zu sich ziehen (Sehe Bild). -
Page 28: Betriebsanleitungen
BETRIEBSANLEITUNG Voreingestellte Zeitprogramme Die Programmauswahl Sie halten die Taste gedrückt und mit drücken der Taste wählen Sie das gewünschte Zeitprogramm aus (Bild 10). Sie können zwischen Pro- grammen Pr1, Pr2, Pr3, Pr4, Pr5, Pr6 und - - - auswählen. Das ausgewählte Programm löscht immer das bisherige Zeitprogramm. Wollen Sie das bisherige Zeitprogramm behalten, wählen Sie - - - aus. - Page 29 Änderung des Zeitprogramms Pr6 Das ausgewählte Zeitprogramm können Sie beliebig verändern und sich ein eigenes, individuelles Zeitprogramm gestalten. Dies machen Sie auf folgende Art. Halten Sie die Taste gedrückt und drücken Sie die Taste so lange bis Pr6 an der Anzeige Erscheint. Mit Drücken der Taste oder wählen Sie die Programmstelle aus, die...
- Page 30 Jetzt drücken Sie die Taste . An der Anzeige beginnt der Tag zu blin- ken. Mit Drücken der Taste oder stellen Sie den Tag ein. Dann drü- cken Sie erneut die Taste . An der Anzeige beginnen die Stunden zu blinken.
- Page 31 Ortung im Menü Im Menü bekommen die Tasten des Raumthermostaten eine andere Be- deutung, wie unter den Tasten gezeichnet ist (Bild a). Zwischen den Grup- pen im Menü bewegen Sie sich mit der Taste nach links und mit der Taste nach rechts (Bild b).
- Page 32 Die Datengruppe d1 Diese Gruppe ist sozusagen die Identitätskarte des Raumthermostaten. Die Gruppe d1 zeigt die Daten des Thermostaten, die Veränderung der Einstellungen ist aber nicht möglich. In der Gruppe d1 sind folgende Para- meter: - [d1.1] Raumthermostat Typ (ST.) - [d1.2] Programmversion - [d1.3] Heizung (HEA) - [d1.4] ED Konstante und Regelanlage...
- Page 33 Temperaturfühler kalibrieren Zum Sol- Temperatur Anzeige Wert zu korrigieren Drücken und Halten Sie die Taste für etwa 10 s. nach dem Signal Ton lassen Sie die Taste los und korrigieren Sie Die Angezeigte Wert mit Tasten 10 s nach dem letzten Veränderung des Temperaturanzeige- Wert, stoppt das blinken und an der Anzeige Erscheint wieder die Gemessene Raum- temperatur an.
-
Page 34: Montageanleitungen
MONTAGEANLEITUNG Auswahl der Montagestelle Die Auswahl der Montagestelle ist wichtig für den richtigen Betrieb des Raumthermostaten. Die dementsprechende Stellen sind an Innenwänden, die nicht von der Sonne angestrahlt sind und nicht den lokalen Wärmequel- len und dem Durchzug ausgesetzt sind. Die Höhe der Montage soll etwa 150 cm über dem Boden sein. - Page 35 Lösen Sie die Schraube am Schutzdeckel und nehmen Sie vorübergehend den Deckel ab (Bild a). Der Raumthermostat ST+ ist für die Aufputzmonta- ge an die Wand geeignet. Falls Sie keine Unterputzdose haben, reißen Sie von der Verpackung Die Schablone ab und markieren Sie damit die Bohrlö- cher.
- Page 36 Direkt- Heizkreis und Brauchwassererwärmung Modul für Heizung Modul für Brauchwassererwärmung MONTAGEANLEITUNG...
- Page 37 Misch- Heizkreis und Brauchwassererwärmung Modul für Heizung Modul für Brauchwassererwärmung MONTAGEANLEITUNG...
-
Page 38: Technische Daten, Stellungsnahme
Für die Reparatur in der Garantiezeit wenden sie sich an einen autorisier- ten Verkäufer oder Servicestelle mit der Originalrechnung oder Ausgefühl- tem Garantiezertifikat. Die Garantie gilt in allen Ländern wo das Gerät seitens Seltron, oder eines autorisierten Fachhandels verkauft wird. TECHNISCHE DATEN, STELLUNGSNAHME... - Page 39 Einhaltung vorgeschriebener normen und Standards Der Raumthermostat entspricht: Verordnung für Elektrogeräte für gebrauch Niederspannungsbereich (EC Niederspannungsdirektive (LVD) 73/23 EEC, 93/68 EEC) vorgesehen sind. Den Anforderungen für die Elektromagnetische Verträglichkeit (EMC) – (EC Direktive der Elektromagnetischen Verträglichkeit (EMC) 89/336 EEC, 92/31 EEC, 93/68 EEC). Der ST+ entspricht folgenden Standards: EN 60730-1:1995, EN60730-2-9:1997, EN 50081-1:1995, EN 50082-1:1995,...
-
Page 40: Gr Οδεγίεο Ρξήζεσο
ΕΓΥΕΙΡΙΔΙΟ ΟΔΗΓΙΩΝ ΕΓΚΑΣΑΣΑΗ & ΕΙΣΟΤΡΓΙΑ Πξηλ από ηελ εγθαηάζηαζε: 1) Γηα ηελ απνθπγή ειεθηξνπιεμίαο ,απελεξγνπνηείζηε ηελ παξνρή ξεύκαηνο ηεο ζέξκαλζή ζαο 2) Γηαβάζηε πξνζεθηηθά όιεο ηηο νδεγίεο πξηλ από ηελ εγθαηάζηαζε. 1.Εγθαηάζηαζε: 1.1 Σνπνζέηεζε ηνπ ζεξκνζηάηε Σνπνζεηείζηε ην ζεξκνζηάηε ζε θάπνηνλ από ηνπο εζσηεξηθνύο ηνίρνπο ζε... - Page 41 4. πλδέζηε, ζηηο επαθέο 1 & 3 ζην ξειέ πνπ βξίζθεηαη ζηα δεμηά ηελ θάζε θαη ηελ (Module R), επηζηξνθή πνπ αθνξά ηελ ζέξκαλζε. Πξνζνρή δελ ζπλδένπκε ζε θακία πεξίπησζε ηνλ νπδέηεξν – θίλδπλνο βξαρπθπθιώκαηνο. 5. πλδέζηε, ζηηο επαθέο 4 & 6 ηνπ αξηζηεξνύ...
- Page 42 2. Εηζαγσγή βαζηθώλ δεδνκέλσλ: Ο ζεξκνζηάηεο από ην εξγνζηάζην έρεη ήδε θάπνηεο βαζηθέο ξπζκίζεηο όπσο: 1) Η εκέξα θαη ε ώξα είλαη πξνξπζκηζκέλεο 2) Ο ζεξκνζηάηεο βξίζθεηαη ζε θαλνληθή θαηάζηαζε ιεηηνπξγίαο Γξήγνξε έμνδνο από ηελ δηαδηθαζία ξπζκίζεσλ: Κάζε θνξά πνπ ζέιεηε λα βγείηε από ηελ δηαδηθαζία ησλ δηαθόξσλ ξπζκίζεσλ...
- Page 43 3. Επηινγέο Σξόπνπ Λεηηνπξγίαο ηνπ ζεξκνζηάηε: Υεηξνθίλεηε (§3.1), Απηόκαηε βάζεη πξνγξακκάησλ (§3.2), Stand By (§3.3), Υεηξνθίλεηε Λεηηνπξγία ON/OFF BOILER (§3.4) : Γεληθά : ζα πξέπεη λα γλσξίδεηε όηη ππάξρνπλ δπν θαηαζηάζεηο ιεηηνπξγίαο ηνπ ζεξκνζηάηε ,νη νπνίεο επηιέγνληαη σο εμήο: Η Καλνληθή Καηάζηαζε ιεηηνπξγίαο κε ην ζύκβνιν , επηιέγεηαη...
- Page 44 3.1 Υεηξνθίλεηε ιεηηνπξγία: 3.1.1 Επηινγή Καλνληθήο Καηάζηαζεο ιεηηνπξγίαο Αλ ζηελ νζόλε εκθαλίδεηαη ε έλδεημε βξίζθεζηε ήδε ζε θαλνληθή θαηάζηαζε ιεηηνπξγίαο. Αλ όρη, πηέζηε ην πιήθηξν όζεο θνξέο ρξεηαζηεί κέρξη λα εκθαληζηεί ζηελ νζόλε ε έλδεημε 3.1.2 Επηινγή Οηθνλνκηθήο θαηάζηαζεο ιεηηνπξγίαο Αλ...
- Page 45 Δειαδή: ην πξόγξακκα 1 θαηαρσξείηε ηελ ώξα πνπ ζέιεηε ν ζεξκνζηάηεο θαηά ηε δηάξθεηα ηεο εκέξαο λα ελεξγνπνηεζεί γηα πξώηε θνξά ζε Καλνληθή Καηάζηαζε Λεηηνπξγίαο ην πξόγξακκα 2 θαηαρσξείηε ηελ ώξα πνπ ζέιεηε ν ζεξκνζηάηεο θαηά ηε δηάξθεηα ηεο εκέξαο λα ελεξγνπνηεζεί γηα πξώηε θνξά ζε Οηθνλνκηθή Καηάζηαζε...
- Page 46 ΟΓΗΓΙΔ ΥΡΗΔΩ...
- Page 47 Δπεηδή ην παξαπάλσ πξόγξακκα από Γεπηέξα (1) έσο Παξαζθεπή (5) είλαη ην ίδην κπνξνύκε λα ην νκαδνπνηήζνπκε ώζηε λα ην θαηαρσξήζνπκε κηα θνξά. Σν ίδην κπνξεί λα ζπκβεί θαη γηα ην αββαηνθύξηαθν (6&7). Αλ ην πξόγξακκα δελ ήηαλ ίδην ζα έπξεπε λα πξνγξακκαηίδακε ηελ θάζε κέξα...
- Page 48 8. Έπεηηα επαλαιάβαηε μαλά ηα βήκαηα από 3. έσο 6. κέρξη λα πξνγξακκαηίζεηε θαη ην Πξόγξακκα 6. 9. Γηα ην πξόγξακκα 7 & 8 μεθηλάηε θαη πάιη από ην βήκα 3. αιιά ζην βήκα 4 πηέζηε ηα πιήθηξα (+) ή (–) γηα ηελ επηινγή ηεο εκέξαο κέρξη λα...
- Page 49 3.3 Λεηηνπξγία Stand By - Η λειτοςπγία Stand Βy είλαη νπζηαζηηθά ην ιεγόκελν OFF ηνπ ζεξκνζηάηε. - Όταν ο θεπμοστάτηρ βπίσκεται σε κατάσταση Stand Βy, είλαη ελεξγνπνηεκέλε κόλν ε αληηπαγεηηθή ιεηηνπξγία. Η πξνξύζκηζε ηνπ εξγνζηαζίνπ ζηελ αληηπαγεηηθή ιεηηνπξγία είλαη νη 6 °C. 3.4 Υεηξνθίλεηε...
- Page 50 3.5 Λεηηνπξγία κε ηνλ ρξνλνδηαθόπηε γηα ην θιείζηκν ηνπ δεζηνύ λεξνύ ρξήζεο – Boiler (πξναηξεηηθό): Αλ επηζπκείηε ε ζέξκαλζε ηνπ δεζηνύ λεξνύ λα θιείζεη απηόκαηα έπεηηα από έλα ρξνληθό δηάζηεκα ν ζεξκνζηάηεο δηαζέηεη ελζσκαησκέλν ρξνλνδηαθόπηε κε ξύζκηζε απηόκαηνπ θιεηζίκαηνο κεηά από 1 έσο 12 ώξεο...
- Page 51 Direct heating circuit and d. h. w. warming Module for Module for d. h w. warming room heating ΟΓΗΓΙΔ ΥΡΗΔΩ...
- Page 52 Indirect heating circuit and d. h. w. warming Module for Module for d. h. w. warming. room heating ΟΓΗΓΙΔ ΥΡΗΔΩ...
-
Page 53: Σερληθά Ραξαθηεξηζηηθά, Δειώζεηο
Γηαζηάζεηο (d x ł x v):....72 x 32 x 112 [mm] Μάδα: ........... 150 g πκβαηόηεηα κε πξόηππα θαη θαλνληζκνύο Η Seltron d.o.o. (Δ.Π.Δ.) δειώλεη ππέπζπλα όηη ν ζεξκνζηάηεο δσκαηίνπ ST+, γηα ηνλ νπνίν ηζρύεη ε παξνύζα δήισζε, αληαπνθξίλεηαη ζηηο απαηηήζεηο ηεο εληνιήο πεξί ειεθηξηθνύ εμνπιηζκνύ, ν νπνίνο πξόθεηηαη... - Page 54 Γηα ηελ επηζθεπε εληόο ηεο εγγπεηηθήο πεξηόδνπ, παξαδσζηε ην πιήξεο πξντόλ, καδί κε ηελ απνδεημε πσιήζεσο ζην εμνπζηνδνηεκέλν θαηαζηεκα ζπληεξεζεο ή ζηνλ έκπνξν. Απηή ε εγγύεζε ηζρύεη ζε θάζε ρώξα, όπνπ ην πξντόλ παξέρεθε από ηελ εηαηξία SELTRON ή ηνλ εμνπζηνδνηεκέλν έκπνξό ηνπ. ΣΔΥΝΙΚΑ ΥΑΡΑΚΣΗΡΙΣΙΚΑ, ΓΗΛΩΔΙ...
- Page 55 Αζθαιήο απόξξηςε πξντόληνο Απόξξηςε παιαηνύ ειεθηξηθνύ θαη ειεθηξνληθνύ εμνπιηζκνύ (Ιζρύεη γηα ηα θξάηε – κέιε ηεο Δπξσπατθήο Έλσζεο θαη ηα θξάηε ηεο Δπξώπεο, ζηα νπνία ηζρύεη ην ζύζηεκα ρσξηζηήο ζπιινγήο απνξξηκάησλ) Σν ζύκβνιν απηό ζην πξντόλ ή ηε ζπζθεπαζία ζεκαίλεη όηη ην πξντόλ...
- Page 56 SELTRON d.o.o. Ruška cesta 96 2345 Bistrica ob Dravi SI - SLOVENIJA Tel: + 386 (0)2 671 96 00 Fax: + 386 (0)2 671 96 66 http://www.seltron.eu Email: info@seltron.eu v1.1r2 J5060361...
Need help?
Do you have a question about the ST+ and is the answer not in the manual?
Questions and answers