Table of Contents
Advertisement
Quick Links
Advertisement
Table of Contents

Related Manuals for Baumatic PV372SS


Summary of Contents for Baumatic PV372SS
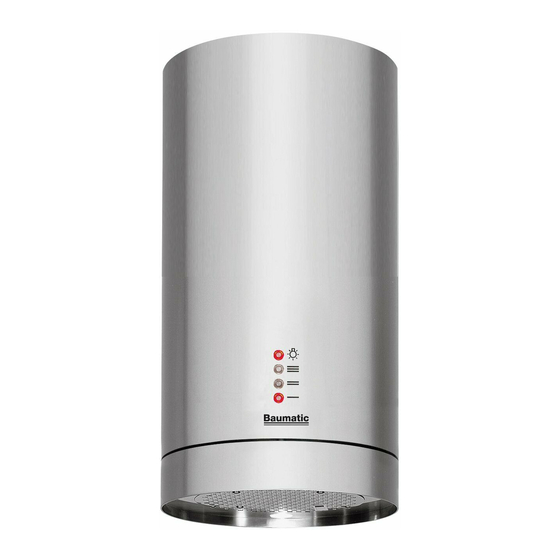
- Page 1 PV372SS 35 cm Island cooker hood...
- Page 2 User Manual for your Baumatic PV372SS 35 cm Island cooker hood NOTE : This User Instruction Manual contains important information, including safety & installation points, which will enable you to get the most out of your appliance. Please keep it in a safe place so that it is easily available for future reference;...
-
Page 3: Table Of Contents
Specifications of your cooker hood 8 – 9 Dimensions Specifications Optional extras 8 - 9 Using your Baumatic cooker hood 9 - 10 Before first use To use your cooker hood 9 - 10 Cleaning your Baumatic cooker hood 10 - 11... -
Page 4: Environmental Note
ENVIRONMENTAL NOTE Note: Before discarding an old appliance, switch off and disconnect it from the power supply. Cut off and render any plug useless. Cut the cable off directly behind the appliance to prevent misuse. This should be undertaken by a competent person. -
Page 5: Important Safety Information
IMPORTANT SAFETY INFORMATION Your safety is of the utmost importance to Baumatic. Please make sure that you read this instruction booklet before attempting to install or use the appliance. If you are unsure of any of the information contained in this booklet, please contact the Baumatic Advice Line. - Page 6 o The edges of the cooker hood are sharp – be mindful of this as you handle your appliance, especially during installation and cleaning. DO NOT CLEAN IN BEHIND THE GREASE FILTERS! o If the room where the cooker hood is to be used contains a fuel burning appliance such as a central heating boiler then its flue must be of the sealed or balanced flue type.
- Page 7 o Remember that when in extraction mode, your cooker hood is removing air from your room. Ensure that proper ventilation measures are being observed. o Note: Your cooker hood is designed to remove cooking odours from the room and not steam. o Warning - Always ensure that the cooker hood been...
-
Page 8: Specifications Of Your Cooker Hood
Specifications of your cooker hood PRODUCT DIMENSIONS Height: 950 - 1250 mm* Width: Ø 350 mm Depth: Ø 350 mm Your stainless steel cooker hood is fitted with: o High extraction tangential motor o Electronic push button control operation o 3 speeds o 1 washable stainless steel grease filter o 3 LED lights o Suitable for extraction or recirculation... -
Page 9: Using Your Baumatic Cooker Hood
DK10 3 Metre length Ducting Kit 125 mm Ø with flat channelling included. o Available from the Baumatic Spares Department. IMPORTANT: Please positioning instructions on pages 18 - 19 to obtain precise information on the height requirements for this product. -
Page 10: Cleaning Your Baumatic Cooker Hood
YOUR HOOD TEN MINUTES BEFORE YOU START TO COOK, OR AT THE VERY LEAST WHEN YOU BEGIN COOKING. YOU SHOULD ALSO RUN YOUR HOOD FOR TEN MINUTES AFTER YOU HAVE FINISHED COOKING. Cleaning your Baumatic cooker hood IMPORTANT: BEFORE CLEANING,... -
Page 11: The Grease Filter
The grease filter o Your cooker hood is fitted with a grease filter, which helps to absorb grease particles and protect your kitchen and furniture from greasy residues. o This metallic filter may become inflammable if you allow them to get saturated with this greasy residue. -
Page 12: Changing A Light Bulb
o Refit the grease filter once it has dried and then retighten the fixing screw that holds it in place. o IMPORTANT: Let the grease filter dry thoroughly before refitting it in the cooker hood. Changing a light bulb IMPORTANT: BEFORE ATTEMPTING TO CHANGE A LIGHT BULB, YOU MUST ENSURE THAT YOU HAVE DISCONNECTED THE COOKER HOOD FROM YOUR MAINS SUPPLY. - Page 13 o Use a screwdriver to remove the 6 fixing screws that hold the light board in place. o Prior to touching the light bulbs ensure that they have cooled down. o Disconnect the light wiring point (see page 20 for a line drawing of how to disconnect the light wiring point).
-
Page 14: Fitting The Carbon Filter
o Use a screwdriver to retighten the 6 fixing screws that hold the light board in place. o Refit the grease filter once it has dried and then retighten the fixing screw that holds it in place. o If the lights still do not work, make sure that the bulbs are fitted properly into their housings before you call for technical assistance. -
Page 15: Installation
3) Turn the carbon filter anticlockwise, until you feel it click into place. o Repeat this process for the second carbon filter. You need to place a carbon filter at either end of the motor. o Refit the grease filter. o The carbon filters should be replaced approximately every three months, if they show signs of damage, or if you start to notice that cooking smells are entering the kitchen through the upper... -
Page 16: Electrical Connection
Electrical connection YOUR COOKER HOOD IS INTENDED FOR FITTED AND PERMANENT INSTALLATION. o The cooker hood’s power cable must be fitted upstream from the electrical connection, using an omni-polar switch with a contact distance of at least 3 mm. THE FUSE MUST BE RATED AT 3 AMPS. -
Page 17: Before Beginning Installation
Before beginning installation o Check that the product purchased is of a suitable size for the chosen installation area. In addition check whether there is an electrical socket available that will be accessible once the hood is mounted. If the product is going to be used in extraction mode, then there should also be space to connect a ducting hose to the outside. -
Page 18: Positioning
Positioning Height of the appliance Total height of the kitchen Height of the worktop Distance between the hob and the hood 7 cm = Height of the hood canopy o To work out the height of the appliance, you need to use the following formula: X = A –... -
Page 19: Installing Your Cooker Hood
If you are using the appliance in recirculation mode, then PLEASE NOTE that some of the vent in the upper chimney section must be exposed. You will have to take this into account when calculating the minimum height of the cooker hood when installed. -
Page 20: Installing The Glass Canopy
Installing the glass canopy (optional extra) o Carefully turn appliance upside down, so that the grease filter is pointing upwards to the ceiling. o Remove the fixing screw that holds the grease filter in place and then pull away the grease filter from the cooker hood. o Use a screwdriver to remove the 6 fixing screws that hold the base of the cooker hood in po... - Page 21 o Carefully lift glass canopy towards the main body of the hood. o Carefully locate the glass canopy over the main body of the hood. o Push together the wires inside of the light wiring point. Retighten the screws for the light wiring point inside of the cooker hood. o Place the base of the cooker hood back onto the main body of the hood.
-
Page 22: Supplied Installation Components
o Use a screwdriver to retighten the 6 fixing screws that hold the base of the cooker hood in position. o IMPORTANT: These screws MUST be fully tightened. Supplied installation components Fixing the cooker hood to the ceiling 1) Position the hanging plate on the ceiling and then mark the position of the screw holes. - Page 23 o The hanging plate should be securely fixed to the ceiling, using the 40 mm x ST6 screws (9 pcs) and wall plugs. o Depending on the surface of the ceiling that you are fixing the hanging plate to, you may need to use six expansion bolts (for concrete).
- Page 24 4) Locate the holes on the top of the main body of the cooker hood that you fix the connector pieces and angle bars to. o The positions of the holes are indicated in the line drawing opposite. 5) Use the 10 mm x M4 nuts and bolts with metal washers (6 pcs) to secure the main body of the hood to the angle bars.
- Page 25 5) Lift the main body of the cooker hood towards the hanging plate. o If you are going to be using hood extraction mode, you should feed the ducting hose through the hole in the ceiling that you made in step 1. The ducting hose should be connected to your external ducting at this stage.
-
Page 26: Completing The Installation
Completing the installation o The electrical connection must correspond to the electrical requirement noted on the rating plate, which is placed inside the cooker hood. The appliance should now be connected to the electrical supply. See page 16 for detailed information on the electrical connection. -
Page 27: Troubleshooting
1 metre. Troubleshooting IMPORTANT: If your cooker hood appears not to be operating properly, before contacting Baumatic Customer Care, please refer to the checklist below. My cooker hood will not start. o Check that the hood is connected to the electricity supply o Check that the fan speed control is set correctly. - Page 28 Or any installation other than the one specified by Baumatic Ltd. has been completed. Please refer to the conditions of guarantee that appear on the...
-
Page 29: Contact Details
Czech Republic United Kingdom Baumatic CR s.r.o. Baumatic Ltd., Lípová 665 Baumatic Buildings, 460 01 Liberec 4 6 Bennet Road, Czech Republic Reading, Berkshire RG2 0QX +420 483 577 200 United Kingdom www.baumatic.cz Sales Telephone (0118) 933 6900 Slovakia Sales Fax Baumatic Slovakia, s.r.o.
Need help?
Do you have a question about the PV372SS and is the answer not in the manual?
Questions and answers
How do I remove the carbon filters please