Table of Contents
Advertisement
Quick Links
MSR4115
Owner's Manual
featuring
MSR4115
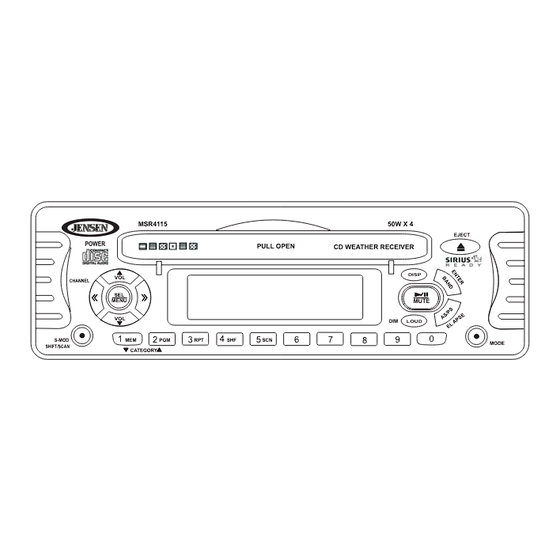
POWER
PULL OPEN
VOL
CHANNEL
SEL
MENU
VOL
1
4
S-MOD
MEM
2
PGM
3
RPT
SHF
5
SCN
SHIFT/SCAN
CATEGORY
ASA Electronics Corporation
www.asaelectronics.com
© 2005 ASA Electronics Corporation
v.103105
50W X 4
EJECT
CD WEATHER RECEIVER
DISP
MUTE
DIM
LOUD
6
7
9
0
8
MODE
Thank You!
Thank you for choosing a Jensen product. We hope you will find the instructions in this owner's
manual clear and easy to follow. If you take a few minutes to look through it, you'll learn how to
use all the features of your new Jensen receiver for maximum enjoyment.
System Features . . . . . . . . . . . . . . . . . . . . . . . . . . . . . . . . . . . . . . . . . . . . . . . . . . . . . . . . . . 1
Preparation . . . . . . . . . . . . . . . . . . . . . . . . . . . . . . . . . . . . . . . . . . . . . . . . . . . . . . . . . . . . . . 3
Installation . . . . . . . . . . . . . . . . . . . . . . . . . . . . . . . . . . . . . . . . . . . . . . . . . . . . . . . . . . . . . . . 4
Wiring . . . . . . . . . . . . . . . . . . . . . . . . . . . . . . . . . . . . . . . . . . . . . . . . . . . . . . . . . . . . . . . . . . . 5
Basic Operation. . . . . . . . . . . . . . . . . . . . . . . . . . . . . . . . . . . . . . . . . . . . . . . . . . . . . . . . . . . 6
Radio Operation . . . . . . . . . . . . . . . . . . . . . . . . . . . . . . . . . . . . . . . . . . . . . . . . . . . . . . . . . . 9
Sirius Operation . . . . . . . . . . . . . . . . . . . . . . . . . . . . . . . . . . . . . . . . . . . . . . . . . . . . . . . . . . 11
CD Player Operation . . . . . . . . . . . . . . . . . . . . . . . . . . . . . . . . . . . . . . . . . . . . . . . . . . . . . . . 13
CD Changer Operation . . . . . . . . . . . . . . . . . . . . . . . . . . . . . . . . . . . . . . . . . . . . . . . . . . . . . 15
Remote Control . . . . . . . . . . . . . . . . . . . . . . . . . . . . . . . . . . . . . . . . . . . . . . . . . . . . . . . . . . . 15
Troubleshooting . . . . . . . . . . . . . . . . . . . . . . . . . . . . . . . . . . . . . . . . . . . . . . . . . . . . . . . . . . 16
Specifications . . . . . . . . . . . . . . . . . . . . . . . . . . . . . . . . . . . . . . . . . . . . . . . . . . . . . . . . . . . . 16
System Features
Features of the Jensen MSR4115 mobile audio system include:
•
PLL Synthesizer Stereo Radio
•
Sirius-Ready Satellite Radio Function
•
Automatic Memory Storing
•
Digital Compact Disc Player
•
Direct Track Access
•
Program CD Tracks
•
CD Changer Control
•
Auxiliary Input Function
•
Wired Commander Control
Advertisement
Table of Contents

Related Manuals for Jensen SIRIUS MSR4115


Summary of Contents for Jensen SIRIUS MSR4115
- Page 1 Thank You! Thank you for choosing a Jensen product. We hope you will find the instructions in this owner’s manual clear and easy to follow. If you take a few minutes to look through it, you’ll learn how to use all the features of your new Jensen receiver for maximum enjoyment.
-
Page 2: Table Of Contents
Guide d'Utilisateur Merci! Merci d'avoir choisi un produit Jensen. Nous espérons que vous allez trouver les instructions dans ce guide de propriétaire claires et faciles à suivre. Prenez quelques minutes à le consulter, vous apprendrez à utiliser toutes les fonctions de radio Jensen pour en tirer une jouissance maximum. -
Page 3: Préparation
MSR4115 Preparation Tools and Supplies The following tools and supplies are needed to install the unit. • Torx type, Flat and Phillips screwdrivers • Wire cutters and strippers • Tools to remove existing radio (screwdriver, socket wrench set or other tools) •... -
Page 4: Disp
Installation Disconnect Battery Before you begin, turn off the vehicle ignition and disconnect the battery negative terminal. Remove Screws Remove the two screws from the top of the unit, and seal the holes with the plastic film provided to ensure that no water is able to enter the unit. Installing the Unit Affix the supplied mounting paper to the... -
Page 5: Wiring
MSR4115 Wiring The wiring diagram depicts all the wiring connections required for operation of the unit. Cableado El diagrama de cableado describe todas las conexiones necesarias para el funcionamiento de la unidad. Câblage Le schéma du câblage dépeint tous les branchements de câble exigés pour l'opération de l'appareil. -
Page 6: Basic Operation
Basic Operation 1. Power Press the power button (1) or any other button on the front of the radio (except the eject button) to turn the unit on. The unit will turn on to the mode that was in use when it was last powered down. -
Page 7: Menu Operation
MSR4115 Basic Operation (continued) 6. Menu Operation Press SEL/MENU for more than three seconds to access the menu feature. Once this feature is activated, press VOL or VOL to step through the available menu options. When the desired option appears in the display, press SEL/MENU for more than three seconds to access the corresponding sub-menu, and use the VOL or VOL buttons to change the setting, if desired. - Page 8 Basic Operation (continued) 7. Illumination Press DIM (7) for more than two seconds to adjust the brightness of the LCD backlight. 8. Loudness Press LOUD (8) momentarily to reinforce the bass output. “LOUD” will appear in the display. Press LOUD again to deactivate this feature. 9.
-
Page 9: Radio Operation
MSR4115 Radio Operation 13. Select a Band Press BAND (13) to change between three FM bands, two AM bands and the weather band. 14. Tuning Seek Tuning Press CHANNEL << (14a) or CHANNEL >> (14b) momentarily, and the unit will automatically tune to the next strong station. - Page 10 Radio Operation (continued) 16. Automatically Store / Preset Scan Automatically Store To automatically select ten strong stations and store them in the current band, select a band (if needed) and press AS/PS (16) for more than three seconds. The 10 strongest stations are stored as presets, replacing any preset stations already stored in that band.
-
Page 11: Eject
MSR4115 Sirius Satellite Radio Operation 19. User Preset Channel Selection While in Sirius mode, navigate the three options in the user-preset channel group by momentarily pressing BAND/ENTER (19). User preset channels include SR1, SR2 and SR3. 20. User Preset Channel Search Press AS/PS (20) to search for each user preset channel from SR1 to SR2 to SR3 and stop at each available channel for five seconds. - Page 12 Sirius Satellite Radio Operation (continued) Category Tune To search the available music categories, access category mode and press CATEGORY CATEGORY (23c) to scroll through the available category options. When the desired category is found, search for a specific channel by momentarily pressing CHANNEL << or CHANNEL >>. When the desired channel is found, press BAND/ENTER to access the channel.
-
Page 13: Cd Player Operation
MSR4115 CD Player Operation 24. Display Disc Slot Display the disc slot by pressing the hook (24) of the plastic disc cover then pulling it down slightly to open the cover and expose the disc slot. 25. Insert and Eject CD Insert a CD label-side up into the CD slot, and the disc will begin to play. - Page 14 CD Player Operation (continued) 29. Repeat (RPT) Press and hold RPT (29) for more than three seconds during disc play to continuously repeat the selected track. Press and hold RPT again to stop repeating. 30. Random Shuffle (SHF) Press and hold SHF (30) for more than three seconds during disc play to play all tracks on a CD in random, shuffled order.
-
Page 15: Cd Changer Operation
MSR4115 CD Changer Operation Refer to the owner’s manual included with the CD changer for instructions on installing, loading and using the CD magazine. When accessing CDC mode, disc play will begin with the first CD that the unit detects, and the disc and track numbers will be shown in the display. 34. -
Page 16: Troubleshooting
Troubleshooting Problem Cause No power. Vehicle ignition switch is not The fuse is blown. Disc cannot be loaded There is a disc already inside or ejected. the unit. Inserting disc in wrong direction. Disc is defective or dirty. Excessive temperature. Condensation has collected. -
Page 17: Disp
MSR4115 Corrección de Problemas Problema Causa No hay corriente. La llave de la ignición del vehículo está apagada. El fusible está quemado. El disco no se puede Hay un disco en la unidad. introducir ni quitar. Insertó el disco en la dirección equiv- ocada. -
Page 18: Disp
Dépannage Problème Cause Pas de puissance L'allumage du véhicule n'est pas en marche Le fusible a sauté Disque ne peut pas Il y a déjà un disque à l'intérieur de être chargé ou éjecté l'appareil Insertion du disque dans le mauvais sens Disque est défectueux ou sale Température excessive dans le véhi-...
Need help?
Do you have a question about the SIRIUS MSR4115 and is the answer not in the manual?
Questions and answers