
Related Manuals for X-TREME XMB-420


Summary of Contents for X-TREME XMB-420
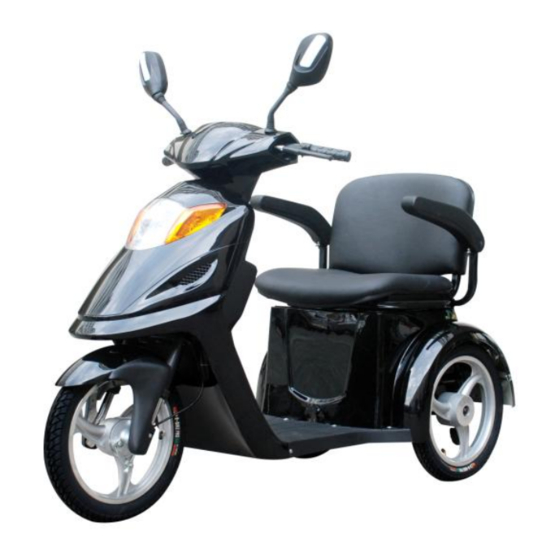
- Page 1 X-Treme™ Electric Scooters XMB-420 Electric Mobility Scooter Read this manual completely before riding.
-
Page 2: Important Information
IMPORTANT! BATTERY MAINTENANCE and CHARGING INSTRUCTIONS You MUST charge completely prior to initial use. (Follow charging instructions in your Product Handbook) Charge immediately after each use. Charge before storage. You must charge every 30 days if not in use. Charge the unit for 6-8 hours or until the light on the charger turns red & green. DO NOT allow this unit to deep discharge the battery. - Page 3 IMPORTANT PLEASE READ THIS BEFORE USING THIS PRODUCT READ THIS FIRST! WARNING This product does not conform to Federal Motor Vehicle Standards and is not intended for operation on public streets, roads or highways. Serious injury can result from the unsafe operations of this product. Operator can minimize these risks by using certain safety equipment such as: safety helmet, goggles, gloves, elbow and kneepads and appropriate footwear.
-
Page 4: Quick Reference Safety Guide
QUICK REFERENCE SAFETY GUIDE SAFETY GUIDE The recommended minimum age for riding this scooter is 16 years old. To avoid damage to the motor and footplate, do not overload the scooter. Never ride with more than one person. ... - Page 5 DO NOT RETURN TO STORE! Do not use this vehicle for the first time until you have inflated the tires to the correct PSI and completely charged the battery. Failure to follow these instructions may damage your vehicle and void your warranty. If you need Help CALL OR GO ONLINE 1-253-777-0690...
-
Page 6: Table Of Contents
Operating Reminders and Suggestions………………………………. 8 Wet Weather Riding………………………………………………….. 8-9 Night Riding………………………………………………………….. 9 Other Reminders……………………………………………………… 9 Specifications……………………………………………………………… 10 Getting To Know Your XMB-420…………………………………………. 11-13 Assembly and Set-Up……………………………………………………… 14 Routine Operation…………………………………………………………. 15 Pre-Ride Check………………………………………………………. 15 Steps To Startup……………………………………………………... 15 Battery Care and Maintenance……………………………………………. 16-18 What To Expect of Your Batteries, Ideally……………………………... -
Page 7: Riding Safety
“Pop a Wheelie” when the throttle is engaged. Use caution! Like any sport, cycling carries the risk of injury and damage. By choosing to ride the XMB-420, you assume all responsibility for these risks. Thus, you need to know and practice the rules of safe and responsible riding. -
Page 8: Operating Reminders And Suggestions
Never hitch a ride by holding on to another vehicle. Never ride your XMB-420 while under the influence of alcohol or other drugs. If possible, avoid riding in bad weather, when visibility is obscured, at dusk or in the dark, or when you are very tired. -
Page 9: Night Riding
Ride at night only if necessary. Slow down and use familiar roads with street lighting, if possible. Other Reminders The XMB-420 works best on level ground. Use caution while going down an incline, such as a hill or a ramp. Hill climbing and repeated acceleration/braking will exhaust the battery much more rapidly. -
Page 10: Specifications
SPECIFICATIONS Battery Voltage 24Volt Dc,20Ah Motor Wattage 400w Wheel Size 16”*2.6 Top Speed 15km/h Charging Time 4-8h Distance of full charge 50km 15° Grade ability Max rider weight 150kgs Left and Right Indicators Rear View mirrors... -
Page 11: Getting To Know Your Xmb-420
Getting To Know Your XMB-420 1. Battery Storage Access (Tilt Seat Forward) – (4) 12V24Ah Batteries Total 2. Seat Recline Adjuster 3. Drop-Down Arm Rests 4. Forward/Reverse Switch 5. Instrument Panel 6. Throttle 7. Brake Lever 8. Ignition Switch Figure 1 On/Off Power Switch Position 1 –... - Page 12 Figure 2 Hi/Low Speed Switch Position 1 – Low Speed Position 2 – Hi Speed Figure 3 When you are seated on your scooter, you will see these switches on the right side of the handlebars. A. Light Switch Position 1 – Lights Off Position 2 –...
- Page 13 Figure 5 Figure 6 The circuit breaker switch (Figure 6) can be located underneath the seat in the seat barrel compartment (Figure 5). While the operating current exceeds the rated current, the circuit breaker would cut the current, but with this circuit breaker switch you can reconnect the current.
-
Page 14: Assembly And Setup
ASSEMBLY AND SETUP 1) With the cardboard, steel frame top & sides, and packing material removed you are ready to begin assembly. The tools needed for setup are included in the XMB-420 tool kit (located in the compartment under the seat). -
Page 15: Routine Operation
3) Verify the front and rear brakes are proper adjusted. 4) Make sure the XMB-420 is in good mechanical order. Visually inspect and hand-check the vehicle, and snug any loose bolts, screws, and electrical terminals. -
Page 16: Battery Care And Maintenance
Always try to recharge the Battery Pack within 24 hours after use to maximize battery cycle life and prevent damage. What’s Inside Your XMB-420’s Battery The Battery is composed of four 12 Volt, 24 Amp-hour capacity batteries, in series, for a total capacity of 48 Volt 24 Ah. -
Page 17: Battery Temperature Sensitivity
When the air temperature is under 0 ºF, the battery power will decline more than one third. So it is natural that the XMB-420 will not reach its normal mileage in winter or in cold weather. When the air temperature is up to 68 ºF, the XMB-420 will achieve its normal range capability. - Page 18 **IMPORTANT** The electric bike is powered by four 12V/24Ah batteries wired in series to provide 48 volts of potential. All batteries charge simultaneously. You should charge your XMB-420 after each ride. You should charge your XMB-420 if it has not been used for 30 days or more.
-
Page 19: Other Maintenance
If you are not comfortable with undertaking this operation, you can ask your servicing dealer or mechanic to change it. Fuse The XMB-420 comes with one 10A Glass Fuse. The fuse is located under the headlight fairing. Lubrication You should inspect and maintain your XMB-420 and lubricate the mechanical power transmission components. -
Page 20: Scheduled Maintenance
Scheduled Maintenance XMB-420 should be checked from time to time. Refer to the maintenance schedule in the following chart: Check ● adjust ◆ change ▲ lubricate ■ Parts daily days days ● ● ◆ ● ■ Bolts, nuts, screws, etc-to ensure that nothing is loose. -
Page 21: Troubleshooting Guide
TROUBLESHOOTING GUIDE Problem Cause Solution Battery gauge does not 1. Loose connection near the power Check the connections, reconnecting register anything when switch or battery pack. any that are loose. vehicle is on. 2. Battery is completely discharged. 2. Charge the battery. 1. - Page 22 DO NOT RETURN TO STORE! Do not use this vehicle for the first time until you have inflated the tires to the correct PSI and completely charged the battery. Failure to follow these instructions may damage your vehicle and void your warranty. If you need Help CALL OR GO ONLINE 1-253-777-0690...
Need help?
Do you have a question about the XMB-420 and is the answer not in the manual?
Questions and answers