Table of Contents
Advertisement
Quick Links
Advertisement
Table of Contents

Related Manuals for MSI WindBOX Series


Summary of Contents for MSI WindBOX Series
- Page 1 WindBOX Series G52-9A151X1...
-
Page 2: Copyright Notice
If a problem arises with your system and no solution can be obtained from the user’s manual, please contact your place of purchase or local distributor. Alternatively, please try the following help resources for further guidance. Visit the MSI website for FAQ, technical guide, BIOS updates, driver up- dates and other information: http://global.msi.com.tw/index.php? func=service... -
Page 3: Safety Instructions
Safety Instructions Always read the safety instructions carefully. Keep this user’s manual for future reference. Keep this equipment away from humidity. Lay this equipment on a reliable flat surface before setting it up. The openings on the enclosure are for air convection hence protects the equipment from overheating. -
Page 4: Fcc-B Radio Frequency Interference Statement
VOIR LA NOTICE D’INSTALLATION AVANT DE RACCORDER AU RESEAU. Micro-Star International WindBOX Series This device complies with Part 15 of the FCC Rules. Operation is subject to the following two conditions: (1) this device may not cause harmful interference, and (2) this device must accept any interference received, including interference that may cause undesired operation. -
Page 5: Weee (Waste Electrical And Electronic Equipment) Statement
WEEE (Waste Electrical and Electronic Equipment) Statement... -
Page 8: Table Of Contents
CONTENTS Copyright Notice ................... ii Trademarks ....................ii U.S. Patent Numbers ..................ii Revision History ................... ii Technical Support ..................ii Safety Instruction ..................iii FCC-B Radio Frequency Interference Statement ........iv WEEE (Waste Electrical and Electronic Equipment) Statement ....v Chapter 1 Getting Started ................ -
Page 9: Chapter 1 Getting Started
Getting Started Chapter 1 Getting Started Congratulations for purchasing the WindBOX. This is your best choice for slim system. It can easily be set anywhere. The feature packed platform also gives you an exciting PC experience. -
Page 10: System Specifications
WindBOX Series System Specifications Processor - Intel Atom processor N270 ® - Front Side Bus (FSB) 533 MHz - Thermal Design Power (TDP) 2.5 W - Highest Frequency Mode (HFM) 1.6 GHz - Lowest Frequency Mode (LFM) 800 MHz Chipset... -
Page 11: Power Supply
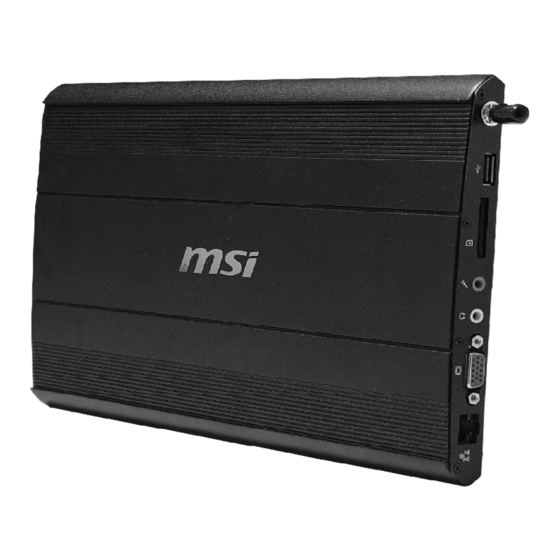
Getting Started Input/ Output (I/O) - 3 USB 2.0 ports - 1 Headphone / speaker connector (3.5mm) - 1 Mic connector (3.5mm) - 1 VGA connector - 1 RJ-45 LAN jack (by Realtek RTL8185E) - 1 3-in-l card reader (SD/MMC/MS) - 1 DC jack - 1 SMA connector for WLAN antenna Power Supply... -
Page 12: System Outlooks
WindBOX Series System Outlooks Right Side View Left Side View RJ-45 Connector The connector is used to connect a LAN cable for network connection. VGA Port The 15-pin-D-sub VGA port allows you to connect an external monitor or other standard VGA-compatible device (such as a projector) for a great view of the computer display. - Page 13 Getting Started Antenna Connector The connector allows you to connect an external antenna for wireless LAN. Kensington Lock This system provides a Kensington Lock hole, which allows users to secure the system in place with a key or some mechanical PIN device and attached through a rubberised metal cable.
-
Page 14: Packing Contents
WindBOX Series Packing Contents WindBOX Power Adapter Power Cord Back Mount Package User Manual Driv er CD WLAN Antenna * Please contact us immediately if any of the item is damaged or missing. * The picture is for your reference only and your packing contents may slightly vary... -
Page 15: Chapter 2 System Assembly
System Assembly Chapter 2 System Assembly This chapter provides you with the information about system assemb l y p roced u res. Wh il e d oin g th e installation, be careful in holding the components and follow the installation procedures. Use a grounded wrist strap before handling computer comp on en ts. -
Page 16: Necessary Tools
WindBOX Series Necessary Tools Cross type screwdriver, can be used to do most of the installation. Choose one with a magnetic head would be better. Rubber gloves, can prevent yourself from suffering the static charge. Assembly Procedures Important Choose the LCD less than 5.8 Kg for keeping the weight balance; otherwise, it may cause fall or related hazard. - Page 17 System Assembly 3. Hang the system on the back mount plate. 4. The screw on the bottom of the back mount plate can be used to fasten the system. 5. Remove the protector from the WLAN antenna connector. 6. Install the attached WLAN antenna.
- Page 18 WindBOX Series 7. Connect the VGA cable between the system and the LCD. 8. Connect the adaptor the the system. 9. Turn on the system and enjoy it.
Need help?
Do you have a question about the WindBOX Series and is the answer not in the manual?
Questions and answers