Hamilton Beach Electric Kettle Instructions
Hide thumbs
Also See for Electric Kettle:
- Instructions (1 page) ,
- Instructions (2 pages) ,
- Instuctions (2 pages)
Advertisement
Quick Links
Download this manual
See also:
Instructions
9. Do not let cord hang over edge of table or counter or
touch hot surfaces, including the stove.
10. Do not place electric kettle on or near a hot gas or electric
burner or in a heated oven.
11. To disconnect electric kettle, turn any control to OFF (O)
and then remove plug from wall outlet. Never pull on cord
as this may damage the cord and eventually cause electric
shock.
12. Do not use appliance for other than intended use.
13. Do not use for other than heating water. Other liquids
or food will contaminate the interior and void warranty.
14. Do not allow kettle to boil dry.
15. To avoid circuit overload, do not operate another high-
wattage appliance on the same circuit.
16. Scalding may occur if the lid is opened during the
heating cycle.
17. Be certain kettle lid is securely in place during operation
and when pouring hot water. Do not use force when
placing lid on kettle.
SAVE THESE INSTRUCTIONS!
Other consumer safety information
This appliance is intended for household use only.
WARNING! Shock Hazard: This product is provided with either
a polarized (one wide blade) or grounded (3-prong) plug to
reduce the risk of electric shock. The plug fits only one way
into a polarized or grounded outlet. Do not defeat the safety
Electric Kettle
purpose of the plug by modifying the plug in any way or by
using an adapter. If the plug does not fit fully into the outlet,
Bouilloire électrique
reverse the plug. If it still does not fit, have an electrician
replace the outlet.
Hervidor Eléctrico
The length of the cord used on this appliance was selected
Le invitamos a leer cuidadosamente este instructivo
to reduce the hazards of becoming tangled in or tripping over
antes de usar su aparato.
a longer cord. If a longer cord is necessary, an approved
extension cord may be used. The electrical rating of the
extension cord must be equal to or greater than the rating of
the appliance. If the appliance is of the grounded type, the
Read before use.
extension cord should be a grounding-type, 3-wire cord. Care
Lire avant utilisation.
must be taken to arrange the extension cord so that it will not
Lea antes de usar.
drape over the countertop or tabletop where it can be pulled
on by children or accidentally tripped over.
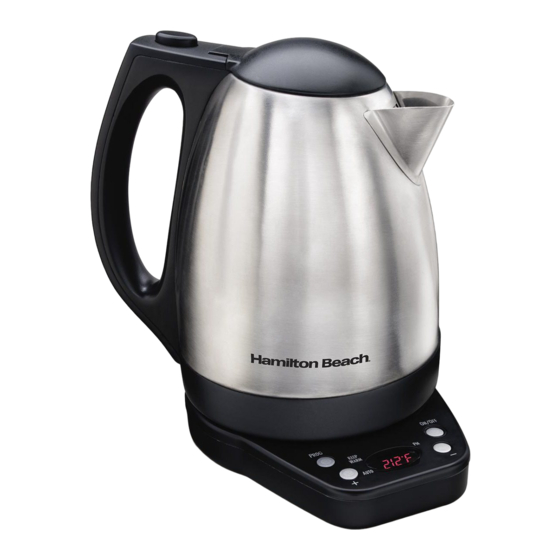
Parts and features
In an effort to reduce paper waste, Hamilton Beach Brands,
Inc., has reduced the size of this Use and Care guide and
made it available online. We believe strongly in doing our
part to help care for the environment. To view Use and Care
guides, recipes, and tips, please visit:
hamiltonbeach.com
Aidez-nous à protéger l'environnement !
Dans le but de réduire la consommation de papier,
Hamilton Beach Brands, Inc., a réduit le format des
1. Push-Button Lid
manuels d'utilisation et d'entretien et offre maintenant la
version complète en ligne. Nous croyons fermement que
2. Removable
nous contribuons à sauvegarder l'environnement. Pour voir
Anti-Scale Mesh
les manuels d'utilisation et d'entretien, les recettes et les
Filter (inside spout)
conseils, veuillez consulter le site :
hamiltonbeach.ca
¡Ayude a Hamilton Beach a Hacer la Diferencia!
En un esfuerzo por reducir el papel de desecho, Hamilton
Beach Brands, Inc., ha reducido el tamaño de este Uso y
Cuidado y lo puso disponible en línea. Creemos
fuertemente en hacer nuestra parte para ayudar a cuidar el
medioambiente. Para ver guías de Uso y Cuidado, recetas y
consejos, por favor visite:
hamiltonbeach.com.mx
USA: 1.800.851.8900
Canada: 1.800.267.2826
México: 01.800.71.16.100
How to use the kettle
IMPORTANT SAFEGUARDS
w WARNING
When using electric appliances, basic safety precautions
BEFORE FIRST USE: Flip open lid and fill kettle with water to
should always be followed, including the following:
the MAX fill line on the water level window. Press ON/OFF
1. Read all instructions.
(I/O) button to turn the kettle ON (I). The kettle will bring the
2. Do not touch hot surfaces or hot water. Use handles or
water to a boil, then shut off automatically. Discard water and
knobs. Care must be taken since burns can occur from
repeat 2–3 times, rinsing out the kettle each time. The kettle
touching hot parts or from spilled hot liquid.
is now ready for use.
3. To protect against fire, electric shock, and personal injury,
1. Remove kettle from power base before filling.
do not immerse cord, plug, power base, or electric kettle
2. Fill kettle with required amount of water. Ensure that
in water or other liquid.
water level is between 0.5 L and MAX on the water level
4. Close supervision is necessary when any appliance
window. Always keep mesh filter in place.
is used by or near children.
3. Make sure the lid is closed and the power base is on a
5. Unplug from outlet when not in use and before cleaning.
level surface.
Allow to cool before putting on or taking off parts and
4. Plug into outlet and turn ON (I). The lighted switch
before cleaning.
indicates that the kettle is ON. Current water temperature
6. Do not operate any appliance with a damaged cord or
is shown on the display.
plug, or after the appliance malfunctions or is dropped or
5. Set desired water temperature (see "Programming water
damaged in any manner. Call our toll-free customer
temperature" section) or just let kettle bring water to a boil
assistance number for information on examination, repair,
(212°F/100°C).
or adjustment.
6. The 60-minute Keep Warm cycle will begin and the Keep
7. The use of accessory attachments not recommended by
Warm/
the manufacturer may result in fire, electric shock, or
the desired temperature. The current water temperature
personal injury.
and remaining Keep Warm time will alternate in the
8. Do not use outdoors.
display. (Remember, the surface of the kettle gets hot;
take care─only grip the kettle by the handle).
840209600
How to use the kettle
7. After 1 hour, the ON (I) light turns off, the Keep Warm/
light turns off, and the current water temperature is
displayed.
8. The kettle may be left on the base once water is heated,
but it is recommended to turn OFF (O) the kettle and
unplug the cord from the outlet. When finished, make sure
cord is unplugged and empty any water from the kettle.
NOTE: Only use kettle to heat water. If kettle is used to heat
other liquids, such as coffee or tea, the warranty will be voided.
Change from Fahrenheit to Celsius
Press the + and – buttons at the same time to show the water
temperature in °C. Press + and – buttons again to show °F.
Programming water temperature
To choose a preprogrammed water temperature:
1. Press the PROG button repeatedly until the temperature
you desire shows on the display; then release button.
Starting at 212°F/100°C, several preset temperatures
will cycle through the display.
To set a custom water temperature:
1. To set a custom water temperature, press the PROG
button to see the current temperature setting. Press the
+ or – buttons to change the desired temperature in
5°F/2–3°C increments and then release.
NOTE: 150°F/65°C is the minimum temperature that can be
programmed.
Setting clock time
To set the clock:
1. Plug in kettle.
2. To set the time of day, press and hold the + button for
several seconds to set the current hour. For PM, the PM
indicator light will illuminate.
3. Press the + or – buttons for less than 1 second to change
the time in minutes until you reach the current time.
NOTES: If the + or – buttons are not pressed again within
3 seconds, then the kettle displays the current water
temperature. Clock time must be set for the AUTO ON
function to work.
Programming AUTO ON
To set and use AUTO ON:
1. Make sure clock is set for the correct time of day.
2. Fill kettle with desired amount of water and place on
power base.
3. Press and hold PROG and + to display 19:99 or the last
programmed time.
4. Use + and – buttons to set the AUTO ON time.
5. Momentarily press PROG and ON/OFF (I/O) at the same
time to set the kettle to turn on automatically at the
desired time.
6. Momentarily press the PROG button again to cancel AUTO
ON.
7. Momentarily press the ON (I) button to cancel AUTO ON
and begin heating.
NOTE: You cannot set the AUTO ON function if the clock has
not been set.
If Kettle Floor Discolors: It is normal for stainless steel
heating elements to discolor. This does not affect the
performance of the kettle. Do not use abrasive scouring pads
or cleaners since this may damage the stainless steel
surface.
3. Power Base
4. Control Panel/
If Kettle Boils Dry: The heating element is protected by two
Display
automatic safety devices. If your kettle is accidentally
switched on without being filled with water, or is allowed to
5. Water Level Window
boil dry, the kettle will automatically switch off. You should:
• Press ON/OFF (I/O) button to turn OFF (O), unplug, and
wait about 20 minutes for the element to cool down.
Control Panel/Display
• Refill the kettle; then use as normal and check that the
kettle functions correctly.
If Kettle Does Not Work: Make these simple checks before
calling the toll-free customer assistance number:
• Have you pressed the ON/OFF (I/O) button to ON (l)
position?
• If the kettle heats but does not boil, it might need descaling
(see "Care and cleaning" section).
• Has the kettle been accidentally turned on without being
filled with water or allowed to boil dry? Press the ON/OFF
(I/O) button to OFF (O), wait 20 minutes, and try again.
• Is cord firmly plugged into the outlet and kettle firmly seated
Burn Hazard. Do not overfill kettle. Boiling
in the base?
water may spit out of the spout.
Anti-Scale Mesh Filter: Scale is caused by lime and calcium
in hard water. The mesh filter will prevent these suspended
particles from being poured out of the kettle. The filter should be
cleaned periodically to ensure optimum performance. To clean
the filter, unplug kettle and allow to cool. The mesh filter may be
removed by pressing down on filter tab, which is visible through
the kettle opening, and pushing it towards the spout and sliding
the filter up. Rinse filter under running water and brush with a
soft brush. An old, clean toothbrush works well. To replace the
mesh filter, slide the filter down into the spout and press down
on the filter tab. Push the filter back until the filter tab latches
into the kettle opening.
Filter Tab
light will illuminate when the water has reached
(cont.)
Tea Guide
• Bring filtered or good-tasting tap water to a boil in the
kettle. Use 6 ounces (180 ml) of water per cup of tea.
• If using loose tea instead of tea bags, measure 1 rounded
teaspoon of tea per cup into an infuser and place the infuser
in the cup. If no infuser is available, put the tea directly into
the cup.
• Pour heated water directly over the tea. For stronger tea,
add more leaves rather than infusing longer than is
recommended.
NOTE: Tea that is oversteeped will become bitter.
NOTE: These temperature settings can vary depending on a
number of factors, such as altitude, impurities in the water,
and the amount of water in the kettle.
Care and cleaning
Electric Shock Hazard. Do not immerse
w WARNING
kettle, power base, or plug in water or any
other liquid.
1. With kettle unplugged, empty any remaining water
and rinse. Allow kettle to cool. The mesh filter may
be removed by pressing on filter tab, which is visible
through the kettle opening. The filter will drop into the
kettle cavity.
2. To replace the filter in the spout, position the filter with
tabs toward spout and press filter until it fits into place.
3. To avoid scale/lime deposit buildup, empty kettle after
each use. To remove discoloration or scale/lime deposit
from heating element: Place 1/2 teaspoon (2.5 ml) cream
of tartar (available in the spice aisle of grocery store) into
the kettle. Then fill the kettle 1/2 full with water. Plug in,
turn ON (I), and bring to boil. Turn OFF (O), let cool, and
rinse several times with clean tap water.
4. Wipe the exterior of kettle with a damp cloth. Do not
use abrasive scouring pads or powders since they
may scratch the smooth surface of the kettle.
Limited warranty
This warranty applies to products purchased and used in the
U.S. and Canada. This is the only express warranty for this
product and is in lieu of any other warranty or condition.
This product is warranted to be free from defects in material
and workmanship for a period of one (1) year from the date of
original purchase. During this period, your exclusive remedy is
repair or replacement of this product or any component found
to be defective, at our option; however, you are responsible for
all costs associated with returning the product to us and our
returning a product or component under this warranty to you.
If the product or component is no longer available, we will
replace with a similar one of equal or greater value.
This warranty does not cover glass, filters, wear from normal
use, use not in conformity with the printed directions, or
damage to the product resulting from accident, alteration,
abuse, or misuse. This warranty extends only to the original
consumer purchaser or gift recipient. Keep the original sales
receipt, as proof of purchase is required to make a warranty
claim. This warranty is void if the product is used for other
than single-family household use or subjected to any voltage
and waveform other than as specified on the rating label
(e.g., 120V ~ 60 Hz).
We exclude all claims for special, incidental, and consequential
damages caused by breach of express or implied warranty. All
liability is limited to the amount of the purchase price. Every
implied warranty, including any statutory warranty or
condition of merchantability or fitness for a particular
purpose, is disclaimed except to the extent prohibited by
law, in which case such warranty or condition is limited to
the duration of this written warranty. This warranty gives
you specific legal rights. You may have other legal rights that
vary depending on where you live. Some states or provinces
do not allow limitations on implied warranties or special,
incidental, or consequential damages, so the foregoing
limitations may not apply to you.
To make a warranty claim, do not return this appliance
to the store. Please call 1.800.851.8900 in the U.S. or
1.800.267.2826 in Canada or visit hamiltonbeach.com in the
U.S. or hamiltonbeach.ca in Canada. For faster service, locate
the model, type, and series numbers on your appliance.
PRÉCAUTIONS IMPORTANTES
Pendant l'utilisation d'appareils électriques, des mesures de
sécurité élémentaires doivent être respectées, incluant les
suivantes :
1. Lire toutes les instructions.
2. Ne pas toucher les surfaces chaudes ou l'eau bouillante.
Utiliser les poignées ou les boutons. Prendre toutes
les précautions nécessaires pour éviter les brûlures
causées par les surfaces chaudes ou les déversements
de liquide chaud.
3. Pour éviter le risque d'incendie, d'électrocution et les
blessures, ne pas immerger le cordon, la fiche, le socle
ou la bouilloire électrique dans l'eau ou tout autre liquide.
4. L'utilisation de tout appareil par ou près des enfants
exige une surveillance accrue.
5. Débrancher de la prise murale dès la fin de l'utilisation et
avant le nettoyage. Laisser refroidir l'appareil avant
d'installer ou de retirer des pièces et avant de le nettoyer.
Utilisation de la bouilloire électrique
6. N'utiliser aucun appareil dont le cordon ou la prise
est endommagé, ou à la suite de toute anomalie de
fonctionnement de l'appareil, d'une chute ou de tout autre
w AVERTISSEMENT
dommage. Appeler notre numéro sans frais de service à
la clientèle pour des renseignements concernant
l'examen, la réparation ou l'ajustement.
7. Pour éviter les risques d'incendie, d'électrocution ou de
AVANT LA PREMIÈRE UTILISATION : Ouvrir le couvercle et
remplir la bouilloire d'eau jusqu'au niveau gradué MAX.
blessure, ne pas utiliser d'accessoires non recommandés
Appuyer sur l'interrupteur I/O (marche/arrêt) pour mettre la
par le fabricant.
bouilloire en MARCHE (I). La bouilloire portera l'eau à
8. Ne pas utiliser à l'extérieur.
ébullition puis se mettra hors tension automatiquement. Jeter
9. Ne pas laisser pendre le cordon de la table ou du
comptoir et éviter que le cordon n'entre en contact avec
l'eau et répéter cette étape 2 à 3 fois en rinçant chaque fois
des surfaces chaudes, y compris la cuisinière.
la bouilloire. La bouilloire est maintenant prête à utiliser.
10. Ne pas placer la bouilloire électrique sur ou près d'un
1. Retirer la bouilloire du socle avant de la remplir.
brûleur chaud à gaz ou électrique ou dans un four chaud.
2. Remplir la bouilloire selon la quantité d'eau nécessaire.
11. Pour débrancher la bouilloire électrique, tourner l'une des
S'assurer que la quantité d'eau se situe entre la ligne
commandes à OFF (ARRÊT/O) puis retirer la fiche de la
0,5 L et MAX du niveau gradué. Toujours garder le filtre
prise murale. Ne jamais tirer sur le cordon d'alimentation
métallique en place.
pour éviter de l'endommager et de provoquer un risque
3. S'assurer que le couvercle est bien fixé et que le socle est
d'électrocution.
installé sur une surface à niveau.
12. N'utiliser cet appareil que pour les fonctions auxquelles il
4. Brancher la fiche dans la prise murale puis mettre la
est destiné.
bouilloire SOUS TENSION (I). Le voyant illuminé indique
13. Cet appareil n'est destiné qu'à faire bouillir l'eau. Bouillir
que la bouilloire est en MARCHE. La température actuelle
d'autres types de liquide ou d'aliments contaminera
de l'eau est indiquée sur l'afficheur.
l'intérieur de l'appareil et annulera la garantie.
5. Régler la température de l'eau au degré désiré (voir le
14. Ne pas faire fonctionner la bouilloire sans liquide.
chapitre « Programmation de la température de l'eau »)
15. Pour éviter la surchauffe d'un circuit électrique, ne pas
ou laisser la bouilloire porter l'eau au point d'ébullition
brancher d'autre appareil de haute puissance sur le
(100 °C/212 °F).
même circuit.
6. Le cycle de garde au chaud de 60 minutes commencera
16. Des éclaboussures peuvent survenir si le couvercle est
et le voyant de
soulevé pendant le cycle de chauffage.
température désirée de l'eau est atteinte. La température
17. Assurez-vous que le couvercle de la bouilloire est bien
de l'eau et le compte à rebours seront indiqués en
ajustée au cours de cette opération et quand vous versez
alternance sur l'afficheur. (Garder en mémoire que la
de l'eau bouillante. Ne posez pas de geste brusque
surface de la bouilloire sera chaude et de prendre la
lorsque vous fixez le couvercle sur la bouilloire.
bouilloire en utilisant uniquement la poignée).
7. Les voyants de MARCHE (I) et de
CONSERVER CES INSTRUCTIONS !
s'éteignent après une heure. La température actuelle de
l'eau est affichée.
8. La bouilloire peut être laissée sur son socle après
Autres consignes de sécurité pour
l'ébullition de l'eau, mais il est recommandé pour mettre
le consommateur
la bouilloire en ARRÉT (O) et débrancher le cordon de la
prise murale. Dès la fin de l'utilisation, s'assurer que le
cordon est débranché puis vider toute l'eau de la bouilloire.
Cet appareil est conçu pour une utilisation domestique
seulement.
REMARQUE : N'utiliser la bouilloire que pour faire bouillir de
l'eau. La garantie est annulée si la bouilloire est utilisée pour
AVERTISSEMENT ! Risque d'électrocution : Ce produit est
faire bouillir d'autres sortes de liquides comme le café ou le
doté d'une fiche polarisée (lame plus large) ou d'une fiche
thé.
(3 lames et mise à la terre) pour réduire le risque
d'électrocution. Cette fiche s'insère dune seule manière dans
une prise avec mise à la terre. Ne pas transformer le
Modification des degrés Fahrenheit
dispositif de sécurité de la fiche en modifiant celle-ci de
quelconque façon ou en utilisant un adaptateur. Si vous ne
en Celsius
pouvez pas insérer complètement la fiche dans la prise,
Appuyer simultanément sur les boutons + et – pour afficher la
inversez la fiche. Si elle refuse toujours de s'insérer, faire
température de l'eau en degrés Celsius. Appuyer à nouveau
remplacer la prise par un électricien.
sur les boutons + et – pour afficher en degrés Fahrenheit.
La longueur du cordon installé sur cet appareil a été
sélectionnée afin de réduire les risques d'enchevêtrement ou
de faux pas causés par un fil trop long. L'utilisation d'une
Programmation de la température
rallonge approuvée est permise, si le cordon est trop court.
de l'eau
Les caractéristiques électriques de la rallonge doivent être
équivalentes ou supérieures aux caractéristiques de l'appareil.
Pour choisir un degré de température d'eau préprogrammé :
Si cet appareil est doté d'une fiche avec mise à la terre, la
1. Appuyer plusieurs fois sur le bouton PROG (programmation)
rallonge doit également posséder une prise avec mise à la
jusqu'à ce que le degré de température de l'eau désiré
terre. Prendre toutes les précautions nécessaires pour
s'affiche et relâcher le bouton. Plusieurs degrés de
installer la rallonge de manière à ne pas la faire courir sur le
température préprogrammés, commençant à 100 °C
comptoir ou sur une table et pour éviter qu'un enfant ne tire
(212 °F), seront indiqués sur l'afficheur.
sur le cordon ou trébuche accidentellement.
Réglage personalisé de la température de l'eau :
1. Pour effectuer un réglage personnalisé de la température,
appuyer sur le bouton PROG (programmation) pour afficher
Pièces et caractéristiques
le réglage de température actuel. Appuyer sur les boutons
+ ou – pour modifier le degré de température jusqu'à la
température désirée par incréments de 2–3 °C ou 5 °F.
REMARQUE : La température de réglage minimal programmable
est de 65 °C ou 150 °F.
Réglage de l'horloge
Pour régler l'horloge :
1. Brancher la bouilloire.
2. Pour régler l'heure, appuyer et maintenir le bout +
enfoncé pendant plusieurs secondes pour régler l'heure.
L'heure du jour sera indiquée par l'illumination du témoin
PM.
3. Appuyer sur le bouton + ou – pendant moins d'une
seconde pour modifier les minutes jusqu'à ce que les
minutes correspondent à l'heure juste.
REMARQUE : Si les boutons + ou – ne sont pas à nouveau
appuyés en moins de trois secondes, la bouilloire affichera la
température de l'eau actuelle. L'horloge doit être réglée pour
pouvoir utiliser la fonction d'arrêt automatique.
Programmation de la mise en
1. Bouton d'ouverture
3. Socle
marche automatique
du couvercle
4. Panneau de
Réglage et utilisation de la mise en marche automatique
2. Filtre métallique
contrôle / affichage
(AUTO ON) :
antitartre amovibles
5. Niveau gradué
1. S'assurer que l'horloge est réglée selon l'heure de la
(intérieur du
journée.
bec verseur)
2. Remplir la bouilloire avec la quantité d'eau désirée et la
déposer sur son socle.
3. Appuyer et maintenir les boutons PROG (programmation)
Panneau de contrôle / affichage
et + pour afficher 19:99 ou le réglage de l'heure
précédent.
4. Utiliser les boutons + et – pour régler la mise en marche
automatique (AUTO ON).
5. Appuyer brièvement sur PROG et I/O (marche/arrêt)
simultanément pour régler la mise en marche
automatique de la bouilloire à l'heure désirée.
6. Appuyer à nouveau brièvement sur le bouton PROG pour
annuler la mise en marche automatique (AUTO ON).
7. Appuyer brièvement sur le bouton de MARCHE (I) pour
annuler la mise en marche automatique (AUTO ON) et
commencer le cycle de chauffage.
REMARQUE : La fonction de mise en marche automatique
(AUTO ON) ne fonctionnera pas si l'horloge n'est pas réglée.
Danger de brûlure. Ne pas trop
remplit la bouilloire. L'eau brûlante
peut jaillir hors du bec.
(garde au chaud) s'illuminera lorsque la
(garde au chaud)
Advertisement

Subscribe to Our Youtube Channel
Related Manuals for Hamilton Beach Electric Kettle


Summary of Contents for Hamilton Beach Electric Kettle
- Page 1 • Bring filtered or good-tasting tap water to a boil in the 7. After 1 hour, the ON (I) light turns off, the Keep Warm/ 10. Do not place electric kettle on or near a hot gas or electric fonctionnement de l’appareil, d’une chute ou de tout autre Danger de brûlure.
- Page 2 Si le fond de la bouilloire se décolore : L’acier inoxydable Entretien et nettoyage Otra información de seguridad para Para cambiar de Fahrenheit a Celsius Filtro de malla (suite) Grupo HB PS, S.A. de C.V. des éléments chauffants décoloré est normal. Ceci ne nuit Monte Elbruz No.
Need help?
Do you have a question about the Electric Kettle and is the answer not in the manual?
Questions and answers