
Related Manuals for McIntosh MX121


Summary of Contents for McIntosh MX121
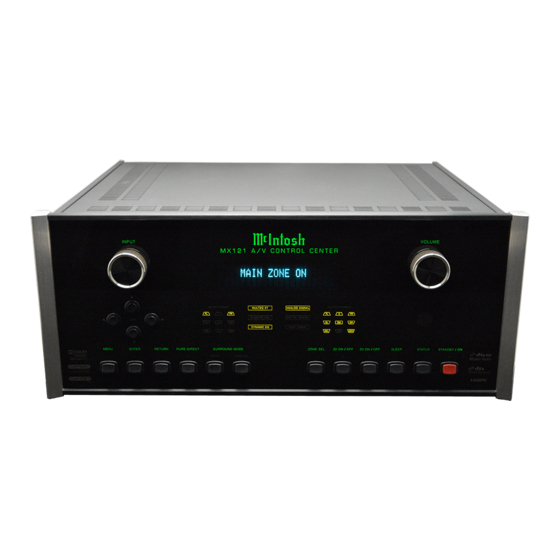
- Page 1 McIntosh Laboratory, Inc. 2 Chambers Street Binghamton, New York 13903-2699 Phone: 607-723-3512 www.mcintoshlabs.com MX121 A/V Control Center Owner’s Manual...
-
Page 2: Safety Instructions
The lightning flash with arrowhead, within an equilateral The exclamation point within an equilateral triangle is triangle, is intended to alert the user to the presence of intended to alert the user to the presence of important uninsulated “dangerous voltage” within the product’s en- operating and maintenance (servicing) instructions in the closure that may be of sufficient magnitude to constitute literature accompanying the appliance. -
Page 3: Trademark And License Information
U.S. patents and that is protected by U.S. patents and other intellectual trade dress are trademarks or registered trademarks of other intellectual property rights. The MX121 uses the property rights of Rovi Corporation. Reverse engi- Pandora Media, Inc. Used with permission. -
Page 4: Table Of Contents
Thank You Customer Service Front Panel: Your decision to own this McIntosh MX121 A/V Con- If it is determined that your McIntosh product is in trol Center ranks you at the very top among discrimi- need of repair, you can return it to your Dealer. You Front Panel Displays, Controls and Push-buttons ...147... -
Page 5: General Information
Output and a TV/Monitor, the On-Screen Over- each HDMI Source connected to MX121. 2. The Main AC Power going to the MX121 and lays including Menus, will only appear on the 9. The Main Zone accepts Video Input Signals from any other McIntosh Component(s) should not HDMI Output. -
Page 6: Connector And Cable Information
Connector and Cable Information XLR Connectors Below is the Pin configuration for the XLR Balanced RS232 DB9 Connector Pin Layout Output Connectors on the MX121. Refer to the dia- 1. N/C 6. N/C grams for connections: 2. Data Out (TXD) 7. -
Page 7: Introduction
Digital EX, DTS Neo6 and DTS-ES Sound Tracks. • Triple Zones • Internet Streaming The MX121 has the built-in ability to control a sepa- Performance Features The MX121 when connected to a network, offers In- rate remote audio/video zone (Zone 2) with program •... -
Page 8: Dimensions
Dimensions Dimensions The following dimensions can assist in determining the best location for your MX121. Front View of the MX121 " 44.5cm " " 19.4cm 18.1cm Side View of the MX121 " 41.9cm " 36.8cm " 9/16 " 3/16 16.7cm 0.5cm... -
Page 9: Installation
Installation Installation The MX121 can be placed upright on a table or " 3/16 shelf, standing on its four feet. It also can be custom 43.7cm installed in a piece of furniture or cabinet of your choice. The four feet may be removed from the bottom of the MX121 when it is custom installed as outlined below. -
Page 10: Rear Panel Connections
Rear Panel Connections Rear Panel Connections The identification of Rear Panel Connections for the MX121 A/V Control Center is located on a separate folded sheet contained in the Owner’s Manual Packet. Refer to separate sheet “Mc1A” for the Rear Panel Connections. -
Page 11: Mx121 Main Zone Input Connections
15. Connect a Ground Cable from the MX121 GND external sensor connected, remote control operation of the system is possible when the MX121 is located in a nection Block) to the MX121 IR IN Jack. Binding Post to the Turntable GND Binding Post. -
Page 12: Mx121 Main Zone Output Connections
When Zone 2 (Audio/Video in another room) on the Power Amplifier Three Power Control In Jack. MX121 will be utilized, proceed to page 13 for infor- 4. Connect a Control Cable from Main Zone Power mation on making the needed additional connections. -
Page 13: Mx121 Zone 2 Input And Output Connections
Note: If there is no external Sensor used for the Main Zone, a splitter is not needed. Connect For additional information refer to “Connector and the Zone 2 Sensor directly to the MX121 IR IN Cable Information” on page 6. Jack. -
Page 14: Front Panel
Front Panel Display, Controls, and Push-buttons Front Panel Display, Controls, and Push-buttons The identification of the MX121 A/V Control Cen- ter Front Panel Display, Controls, and Push-buttons is located on a separate folded sheet contained in the Owner’s Manual Packet. Refer to separate sheet “Mc1B”. -
Page 15: Remote Control
Remote Control Push-Buttons Remote Control Push-Buttons The identification of Remote Control Push-Buttons for the MX121 A/V Control Center is located on a separate folded sheet contained in the Owner’s Manual Packet. Refer to separate sheet “Mc4A and Mc4B” for Push- buttons identification. -
Page 16: Introduction To The Mx121 Setup Mode
Manual Setup To assist in navigating the various On Screen Input Setup Menus please refer to the set of MX121 Menu separate folded sheets "MX121-Menu-1 thru Menu-7"; and to separate sheets “Mc4A thru Mc4B” for Push-button identifications. These separate sheets are contained in Adjust various audio and video parameters the Owner’s Manual Packet. - Page 17 Setup Mode Audyssey Auto Setup Information ® The acoustic characteristics of the connected speak- 8. Do not adjust Volume during the measurements as this will cancel the measurements. ers and listening room are measured and the optimum Front Height Loudspeaker 9.
-
Page 18: Audyssey Auto Setup
Audyssey Auto Setup Procedure ® With the MX121 connected to a TV/Monitor, the sup- 4. With the word "Measure" highlighted On-Screen 6. Continue following the On-Screen instructions plied microphone connected to the SETUP MIC Jack press the ENTER Push-button to start the Mea- repeat the measurement process as outlined in on the Rear Panel and placed in the "Main Listening... - Page 19 Setup Mode, con't Audyssey Parameter Check ® Refer to the illustration below: 9. With "Store" highlighted again, press the ENTER Once the Setup Process has been completed, the Push-button. Saving the results requires about 10 Parameter Check Function becomes available. From AUTO SETUP AUDYSSEY AUTO SETUP MultEQ XT...
- Page 20 Audyssey Parameter Check ® An error message is displayed if the Audyssey Auto Error Details Corrective Measures On-Screen Display Setup could not be completed due to speaker place- The connected setup microphone Connect the included setup microphone to ment, the measurement environment, etc. If this hap- AUTO SETUP AUDYSSEY AUTO SETUP MultEQ XT...
-
Page 21: Network Settings And Functions
MX121 for access to the internet, your system normal type cable. NETWORK CONNECTING might vary from this. Refer to figure below. Notes: 1. With the MX121, it is possible to use the DHCP DHCP and Auto IP functions to make the network set- Internet Access Device IP Address tings automatically. - Page 22 NETWORK CONNECTING 2. Using the Directional Push-buttons highlight the From the Network Information Menu-Screen note the "Detail" Push-button then press the ENTER Push- Proxy IP Address for the MX121. Enter the IP number on the Proxy Address button. Address [000.000.000.000] URL Address Line in the Web Browser after "http://".
-
Page 23: Trigger Settings And Option Settings
Perform the follow- figure 15. provide On (+12V) / Off (0V) Signal when the MX121 ing to make changes from the default settings: is On/Off (Main Zone, Zone 2 or Zone 3), when a spe- 1. -
Page 24: Default Input Connection Assignments
Input Re-Naming The MX121 has the most commonly used Inputs Audio or Video Connections and therefore are The MX121 default Input Names may be changed as not re-assignable. preassigned to HDMI, Digital Coaxial/Optical and desired. The new Input Name(s) will appear on the 2. -
Page 25: Manual Speaker Setup
Setup Mode, con't Manual Speaker Setup The MX121 with built-in Audyssey automatically When the Front Speakers are Large, the Low Fre- ® MANUAL SETUP SPEAKER SETUP performs all the necessary speaker settings and quency Audio Signal is reproduced just by the Front CHANNEL LEVEL corrects for the undesirable room acoustic. -
Page 26: Hdmi, Zone 2 And Zone 3 Setup
MANUAL SETUP there is a HDMI cable connected be- Zones 2 and 3 of the MX121. To make changes to the HDMI SETUP tween the MX121 HDMI OUT 1 ARC default settings perform the following: and the TV. -
Page 27: Picture Adjust And Ir Sensor Setting
Setup Mode, con't IR Sensor Setting Channel --- Select the Mode STEREO default setting The MX121 has a Front Panel IR Sensor along with AUDIO/VIDEO ADJUST or MONO. provisions for also connecting an external sensor. PICTURE ADJUST Volume Level --- The Zone 2 and Zone 3 outputs can be... -
Page 28: Video Input, Input Mode Setup
HDMI for when the Input is asigned to both Input Mode Setup allows for establishing default component video & HDMI. HDMI setting Input Source. These settings include the following: audio settings for MX121 Inputs including selection for digital video signal. OFF switches the A. Video Select E. Resolution of the audio connections types (HDMI, Coaxial/ I/P Scaling off. -
Page 29: Manual Equalization
2. Use the Directional Push-buttons to select "7.1 ch Compensate analog audio input playback level Figure 31 in SW Level". The default setting for the MX121 Adjust surround sound parameter Figure 32 2. Use the Directional Push-buttons to select and is +10dB of which is the proper level for most make changes. -
Page 30: Manual Equalization
Manual Equalization, con't Surround Parameter 4. Using the directional push-buttons select from The MX121 has additional Surround Processing The default setting is AUTO which will automatically adjust depending on the signal. "All", "L/R" or "Each"; then press the ENTER Options depending upon the type of Input Signal LOW/MID/HIGH are manual settings. - Page 31 Setup Mode, con't...
-
Page 32: How To Operate The Mx121
“M.VOL.---.-dB ”, which is the factory default set- buttons. Setup” starting on page 17, to ensure the ting. The next time the MX121 is switched On, the last Note: To access the 7.1 Analog Multichannel Input use best audio performance. - Page 33 How to Operate the MX121 illuminate. Input Format: A. If the input signal source is Eight Channel, the front panel INPUT FORMAT LEDs FL, C, FR, SR, SBR, SBL, SL and LFE will illuminate. Refer to figure 41. B. If a Digital Input...
- Page 34 Zone 2 Return processing) and PURE DIRECT (bypasses all digital Press the Z2 ON/OFF Push-button to switch Zone 2 When the MX121 is in Setup Mode it is used for re- processing). On or Off. turning to a previous Menu Screen.
- Page 35 Directional Push-buttons. sible resolution) down through to Analog (lowest possible resolution). Audio Delay The MX121 has built in Auto Lip Sync. Occasionally On-Screen Source Select when viewing a specific Digital Audio/Video Program Pressing the SOURCE SELect Push-button on the Re- the Lip Sync might not be correct.
- Page 36 Playback of Music and Photo Files Press the CH LVL Push-button on the Remote Chan- When the MX121 is connected to a computer network nel and refer to figure 46. The Channel Level set- including a computer, network storage device or a...
-
Page 37: Audyssey Adjustments
To assist in navigating the various On Screen with “Manual EQ”. Press the MENU Push-button, then select “Audio/Vid- Menus please refer to the set of MX121 Menu separate OFF: Switches the “MultEQ XT” eo Adjust”, then “Audio Adjust”, followed by “Audys- folded sheets "MX121-Menu-1 thru Menu-7";... -
Page 38: Ipod Playback And Airplay
® mixed at 10 dB below film reference. Direct Mode: Connect the iPod to the MX121 Rear Panel iPod/USB Con- 15dB : Select this setting for pop/rock music or other nector using the cable suppplied with the iPod. To playback Display iPod information on the iPod screen. -
Page 39: Airplay
(version 10 or later) on the computer McIntosh:[MX121]. Refer to figure 56. To use the McIntosh MX121 Remote Control to play connected to the same network as the MX121. Also and pause iTunes, as well as skip to next and previous Multiple Speakers update your iPhone, iPod touch or iPad to OS 4.2.1 or... -
Page 40: Usb Drive Playback
.mp4 favorite vices in “FAT16” or “FAT32” format. Internet Radio FLAC Media Server 32/44.1/48k/ 5. The MX121 plays back image (JPEG) files in the .flac (Free Lossless 88.2/96kHz Flickr orientation in which they are stored in the folder. Audio Codec) Pandora 6. - Page 41 How to Operate the MX121, con’t...
-
Page 42: Accessing The Internet And Mcintosh Radio
Your McIntosh MX121 has been factory pre-config- please look up the MAC Address (unique Indenti- ured for accessing several Internet Media Streaming faction Number [ID] for each MX121) as it will be Favorite Internet Radio Sites. The pre-configured sites vary depending upon entered in the “ID”... - Page 43 How to Operate the MX121, con’t My Favorites 1 [1/3] Internet Radio Memory up to 56 Internet Radio Stations for quick recall. To enter a Internet Radio Station perform the 1.fm 80s US 181 FM Classic Guitar Now Playing following steps: 101.ru Pop Classical Music...
-
Page 44: Pandora
I am new to Pandora similar to the method previously used to set up the 10. Select “New Station”. Refer to figure 86. McIntosh (vTuner) Site. To access Pandora using the ® Note: The word “Radio” is added to the end of a file MX121 perform the following steps: name and your original radio station is created. -
Page 45: Pandora
How to Operate the MX121, con’t During playback of a song, a Menu/Help can be dis- played allowing various additonal options by pressing Pandora Account McIntosh2 Radio the Directional Push-button. Refer to figure 88. Email address I like this track Now Playing Press when you like the track that is being played. -
Page 46: Last.fm
Last.fm learns what you love and it’s a great way to [1/5] MANUAL SETUP NETWORK SETUP discover new music. With the MX121 you can create a Favorite Internet Radio free Last.fm profile keeping track of all the songs you Network Connection... - Page 47 How to Operate the MX121, con’t 8. Select Last.fm account and press the ENTER Push-button. Refer to figure 91. rock Radio 9. Referring to figure 93 enter a Username and Now Playing Password, then highlight OK and press the ENTER...
-
Page 48: Flickr
5. Select “All Content” followed by pressing the EN- graphs shared on Flickr. name. Select the user name just entered and press TER Push-button. Refer to figure 100. To access Flickr using the MX121 perform the fol- the ENTER Push-Button. Refer to figure to 99. [1/2] Flickr... -
Page 49: Resetting The Micro And Updating Firmware
Push-button. Refer to figure 105. steps will first save all the user preference settings. MANUAL SETUP OPTION SETUP Note: If it is desired to return the MX121 to factory FIRMWARE UPDATE default settings, skip steps 3, 4 and 6. Figure 103 Check for Update 3. -
Page 50: Specifications
Video Specifications Standby, less than 0.5 watt Signal System Signal To Noise Ratio Note: Refer to the rear panel of the MX121 for the correct NTSC/PAL Phono: 86dB below 10mV input (A Weighted) voltage. High Level: 96dB below rated output (A Weighted) -
Page 51: Packing Instruction
FOAM (2) a shipping carton or any of the interior part(s) are needed, please call or write Customer Service Depart- ACCESSORY ment of McIntosh Laboratory. Refer to page 4. Please see the Part List for the correct part numbers. DIVIDER FOAM... - Page 52 McIntosh Laboratory, Inc. 2 Chambers Street Binghamton, NY 13903 www.mcintoshlabs.com The continuous improvement of its products is the policy of McIntosh Laboratory Incorporated who reserve the right to improve design without notice. Printed in the U.S.A. McIntosh Part No. 04127600...
Need help?
Do you have a question about the MX121 and is the answer not in the manual?
Questions and answers