
Subscribe to Our Youtube Channel
Related Manuals for 909 254CMS


Summary of Contents for 909 254CMS
- Page 1 INSTRUCTION MANUAL 254CMS 1800W 255mm (10 " ) SINGL E BE V EL L ASER GUIDED COMP OUND MI T RE SAW...
-
Page 2: Table Of Contents
CONTENTS Warranty Power Tools Description of symbols Specifications For full details please visit us at www.909.com General safety instructions Safety rules for laser lights Additional safety rules for mitre saws Accessories Know your product Unpacking Transportation Bench mounting Release knob... -
Page 3: Specifications
Manual before using your new 909 Power Tool. Take for electromagnetic compatibility. special care to heed the Cautions and Warnings. Your 909 power tool has many features that will make your job faster and easier. Safety, performance, and For safe operation read instruction manual. -
Page 4: General Safety Instructions
General safety rules f) To reduce the risk of electric shock, the manufacturer recommends the use of a residual current device WARNING. Read all safety warnings and all instructions. with a rated residual current of 30mA or less at Failure to follow the warnings and instructions may result in all times. -
Page 5: Safety Rules For Laser Lights
4) Power tool use and care i) Children should be supervised to ensure that they do not play with the appliance. a) Do not force the power tool. Use the correct power tool for your application. The correct power tool will 5) Service do the job better and safer at the rate for which it was a) Have your power tool serviced by a qualified repair... -
Page 6: Additional Safety Rules For Mitre Saws
• Always hold the saw on parts that are insulated. If you Additional safety rules for mitre saws accidentally cut into hidden wiring or the saw’s own cable, • Ensure that the lighting is adequate. the metal parts of the saw will become ‘live’. Switch off at •... -
Page 7: Accessories
Damage to the lungs if an effective dust mask is not worn. • Damage to hearing if effective earmuffs are not worn. Accessories The 909 254CMS Compound Mitre Saw is supplied with the following accessories as standard: • Saw blade (fitted) •... -
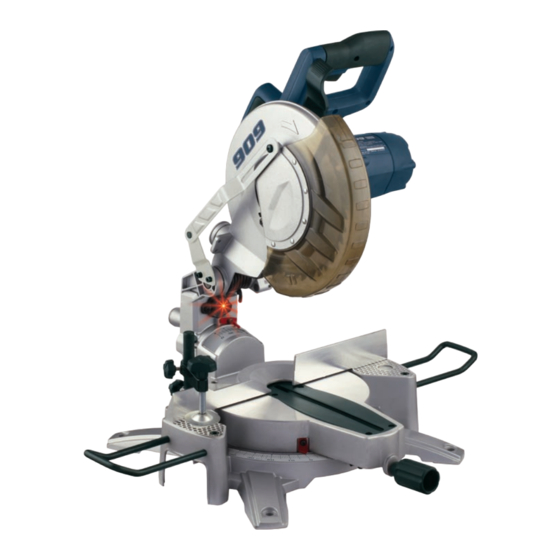
Page 8: Know Your Product
Know your product Before using the saw, familiarise yourself with all the operating features and safety requirements. 1. Saw arm 16. On/Off switch trigger 2. Release knob 17. Release latch 3. Operating handle 18. Spindle lock button 4. Upper fixed 19. -
Page 10: Unpacking
Due to modern mass production techniques, it is unlikely The saw base has holes in that your 909 Power Tool is faulty or that a part is missing. each corner to facilitate bench If you find anything wrong, do not operate the tool until the mounting (Fig. -
Page 11: Mitre Table Lock
Mitre table lock Bevel adjuster The mitre table lock (15) is To return the saw arm to the used to lock the table at the vertical (0° bevel) position desired mitre angle (Fig. E). move the saw arm to the left. The mitre saw cuts from 0°... -
Page 12: Spindle Lock Button
Spindle lock button The spindle lock button (18) prevents the blade in the saw from rotating (Fig. L). Depress and hold the spindle lock button while installing, changing, or removing the blade. Rotating lower Turning on and off blade guard 1. -
Page 13: Setting The Table Square With The Blade
11. Use a 13 mm spanner Setting the table square with the blade or adjustable wrench 1. Make sure that the electrical plug is removed from the to loosen the lock nut power point. securing the 0° bevel 2. Push the saw arm (1) down to its lowest position and adjustment screw (10) engage the release knob (2) to hold the saw arm in the (Fig. -
Page 14: Setting The Fence Square With The Table
11. Retighten the screw securing the mitre scale pointer. Setting the fence Changing a blade square with the table DANGER! Never try to use a blade larger than the stated 1. Make sure that the capacity of the saw. It might come into contact with the electrical plug is removed blade guards. -
Page 15: Cross-Cutting
rotating blade guard (5) is 12. Replace the outer blade positioned over the upper washer (Fig. l). fixed blade guard (4) it 13. Depress the spindle is possible to access the lock button (18) and blade bolt (Fig. h). replace the flat washer 7. -
Page 16: Bevel Cut
1. Pull on the release knob (2) and lift the saw arm (1) to its 11. Release the switch trigger full height. (16) and allow the saw blade to stop rotating 2. Loosen the mitre lock (15). before raising the blade 3. -
Page 17: Compound Mitre Cut
8. Use the clamp assembly (30) to secure the workpiece 5. Loosen the bevel lock (7) and pull out the 0º bevel wherever possible. adjuster and move the saw arm (1) to the left or right to the desired bevel angle (between 0º and 45º). 9. -
Page 18: Using The Laser Line Generator
• Global Power Brands will not be responsible for any Using the laser line generator damage or injury caused by unauthorized repair or WARNINGS mishandling of the tool. Do not stare directly at the laser beam. Power cord maintenance Never aim the beam at any person or an object other than If the supply cord needs replacing, the task must be carried the workpiece.
Need help?
Do you have a question about the 254CMS and is the answer not in the manual?
Questions and answers