Table of Contents
Advertisement
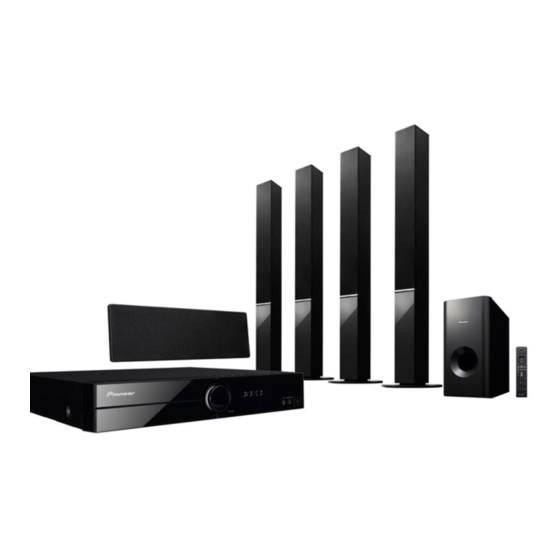
HTZ111DVD
XV-DV202
S-DV111
HTZ212DVD
XV-DV202
S-BD808T
S-DV210SW
HTZ101DVD
XV-DV202
S-DV101
HTZ202DVD
XV-DV202
S-BD808T
S-DV202SW
DVD surround system/
DVD 家庭影院組合
DVD/CD Receiver/ DVD/CD 接收器
Speaker system/ 揚聲器系統
DVD surround system/
DVD 家庭影院組合
DVD/CD Receiver/ DVD/CD 接收器
Speaker system/ 揚聲器系統
Speaker system/ 揚聲器系統
DVD surround system/
DVD 家庭影院組合
DVD/CD Receiver/ DVD/CD 接收器
Speaker system/ 揚聲器系統
DVD surround system/
DVD 家庭影院組合
DVD/CD Receiver/ DVD/CD 接收器
Speaker system/ 揚聲器系統
Speaker system/ 揚聲器系統
P/NO: MFL67240409
Advertisement
Table of Contents

Related Manuals for Pioneer HTZ111DVD


Summary of Contents for Pioneer HTZ111DVD
- Page 1 DVD surround system/ HTZ111DVD DVD 家庭影院組合 DVD/CD Receiver/ DVD/CD 接收器 XV-DV202 Speaker system/ 揚聲器系統 S-DV111 DVD surround system/ HTZ212DVD DVD 家庭影院組合 DVD/CD Receiver/ DVD/CD 接收器 XV-DV202 Speaker system/ 揚聲器系統 S-BD808T Speaker system/ 揚聲器系統 S-DV210SW DVD surround system/ HTZ101DVD DVD 家庭影院組合...
-
Page 2: Caution
Safety Information Safety Information Cautions and Warnings CAUTION WARNING: TO PREVENT FIRE OR ELECTRIC SHOCK RISK OF ELECTRIC SHOCK DO NOT OPEN HAZARD, DO NOT EXPOSE THIS PRODUCT TO RAIN CAUTION: TO REDUCE THE RISK OF ELECTRIC SHOCK OR MOISTURE. DO NOT REMOVE COVER (OR BACK) NO USER- WARNING: Do not install this equipment in a SERVICEABLE PARTS INSIDE REFER SERVICING TO... -
Page 3: Copyrights
Safety Information CAUTION: The apparatus shall not be exposed to Copyrights water (dripping or splashing) and no objects fi lled with liquids, such as vases, shall be placed on the It is forbidden by law to copy, broadcast, show, apparatus. broadcast via cable, play in public, or rent copyrighted material without permission. -
Page 4: Table Of Contents
1.5 times speed playback Speaker Setup for HTZ212DVD / Starting play from selected time HTZ202DVD Last Scene Memory Speaker Setup for HTZ111DVD / Changing the character set to HTZ101DVD display DivX® subtitle correctly Wall mounting the center speaker Programmed Playback... - Page 5 Contents Viewing a PHOTO fi le Viewing photo fi les as a slide show Maintenance Listening to music during slide Notes on Discs show Handling the Unit Radio Operations Listening to the Radio Presetting the Radio stations Troubleshooting Deleting all the saved stations Improving poor FM reception Troubleshooting Sound adjustment...
-
Page 6: Preparation
Preparation Preparation Unique Features Playable Discs This unit plays DVD±R/RW and CD-R/RW that contains audio titles, DivX, MP3, WMA and/or JPEG fi les. Some DVD±RW/DVD±R or CD- Portable In RW/CD-R cannot be played on this unit due to Listens to music from your portable device. the recording quality or physical condition of (MP3, Notebook, etc) the disc, or the characteristics of the recording... -
Page 7: Supplied Accessories
Preparation Supplied Accessories (S-DV210SW) Please check and identify the supplied accessories. Large non-skid pads(1) (S-DV202SW) Remote Control (1) VIDEO cable (1) Large non-skid Colour-coded pads(1) Speaker cables (1) (S-DV111) FM Antenna (1) Battery (1) Samll non-skid Colour-coded Accessories of speaker box pads(1) Speaker cables (6) (S-BD808T) -
Page 8: Playable Fi Le Requirement
Preparation About the Symbol Display Playable fi le Requirement “ ” may appear on your TV display during operation and indicates that the function MP3/ WMA music fi le requirement explained in this owner’s manual is not MP3/ WMA fi le compatibility with this unit is available on that disc. - Page 9 Preparation DivX fi le requirement Compatible USB Devices • MP3 Player : Flash type MP3 player. DivX fi le compatibility with this unit is limited as follows : • USB Flash Drive : Devices that support USB 2.0 or USB 1.1. •...
-
Page 10: Front Panel
Preparation Front panel a Disc Tray c USB port b Operation buttons d MIC STANDBY/ON e PORTABLE IN OPEN/CLOSE f Remote Sensor FUNCTION Changes the input source or function. g Display window d/M (PLAY/PAUSE) h Volume control (STOP) C/V (SKIP) - TUNE + (Radio tuning) -
Page 11: Rear Panel
Preparation Rear panel a AC Power cord d VIDEO OUT Plug into the power source. e AUX (L/R) INPUT b Speakers connectors f HDMI OUT (type A, Version 1.3) c FM Antenna connector Connects to TV with HDMI inputs. g COMPONENT VIDEO (Y Pb Pr) OUTPUT (PROGRESSIVE SCAN) -
Page 12: Remote Control
Preparation SLEEP : Sets the system to turn off Remote Control automatically at a specifi ed time. STANDBY/ON ( ) : Switches the unit ON or OFF. OPEN/CLOSE : Opens and closes the disc Remote control Drawer. TOP MENU : If the current DVD title has a menu, the title menu appears on the screen. - Page 13 TV Control buttons : Controls the TV. Controlling the TV You can control the sound level, input source, and power switching of Pioneer TVs as well. Hold POWER (TV) and press PR/CH (+/–) button repeatedly until the TV turns on or off.
-
Page 14: Installation
Installation Installation For subwoofer (HTZ202DVD) Assemble the Use the supplied adhesive to attach four speakers large pads to the base of subwoofer. Speaker Setup for HTZ212DVD / HTZ202DVD Preparing the speakers 1. Attach the non-skid pads to the base of each speaker stand bases, the subwoofer and the center speaker. - Page 15 Always use a cord when stabilizing the speaker. • Pioneer disclaims all responsibility for any losses or damage resulting from improper assembly, installation, insuffi cient strength of the installation materials, misuse, or natural disasters.
-
Page 16: Speaker Setup For Htz111Dvd / Htz101Dvd
Installation Speaker Setup for HTZ111DVD For center speaker: Use the supplied adhesive to attach four / HTZ101DVD small pads to the base of center speaker. Preparing the speakers 1. Attach the non-skid pads to the base of each speaker. For speakers:... -
Page 17: Wall Mounting The Center Speaker
Magnetic storage media (such as the wall, consult a professional for advice. fl oppy discs and tape or video cassettes) • Pioneer is not responsible for any accidents or should also not be kept close to the subwoofer. damage that result from improper installation. -
Page 18: Positioning The System
Installation Positioning the System CAUTION The following illustration shows an example of positioning the system. • Be careful to make sure children do not put their hands or any objects into the *subwoofer duct. Note that the illustrations in these instructions *subwoofer duct: A hole for plentiful bass sound diff er from the actual unit for explanation on subwoofer cabinet (enclosure). -
Page 19: Connections To Your Tv
Installation Component Video Connection Connections to Your Connect the COMPONENT VIDEO (PROGRESSIVE SCAN) OUTPUT jacks on the unit to the corresponding input jacks on the TV using Y Pb Pr cables. Make one of the following connections, You can hear the sound through the system’s depending on the capabilities of your existing speakers. -
Page 20: Hdmi Out Connection
Installation HDMI Out Connection NOTE If you have a HDMI TV or monitor, you can connect it to this unit using a HDMI cable. • If a connected HDMI device does not accept Connect the HDMI OUT jack on the unit to the audio output of the unit, the HDMI device the HDMI IN jack on a HDMI compatible TV or ’s audio sound may be distorted or may not... -
Page 21: Video Connection
Installation Video Connection Connect the VIDEO OUT (MONITOR) jack on the unit to the video in jack on the TV using a video cable. You can hear the sound through the system’s speakers. Video Connection... -
Page 22: Optional Equipment Connection
Installation PORTABLE IN Connection Optional Equipment Connect an OUTPUT of portable device (MP3 Connection or PMP etc) to the PORTABLE IN connector. PORTABLE IN Connection AUX IN Connection Connect an Output of auxiliary device to the AUX Input (L/R) Connector. If your TV has only one output for audio (mono), connect it to the left (white) audio jack on the unit. -
Page 23: Usb Connection
Installation USB Connection Antenna Connection Connect the USB port of USB Memory (or MP3 Connect the supplied FM antenna for listening player, etc.) to the USB port on the front of the to the radio. unit. Connect the FM Wire antenna to the FM antenna connector. -
Page 24: Adjust The Setup Settings
Installation To display and exit the Setup Adjust the Setup Menu settings 1. Select the DVD/CD or USB function by pressing FUNCTION. 2. Press SETUP. By using the Setup menu, you can make Displays the [SETUP] Menu. various adjustments to items such as picture 3. -
Page 25: Language
Installation LANGUAGE DISPLAY Menu Language TV Aspect Select a language for the Setup menu and Select which screen aspect to use based on then on screen display. the shape of your TV screen. 4:3 – Select when a standard 4:3 TV is Disc Audio / Disc Subtitle / Disc Menu connected. -
Page 26: Audio
Installation AUDIO 5.1 Speaker Setup Make the following settings for the built-in 5.1 channel surrounds decoder. DRC (Dynamic Range Control) 1. Press SETUP. Make the sound clear when the volume is turned down (Dolby Digital only). Set to [On] 2. Use to select AUDIO menu and then for this eff ect. -
Page 27: Lock (Parental Control)
Installation Speaker selection LOCK (Parental Control) Select a speaker that you want to adjust. Initial Setting of the Area Code: When you use this unit for the fi rst time, you NOTE have to set the Area Code. Certain speaker settings are prohibited by the 1. -
Page 28: Others
Installation Password OTHERS You can enter or change password. PBC (Playback Control) 1. Select [Password] on the [LOCK] menu and Playback control provides special navigation then press features that are available on some disc. Select 2. Input a password and press ENTER [On] to use this feature. -
Page 29: Operation
Operation Operation Basic Operations Do this Stop Press Z Playback Press d 1. Insert the disc by Pressing OPEN/CLOSE or Pause Press PAUSE/STEP connect the USB device to the USB port. Frame- Press PAUSE/STEP 2. Select the DVD/CD or USB function by by-Frame repeatedly to play title pressing FUNCTION. -
Page 30: Other Operations
Operation To display the DVD Menu Other Operations When you play a DVD which contains several menus, you can select the menu you want using the Menu. Displaying Disc Information on- 1. Press MENU. screen The disc’s menu appears. You can display various information about the 2. -
Page 31: Starting Play From Selected Time
Operation Starting play from selected Programmed Playback time DivX MP3 WMA To start playing at any chosen time on the fi le The program function enables you to store or title. your favourite fi les from any disc or USB device. 1. -
Page 32: Viewing A Photo Fi Le
Operation Viewing a PHOTO fi le About help menu for slide show Menu Buttons Operation This unit can play discs with photo fi les. Rotating the 1. Select the DVD/CD or USB function by picture pressing FUNCTION. 2. Press to select a folder, and then Moving to press ... -
Page 33: Radio Operations
Operation Presetting the Radio Stations Radio Operations You can preset 50 stations for FM. Before tuning, make sure that you have turned Be sure that FM aerial is connected. (Refer to down the volume. the page 23) 1. Press FUNCTION until FM appears in the display window. -
Page 34: Sound Adjustment
Operation Sound adjustment On Display Description Gives you suitable sound Setting the surround mode PIONEER1 setting with connecting tall type of speakers(S-BD808T). This system has a number of pre-set surround Gives you suitable sound sound fi elds. You can select a desired sound setting with connecting mode by using EQ. -
Page 35: Advanced Operations
Operation Turn off the sound temporarily Advanced Operations Press MUTE to mute your unit. You can mute your unit, for example, to answer the telephone, the “MUTE” displayed in the Sleep Timer Setting display window. Press SLEEP one or more times to select delay time between 10 and 180 minutes, after the System Select - Optional unit will turn off . -
Page 36: Recording To Usb
Operation Recording to USB NOTE 1. Connect the USB device to the unit. • You can check the recording percentage rate 2. Select a function by pressing FUNCTION. for the USB record on the screen during the Play back a sound source fi rst. recording. -
Page 37: Maintenance
Maintenance Maintenance Notes on Discs Handling the Unit Handling Discs When shipping the unit Please save the original shipping carton and packing materials. If you need to ship the unit, for maximum protection, re-pack the unit as it was originally packed at the factory. Keeping the exterior surfaces clean Never stick paper or tape on the disc. -
Page 38: Troubleshooting
Troubleshooting Troubleshooting PROBLEM CAUSE CORRECTION No Power The power cord is disconnected. Plug the power cord into the wall outlet securely. Select the appropriate video input mode on the TV so No Picture The TV is not set to receive the DVD signal. the picture from the DVD Receiver appears on the TV screen. -
Page 39: Appendix
If your TV is listed in the table below, set the appropriate manufacturer code. 1. While holding down (TV POWER) button, You can control your PIONEER TV using the and press the manufacturer code for your buttons below. TV with the numerical buttons (see the table below). -
Page 40: Language Codes
Appendix Language Codes Use this list to input your desired language for the following initial settings: Disc Audio, Disc Subtitle, Disc Menu. Language Code Language Code Language Code Language Code Afar 6565 French 7082 Lithuanian 7684 Singhalese 8373 Afrikaans 6570 Frisian 7089 Macedonian... -
Page 41: Area Codes
Appendix Area Codes Choose a area code from this list. Area Code Area Code Area Code Afghanistan Hong Kong Poland Argentina Hungary Portugal Australia India Romania Austria Indonesia Russian Federation Belgium Israel Saudi Arabia Bhutan Italy Senegal Bolivia Jamaica Singapore Brazil Japan Slovak Republic... -
Page 42: Trademarks And Licences
Appendix Trademarks and Licences Windows Media is either a registered trademark or trademark of Microsoft Corporation in the United States and / or other countries. This product includes technology owned by Microsoft Corporation and cannot be used or HDMI, the HDMI Logo and High-Defi nition distributed without a license from Microsoft Multimedia Interface are trademarks or registered Licensing, Inc. -
Page 43: Specifi Cations
Appendix Tuner Specifi cations • FM Tuning Range: 87.5 to 108.0 MHz or 87.50 to 108.00 MHz General Amplifi er • Power requirements: • Power output (4 Ω), (PEAK) AC 110-240 V, 50/ 60 Hz Front 45 W x 2 •... - Page 44 Appendix Speakers for HTZ212DVD Speakers for HTZ111DVD S-BD808T S-DV111 • Front/Sourround speaker (Left/ Right) • Front/Sourround speaker (Left/ Right) Type: 2 Way Type: 1 Way Impedance Rated: 4 Ω Impedance Rated: 4 Ω Net Dimensions 260 x 1097 x 260 mm...
- Page 45 253 Alexandra Road, #04-01, Singapore 159936 TEL: 65-6472-7555 PIONEER ELECTRONICS AUSTRALIA PTY. LTD. 178-184 Boundary Road, Braeside, Victoria 3195, Australia, TEL: (03) 9586-6300 PIONEER ELECTRONICS DE MEXICO S.A. DE C.V. Blvd.Manuel Avila Camacho 138 10 piso Col.Lomas de Chapultepec, Mexico, D.F. 11000 TEL: 55-9178- 4270...
- Page 46 DVD surround system/ HTZ111DVD DVD 家庭影院組合 DVD/CD Receiver/ DVD/CD 接收器 XV-DV202 Speaker system/ 揚聲器系統 S-DV111 DVD surround system/ HTZ212DVD DVD 家庭影院組合 DVD/CD Receiver/ DVD/CD 接收器 XV-DV202 Speaker system/ 揚聲器系統 S-BD808T Speaker system/ 揚聲器系統 S-DV210SW DVD surround system/ HTZ101DVD DVD 家庭影院組合...
- Page 47 安全資訊 安全資訊 安全資訊 注意事項與警告 小心 小心 有觸電的危險 有觸電的危險 警告: 警告: 為避免發生火災或觸電危險,請勿將此產 請勿開啟 請勿開啟 品暴露於雨中或濕氣中。 小心 小心: 為降低發生觸電的危險,請勿移除外蓋( 警告: 警告: 請勿將本設備安裝在封閉空間內,例如書 或背板),內部並無使用者可自行維修之零件。 櫃或相似物品。 請由專業服務人員進行維修服務。 等邊三角形內含有一個箭頭的閃 電符號是用以警告使用者,本產 品內部含有未絕緣的「危險電壓 小心: 小心: 根據雷射產品安全性分類 IEC60825-1:2007 」,可能對人體構成觸電危險。 ,本機屬於第一類產品。為確保能正確使用此產 品,請詳讀操作手冊,並妥善保存此手冊以供日 等邊三角形中含有驚嘆號的符號 後參考。 是用以提醒使用者,本機的隨附 若此裝置需要維修時,請與授權服務中心連絡。 手冊中含有重要的操作及維修指 使用非此處所指定之控制,調整或執行程序,可 示。 能造成直接接觸輻射的危險。...
- Page 48 安全資訊 小心: 小心: 本設備不得接觸水滴或遭液體潑濺,請勿 著作權 著作權 將花瓶等內含液體之物品放置於本機上。 小心 關於電源線 小心 關於電源線 法律禁止在未得到同意的情況下拷貝,廣播,展 示,有線廣播,公開播放或出版有版權的資料 建議將大部分裝置安置於專用電路上。 。本產品具有 Rovi Corporation. 開發的防拷功能 就是單開關電路僅供應電源給該設備且沒有其他 ,且某些光碟上亦錄有防拷訊息,故於燒錄和播 開關或分支電路。 請檢查此使用手冊內的規格 放該等光碟的影像時將會出現雜訊。本產品採 頁,確認相關規格資訊。 用之版權保護技術受美國專利及其他智慧財產 請勿讓牆上電源插座過載。 讓電源插座過載, 權所保護。使用此版權保護技術必須經過 Rovi 讓電源插座,延長線鬆脫或損壞,讓電源線磨損 Corporation. 公司的授權,且僅能用於家庭或其他 ,或讓電線絕緣層損壞或破裂,都是很危險的。 有限範圍的視聽,除非另有 Rovi Corporation. 公 發生以上任何一種情況皆可能會導致發生觸電或 司的授權。禁止逆向工程或是拆卸本產品。 火災。 請定期檢查電線裝置,一旦發現電線可 消費者應注意,並非所有高畫質電視機皆可與本...
- Page 49 目錄 安全資訊 安裝 小心 組合揚聲器 著作權 HTZ212DVD/HTZ202DVD 的喇叭 設定 HTZ111DVD/HTZ101DVD 的喇叭 設定 使用前的準備 將中置揚聲器固定於牆上 特殊功能 在揚聲器擺放上之補充說明 可播放的光碟 選擇系統位置 隨機配件 連接到您的電視 可播放的檔案要求 連接色差端子 前方面板 HDMI 輸出孔的連接 後方面板 連接視訊 遙控器 連接輔助裝置 連接外部音源輸入介面 連接視訊輸入(可攜型輸入)介 面 連接USB介面 連接天線 調整設定值 顯示與退出設定表單 語言 畫面 音頻 5.1揚聲器...
- Page 50 目錄 操作 維護 基本操作 光碟須知 其他操作 裝置的保養與維護 在螢幕上顯示光碟資訊 顯示DVD表單 顯示DVD標題 疑難排解 選擇字幕語言 疑難排解 以 1.5 倍速度播放 DVD 由選擇的時間開始播放 最後場景記憶 附件 變更字元組,以正確顯示 DivX ® 子標題 使用隨附遙控器控制電視機 節目播放 語言代碼 檢視照片檔案 區碼 以幻燈片播放的方式觀賞影像檔 商標及授權 播放投影片時聆聽音樂 主要裝置規格 操作收音機 收聽收音機 預設電台頻道 刪除所有已儲存的電台 改善FM接收不良情況 調較音效 設定環迴立體聲模式 進階操作...
- Page 51 使用前的準備 使用前的準備 使用前的準備 特殊功能 特殊功能 可播放的光碟 可播放的光碟 連接可攜式裝置 連接可攜式裝置 本機可播放包括音訊標題,DivX,MP3, WMA和/或 JPEG檔案的 聆聽可攜式裝置的音樂檔案. (MP3、筆記 DVD±R/ RW與CD-R/ RW光碟。燒錄品質 型電腦等) 或光碟的實際情況,或燒錄裝置與編寫軟 體的特性,可能會導致本機無法播放某些 DVD±RW/ DVD±R或CD-RW/ CD-R光碟。 透過USB介面直接錄製 透過USB介面直接錄製 DVD-VIDEO (8 厘米/12 厘米光 碟) 將光碟的檔案錄製到USB裝置。 市面上販售或出租的影片光碟 DVD±R (8 厘米/12 厘米光碟) 具視訊模式和已最終化 DVD-RW (8 厘米/12 厘米光碟) 本機無法播放視訊模式和已最...
- Page 52 使用前的準備 隨機配件 (S-DV210SW) 請檢查產品包裝是否內含下列配件。 大型防滑墊 (1) (S-DV202SW) 視訊連接線 (1) 遙控器 (1) 彩色標示揚聲器纜線 大型防滑墊 (1) (S-DV111) 電池 (1) FM 天線 (1) 音箱配件 (S-BD808T) 彩色標示揚聲器纜線 小型防滑墊 (1) 彩色標示揚聲器纜線 螺絲 (12) 大型防滑墊 (1) 小型防滑墊 (1) 揚聲器支架基座 (4) (S-DV101) 中型防滑墊 (1) 彩色標示揚聲器纜線 小型防滑墊 (1) 大型防滑墊...
- Page 53 使用前的準備 可播放的檔案要求 關於 關於 符號顯示 符號顯示 在操作過程中,電視機螢幕上可能會出現 「 」符號,以表示該特定DVD影片光碟 上,無法使用此操作手冊中說明之功能。 MP3/ WMA音樂檔需求 MP3/ WMA音樂檔需求 手冊中之指示符號說明 手冊中之指示符號說明 MP3/ WMA 光碟與本播放器的相容性限制 如下: 標記 標記 ‧ 取樣頻率: 32 到 48 kHz內(MP3), 32 到 48kHz內(WMA) 代表特別附註及操作要點。 ‧ 位元率: 32 到 320 kbps內(MP3), 40 到...
- Page 54 使用前的準備 Divx檔需求 Divx檔需求 相容USB裝置 相容USB裝置 DivX光碟與此播放機的相容性受下列條件 ‧ MP3播放器 : 快閃記憶體類型的MP3播放 限制: 器 ‧ 可用解析度大小: ‧ USB快閃磁碟 : 支援 USB 2.0或 USB 1.1 最高為 720x576 (W x H) 像素 的裝置 ‧ DivX字幕檔的檔名應為 45 個字元或更 ‧ 本播放器的 USB 功能並不支援某些 USB 少。 裝置。 ‧...
- Page 55 使用前的準備 前方面板 前方面板 a 光碟托盤 c USB埠 ( USB port ) b 操作按鍵 d MIC STANDBY/ON e PORTABLE IN OPEN/CLOSE FUNCTION ( 功能) f 遙控感應器 變更輸入來源或功能。 g 顯示畫面 d/M( 播放/暫停 ) ( 停止 ) h 音量控制 C/V( 跳過 ) - TUNE + ( 收音機調頻 )
- Page 56 使用前的準備 後方面板 後方面板 a AC 電源線 d VIDEO OUT 插入電源。 e AUX (L/R) INPUT b 喇叭接頭 f HDMI 輸出孔(A 型 1.3 版)接至電視 c FM 天線接頭 的 HDMI 輸入孔 g COMPONENT VIDEO (Y Pb Pr) OUTPUT (PROGRESSIVE SCAN)
- Page 57 使用前的準備 遙控器 SLEEP : SLEEP : 設定系統於一定時間自動關閉。 STANDBY/ON ( ) : 開啟或關閉裝置電源。 OPEN/CLOSE : 開啟及關閉光碟拖盤。 TOP MENU : TOP MENU : 若目前的DVD標題中含有選單 遙控器 ,螢幕上便會出現標題選單, 否則就會出 現光碟選單。 ‧ ‧ ‧ ‧ ‧ ‧ ‧ ‧ ‧ ‧ DISPLAY : DISPLAY : 可存取螢幕顯示選單。 MENU : MENU : 可存取DVD光碟上的選單。...
- Page 58 ‧ ‧ ‧ ‧ ‧ 電視控制鍵 : 電視控制鍵 : 可控制電視機。(僅限LG電 視機) 控制電視機。 控制電視機。 按住電源(TV)並重複按 PR/CH (+/–) 鍵,直到開啟或關閉電視機電源為止, 即可控制 Pioneer 電視機的音量,輸入來 源及電源開關。 DIMMER : 調整顯示器的亮度。 RESOLUTION : 設定 HDMI 與色差影像輸出 插孔的輸出解析度。 f ‧ ‧ ‧ ‧ ‧ ‧ ‧ ‧ ‧ ‧ MIC VOL. (-/+): MIC VOL.
- Page 59 安裝 安裝 安裝 組合揚聲器 對於重低音(HTZ202DVD): 請利用隨附的黏著劑將四個大型防滑墊 安裝至重低音的底部。 HTZ212DVD / HTZ202DVD 的喇 大型防滑墊 叭設定 準備揚聲器 1. 將防滑墊安裝至各個揚聲器底座、重低 音以及中置揚聲器的底部。 對於揚聲器底座: 請利用隨附的黏著劑將四個中型防滑墊 安裝至各個揚聲器底座的底部。 對於中置揚聲器: 中型防滑墊 請利用隨附的黏著劑將四個小型防滑墊 安裝至中置揚聲器的底部。 小型防滑墊 對於重低音(HTZ212DVD): 請利用隨附的黏著劑將四個大型防滑墊 安裝至重低音的底部。 2. 利用提供的螺絲將揚聲器底座安裝至支 柱上。 大型防滑墊 在將支柱與底座對準之後,請隨即利用 小顆螺絲在下圖所示各點加以上緊固定 。 請注意,揚聲器應面向等腰三角形的 底部。...
- Page 60 另一條則連接至 (–) 側。 在將揚聲器線 塑膠扣拴 連接至播放機上時,先按壓各個塑膠指 壓固定墊以打開連接端子。 跟著將線插 入並放開指壓固定墊。 小心 小心 有色 (+) ‧ 由於塑膠扣拴不屬於固定配件,因此不應利 有色 (+) 有色 (+) 用此扣拴將揚聲器直接掛於牆壁上。 在穩定 揚聲器時,請務必使用繩索。 ‧ Pioneer 對於任何由於組裝和安裝不當、安裝 材料強度不足、不當使用或天災所造成的損 失或損壞,概不負責。 ‧ 在擺放本套設備時,請確定其已固定牢靠並 避開其在天災(如地震)發生時可能掉落並 黑色 (-) 造成傷害的區域。 小心 小心 ‧ 切勿連接任何並非專為本系統所提供的揚聲 器。 ‧ 切勿將隨附的揚聲器連接至並非隨本系統所 提供的擴大機上, 否則將有可能導致系統故...
- Page 61 安裝 HTZ111DVD / HTZ101DVD 的喇 對於中置揚聲器: 請利用隨附的黏著劑將四個小型防滑墊 叭設定 安裝至中置揚聲器的底部。 準備揚聲器 小型防滑墊 1. 將防滑墊安裝至各個揚聲器的底部。 用於揚聲器: 使用隨附的黏貼,把 4 個小墊貼在每個 揚聲器的底部上。 小型防滑墊 2. 將揚聲器線連接至播放機上。 將有灰色線條的白線連接至 (+) 側,而 另一條則連接至 (–) 側。在將揚聲器線 連接至播放機上時,先按壓各個塑膠指 壓固定墊以打開連接端子。 跟著將線插 入並放開指壓固定墊。 有色 (+) 對於重低音(HTZ111DVD): 請利用隨附的黏著劑將四個大型防滑墊 安裝至重低音的底部。 有色 (+) 有色 (+) 大型防滑墊...
- Page 62 請確定所有裸露的揚聲器線均已扭合在一 須謹記揚聲器系統極重,因此其重量可能 起並完全插入揚聲器端子之中。 否則一旦 會造成螺絲鬆動或壁材脫落而無法支撐, 有任何裸露的揚聲器線碰觸到背面面板時 進而導致揚聲器掉落,故請確定準備用於 ,其將可導致電源基於安全措施而切斷。 固定揚聲器的牆壁其強度足以支撐。 切勿 前置、中置及環繞三組隨本系統所提供的 固定於三合板或軟質的壁面上。 揚聲器,均採防磁設計。 不過,仍須視安 本系統並未提供固定螺絲。請使用適合該 裝位置而定,若是將揚聲器安裝得太過靠 壁材且可支撐揚聲器重量的螺絲。 近電視機的螢幕,還是可能會發生色彩失 真的情況。 一旦發生此種情況時,請先關 掉電視機的電源,15到30分鐘後再將其打 小心 小心 開。若是問題依舊,此時請將揚聲器擺放 在遠離電視機的位置。 ‧若是您不確定牆壁的材質和強度,請向專家 諮詢意見。 由於重低音並未採防磁設計,因此最好不 ‧Pioneer對於任何由於安裝不當所造成的意外 要靠近電視機或顯示器擺放。 磁性儲存媒 或損害,概不負責。 體(如磁片及磁帶,或錄影帶)亦最好不 要存放在重低音的附近。 切勿將前置/環繞揚聲器及重低音安裝至 牆上或天花板上, 以免掉落而造成傷害。 選擇系統位置 固定螺絲 (未提供)...
- Page 63 安裝 下列插圖說明選擇系統位置的範例。 小心 小心 請注意,這些插圖因用於說明所以和實際 裝置有出入。 ‧ 請小心謹慎並切勿讓孩童將手或任何物體伸 如要擁有最佳的環繞音效,所有非重低音 入*喇叭導管內 的喇叭都必須置於和聆聽位置 ( ) 相同的 *喇叭導管:在喇叭音箱裡產生低音的地方。 距離。 ‧ 請把中置揚聲器放到兒童不能觸模的安全位 置,否則也許會導致揚聲器掉下,令人受傷 及/或物件損毀。 ‧ 喇叭內含有磁性零件,因此電視機的螢幕或 電腦顯示器可能會出現顏色異常的情況。 請 將喇叭置於遠離電視機的螢幕或電腦顯示 器 的場所。 左前喇叭 (L)/ 右前喇叭 (R): 將前側喇叭置於螢幕或畫面的兩側,並 盡量保持畫面的平整。 中央喇叭: 將中央喇叭置於螢幕或畫面之 上或下。 左側喇叭環繞 (L)/ 右側喇叭環繞 (R): 將這些喇叭置於您聆聽位置的後側,正...
- Page 64 安裝 連接到您的電視 連接到您的電視 連接色差端子 連接色差端子 使用 Y Pb Pr 纜線把播放器的元件視訊 ( 逐行掃描 PROGRESSIVE SCAN) 輸出 (COMPONENT VIDEO OUT) 插口接駁到電 依據原有設備的規格,選擇下列連接方式 視機相應的輸入插口。 之一。 此時,即可透過系統喇叭聆聽到影片聲響 。 標記 標記 連接色差端子 ‧您可以依據想要連接的電視和其他裝置,選 擇不同的播放器連接方法。 請使用本手冊建 議的安裝方法之一,切勿自行拆裝。 ‧ 必要時,可以參考電視、立體音響或其他裝 置的使用手冊,以進行最合適的連接。 小心 小心 ‧ 檢查播放器是否正確連接至電視端。 然後將 電視調整到正確的視訊輸入頻道。 ‧...
- Page 65 安裝 HDMI 輸出孔的連接 標記 標記 若您有 HDMI 電視或顯示器,您可用 HDMI 連接線將本機接至電視。 ‧ 若連接的 HDMI 裝置不支援本機的音頻輸出, 把本機的 HDMI 輸出 (HDMI OUT) 插孔接 HDMI裝置的所發出聲音可能會失真或無聲。 至 HDMI 相容電視或顯示器的 HDMI 輸入 ‧ 連接 HDMI 或 DVI 相容裝置時,請確定下列 (HDMI IN) 插孔。 幾點: 將電視的輸入來源設定為 HDMI(參考電視 - 請先關閉 HDMI/DVI 裝置以及本機。接著 的操作手冊)。...
- Page 66 安裝 連接視訊 連接視訊 使用視訊連接線將本播放器的視訊輸出接 頭,連接至電視的視訊輸入接頭。 此時,即可透過系統喇叭聆聽到影片音效 。 連接視訊...
- Page 67 安裝 連接輔助裝置 連接輔助裝置 連接視訊輸入(可攜型輸入) 連接視訊輸入(可攜型輸入) 介面 介面 將可攜式裝置(MP3或PMP等裝置)的輸出 接頭,連接至本播放器的視訊輸入接頭。 連接外部音源輸入介面 連接外部音源輸入介面 連接視訊輸入介面 將輔助裝置的輸出端子連接至外部音源輸 入(L/R)端子。 若您的電視只有一個視訊輸出接頭(單音 ),請將輔助裝置的輸出端子連接至本播 放器左邊(白色)的視訊接頭。 連接外部音源輸入介面...
- Page 68 安裝 連接USB介面 連接USB介面 連接天線 連接天線 將USB儲存裝置(或MP3播放器等)的USB 連接產品隨附的 FM 天線,以收聽電台頻 接頭,連接至本播放器前方的USB接頭。 道。 將FM線型天線連接至FM天線接頭。 連接USB介面 連接天線 卸除本播放器所連接的USB裝置 卸除本播放器所連接的USB裝置 1. 選擇其他功能模式或連續按下「STOP」 按鈕( Z )兩次。 2. 將播放器之USB裝置移除。 標記 標記 ‧ 務必將 FM 線型天線向外完全延伸。切勿讓 連接好的 FM 線型天線呈現水平擺放。...
- Page 69 安裝 調整設定值 調整設定值 顯示與退出設定表單 顯示與退出設定表單 1. 按下FUNCTION FUNCTION按鈕以選取DVD/CD或 USB的功能選項。 2. 按下SETUP SETUP按鈕。 調整設定表單的各式選項,例如畫質與音 顯示 [設定] 表單。 效。此外,您也可以變更字幕和設定表單 的語言顯示。關於設定表單的詳細操作資 3. 按下SETUP SETUP或RETURN RETURN按鈕以退出 訊,請參閱第 24 頁至第 28 頁。 [設定] 表單。 關於設定的說明選單 關於設定的說明選單 表單 表單 按鈕 按鈕 操作 操作 移動至其他表單。 Move Move <...
- Page 70 安裝 語言 語言 畫面 畫面 選單語言 選單語言 電視機畫面 電視機畫面 為設定的選單與螢幕顯示畫面選擇語言 根據電視螢幕的形狀,選擇所需使用的螢 幕長寬比。 光碟音頻/ 光碟字幕/ 光碟選單 光碟音頻/ 光碟字幕/ 光碟選單 4:3 – 4:3 – 若所連接的是標準的4 : 3電視機時, 請選擇此設定。 選擇您想要的音訊曲目 (光碟音訊)、字幕 以及光碟選單的語言。 16:9 – 16:9 – 若所連接的是16 : 9寬螢幕電視機時 ,請選擇此設定。 原版 原版 – 使用錄製光碟時使用的原始語言。 其他...
- Page 71 安裝 音頻 音頻 5.1揚聲器 5.1揚聲器 依據下列步驟,進行內建5.1聲道環繞解碼 DRC (動態範圍控制) DRC (動態範圍控制) 器的設定。 調低音量可使聲音變得更清晰(僅適用於 1. 按下SETUP SETUP 按鈕。 Dolby Digital)。請將DRC設定為[開],便可 2. 使用 選取視訊表單,然後再按下 獲得此效果。 。 Vocal Vocal 3. 使用 選取 [5.1揚聲器 5.1揚聲器] 表單,然後 再按下 。 選擇[開],可將卡拉OK聲道混合成一般的 立體聲音效輸出,但此功能僅適用於多聲 4. 按下 ENTER 按鈕。 道卡拉OK DVD。...
- Page 72 安裝 鎖定 (家長管控) 鎖定 (家長管控) 選擇喇叭 選擇喇叭 選擇想要調整音質的喇叭。 區碼初始設定 區碼初始設定 第一次使用本播放器之前,必須先進行區 標記 標記 域碼的設定。 杜比數位(Dolby Digital)授權協議禁止使用者 1. 選擇 [鎖定] 表單,然後按下 。 針對喇叭進行設定變更。 2. 按下 。 要在 [鎖定] 狀態下變更功能,必須先輸 Size Size – 喇叭必須沿用標準設定,切勿自行 入當初設定的密碼。輸入密碼,然後按 變更。 下 ENTER 按鈕。再輸入一次,然後按 下 ENTER 按鈕以進行密碼驗證。若密 Volume Volume –...
- Page 73 安裝 其他 其他 密碼 密碼 您可以輸入或變更密碼。 PBC (播放控制) 1. 選擇 [鎖定] 表單的 [密碼],然後按下 。 播放控制能在某些光碟上提供特殊的導覽 播放控制能在某些光碟上提供特殊的導覽 2. I輸入密碼,然後按下 ENTER 按鈕。 功能。選擇 [On] 以使用本功能。 功能。選擇 [On] 以使用本功能。 若要變更密碼,請在選取 [變更] 選項的 狀態下,按下 ENTER 按鈕。輸入密碼 DivX(R) VOD DivX(R) VOD ,然後按下 ENTER 按鈕。再輸入一次 ®...
- Page 74 操作 操作 操作 基本操作 基本操作 前往 前往 執行 執行 停止 按下 Z 播放 按下 d 1. 按下OPEN/CLOSE OPEN/CLOSE或連接USB裝置至USB 暫停 按下 PAUSE/STEP PAUSE/STEP 埠,即可置入光碟。 重複按下PAUSE/STEP PAUSE/STEP按 2. 按下FUNCTION FUNCTION按鈕以選擇DVD/CD或 連續回放 鈕以依據標題順序播放影 USB功能選項。 片。 3. 按下 以選取您想要播放的 W/S/A/D 回放時,按下 C 或 檔案(或音軌/標題)。 V 以前往下一章節/...
- Page 75 操作 其他操作 其他操作 顯示DVD表單 顯示DVD表單 若您播放的DVD光碟內含多個表單,即可 使用表單功能選擇您想要的表單。 1. 按下MENU MENU按鈕。 在螢幕上顯示光碟資訊 此時會顯示光碟內含的表單。 您可以光碟的各式資訊顯示在螢幕畫面上 2. 按下 . 以選取其中一個表單 W/S/A/D 。 。 1. 按下 DISPLAY DISPLAY 按鈕以呈現各式播放資訊 3. 按播放 (PLAY PLAY) 鍵確定。 。 依據光碟類型或播放狀態,其顯示項目 顯示DVD標題 顯示DVD標題 也會有所差異。 若您播放的DVD光碟內含多個表單,即可 2. 請按 選擇項目,然後按 變更 使用表單功能選擇您想要的標題。...
- Page 76 操作 由選擇的時間開始播放 由選擇的時間開始播放 節目播放 節目播放 MP3 WMA DivX DivX 您可以使用程式裡的功能,將光碟或USB 裝置裡的音樂,儲存成您最愛的檔案。 定時播放檔案或標題。 一個自訂播放清單可以包含 30 首曲目/檔案 1. 回放時,按下 DISPLAY DISPLAY 按鈕。 。 2. 按下 以選取時鐘圖示,此時螢幕 1. 按下 FUNCTION FUNCTION 按鈕以選擇 DVD/CD 或 上會出現「--:--:--」。 USB 的功能選項。 3. 由左到右依序輸入想要開始的小時、分 2. 將音樂檔案新增至節目清單,然後按下 鐘和秒鐘。 若輸入數字有誤,請按下 PGM/MEM PGM/MEM 按鈕以進入節目編輯模式(...
- Page 77 操作 關於幻燈片的說明選單 檢視照片檔案 檢視照片檔案 表單 表單 按鈕 按鈕 操作 操作 本裝置可以播放內含照片檔案的光碟。 旋轉照片 旋轉照片 1. 按下 FUNCTION FUNCTION 按鈕以選擇 DVD/CD 或 USB功能選項。 移動至其他表 移動至其他表 單。 單。 Prev./ Next Prev./ Next 2. 使用 選取想要的資料夾,然後按下 ENTER 按鈕。 RETURN 關閉幻燈播放 關閉幻燈播放 此時會顯示資料夾的所有檔案清單。 隱藏求助表單 隱藏求助表單...
- Page 78 操作 操作收音機 操作收音機 預設電台頻道 您可以針對 FM 調頻,預設 50 組電台頻道。 調整頻道之前,請先降低音量。 確定已連接 FM 天線。(請參閱第23頁) 1. 按下 FUNCTION FUNCTION 按鈕,直到顯示視窗出 現 FM 的字樣為止。 2. 按下TUNE (-/+) TUNE (-/+)按鈕以選擇想要的電台 收聽收音機 收聽收音機 頻率。 1. 按下 FUNCTION FUNCTION 按鈕,直到顯示視窗出 3. 按下 PGM/MEM PGM/MEM 按鈕,此時顯示視窗會 現 FM 的字樣為止。 出現閃爍的預設號碼。...
- Page 79 操作 調較音效 調較音效 顯示幕上 顯示幕上 描述 描述 連接高腳型揚聲器 PIONEER 1 (S-BD808T),以完成適當 的音響設定。 設定環迴立體聲模式 設定環迴立體聲模式 連接小型揚聲器 (S-DV111 本系統具有數種預先設定的環場音場。您 PIONEER 2 / S-DV101),以完成適當 可以使用 EQ EQ 選擇想要的音效模式。您可以 的音響設定。 在顯示 EQ EQ 資訊時,使用 箭頭鍵來變 設定聲音等化器為與歌曲 更EQ EQ。 AUTO EQ 檔案MP3 ID3標籤裡類型 依音源及效果的不同,等化器的顯示項目 最相近的模式。...
- Page 80 操作 進階操作 暫時關閉音源 暫時關閉音源 按下 MUTE MUTE 按鈕即可關閉播放器的音源。 例如,您可以在接聽電話時把播放器調至 靜音狀態,顯示窗會顯示「靜音」(MUTE) 字樣。 定時關機設定 定時關機設定 按下 SLEEP SLEEP 按鈕一次或多次,以選擇播放 系統選擇 - 選購 系統選擇 - 選購 器自動關機的延遲時間(10到180分鐘之間) 您必須為電視系統選擇適當的系統模式。 。 若顯示視窗中顯示為沒有光碟 若要檢視剩餘時間,請按下 SLEEP SLEEP 按鈕 (NO DISC),請按下並按住遙控器上的暫 停/格放(PAUSE/STEP PAUSE/STEP) ( M ) 按鍵五秒鐘以 若要取消定時關機功能,請重複按下 上,即可選擇系統。.
- Page 81 操作 使用 USB 裝置 使用 USB 裝置 標記 標記 1. 將USB裝置與機組相連。 2. 按下 FUNCTION FUNCTION 按鈕以選擇 選項。 ‧ 您可以在錄音時,在螢幕上檢查USB裝置 先播放一個音源。 錄音的錄製完成百分率。 ‧ 若您在播放時停止錄音,則會儲存至停止 3 按下 X USB REC REC 按鈕以開始錄製。 時所錄製的檔案。 4 若要停止錄製,請按下 Z STOP STOP 按鈕。 ‧ 進行USB 錄音時,勿取下USB裝置。會造 成檔案不完整,還可能會在電腦上無法刪...
- Page 82 維護 維護 維護 光碟須知 光碟須知 裝置的保養與維護 裝置的保養與維護 拿取光碟 拿取光碟 搬運播放器 搬運播放器 切勿觸碰到光碟的播放面。 請妥善保存本播放器的包裝和填充物品, 以供日後搬運之用。搬運本播放器之前, 請以產品出廠時的包裝方式,確保完整的 安全防護。 保持播放器外表的清潔 保持播放器外表的清潔 收藏光碟 收藏光碟 ‧ 切勿在播放器附近噴灑殺蟲劑等揮發性 播放完畢之後,請將光碟放回原本的光碟 液體。 盒。切勿將光碟收藏在太陽直曬或過熱場 ‧ 清潔擦拭時動作請放輕,以免損傷播放 所,並避免擺放在艷陽曝曬的車上。 器表面。切勿將橡膠或塑膠用品長時間 擺放於播放器上。 清潔光碟 清潔光碟 光碟上的指紋和灰塵可能導致畫質不佳和 清潔播放器 清潔播放器 音質失真。播放之前,請先以乾布稍微擦 請以柔軟的乾布清潔本裝置。若表面沾附 拭。清潔光碟時,請由中央往外擦拭。切 過多髒污,請以濕布搭配中性清潔劑擦拭 勿使用強效清潔液體,包括酒精、化學劑 。切勿使用酒精、化學劑或稀釋劑等強效...
- Page 83 疑難排解 疑難排解 疑難排解 問題 原因 修正 沒有電源 電源線已脫離。 請確認電源線已確實插入牆上的電源插座中。 沒有畫面 在電視機上選擇正確的視訊輸入模式,來自DVD 電視機並未設定為接收DVD訊號。 接收器的畫面便會顯示在電視螢幕上。 視訊連接線並未穩固連接。 將視訊連接線穩固地連接電視機和DVD接收器。 聲音很小或沒有 以音訊連接線連接之設備並未設定為接收DVD訊號 選擇音訊接收器的正確輸入模式,便可聽到DVD 聲音 輸出。 接收器輸出的聲音。 音訊連接線未穩固地連接喇叭或接收器。 將音訊連接線正確連接至連接端子。 要是沒有,請正確連接喇叭線。 已正確連接喇叭線。 光碟髒汙。 使用軟布由內朝外清潔光碟。 DVD畫質不良 沒有置入光碟。 插入光碟。 DVD/ CD不播放 插入可播放光碟(檢查光碟類型,色系和區 所置入之光碟無法播放。 碼)。 放置光碟時,請將有標籤或印刷字樣的一面朝 光碟置入方向上下顛倒。 上。 選單在螢幕上開啟。 請按下設定(SETUP)關閉選單畫面。 成人鎖定功能防止播放等級分級的DVD。...
- Page 84 附件 附件 附件 使用隨附遙控器控制 設定遙控器以控制電視機 電視機 使用隨附遙控器來操作電視機。 如果您的電視機包含在下表中,請設定適 當的製造商代碼。 1. 按住 (TV POWER,電視電源)按鈕 使用以下按鈕可控制 PIONEER 電視機。 ,然後按數字按鈕在電視機上輸入製造 商代碼(請見下表)。 製造商 代碼 Pioneer 1(預設) TV Control Sony 2, 3 (電視機控制) 按鈕 Panasonic 4, 5 Samsung 6, 7 8, 9 按鈕 操作方法 2. 放開...
- Page 85 附件 語言代碼 語言代碼 請使用此清單為下列初始設定值輸入想要的語言: 光碟聲音,光碟字幕,光碟選單。 語言 語言 碼 碼 語言 語言 碼 碼 語言 語言 碼 碼 語言 語言 碼 碼 阿富汗語 6565 弗里斯蘭語 7089 馬其頓語 7775 僧加羅語 8373 南非荷蘭語 6570 加里西亞語 7176 馬爾加什語 7771 斯洛伐克語 8375 阿爾巴尼亞語 8381 喬治亞語 7565 馬來語...
- Page 86 附件 區碼 區碼 請自此清單中選擇一個區碼。 區域 區域 碼 碼 區域 區域 碼 碼 區域 區域 碼 碼 阿富汗 香港 波蘭 阿根廷 匈牙利 葡萄牙 澳大利亞 印度 羅馬尼亞 奧地利 印尼 俄羅斯聯邦 比利時 以色列 沙烏地阿拉伯 不丹 義大利 塞內加爾 玻利維亞 牙買加 新加坡 巴西 日本 斯洛伐克共和國 柬埔寨...
- Page 87 附件 商標及授權 Windows Media 是 Microsoft Corporation 在美國 及/或其他國家的註冊商標或商標。 本產品包含 Microsoft Corporation 擁有的技術, 未經 Microsoft Licensing, Inc. 授權不得使用或分 銷。 HDMI、HDMI 標誌和高畫質多媒體介面是 HDMI 授權 LLC 在美國和其他國家的商標或註 冊商標。 是 DVD Format/Logo Licensing Corporation 的商標。 依杜比實驗室的授權製造。 「Dolby」、「Pro Logic」和雙-D 符號是杜比實驗室的商標。 DivX 是 DivX, Inc. 的註冊商標,並根據授權使 用。...
- Page 88 附件 主要裝置規格 主要裝置規格 調諧器 調諧器 ‧ FM 調校範圍: 87.5 到 108.0 MHz 或 87.50 到 108.00 MHz 一般 一般 擴大機 ‧ 電源需求: ‧ 電源輸出 (4 Ω)、(峰值) AC 110-240 V, 50/ 60 Hz 前方 45 W x 2 ‧ 耗電量: 中央 45 W 50 W 環場...
- Page 89 附件 適用於 HTZ212DVD 的喇叭 適用於 HTZ111DVD 的喇叭 S-BD808T S-DV111 ‧ 前/環繞喇叭(左/右) ‧ 前/環繞喇叭(左/右) 類型: 雙聲道 類型: 單聲道 額定阻抗: 4 Ω 額定阻抗: 4 Ω 淨尺寸 260 x 1097 x 260 mm 淨尺寸 96 x 96 x 85 mm 寬x高x深): (寬x高x深): 淨重: 3.8 kg...
- Page 90 253 Alexandra Road, #04-01, Singapore 159936 TEL: 65-6472-7555 PIONEER ELECTRONICS AUSTRALIA PTY. LTD. 178-184 Boundary Road, Braeside, Victoria 3195, Australia, TEL: (03) 9586-6300 PIONEER ELECTRONICS DE MEXICO S.A. DE C.V. Blvd.Manuel Avila Camacho 138 10 piso Col.Lomas de Chapultepec, Mexico, D.F. 11000 TEL: 55-9178- 4270...
Need help?
Do you have a question about the HTZ111DVD and is the answer not in the manual?
Questions and answers