Table of Contents
Advertisement
Quick Links
Download this manual
See also:
Installation Manual
Advertisement
Table of Contents

Related Manuals for IOGear GCS661U


Summary of Contents for IOGear GCS661U
-
Page 1: User Manual
User Manual USB Laptop KVM Switch GCS661U Part No. M1069... -
Page 3: Table Of Contents
Table of Contents User Notice A Note About Terminology Overview Features Package Contents Requirements Operating System Support GCS661U Diagram Hardware Setup Installation Diagram Operation Specifications Troubleshooting RoHS Contact Warranty... -
Page 4: User Notice
User Notice All information, documentation, and specifications contained in this manual are subject to change without prior notification by the manufacturer. The manufacturer makes no representations or warranties, either expressed or implied, with respect to the contents hereof and specifically disclaims any warranties as to merchantability or fitness for any particular purpose. -
Page 5: A Note About Terminology
A Note About Terminology Throughout this manual, and in the File Transfer application Graphical User Interface (GUI), Local computer or Local Machine refers to the laptop (also may be referred to as Console) that is being used to control the second PC. -
Page 6: Overview
USB peripheral device such as an external hard drive or others, for sharing or file transfer. The GCS661U offers a complete easy to install out-of-box solution and with no additional cables required. It is ideal for people who own a laptop and an older desktop PC and wish to keep using both for various functions or... -
Page 7: Features
Features • USB-to-USB Laptop KVM with File Transfer functionality • Control your second computer with your laptop • File system management utility allows you to transfer files between two computers/laptops – simply drag and drop • Desktop scaling – user can adjust the resolution of the Remote screen to the Local one •... -
Page 8: Package Contents
Note: Features may have been added to the GCS661U since this manual was printed. Please visit our website at www.iogear.com to download the most up to date version of the manual, if necessary. -
Page 9: Requirements
Requirements Local computer (Console) A laptop computer with a USB 2.0 Type A port (Alternative option: A desktop with a keyboard, mouse and monitor) Remote Computer (secondary PC) A computer (desktop or laptop) with a USB 2.0 Type A port... -
Page 10: Operating System Support
Operating System Support Windows ® 2000 or higher, XP, and Vista... -
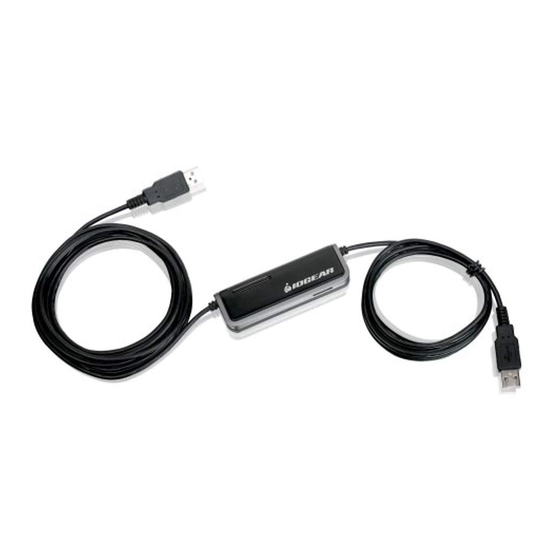
Page 11: Gcs661U Diagram
GCS661U Diagram Component USB Plug USB Plug USB 2.0 Peripheral Port Description This end connects to the USB port on the Remote computer (note the longer length of the cord). Flashes blue at a slow, steady pace when connection between both computers is working or when the device is idle. -
Page 12: Hardware Setup
Hardware Setup Make sure that all devices are properly grounded. Setting up the GCS661U is quick and easy, offering simple plug and play functionality in just a few short steps. Follow the steps below and refer to the installation diagram on the following page: 1. - Page 13 4. Go to “My Computer” and highlight “GCS661U” 5. Double click on the “Setup.exe” file. drive. Right click on it and choose “Explore”.
- Page 14 6. The Setup screen will show on your screen. 7. Choose where you want to install the application Click on “next”. then click “next”.
- Page 15 8. Click “next” one more time. 9. Click “install” to install the application on the computer.
- Page 16 10. Set up will install the software on your Remote computer. Click “Finish”. Note: You may be prompted to reboot the Local computer after the software has been installed. It is not necessary to do so. 11. Turn on the Local (laptop) computer. 12.
- Page 17 15. Connection is established and the Remote screen (desktop) is displayed on your Local screen (laptop). You’re now ready to control the Remote PC from your Local PC’s key board and mouse.
-
Page 18: Installation Diagram
Installation Diagram Remote Local... -
Page 19: Operation
Operation The GCS661U User Interface provides a convenient toolbar in the top left of the Remote computer window. The Toolbar buttons are as follows (see table below for details): Toolbar Buttons Name Open File Transfer Toggle Full Screen Mode Minimize Remote Screen Send to “Start”... - Page 20 File Transfer The GCS661U features a file management function that includes an intuitive File Transfer utility. Transferring files between the Local and Remote computers is simple and easy. 1. In the Remote desktop window on the Local computer’s monitor, click the Open File Transfer icon.
- Page 21 Progress bar. A message in the History bar will tell you when the file transfer has completed. Other File Management Features In addition to File Transfer, the GCS661U’s User Interface also offers a full range of file system management features, such as creating, renaming, and deleting files and folders on both the Local and the Remote computers.
- Page 22 Remote PC. Match Server Screen (Desktop Scaling) When the GCS661U is operational, the desktop environment of the Remote computer appears in its own window on the desktop of the Local computer.
-
Page 23: Specifications
Specifications FUNCTION Computer Connections Connectors LED’s USB hub Environment Physical Properties GCS661U Console Port 1 x USB Type A Male (Black) Computer Port 1 x USB Type A Male (Black) On Line 1 (Blue) Data Transfer 1 (Blue) 1 x USB 2.0 Hub Port Operating Temp. -
Page 24: Troubleshooting
Troubleshooting Issue Once installation is complete, can I use the GCS661U to control the Local (laptop) computer from the Remote (desktop) one? What if I want to use the desktop computer to control my laptop? Does the GCS661U support different languages OS for the... - Page 25 Remote hard drive to the printer that is directly connected to it? Potential Solution No, the current version of the GCS661U only supports Windows 2000 or higher, XP, and Vista. This may be that the device requires an external power adapter. If such adapter is supplied, then it is recommended that it be used.
- Page 26 “Laptop KVM software running”. The utility software auto start. Go to “My Computer” in the Local computer and click on the GCS661U icon that is showing. The connection between computers will be established.
- Page 27 Issue How can I eliminate the Remote computer’s request to put in a password every time I turn it on? Potential Solution You can change the password settings in Windows through the Control Panel (2000, XP, or Vista). In XP, go to Control Panel, then User Accounts, choose the Account you want to change and follow instructions.
-
Page 28: Federal Communications Commission (Fcc) Statement
Federal Communications Commission (FCC) Statement 15.21 You are cautioned that changes or modifications not expressly approved by the part responsible for com- pliance could void the user’s authority to operate the equipment. 15.105(b) This equipment has been tested and found to comply with the limits for a Class B digital device, pursuant to part 15 of the FCC rules. -
Page 29: Fcc
Operation is subject to the following two conditions: 1) this device may not cause interference and 2) this device must accept any interference, including interference that may cause undesired operation of the device. FCC RF Radiation Exposure Statement: This equipment complies with FCC radiation exposure limits set forth for an uncontrolled environment. End users must follow the specific operating instructions for satisfying RF exposure compliance. - Page 30 CE Statement This device has been tested and found to comply with the requirements set up in the council directive on the approximation of the law of member states relating to EMC Directive 89/336/EEC, Low Voltage Directive 73/23/EEC and R&TTE Directive 99/5/EC.
-
Page 31: Rohs
RoHS This product is RoHS compliant. -
Page 32: Contact
Microsoft Corporation. All other brand and product names are trademarks or registered trademarks of their respective holders. IOGEAR makes no warranty of any kind with regards to the information presented in this document. All information furnished here is for informational purposes only and is subject to change without... -
Page 33: Warranty
NEED ASSISTANCE SETTING UP THIS PRODUCT? Make sure you: 1. Use the live chat at www.iogear.com to try and solve any issues you may be having with the product 2. Visit the Tech Info Library/FAQ on www.iogear.com (under the Support tab) 3. - Page 36 The use of our technology solutions helps reduce electronic waste. HEALTH IOGEAR supports healthy and fit lifestyles. By integrating products with the latest scientific developments, IOGEAR’s solutions enhance the life of end- users. © 2008 IOGEAR...
Need help?
Do you have a question about the GCS661U and is the answer not in the manual?
Questions and answers