HME ion IQ Operating Instructions Manual
Wireless drive-thru audio system
Hide thumbs
Also See for ion IQ:
- Operating instructions manual (85 pages) ,
- Manual (6 pages) ,
- Operation (2 pages)

Related Manuals for HME ion IQ


Summary of Contents for HME ion IQ
- Page 1 Wireless Drive-Thru Audio System Operating Instructions HM Electronics, Inc. 14110 Stowe Drive Poway, CA 92064 USA Phone: 1-800-848-4468 Fax: 858-552-0172 HME# 400G660 Rev B 1/6/12...
-
Page 3: Table Of Contents
Table of Contents ion|IQ EQUIPMENT ..........................1 Base Station ................................2 Front Panel ................................2 Rear and Side Panels ............................3 HEADSET ................................4 Features and Controls ............................4 How to Wear the Headset ............................ 4 How to Use the Headset Controls ........................5 Headset Registration ............................ - Page 4 Illustrations in this publication are approximate representations of the actual equipment, and may not be exactly as the equipment appears. © 2012 HM Electronics, Inc. The HME logo and product names are registered trademarks of HM Electronics, Inc. All rights reserved.
-
Page 5: Ion|Iq Equipment
ion|IQ EQUIPMENT The ion|IQ is an audio system primarily for use at quick-service restaurants. The equipment shown below is standard with the ion|IQ . Optional equipment can be ordered from your local dealer. NOTE: Equipment quantities vary, depending on individual store needs at time of purchase. -
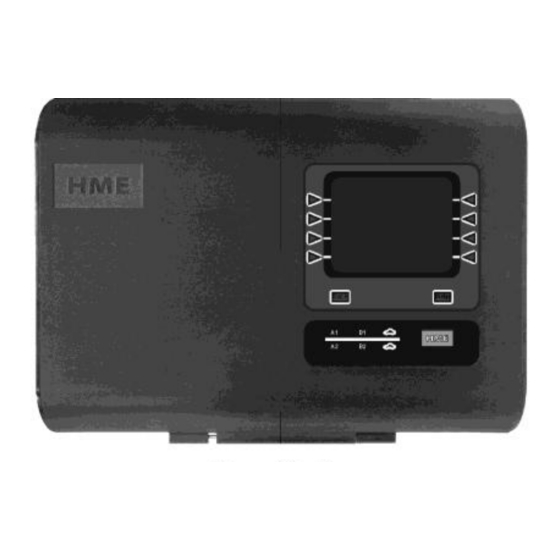
Page 6: Base Station
Base Station All functions of the drive-thru audio system are channeled through the base station. It is the electronic heart of the ion|IQ External base station features are shown in Figures 2 and 3. Internal features are shown in Figure Front Panel Display screen Menu-select... -
Page 7: Rear And Side Panels
The menu-select buttons are used to make selections from the menu on the display screen. The Help button can be pushed to obtain information needed in case of problems with the ion|IQ The Back button can be pushed to go back to the previous menu display. ... -
Page 8: Headset
HEADSET Features and Controls Power button Channel “A1” Channel “B” Power button Transmit light button Channel “A1” light Channel “A2” button button Power Channel “A2” lights button Power button Volume-up Volume-up button button Channel “B” Headset cable Volume-down Volume-down button connector socket button button... -
Page 9: How To Use The Headset Controls
How to Use the Headset Controls The headset control buttons will activate when pressed firmly. Use your fingertips, not your fingernails, to press the buttons. Power On/Off Power On Press and release the power button. If using a Belt-pac ─ A voice message in the earpiece will say “belt- pac #, battery full/half/low”... - Page 10 Register each headset as follows: Be certain all headsets to be registered are turned off and the base station power is on. Other headsets can be on or off. On the base station STATUS display, press the Menu button. NOTE: Headsets must be within 6 feet (1.83 meters)
- Page 11 The power light on the headset will remain on steady green. If you have any problems registering the headsets: In the USA, call HME Customer Support at 1-800-848-4468. Outside the USA, call your local HME representative for assistance.
-
Page 12: Battery Removal And Replacement
Battery Removal and Replacement COM6000BP Belt-pac Batteries — To change batteries: Battery-release If a battery is weak when Belt-pac Battery latch power is turned on, a voice in the earpiece will say “Battery low.” If a battery becomes weak during operation, a voice in the earpiece will say “Change battery.”... -
Page 13: Battery Charger
Battery Charger Up to four batteries can be charged in the charger at the same time. Charging time is approximately 2.5 hours. The battery status lights next to each charging port are explained below. Up to six fully charged batteries can be stored in the battery storage ports. ... -
Page 14: Ion|Iq Operation
ion|IQ OPERATION The ion|IQ can be operated in Hands-Free (HF), Auto-Hands-Free (AHF) or Push-To-Talk (PTT) modes. A full-duplex system supports HF, AHF and PTT operation. In HF and AHF operation, communication can be transmitted and received at the same time, as in a normal telephone conversation. In the AHF mode, transmission and reception are activated automatically when a customer drives into the drive-thru lane. -
Page 15: Single-Lane Operation
Single-Lane Operation Hands-Free (HF) Mode With the power off, press and hold the volume-up ▲ and B buttons while you press and release the PWR button to turn the power on in the HF mode. The headset will remember this setting. ... -
Page 16: Dual-Lane Operation
Dual-Lane Operation In a dual-lane operation, there are two lanes, with one order point NOTE: in each lane. If you have an optional MS10 Mode Switch, Hands-Free (HF) Mode placing the switch in the With the headset power off, press and hold the volume-up ▲ and Non-Dedicated position B buttons while you press and release the PWR button to turn the allows headset operators... -
Page 17: Tandem Operation
Tandem Operation Tandem is a special case of dual-lane operation in which a customer arriving at Order Point #2 can be given a “Please pull forward” message if no customer is present at Order Point #1. Headset operation is the same as described for dual-lane operation. NOTE: In Tandem operation, if Order Taker #2’s... -
Page 18: Operator Mode
Operator Mode Speed team operation is used during high-volume times. An order taker wearing a headset relays orders from outside into the store, using button A1, A2 or B. The dedicated mode is a dual-lane setting. In the dedicated mode, headset users only hear vehicle arrival tones and customers talking from their own lane. -
Page 19: Message Center Operation
Message Center Operation The Message Center is a central point at which messages can be set up to be triggered by various events during designated time HINT! periods, to be sent to customers at the speaker post or to crew members via headsets or ceiling speakers. - Page 20 MESSAGE CENTER MESSAGES NAME CONTENT Not pre-recorded. All Day 1 Not pre-recorded. All Day 2 Not pre-recorded. Breakfast 1 Not pre-recorded. Breakfast 2 Not pre-recorded. Lunch 1 Not pre-recorded. Lunch 2 Customer Greeter Not pre-recorded. Snack 1 messages are Not pre-recorded. Snack 2 triggered by detection Not pre-recorded.
-
Page 21: Customer Greeter Settings
Customer Greeter Settings To set up the time periods and locations for Customer Greeter messages to be played, or to name and/or record Customer Greeter messages, press the Menu button on the base station STATUS display and then, on the MAIN MENU press the Message Center button. - Page 22 Turn Message On/Off To turn the selected message on or off, press the Message button on the EDIT CUSTOMER GREETER display to highlight either (on) or −(off). Press the Back button to save this setting. ✔ Review or Record Message To review the existing selected message, or to record a new message, press the Review/Record button on the EDIT CUSTOMER GREETER display.
- Page 23 Message Schedule To choose the schedule for the selected message , press the Schedule button on the EDIT CUSTOMER GREETER display. On the SCHEDULE CUSTOMER GREETER display, press the button for the day you want the selected message to be played. NOTE: To edit the Start and Stop times for the time periods...
- Page 24 Message Playback Settings To edit where the selected Customer message will be heard (in addition to the speaker post), press the Settings button on the EDIT CUSTOMER GREETER display. On the EDIT CUSTOMER SETTINGS display, press the button corresponding to the location where you would like the selected (on) or −(off).
-
Page 25: Reminder Message Settings
Reminder Message Settings To set up the time periods and locations for Reminder Messages to be played, or to name and/or record Reminder Messages, press the Menu button on the base station STATUS display and then, on the MAIN MENU press the Message Center button. Press the Reminders button on the MESSAGE CENTER MENU. - Page 26 Turn Message On/Off To turn the selected message on or off, press the Message button on the EDIT REMINDER MESSAGE display to highlight either (on) or −(off). Press the Back button to save this setting. ✔ Review or Record Message To review the existing selected message, or to record a new message, press the Review/Record button on the EDIT REMINDER MESSAGE display.
- Page 27 Message Priority NOTE: If a low priority reminder To set a priority selected message, press the Priority button on message is scheduled to the EDIT REMINDER MESSAGE display to highlight either High be played when or Low. Press the Back button to save this setting. communication with a customer is ongoing, the message will be...
- Page 28 Message Playback Settings To choose where the selected Reminder message will be heard, press the Settings button on the EDIT REMINDER MESSAGE display. To designate specific headsets where you would like the selected Reminder message to be heard, press the Headsets button on the EDIT REMINDER SETTINGS display.
-
Page 29: Alert Message Settings
Alert Message Settings To set up the time periods and locations for Alert Messages to be played, or to name and/or record Alert Messages, press the Menu button on the base station STATUS display and then, on the MAIN MENU press the Message Center button. Press the Alerts button on the MESSAGE CENTER MENU. - Page 30 Turn Message On/Off To turn the selected message on or off, press the Message button ✔ on the EDIT ALERT MESSAGE display to highlight either (on) or −(off). Press the Back button to save this setting. Review or Record Message To review the existing selected message, or to record a new message, press the Review/Record button on the EDIT ALERT MESSAGE display.
- Page 31 Message Schedule To choose the schedule for the selected message, press the Schedule button on the EDIT ALERT MESSAGE display. On the SCHEDULE ALERT MESSAGE display, press the button for the day you want the selected message to be played. On the SELECT SCHEDULE TIMES display, select the time when you want the selected message to play by pressing the ▲(up) and ▼(down) buttons to scroll through the 12 available time periods.
- Page 32 Message Playback Settings To choose where the selected Alert message will be heard, press the Settings button on the EDIT ALERT MESSAGE display. To designate specific headsets where you would like the selected Alert message to be heard, press the Headsets button on the EDIT ALERT SETTINGS display.
- Page 33 To set a delay after the Alert message is triggered until it begins playing, press the Delay buton. On the DELAY BEFORE PLAY display, use the Left or Right button to move the highlight left or right in the Delay field for minutes and seconds (MM:LL).
-
Page 34: Schedule Times
Schedule Times To set up all the time periods during each day, in which all Message Center messages can be scheduled, press the Menu button on the base station STATUS display and then, on the MAIN MENU press the Message Center button. Press the Edit schedule times button on the MESSAGE CENTER MENU. -
Page 35: Volume Adjustments
Volume Adjustments To adjust the volume of inbound and outbound audio, alert tones and message repeater messages, on the base station STATUS display, select Menu and then, on the MAIN MENU select Volume adjust. Press the buttons on the left side of the VOLUME MENU to select which volume you want to adjust. -
Page 36: Wired Backup System Operation
Wired Backup System Operation In order to use a Wired Backup System, you must have a Switcher Board (optional) in your base station. If you have a Switcher Board, you will find a switch on the bottom of your base station as shown in Figure 10. -
Page 37: Vehicle Detection
Vehicle Detection You can test the vehicle detector function by simulating a vehicle arrival at the speaker post or menu board. Before doing this, be sure there is no car (or metal object) at the detection point. Press the Menu button on the base station STATUS display and then press the Vehicle detection button on the MAIN MENU. -
Page 38: Store Settings
Store Settings Store settings are crucial to drive-thru operation, and are normally controlled by password access. To access Store Settings, press the Menu button on the base station STATUS display and then press the More button on the NOTE: MAIN MENU. Store settings are normally made or changed only by... - Page 39 Set Date or Time To make changes to the date or time settings, press the Set date or Set time button on the STORE SETTINGS display. On the SET DATE or SET TIME display, use the Left and Right buttons to move the highlight in the Date or Time field, and use the Up and Dn buttons to change the highlighted numbers.
- Page 40 Edit Schedule Times Up to 12 Schedule Times can be set to establish periods in which messages can be played from the Message Center. Schedule Times can be edited as needed. To make changes to the Schedule Times, press the Edit schedule times button on the STORE SETTINGS display.
-
Page 41: Change Password
Change Password For security purposes, you may need to change the password periodically for entry to the STORE SETTINGS display, or when someone’s employment terminates. To do this, press the Set password button on the STORE SETTINGS display. The current password will be shown in the Enter New field on the SET USER PASSWORD display. - Page 42 To save this setting, press the Back button. Phone Headsets If there is an HME Telephone Interface connected to your base station, you can assign one beltpac/headset to receive incoming telephone calls. To do this, press the Phone headset button on the ADVANCED STORE SETTINGS display.
- Page 43 VAA Adjustment VAA settings can be adjusted to eliminate echo, feedback or fluctuating inbound audio levels. To adjust VAA levels, press the More button on the STORE SETTINGS display. On the ADVANCED STORE SETTINGS display, press the VAA button. NOTE: If you have a dual lane drive-thru operation, you may need to make...
-
Page 44: Network Settings
If you need to contact HME Technical Support regarding any problem with your network connection, you may be asked to make changes to the network settings. If so, press the More button on the STORE SETTINGS display. -
Page 45: Automatic Volume Control
Automatic Volume Control When the Automatic Volume Control (AVC) is on, the volume level at the outside speaker will be automatically adjusted to compensate for environmental noise at the speaker post. When there is excessive noise, the level of the order taker’s voice in the speaker will be adjusted up. -
Page 46: Pc Navigation
PC Navigation If your ion|IQ was set up to operate with a PC network, all of the same settings that can be made on the base station can also be made on your PC. The following examples show you how to navigate through system settings as they appear on your PC screen. -
Page 47: Pc Reports
PC Reports The ion|IQ is also able to generate the following reports to your PC. The Headset Statistics Report includes a list of all headsets, with the following information: the last time/date each headset was used which messages are assigned to each headset ... -
Page 48: Equipment Care And Cleaning
Foam muffs on headset earpieces can easily be replaced for sanitary purposes. To order extra foam muffs, call your local HME sales representative. Battery Charger Avoid splashing water or grease on the battery charger. -
Page 49: In Case Of Problems
NOTE: If the inbound level is too low, you will not hear the customer. Power may be off at base station. Be sure HME logo and other lights on base station are lit. No sound is heard in headset when you press Check circuit breaker for building. -
Page 50: Service Call
Repeat registration procedure. Call HME.* Service Call For information to contact HME Technical Support, press the Menu button on the base station STATUS display and then press the Service button on the MAIN MENU, or press the Help button under the display screen. -
Page 51: Base Station Internal Controls And Indicators
Base Station Internal Controls and Indicators 3 4 5 6 7 Figure 11. Base station internal features ANT1 antenna connector ANT2 antenna connector Jumper, microphone load, JP1-Lane 1 Jumper, microphone load, JP2-Lane 2 Switcher board connectors, J4-Lane 1 ... -
Page 52: Diagnostics
Diagnostics If you make a service call to HME Technical Support, you may be asked to have diagnostics performed automatically by the base station. If so, press the Menu button on the base station STATUS display and then press the More button on the MAIN MENU. -
Page 53: To Set Base Station For Spanish Or French Language Operation
To Set Base Station for Spanish or French Language Operation If the base station is returned to its factory default settings, it will be set for English language operation. To change the language to Spanish or French, make the following selections on the base station display. -
Page 54: Equipment Specifications
EQUIPMENT SPECIFICATIONS Base Station Voltage input 24VDC ±2.5V AC current input 2.5A maximum Audio distortion 5% maximum level Outside speaker output 3 watts RMS into 8 ohms Ceiling speaker power 3 watts RMS into 8 ohms TX/RX frequency 2400MHz – 2483.5MHz Dimensions 9.75”H x 13”W x 3.5”D (248 mm x 330 mm x 89 mm) -
Page 55: Important Notices
2dBi. Antennas/Kits not included in this list or having a gain greater than 2dBi are strictly prohibited for use with this device. The required antenna impedance is 50 ohms. 1. Antenna: NEARSON, S181TR-2450R, 2dBi 2. Antenna Kit: HME, EC20 (P/N G28493-1), 0dBi 3. Antenna Kit: HME, EC10 (P/N G27706-1) Industry Canada (IC) The term “IC:”... - Page 56 (manufacturers, distributors and/or retailers) to take-back electronic products at the end of their useful life. The WEEE Directive covers most HME products being sold into the EU as of August 13, 2005. Manufacturers, distributors and retailers are obliged to finance the costs of recovery from municipal collection points, reuse, and recycling of specified percentages per the WEEE requirements.
- Page 57 Right Message, Right People, Right Time! INSTRUCTIONS Planning to set-up your HME ion|IQ™ Message Center is easy to do when you follow these three simple steps. STEP ONE: Choose your CUSTOMER GREETINGS, EMPLOYEE REMINDERS, and ALERTS TIP: Schedule only a few messages at a time and change them often to improve your customers’ and employees’...
- Page 58 HME ion|IQ™ Message Center Quick Start Guide Right Message, Right People, Right Time! EXAMPLE PLANNER CUSTOMER GREETINGS NAME START TIME STOP TIME HEADSETS CEILING SPKR DELAY ✔(on) ✔(on) BREAKFAST 06:00 11:00 − − (off) (off) LUNCH/DINNER 11:00 20:00 ✔(on) ✔(on)
- Page 59 HME ion|IQ™ Message Center Quick Start Guide Right Message, Right People, Right Time! CUSTOMER GREETINGS NAME START TIME STOP TIME DELAY HEADSETS CEILING SPKR REMINDERS NAME START TIME STOP TIME REPEAT HEADSETS CEILING SPKR ALERTS NAME START TIME STOP TIME...
- Page 61 HME ion|IQ™ Message Center Quick Start Guide Right Message, Right People, Right Time! CUSTOMER GREETINGS NAME START TIME STOP TIME DELAY HEADSETS CEILING SPKR REMINDERS NAME START TIME STOP TIME REPEAT HEADSETS CEILING SPKR ALERTS NAME START TIME STOP TIME...
- Page 63 HME ion|IQ™ Message Center Quick Start Guide Right Message, Right People, Right Time! CUSTOMER GREETINGS NAME START TIME STOP TIME DELAY HEADSETS CEILING SPKR REMINDERS NAME START TIME STOP TIME REPEAT HEADSETS CEILING SPKR ALERTS NAME START TIME STOP TIME...
- Page 65 HME ion|IQ™ Message Center Quick Start Guide Right Message, Right People, Right Time! CUSTOMER GREETINGS NAME START TIME STOP TIME DELAY HEADSETS CEILING SPKR REMINDERS NAME START TIME STOP TIME REPEAT HEADSETS CEILING SPKR ALERTS NAME START TIME STOP TIME...
- Page 67 HME ion|IQ™ Message Center Quick Start Guide Right Message, Right People, Right Time! CUSTOMER GREETINGS NAME START TIME STOP TIME DELAY HEADSETS GRILL SPKR REMINDERS NAME START TIME STOP TIME REPEAT HEADSETS GRILL SPKR ALERTS NAME START TIME STOP TIME...
- Page 69 HME ion|IQ™ Message Center Quick Start Guide Right Message, Right People, Right Time! CUSTOMER GREETINGS NAME START TIME STOP TIME DELAY HEADSETS GRILL SPKR REMINDERS NAME START TIME STOP TIME REPEAT HEADSETS GRILL SPKR ALERTS NAME START TIME STOP TIME...
Need help?
Do you have a question about the ion IQ and is the answer not in the manual?
Questions and answers