Table of Contents
Advertisement
Advertisement
Table of Contents
Troubleshooting

Related Manuals for Datamax LP3


Summary of Contents for Datamax LP3
- Page 1 110149-006 LP3 LABEL PRINTER User Guide...
-
Page 3: Table Of Contents
TABLE OF CONTENTS Label Printer Views........1 Front View........... 1 Back View ........... 1 Right Side View..........2 Left Side View..........2 Setting Up Your Printer ......... 3 Unpacking Your Printer......... 3 Installing Batteries ........3 Removing Batteries ........4 Charging the Batteries ...... -
Page 4: Label Printer Views
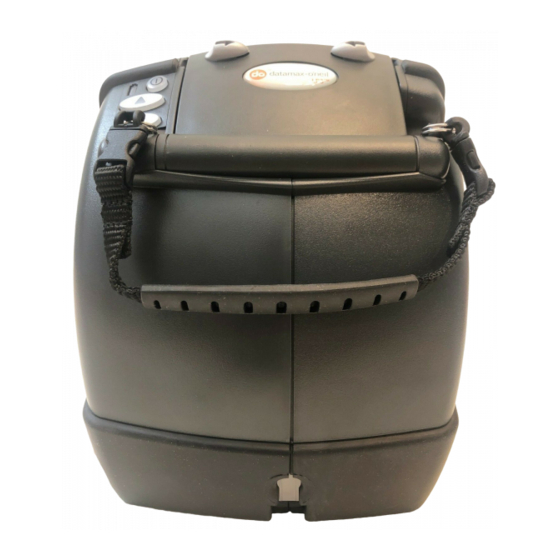
LP 3 LABEL PRINTER USER'S GUIDE Label Printer Views Front View Printhead cover (arrow) buttons Printhead cover Control panel Handle strap Data port Figure 1 Back View Roller Label presenter Figure 2... -
Page 5: Right Side View
ABEL RINTER IEWS Right Side View Media ring Media cavity Security cover/ 802.11X slot/ Bluetooth slot Figure 3 Left Side View Power port Battery 2 cavity Battery 1 cavity Figure 4... -
Page 6: Setting Up Your Printer
If the printer has been damaged: • Contact the shipping company and file a damage report. • Contact Datamax-O’Neil. • Keep all shipping materials. Installing Batteries 1. Remove any packaging material (if applicable). -
Page 7: Removing Batteries
ETTING RINTER 4. Position the battery with its contacts facing up. The battery contacts should face toward the back of the battery cavity (Figure 7). 5. Insert the battery into the battery cavity. The printer beeps one time when the first battery is installed. Do not force the battery into the battery cavity. -
Page 8: Charging The Batteries
LP 3 LABEL PRINTER USER'S GUIDE Charging the Batteries If the batteries are low when the printer turns on, the battery Using the status LED displays red. For more information, see Control Panel on page 15 . Perform the following procedure to charge the batteries: 1. -
Page 9: Determining The Batteries' Condition
Caution: The operating temperature of this portable printer is 45° C. However, the operating temperature when used with Datamax-O’Neil power supply part number 220240-100 for charging the portable printer is limited to 40 degrees C. Please charge the printer in a suitable location that meets this temperature requirement. -
Page 10: Loading Printable Media
LP 3 LABEL PRINTER USER'S GUIDE Loading Printable Media Media Guidelines Media width 1” to 3.125” Roll capacity diameter 3.5” Media types Linered label media, thermal paper * Depending on the type of media used, you may need to configure your printer. For more Configuring the Printer on information, see page 14... - Page 11 ETTING RINTER 6. Push the media as far back as possible on the spindle so that the edge of the media roll is aligned with the media “rib” of the label presenter as shown in Figure 16. Media “rib” Figure 16 Figure 15 The printer begins printing at the media rib's edge;...
- Page 12 LP 3 LABEL PRINTER USER'S GUIDE 10. Close the printer's printhead cover. The printer's printhead cover “snaps” into place when completely closed. 11. Verify the media exits straight and the media is still aligned with the second “rib” of the label presenter. Using the Label 12.
-
Page 13: Using The Label Presenter
ETTING RINTER Using the Label Presenter Use the following procedure to separate linered media using the label presenter: Note: You must configure your printer specifically to present Configuring the Printer on media. For more information, see page 14. 1. Install the linered media using the procedure described in Loading Printable Media on page 7 steps 1 through 11. - Page 14 LP 3 LABEL PRINTER USER'S GUIDE 7. Pull the slack from the media and close the label presenter (Figure 26). Edge of media Label presenter Figure 26 8. Press the Media Function button so that at least one label presents (Figure 27). The printer separates the linered media as shown in Figure 28 (side view).
-
Page 15: Printing A Self-Test
2. After printing begins, release the power button. Connecting the Printer The LP3 is designed to transmit and receive data from a host terminal. The host terminal may be your computer, handheld, or laptop. Communication can occur by using a data cable to connect the printer and the host terminal. - Page 16 LP 3 LABEL PRINTER USER'S GUIDE Removing a Data Cable 1. Tilt the printer on its side so that the printer's data port is visible (Figure 30). 2. Using a pen or small screwdriver, lift the cable connector's lever and remove the cable. Data port Figure 30...
-
Page 17: Bluetooth And/Or 802.11B Parameters
Printer on this page . Contact your network administrator to verify the proper radio settings for your environment. Configuring the Printer The printer has many configurable settings. To configure or upgrade firmware, download the latest Windows configuration program at www.datamax-oneil.com. -
Page 18: Using The Control Panel
LP 3 LABEL PRINTER USER'S GUIDE Using the Control Panel The tables on the following pages document the following: • Audio Indicators on page 15 • Battery Status LED on page 16 • Power Button/LED on page 17 • Media Function Button/LED on page 17 •... -
Page 19: Battery Status Led
SING THE ONTROL ANEL Battery Status LED Battery Description Action Status LED Red (solid): • If A/C power is not plugged • Charge batteries. The batteries in, the printer will soon turn have less than off. 5% power. • If A/C power is plugged in, •... -
Page 20: Power Button/Led
LP 3 LABEL PRINTER USER'S GUIDE Orange, red, or When the AC adapter is None. green flash - plugged into the printer's fast power port, the battery status LED flashes orange, red, or green (depending on the battery status LED color that is initially displayed) to indicate the AC adapter is plugged in. -
Page 21: Radio Button/Led
SING THE ONTROL ANEL Radio Button/LED Radio Button Short press Toggles radio power off and on. Radio LED* Blue flash - slow* RF power is on and printer is awake. Blue flash - fast* RF power is on and printer is asleep. Blue flash to solid red The printer is out of range of the access point and/or infrastructure. -
Page 22: Maintenance And Troubleshooting
LP 3 LABEL PRINTER USER'S GUIDE Maintenance and Troubleshooting Maintenance Guidelines • Keep the printer in a cool, dry place, away from direct sunlight, high temperature, and moisture. • Do not insert foreign objects into the printer. • Do not operate the printer if it appears damaged. •... -
Page 23: Troubleshooting
Mark and/or, printer prints Verify the configuration matches the continuously type of media it is printing on. Help Desk If you need additional assistance, please contact Datamax- O’Neil at (949) 458-0500. Please have the following information ready: • Model number •... -
Page 24: Supplies
LP 3 LABEL PRINTER USER'S GUIDE Supplies Media Supplies Datamax-O’Neil offers many certified grades of paper for use in the printer. Our certified supplies are guaranteed compatible — this important qualification means that rigorous performance and image life testing have been performed. -
Page 25: Agency Approvals
LP 3 LABEL PRINTER USER'S GUIDE Agency Approvals FCC Notice This equipment has been tested and found to comply with the limits for a Class B digital device, pursuant to Part 15 of the FCC Rules. These limits are designed to provide reasonable protection against harmful interference in a residential installation. - Page 26 LP 3 LABEL PRINTER USER'S GUIDE...
- Page 27 Copyright This manual and any examples contained herein are provided “as is” and are subject to change without notice. Datamax-O’Neil makes no warranty of any kind with regard to this manual, including, but not limited to, the implied warranties of merchantability and fitness for a particular purpose.
- Page 28 COPYRIGHT © 2010, DATAMAX-O’NEIL...
Need help?
Do you have a question about the LP3 and is the answer not in the manual?
Questions and answers