Pride Mobility JET 3 Owner's Manual
Hide thumbs
Also See for JET 3:
- Owner's manual (48 pages) ,
- Troubleshooting manual (4 pages) ,
- Owner's manual (40 pages)
Table of Contents

Related Manuals for Pride Mobility JET 3


Summary of Contents for Pride Mobility JET 3
- Page 1 Owner’s Manual ATTENTION: Please read the content of your owner’s manual before operating your power chair. Stylish Design and Premium Performance ® Unit 106, Heyford Park Camp Road Upper Heyford, Oxfordshire OX25 5HA www.pridemobility.com...
- Page 2 Copyright 2002 Pride Mobility Products Ltd. INFMANU1564 www.pridemobility.com UK Jet 3/Rev B/Dec02...
-
Page 3: Table Of Contents
SSEMBLY ......................21 HEEL SSEMBLY ......................21 ASTOR HEEL SSEMBLY ........................22 ARE AND AINTENANCE ......................22 REVENTIVE AINTENANCE ..............23 OW TO REPARE OWER HAIR FOR TORAGE ......................23 ORRECTIVE AINTENANCE ............................24 ARRANTY UK Jet 3/Rev B/Dec02 www.pridemobility.com... -
Page 4: Introduction
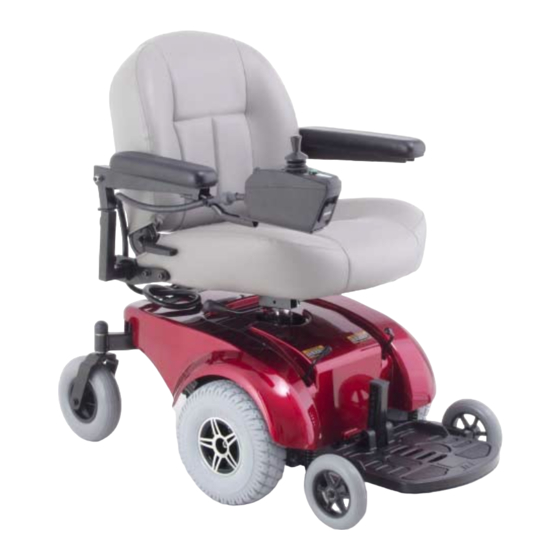
DESCRIPTION Your Pride Jet 3 is a motorised, mid-wheel drive power chair that is designed to operate both indoors and outdoors (in clear weather). It is sufficiently compact and maneuverable for some indoor environments but is also capable of negotiating some outdoor obstacles as well. - Page 5 CASTOR WHEEL DRIVE WHEEL Figure 1. Jet 3 MOTOR/BRAKE ASSEMBLY BATTERY SEAT POST CONNECTOR HOUSING MANUAL BRAKE RELEASE LEVERS BATTERY MOTOR/BRAKE ASSEMBLY ONBOARD BATTERY Figure 2. Jet 3 Power Base Assembly CHARGER (Seat and Shroud Removed) UK Jet 3/Rev B/Dec02 www.pridemobility.com...
-
Page 6: Specifications
(SAE and Metric). drive socket set (SAE and Metric). adjustable spanner. spanner set (SAE and Metric). set of screwdrivers. www.pridemobility.com UK Jet 3/Rev B/Dec02... -
Page 7: Operation
WARNING! Do not attempt to drive onto an incline without first checking your brakes. If you attempt to drive onto an incline and the brakes are not functioning correctly, you risk serious injury. UK Jet 3/Rev B/Dec02 www.pridemobility.com... -
Page 8: Maximum Recommended Incline
WARNING! To avoid personal injury or property damage, always exercise common sense when cornering. If the situation arises where you have to negotiate a sharp corner, reduce your speed and steering angle (i.e., lessen the sharpness of the turn). This greatly reduces the possibility of a tip or fall. www.pridemobility.com UK Jet 3/Rev B/Dec02... -
Page 9: Electrical System
MAIN CIRCUIT BREAKER The main circuit breaker is a safety feature built into your Jet 3. It is located at the back of the power chair. See figure 4. When the batteries and the motors are heavily strained (e.g., from excessive loads), the main circuit breaker will trip to prevent damage to the motors and the electronics. -
Page 10: Battery Replacement
Your Jet 3 may be equipped with an off-board charger. Typi- cally, off-board chargers plug into the joystick controller. (See figure 19.) If your Jet 3 is equipped with an off-board charger, refer to the instructions that come with the charger. -
Page 11: Frequently Asked Questions
(red) terminal. Connect the wire labeled FRONT BATTERY (-) to the negative (black) terminal. See figure 7. Install the battery in the front of your Jet 3ís battery tray with the battery terminals facing inward, toward the center of the Jet 3. -
Page 12: Manual Brake Release Levers
MANUAL BRAKE RELEASE LEVERS For convenience, your Jet 3 is equipped with two manual brake release levers located on the front of your Jet 3. See figure 8 and 9. These levers allow you to disengage the drive motors and maneuver the chair manually. -
Page 13: Seating System
ARMREST RECEIVER Seating System BRACKET After you have used your Jet 3 for an extended period of time, you may find the need to make some adjustments to increase your comfort. LOOSEN SETSCREW TO ADJUST ARM- WARNING! If your Jet 3 was configured by your REST WIDTH. -
Page 14: Armrest Width And Height Adjustment
2. Slide the joystick mounting bracket into or out of the armrest Figure 15. Tie-Wrap Location to the desired position. 3. Retighten the setscrew by turning it clockwise. ANGLE ADJUSTMENT SETSCREW Figure 16. Footrest Angle Adjustment www.pridemobility.com UK Jet 3/Rev B/Dec02... -
Page 15: Joystick/Controller Position
3. Reinstall the bolt into the footrest. To adjust the anti-tip wheel height: 1. Remove the seat, the body shroud, and the batteries. 2. Locate the jam nut and bolt on the anti-tip assembly. See figure 22. UK Jet 3/Rev B/Dec02 www.pridemobility.com... -
Page 16: Footrest Depth
FOOTREST DEPTH The Jet 3 uses a ball detent pin to fasten the footrest to the power base. See figure 17. To adjust the footrest depth: 1. Remove the ball detent pin from the footrest bracket. 2. Move the footrest in or out to the desired depth. - Page 17 5 volts. This reduces your power chairís speed and allows the electrical components to cool down. When the tem- perature returns to a safe level, your power chair resumes its normal speed. UK Jet 3/Rev B/Dec02 www.pridemobility.com...
-
Page 18: Vsi Controller
Unless the joystick is damaged, this action should stop your power chair. KEYPAD The keypad is located in front of the joystick. It contains keys necessary to operate your Jet 3. See figure 21. ON/OFF KEY The on/off key turns the VSI on and off. See figure 21. - Page 19 CAUTION! Failure to properly align the connectors can result in damage to the VSI, the charger harness, and the connectors. UK Jet 3/Rev B/Dec02 www.pridemobility.com...
-
Page 20: Wheels And Suspension
TYRES AND TUBES If your Jet 3 is equipped with pneumatic tyres, you should check the air pressure at least once per week. This will prolong the life of your tyres as well as help ensure the perfect operation of your chair. If you have a flat tyre, replace the tube. Replace- ment tyres and tubes are readily available at your authorised Pride dealer. -
Page 21: Anti-Tip Wheel Assembly
In this case, you may need to raise the anti-tip wheels. If you drive your Jet 3 primarily on smooth surfaces, such as linoleum or tile, you may find that you are tipping forward a bit more than you find comfortable. -
Page 22: Care And Maintenance
Check the motor brushes. Refer to ìElectrical System.î YEARLY CHECK-UP Take your power chair to your authorised Pride dealer for yearly maintenance. This will help ensure that your power chair is functioning properly and help prevent future complications. www.pridemobility.com UK Jet 3/Rev B/Dec02... -
Page 23: How To Prepare Your Power Chair For Storage
CAUTION! Some of the parts of your Jet 3 are susceptible to extreme changes in temperature. Always keep your Jet 3 between the temperatures of -8°C/18°F and 50°C/122°F. -
Page 24: Warranty
WARRANTY EXCLUSIONS Warranty service can be performed by your authorised Pride dealer. Please contact your authorised Pride dealer for advice on the current cost affecting the service visit. www.pridemobility.com UK Jet 3/Rev B/Dec02... - Page 25 Notes UK Jet 3/Rev B/Dec02 www.pridemobility.com...
- Page 26 Notes www.pridemobility.com UK Jet 3/Rev B/Dec02...
- Page 27 Notes UK Jet 3/Rev B/Dec02 www.pridemobility.com...
- Page 28 Quality Control Thank you for making the Jet 3 your choice in power chairs. We have thoroughly inspected your Jet 3. The following checkmarks indicate that it has been driven and inspected. Model # Controller Serial # Serial # Inclusion of all...
Need help?
Do you have a question about the JET 3 and is the answer not in the manual?
Questions and answers