Table of Contents
Advertisement
Advertisement
Table of Contents

Related Manuals for Pride Mobility JET 3


Summary of Contents for Pride Mobility JET 3
- Page 1 All manuals and user guides at all-guides.com Owner’s Manual ATTENTION: Please read the content of your owner’s manual before operating your power chair. Stylish Design and Premium Performance Exeter, PA St. Catharines, ON 1-800-800-8586 www.pridemobility.com...
- Page 2 WARNING! Failure to heed the warnings in this owner’s manual may result in personal injury. CAUTION! Failure to heed the cautions in this owner’s manual may result in damage to your power chair. Copyright ©2003 Pride Mobility Products Corp. INFMANU1195 www.pridemobility.com Jet 3/Rev I/Feb03...
-
Page 3: Table Of Contents
C O N T E N T S INTRODUCTION......................... 4 SAFETY ............................6 III. EMI/RFI ............................14 IV. THE JET 3 ..........................16 COMFORT ADJUSTMENTS....................21 VI. DISASSEMBLY ......................... 25 VII. BATTERIES AND CHARGING .................... 26 VIII. OPERATION ..........................30 IX. -
Page 4: Introduction
I N T R O D U C T I O N INTRODUCTION Welcome to Pride Mobility Products Corporation (Pride). Congratulations on the purchase of your new Pride Power Chair. The Pride Power Chair design combines the most advanced state-of-the-art components with modern, attractive styling. - Page 5 Address:_____________________________________________________________________________ Phone Number:________________________________________________________________________ Purchase Date:________________________________________________________________________ NOTE: If you ever lose or misplace your product registration card or your copy of this manual, contact us and we will be glad to send you a new one immediately. Jet 3/Rev I/Feb03 www.pridemobility.com...
-
Page 6: Safety
Check all electrical connections. Make sure they are tight and not corroded. n Check all controller connections to the electronics tray. Make sure they are secured properly. n Check the brakes. See XI. “Care and Maintenance.” n Check battery charge. See VII. “Batteries and Charging.” www.pridemobility.com Jet 3/Rev I/Feb03... - Page 7 If your power chair starts to move down the incline faster than you anticipated or desired, allow it to come to a complete stop by releasing the joystick, then push the joystick forward slightly to ensure a safely controlled descent. Jet 3/Rev I/Feb03 www.pridemobility.com...
- Page 8 WARNING! When cornering sharply, reduce your speed. This greatly reduces the possibil- ity of a tip or fall. To avoid personal injury and/or property damage, always exercise com- mon sense when cornering. www.pridemobility.com Jet 3/Rev I/Feb03...
- Page 9 Your power chair is equipped with a manual freewheel lever to allow for manual maneuverability by a trained attendant. For more information about how to place your power chair into and out of freewheel mode, see IV. “The Jet 3.” WARNING! Do not use your power chair in freewheel mode without an attendant present.
- Page 10 Transfers Transferring onto and off of your power chair requires a good sense of balance. Always have an attendant or healthcare professional present while learning to properly transfer yourself. www.pridemobility.com Jet 3/Rev I/Feb03...
- Page 11 Turn the power off. See VIII. “Operation.” n Ensure your power chair is not in freewheel mode. See IV. “The Jet 3.” n Turn both caster wheels toward the transfer destination to improve power chair stability during transfer.
- Page 12 This will prevent unexpected motion from inadvertent joystick contact. This will also eliminate the possibility of unintended chair movement from electromagnetic (EM) sources. Failure to do so may result in personal injury. www.pridemobility.com Jet 3/Rev I/Feb03...
- Page 13 Removable Parts WARNING! Do not attempt to lift or move a power chair by any of its removable parts. Personal injury and/or damage to the power chair may result. Jet 3/Rev I/Feb03 www.pridemobility.com...
-
Page 14: Emi/Rfi
Furthermore, it is possible for EMI/RFI to unexpectedly release the brakes on a power chair. Some intense sources of EMI/RFI can even damage the control system of your Jet 3. Is there any way to know for sure whether radio waves are responsible for the unintended motion... - Page 15 However, it is always possible that problems could arise if your power chair is close to a source of radio waves. Therefore, it is very important to be alert to this possibility. The Jet 3 meets or exceeds an immunity level of at least 20 V/m.
-
Page 16: The Jet 3
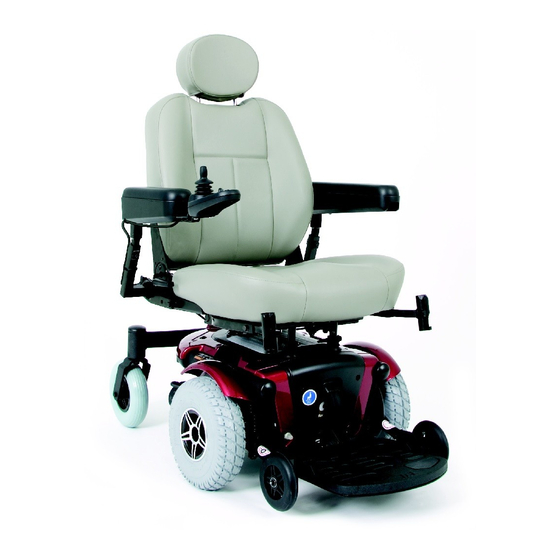
J E T Your Jet 3 has two main assemblies: the seat and the power base. See figure 3. There are a variety of seating options that are designed to accommodate most users. Typically, the seating system includes armrests, seatback, and joystick/controller. - Page 17 Pilot Controller VSI Controller (standard) Weight Capacity: 250 lbs. Component Weights: Base: 95 lbs. Seat: 36.5 lbs. Batteries: 24.5 lbs. each Warranties: Five-year limited warranty on frame One-year warranty on electronics One-year warranty on drive motors Jet 3/Rev I/Feb03 www.pridemobility.com...
- Page 18 J E T MOTOR/BRAKE ASSEMBLY BATTERY CONNECTOR HOUSING SEAT POST FREEWHEEL LEVERS BATTERY MOTOR/BRAKE ASSEMBLY BATTERY CHARGER Figure 4a. Jet 3 Power Base (Shroud Removed) CONTROLLER HARNESS CONNECTORS MAIN CIRCUIT BREAKER AMMETER BATTERY CHARGER POWER CORD RECEPTACLE Figure 4b. Electronics Connector Housing www.pridemobility.com...
- Page 19 ELECTRONICS CONNECTOR HOUSING The connector housing is located on the rear of the Jet 3. See figures 4a and 4b. The connector housing holds the ammeter, the battery charger power cord receptacle, the main circuit breaker, and controller harness connectors.
- Page 20 3. Turn the levers inward to disengage the drive motors (freewheel mode). See figure 7. If a lever is difficult to move in either direction, rock the Jet 3 gently back and forth while turning the levers. The lever should then move to the desired position.
-
Page 21: Comfort Adjustments
C O M F O R T A D J U S T M E N T S After you have used your Jet 3 for an extended period of time, you may find the need to make some adjustments increase your comfort. - Page 22 6. Place the joystick bracket in the other armrest. 7. Tighten the setscrew in each armrest. 8. Connect the controller cable to the armrest with a new wire tie. See figure 12. Figure 12. Wire Tie Location www.pridemobility.com Jet 3/Rev I/Feb03...
- Page 23 3. Reinstall the bolt into the footrest. FOOTREST DEPTH The Jet 3 uses a ball detent pin to fasten footrest to the power base. See figure 14. To adjust the footrest depth: 1. Remove the ball detent pin from the footrest bracket.
- Page 24 Consult your authorized Pride provider before attempting to to a height of 1/2-in. off the ground. This is the ideal setting for most Jet 3 users. However, you may encounter change the anti-tip wheel height! Changing the anti-tip height affects handling situations where you may need to adjust the anti-tip wheels.
-
Page 25: Disassembly
To remove the body shroud: 1. Turn the power off. 2. Make sure the Jet 3’s motors are engaged. See IV. “The Jet 3.” 3. Unplug the controller wiring harness. 4. Pull lever and turn the seat slightly while lifting. -
Page 26: Batteries And Charging
CHARGING YOUR BATTERIES The battery charger is one of the most important parts of your Jet 3. The battery charger is designed to optimize your Jet 3’s performance by charging the batteries quickly and easily. The charging system consists of the charger, a charger fuse, and the ammeter. - Page 27 1. Fully recharge any new battery prior to its initial use. This will bring the battery up to about 90% of its peak performance. 2. Run your Jet 3 about the house. Move slowly at first and don’t stray too far until you grow accustomed to the controls and break-in the batteries.
- Page 28 DAILY USE If you use your Jet 3 on a daily basis, charge the batteries as soon as you are finished using it for the day. Each morning your Jet 3 will be ready to give you a full day’s service. We recommend that you charge the batteries for 8 to 14 hours after daily use.
- Page 29 NOTE: If you are storing a Jet 3 for an extended period of time, you may wish to block the unit up off the ground or floor with several boards placed under the frame. This will keep the tires off the ground and prevent the possibility of flat spots developing where the tires rest on the ground or floor.
-
Page 30: Operation
Unless the joystick is damaged, this action should stop your power chair. Keypad The keypad is located in front of the joystick. It contains keys necessary to operate your Jazzy. See figure 18. www.pridemobility.com Jet 3/Rev I/Feb03... - Page 31 The speed/profile setting is displayed on the maximum speed/profile indicator. If your power chair was programmed with a drive profile, contact your authorized Pride provider for more information. Jet 3/Rev I/Feb03 www.pridemobility.com...
- Page 32 This reduces your power chair’s “power,” which could also reduce your power chair’s speed, and allows the electrical components and motors to cool down. When the temperature returns to a safe level, your power chair resumes its normal operation. www.pridemobility.com Jet 3/Rev I/Feb03...
- Page 33 The parking brakes have a bad connection. Check the parking brake and motor connections. Make sure the controller connections are secure. An excessive voltage has been applied to the controller. This is usually caused by a poor battery connection. Check the battery connections. Jet 3/Rev I/Feb03 www.pridemobility.com...
- Page 34 WARNING! Unless faced with an emergency situation, do not use the on/off push button to stop the chair. This will cause the power chair to stop abruptly. WARNING! Always turn the power off when you are stationary to prevent unexpected movement. www.pridemobility.com Jet 3/Rev I/Feb03...
- Page 35 CAUTION! Failure to properly align the connectors can result in damage to the Pilot, the charger harness, and the connectors. Jet 3/Rev I/Feb03 www.pridemobility.com...
- Page 36 Right Motor Wiring Fault Check right motor wiring. Right Motor Disconnected Check right motor wiring. Left Motor Wiring Fault Check left motor wiring. Left Motor Disconnected Check left motor wiring. Low Battery Voltage Check batteries/battery wiring. www.pridemobility.com Jet 3/Rev I/Feb03...
-
Page 37: Care And Maintenance
If you follow the maintenance checks in this section as scheduled, you can help ensure that your Jet 3 gives you years of trouble-free operation. If you have any doubt as to your Jet 3’s care or operation, contact your authorized Pride provider. - Page 38 4. Repeat this test three times, pushing the joystick backwards, left, and right. MONTHLY CHECKS n Check that the anti-tip wheels are not rubbing the ground when you are operating the Jet 3. Adjust them as necessary. See V. “Comfort Adjustments.”...
- Page 39 TIRES AND TUBES If your Jet 3 is equipped with pneumatic tires, you should check the air pressure at least once per week. This will prolong the life of your tires as well as help ensure the perfect operation of your chair. If you have a flat tire, replace the tube.
- Page 40 3. Remove the seat. 4. Remove the body shroud. 5. Ensure the Jet 3 is not in freewheel mode. See IV. “The Jet 3.” 6. Locate the two wiring harnesses attached to your batteries. Disconnect these two harnesses from their respective quick disconnects.
- Page 41 Disconnect both batteries before load testing and follow the directions that came with the load tester. If either one of the battery fails the load test, replace both of them. If your Jet 3 still does not power up, contact your authorized Pride provider.
- Page 42 WHEN TO SEE YOUR AUTHORIZED PRIDE PROVIDER FOR SERVICE The following symptoms could indicate a serious problem with your Jet 3. If necessary, contact your authorized Pride provider. When calling, have ready the model number, the serial number, the nature of the problem, and the trouble code if available.
-
Page 43: Options And Accessories
SWING-AWAY LEG RESTS Swing-away Leg Rests provide the Jet 3 with the ability to swing each leg rest to the side to aid in mounting and dismounting the Jet 3. SPECIALTY SEATING SYSTEMS Your Jet 3 may be equipped with specialty seating or with the Versa Seat. -
Page 44: Warranty
Warranty service can be performed by your authorized Pride provider. Do not return faulty parts to Pride without prior consent. All transportation costs and shipping damage incurred while submitting parts for repair or replacement are the responsibility of the purchaser. www.pridemobility.com Jet 3/Rev I/Feb03... - Page 45 This warranty gives you specific rights, and you may also have other rights which vary from state to state. Please fill out and return the warranty card to Pride. This will aid Pride in providing the best possible technical and customer service. Jet 3/Rev I/Feb03 www.pridemobility.com...
- Page 46 All manuals and user guides at all-guides.com N O T E S www.pridemobility.com Jet 3/Rev I/Feb03...
- Page 47 Power Chairs Quality Control - Model JET 3 Thank you for making the Jet 3 your choice in power chairs. We have thoroughly inspected your Jet 3. The following checkmarks indicate that it has been driven and inspected. Model #______________...
Need help?
Do you have a question about the JET 3 and is the answer not in the manual?
Questions and answers