Table of Contents
Advertisement
Advertisement
Table of Contents

Related Manuals for DieHard 28.71219


Summary of Contents for DieHard 28.71219
-
Page 1: Battery Charger
OPERATOR’S MANUAL Battery Charger Model No. 28.71219 Read and follow all Safety Rules and Operating Instructions before Every Use of this Product. SAvE ThESE INSTRUCTIONS. Sears Brands Management Corporation, hoffman Estates, IL 60179 U.S.A. 00-99-000999/01... -
Page 3: Table Of Contents
When operated and maintained according to all supplied instructions, if this DieHard product fails due to a defect in material or workmanship within 3 years from the date of purchase, return it to any DieHard outlet in the United States for free replacement. - Page 4 IMPORTANT: READ AND SAvE ThIS SAfETY AND INSTRUCTION MANUAL. SAvE ThESE INSTRUCTIONS – The 71219 offers a wide range of features to accommodate your needs. This manual will show you how to use your charger safely and effectively. Please read, understand and follow these instructions and precautions carefully, as this manual contains important safety and operating instructions.
-
Page 5: Important Safety Instructions
IMPORTANT SAfETY INSTRUCTIONS - SAvE ThESE INSTRUCTIONS - This manual contains important safety and operating instructions RISK Of ELECTRIC ShOCK OR fIRE. Keep out of reach of children. Do not expose the charger to rain or snow. Use only recommended attachments. Use of an attachment not recommended or sold by the battery charger manufacturer may result in a risk of fire, electric shock or injury to persons or damage to property. -
Page 6: Personal Precautions
Do not disassemble the charger; take it to a qualified service person when service or repair is required. Incorrect reassembly may result in a risk of fire or electric shock. (Call customer service at: 1-800-732-7764.) RISK Of EXPLOSIvE gASES. 1.10 WORKING IN THE VICINITY OF A LEAD-ACID BATTERY IS DANGEROUS. -
Page 7: Preparing To Charge
Be extra cautious to reduce the risk of dropping a metal tool onto the battery. It might spark or short-circuit the battery or other electrical part that may cause an explosion. Use this charger for charging LEAD-ACID batteries only. It is not intended to supply power to a low voltage electrical system other than in a starter-motor application. -
Page 8: Charger Location
Be sure the area around the battery is well ventilated while the battery is being charged. Clean the battery terminals before charging the battery. During cleaning, keep airborne corrosion from coming into contact with your eyes, nose and mouth. Use baking soda and water to neutralize the battery acid and help eliminate airborne corrosion. -
Page 9: Dc Connection Precautions
Do not operate the charger in a closed-in area or restrict the ventilation in any way. DC CONNECTION PRECAUTIONS Connect and disconnect the DC output clips only after setting all of the charger switches to the “off” position (if applicable) and removing the AC plug from the electrical outlet. - Page 10 Check the polarity of the battery posts. The POSITIVE (POS, P, +) battery post usually has a larger diameter then the NEGATIVE (NEG, N, -) post. Determine which post of the battery is grounded (connected) to the chassis. If the negative post is grounded to the chassis (as in most vehicles), see step 6.5.
-
Page 11: Follow These Steps When Battery Is Outside Vehicle
fOLLOW ThESE STEPS WhEN BATTERY IS OUTSIDE vEhICLE A SPARK NEAR ThE BATTERY MAY CAUSE A BATTERY EXPLOSION. TO REDUCE ThE RISK Of A SPARK NEAR ThE BATTERY: Check the polarity of the battery posts. The POSITIVE (POS, P, +) battery post usually has a larger diameter than the NEGATIVE (NEG, N, -) post. -
Page 12: Grounding And Ac Power Cord Connections
gROUNDINg AND AC POWER CORD CONNECTIONS RISK Of ELECTRIC ShOCK OR fIRE. This battery charger is for use on a nominal 120-volt circuit and has a grounded plug that looks like the plug illustrated. The charger must be grounded to reduce the risk of electric shock. The plug must be plugged into an outlet that is properly installed and grounded in accordance with all local codes and ordinances. -
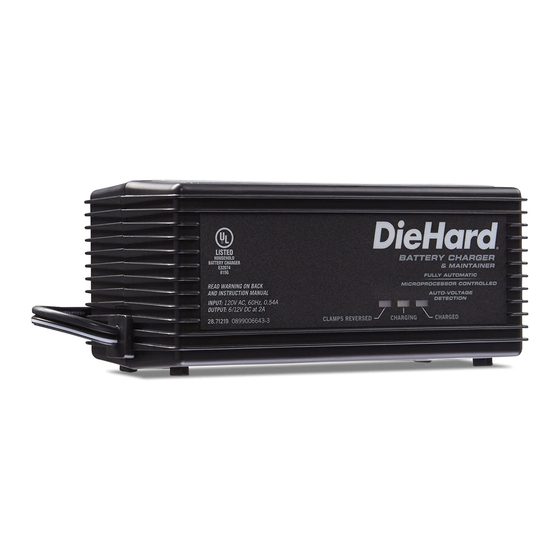
Page 13: Features/Control Panel
fEATURES/CONTROL PANEL Amp/Volt Selector Switch Battery Status LEDs AC Power cord Battery Clamp Cable Assembly Ring Terminal Cable Assembly 12V Plug Cable Assembly Charger Quick-Connect Cable 10.1 Amp/volt Selector Switch 2A, 12v AMP/vOLT SELECTOR 4A, 6v 10.2 LED Display ChECK BATTERY (red) LED lit: Indicates the battery is not properly connected to the charger. -
Page 14: Operating Instructions
ChECK BATTERY (red) LED blinking: Indicates the charger is in abort mode. ChARgINg (yellow) LED lit: Indicates the charger is charging the battery. ChARgED (green) LED lit: Indicates the battery is fully charged and the charger is in maintain mode. NOTE: See the Operating Instructions section for a complete description of the charger modes. - Page 15 USINg ThE QUICK-DISCONNECT CABLE CONNECTORS Connect any of the three output cable assemblies to the charger in seconds. Make sure to place the charger on a dry, non- flammable surface. NOTE: Never connect the clamp and ring terminal connectors together for use in other applications, such as external battery or other power source charging, or to extend the output cable length, as reverse polarity and/or overcharge conditions will occur.
- Page 16 12v ACCESSORY PLUg Charge or maintain your battery without lifting the hood. Connect the end of the 12V Accessory Plug Cable Quick- Connect to the charger. Insert the 12V accessory plug into the 12V accessory outlet. Route the power cord from the charger through the vehicle’s open window.
-
Page 17: Battery Percent And Charge Times
Therefore, we do not recommend charging a large battery with this unit. NOTE: The maintain mode technology utilized in DieHard’s chargers allows you to safely charge and maintain a healthy battery for extended periods of time. However, problems with the battery, electrical problems in the vehicle, improper connections or other unanticipated conditions could cause excessive current draws. -
Page 18: Maintenance Instructions
12.1 Charging Times Battery Condition 2 Amp, 12 Volt Battery 50% Discharged 100% Discharged Ampere Hour Battery Approximate Average Charge Time in Capacity Hours 12.4 Battery Condition 4 Amp, 6 volt Battery 50% Discharged 100% Discharged Ampere Hour Battery Approximate Average Charge Time in Capacity Hours MAINTENANCE INSTRUCTIONS... -
Page 19: Moving And Storage Instructions
MOvINg AND STORAgE INSTRUCTIONS 14.1 Store the charger unplugged, in an upright condition. The AC cord will still conduct electricity until it is unplugged from the outlet. 14.2 Store inside, in a dry, cool place. 14.3 Do not store the clips on or around metal, clipped together or clipped to cables. -
Page 20: Before Returning For Repairs
REASON/ PROBLEM POSSIBLE CAUSE SOLUTION CHECK BATTERY Battery is not Make sure the (red) LED is lit. properly connected to connections from the (continued) the charger. battery connector cable to the battery and to the charger are tight. CHECK BATTERY Charger is in abort See “Aborted Charge”...
Need help?
Do you have a question about the 28.71219 and is the answer not in the manual?
Questions and answers
Can you use this charger for AGM batteries
Yes, the DieHard charger with part number 28.71219, made by Schumacher, can be used for AGM batteries.
This answer is automatically generated
Why does the yellow light blink constantly and how do I fix it?
A constantly blinking yellow light (CHECK light) on a DieHard 28.71219 indicates the battery did not reach full charge within 24 hours. This may be due to:
- A very large battery or multiple batteries needing more power than the charger can deliver.
- A faulty battery.
To fix it:
1. Reset the charger by unplugging it or briefly disconnecting the negative battery clip.
2. Reconnect everything properly.
3. Select the desired charge rate and battery type again.
If the issue continues, the battery may be faulty.
This answer is automatically generated