
Related Manuals for Monogram Vent Hood


Summary of Contents for Monogram Vent Hood
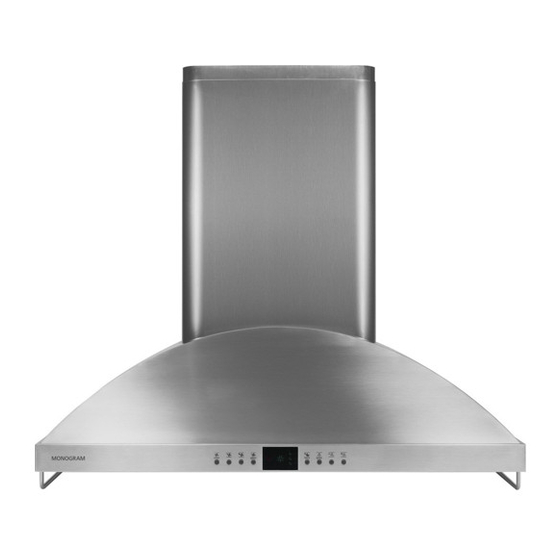
- Page 1 Installation Instructions If you have questions, call 800-GE-CARES or visit our website at: www.monogram.com ZV950 36" Stainless Steel Vent Hood Monogram. ® We bring good things to life.
-
Page 2: Safety Information
Safety Information BEFORE YOU BEGIN WARNING: TO REDUCE THE RISK Read these instructions completely and carefully. OF FIRE, ELECTRICAL SHOCK OR INJURY TO IMPORTANT PERSONS, OBSERVE THE FOLLOWING: • - Save these instructions for A. Use this unit only in the manner intended by the local inspector’s use. -
Page 3: Table Of Contents
35-5/8" 25" *The supplied duct cover fits 8 ft. to 10 ft. ceilings. The vent hood must be installed 25-1/2” min. and 30” 36" Min. max. above the cooking surface. Use the decorative duct cover to conceal ductwork running from the top of the hood to the ceiling. -
Page 4: Advance Planning
See page 8. vent exhaust air into spaces within walls or ceilings or • We strongly recommend that the vent hood with duct into attics, crawl spaces, or garages. cover be on site before final framing and wall finishing... -
Page 5: Duct Fittings
26 ft. * Actual length of straight duct plus duct fitting equivalent. Equivalent length of duct pieces are based on actual Total Duct Run tests conducted by GE Evaluation Engineering and reflect requirements for good venting performance with any ventilation hood. -
Page 6: Tools And Materials Required
• Strain relief for junction cover. • 8" round metal duct, length to suit installation. REMOVE THE PACKAGING The vent hood is shipped secured to a shipping board with a shipping bracket and 4 screws. • Remove the duct cover, parts box and other packaging. -
Page 7: Check Installation Hardware
Installation Preparation DUCTWORK, WIRING LOCATIONS CHECK INSTALLATION HARDWARE Determine the exact location of the vent hood. Locate the hardware accessory box packed with the • Locate the template packed with the literature. hood and check contents. – Measure 36" from the floor to the top of the cooking surface. -
Page 8: Installation Instructions
2 INSTALL MOUNTING BRACKETS 1 INSTALL FRAMING FOR HOOD SUPPORT This vent hood must be secured to the horizontal support or wall studs. IMPORTANT: Framing must be capable of • With the template taped in place, use a punch to supporting 100 lbs. -
Page 9: Step 3, Install Duct Bracket
Installation Instructions 3 INSTALL DUCT BRACKET The duct bracket must be installed against the ceiling. Pre-Tap Pre-Tap This bracket will hold the decorative duct cover in place Side Side at the top. Screw Screw • Install the 2 small screws into the sides of the duct bracket. -
Page 10: Step 5, Connect Ductwork
Installation Instructions 5 CONNECT DUCTWORK • Install ductwork, making connections in direction of Air Flow airflow as illustrated. Duct Tape • Push duct over the exhaust outlet until it reaches the Over Seam duct stops. and Screw Screw • Secure joints in ductwork with sheetmetal screws. •... -
Page 11: Step 8, Install Filters
Installation Instructions 8 INSTALL FILTERS • Remove protective film on the filters. • Install all 3 grease filters. • Tip the filter into the slots at the rear of the opening. • To remove the filters, grasp the knob, push the filter Lift the filter and pull the knob forward until the filter towards the rear and tilt downwards. - Page 12 Note: While performing installations described in this book, safety glasses or goggles should be worn. For Monogram local service in your area, call 1-800-444-1845. Note: Product improvement is a continuing endeavor at General Electric. Therefore, materials, appearance and specifications are subject to change without notice. Pub.
Need help?
Do you have a question about the Vent Hood and is the answer not in the manual?
Questions and answers