
Related Manuals for Ness EDSR100


Summary of Contents for Ness EDSR100
- Page 1 EDSR100 D I G I TA L V I D E O R E C O R D E R I N S T R U C T I O N M A N U A L Before installing and using this unit, please read this manual carefully.
-
Page 2: Safety Warning
Safety Warning WARNING TO REDUCE RISK OF FIRE OR ELECTRIC SHOCK, DO NOT EXPOSE THIS APPLIANCE TO RAIN OR MOISTURE CAUTION DO NOT REMOVE COVER. NO USER SERVICEABLE PARTS INSIDE. REFER SERVICING TO QUALIFIED SERVICE PERSONNEL. WARNING: This equipment has been tested and found to comply with the limits for a Class “A” digital device, pursuant to part 15 of the FCC Rules. -
Page 3: Table Of Contents
Table of Contents Page Front Panel Controls……………….……………………………………………… 4 . 5. 6. Instant Recording Controls …………………………………………………………………. 7. Normal & Instant Record Setting Menu Normal Playback……………………………………………………………… 8. 9. 10. 11. 12. Normal Playback…………………………………………………………………………………………………………... Search Playback……………………………………………………………………………………………………… Copying Images ………………………………….………………………………… 13. 14. 15. Still Image Copy…………………………………………………………………………………………………………… Copy to Movie File……...…………………………………………………………………………………………………. -
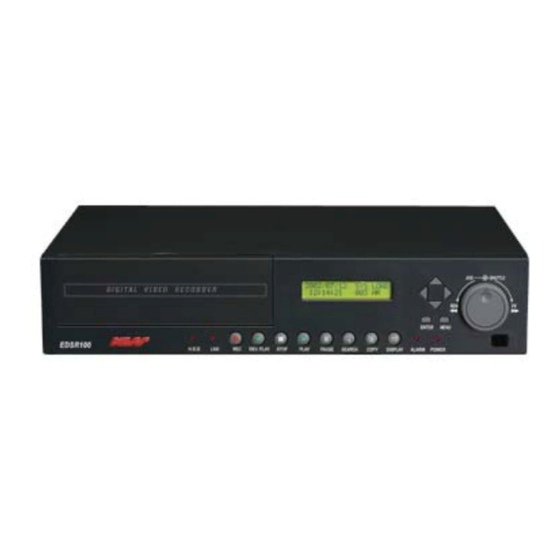
Page 4: Front Panel Controls
Front Panel Control 2. Front Panel Controls HDD : HDD Activity, the LED will flash indicating that the HDD is active. LAN : LAN Access, the LED will flash when the LAN is accessed. ALARM : The LED will flash when an alarm occurs. POWER : Indicates Power is ON. - Page 5 Front Panel Control ENTER : Press this Button to confirm the selection or data changed. MENU : Press this Button to enter the Installation Setup menu. Note: This area is reserved for the Technician, and should not be ACCESSED by the user. Remote Control IR Remote receiver Jog and Shuttle Dial...
- Page 6 Front Panel Control LCD Display 2002/04/24 SYS LOAD Switch on the power, “system loading” will be shown 12:00:00 002 HR for10 seconds, both on the LCD display & Main monitor screen. In Standby mode, the date/time is the current date/time and 2002/04/24 STANDARD shows the quality and rate setting for normal recording.
-
Page 7: Instant Recording Controls
7. INSTANT RECORDING Press the Record Button to start the recording. Video out Press the REC button to commence recording. RECORD •The recording rate and recording quality are 002 HR set in the Record Set menu • “ RECORD ” appears in the operating display •... -
Page 8: Playing Back
Playing Back 8. NORMAL PLAYBACK (1) Playback PLAY button : Starts Playback of video. PLAY REV.PLAY button: Starts reverse playback of video. REV.PLAY (2) STOP STOP button : stops recording or playing. STOP (3) Fast Forward/Reverse Playback PLAY button to start playback of video.. PLAY Turn the shuttle dial clockwise and fast forward playback starts. - Page 9 Playing Back (4) Slow Forward/Reverse Playback PAUSE button: Press to freeze playback video picture. PAUSE Turn the shuttle dial clockwise and slow forward playback starts. The speed will show on the LCD and the right upper corner of the screen. >>...
-
Page 10: Search Playback
Playing Back SEARCH & PLAYBACK (10) Segment Search Playback Note: Press the STOP Button to Stop RECORDING before Searching for any Video Playback. Press the SEARCH Button to enter the Search menu. SEARCH SEARCH MENU BY SEGMENT LIST BY ALARM LIST BY DATA TIME Using the keys to move the cursor to Highlight over the BY SEGMENT LIST menu ,... - Page 11 Playing Back (11) Alarm Search Playback Note: Press the STOP Button to Stop RECORDING before Searching for any Video Playback. Press the SEARCH Button to enter the Search menu. SEARCH SEARCH MENU BY SEGMENT LIST BY ALARM LIST BY DATE TIME Using the keys to move the cursor to Highlight over the BY ALARM LIST Title, and press the ENTER Button to select next menu.
- Page 12 Playing Back (12) Date/Time Search Playback Note: Press the STOP Button to Stop RECORDING before Searching for any Video Playback. Press the SEARCH Button to enter the Search menu SEARCH SEARCH MENU BY SEGMENT LIST BY ALARM LIST BY DATE/TIME Using the Buttons to move the cursor to Highlight over the Year or Month or Day or Hour or Minute or Seconds and use the...
-
Page 13: Still Image Copy
COPY 13. COPY Insert a Compact Flash card into the Compact Flash bay behind the HDD cover. When inserting the Compact Flash card, make sure that the direction of insertion is correct. STILL IMAGE COPY Press the PLAY button to start play back. PLAY Press the PAUSE button to freeze the picture required for copying.. -
Page 14: Copy To Movie File
COPY 14. COPY the MOVIE FILE Press the PLAY button to start playback. PLAY Press the COPY button and the copy menu will appear with command prompts.. COPY COPY TO MOVIE FILE Press COPY To Step Copy Press PLAY To Continue Copy Press PAUSE To Stop Continue Press STOP... - Page 15 COPY COPY the MOVIE FILE Cont.: Press the PAUSE button to stop movie copying. PAUSE Press the STOP button to end new movie copying. STOP Note: Copied images are stored as a movie picture. Copied files are saved as .MOV file. Use QuickTime to play the retrieved .MOV files.
-
Page 16: Remote Controller
Optional Remote Controller 16. Remote Controller (Optional) The remote controller is an accessory to enhance the handy operations of EDSR100 RC-100 RC-100 (Figure 1). You can operate all functions settings via the IR remote control. The effective distance is up to 10 meters without any obstacle. - Page 17 1689H 1266H 1013H 844H 724H 633H 0.311 4763H 3572H 2858H 2381H 2041H 1786H 0.207 7156H 5367H 4294H 3578H 3067H 2683H 0.156 9646H 7122H 5698H 4748H 4070H 3561H For Smaller or Larger Hard Drive Storage ranges, Contact Your NESS CCTV DEALER...
-
Page 18: Appendix-B/ Security Lock Setting
SECURITY LOCK SETTING Press the REC Button 5 times during record mode, this will lock all Buttons from Control on the front panel. When you Press STOP Button, the system will ask for the password. By entering the correct password, all buttons will be unlocked for use. STOP Front panel Button / Number configuration. - Page 19 2) Open the Hard Drive Cover and disconnect the Hard Drive by turning the Hard Drive Key Lock OFF. 3) Turn ON the EDSR100, wait for the LCD screen to display normal time date, status information. 4) Turn ON the Hard Drive Lock, wait for the ( System Loading ) indication on the Monitor to stop flashing and disappear, Now Press REC to resume normal recording.
- Page 20 All rights reserved. No part of this publication may be reproduced, transmitted or stored in a retrieval system in any form or by any means, electronic, mechanical, photocopying, recording, or otherwise, without the prior written permission of Ness. Ness reserves the right to make changes to features and specifications at any time without prior notification in the interest of ongoing product development and improvement.
Need help?
Do you have a question about the EDSR100 and is the answer not in the manual?
Questions and answers