Dell Inspiron 2500 Factory Service Manual
Hide thumbs
Also See for Inspiron 2500:
- Solution manual (118 pages) ,
- Factory service manual (3 pages) ,
- Start here (2 pages)
Table of Contents
Advertisement
Advertisement
Table of Contents

Related Manuals for Dell Inspiron 2500


Summary of Contents for Dell Inspiron 2500
- Page 1 Thank you for purchasing this Factory Service Manual CD/DVD from servicemanuals4u.com. Please check out our eBay auctions for more great deals on Factory Service Manuals: servicemanuals4u...
-
Page 2: Dell™ Inspiron™ 2500 Systems
Reproduction in any manner whatsoever without the written permission of Dell Computer Corporation is strictly forbidden. Trademarks used in this text: Dell, the DELL logo, and Inspiron are trademarks of Dell Computer Corporation; Intel and Pentium are registered trademarks and Celeron is a trademark of Intel Corporation; Microsoft and Windows are registered trademarks of Microsoft Corporation. - Page 3 Macrovision Corporation, and is intended for home and other limited viewing uses only unless otherwise authorized by Macrovision Corporation. Reverse engineering or disassembly is prohibited. February 2002 Rev. A03 file:///I|/SERVICE%20MANUALS/DELL%20MANUALS/LAP..._checked%20ok/Inspiron/2500/2500%20SM/index.htm (2 of 2)6/21/2004 12:45:22 AM...
-
Page 4: A Tour Of Your Computer
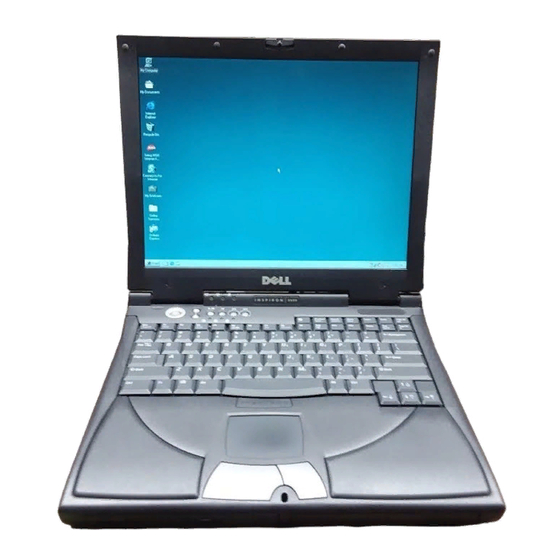
A Tour of Your Computer : Dell Inspiron 2500 Systems Back to Contents Page A Tour of Your Computer Dell™ Inspiron™ 2500 Systems Front View Left Side View Right Side View Back View Front View file:///I|/SERVICE%20MANUALS/DELL%20MANUALS/LA..._checked%20ok/Inspiron/2500/2500%20SM/tour.htm (1 of 15)6/21/2004 12:45:24 AM... -
Page 5: Display Latch
A Tour of Your Computer : Dell Inspiron 2500 Systems Display Latch This latch keeps the display locked in place when the display is closed. Display The computer has a color LCD. Device Status Lights file:///I|/SERVICE%20MANUALS/DELL%20MANUALS/LA..._checked%20ok/Inspiron/2500/2500%20SM/tour.htm (2 of 15)6/21/2004 12:45:24 AM... - Page 6 A Tour of Your Computer : Dell Inspiron 2500 Systems The lights below the display indicate the following: The light labeled turns on when the computer is turned on and blinks when the computer is in standby mode. The light labeled turns on steadily or blinks to indicate the battery charge status.
-
Page 7: Air Intake
A Tour of Your Computer : Dell Inspiron 2500 Systems NOTICE: To avoid data loss, never turn off the computer while the green light labeled flashing. Air Intake HINT: The computer turns on the fans only when the computer gets hot. They may run most of the time or very seldom, depending on your use of the computer. -
Page 8: Touch Pad
A Tour of Your Computer : Dell Inspiron 2500 Systems The green lights located above the keyboard indicate the following: The light labeled turns on when you press to enable the numeric keypad. The light labeled turns on when you press to enable the uppercase letter function. -
Page 9: Battery Bay
With a charged battery in this bay, you can use the computer without plugging it in to an electrical outlet. Media Bay You can install devices such as a floppy drive, an internal Zip drive, or a Dell TravelLite™ travel module in the media bay. Touch Pad Buttons These buttons correspond to the left and right buttons on a standard mouse. -
Page 10: Power Button
A Tour of Your Computer : Dell Inspiron 2500 Systems HINT: To launch the Dell Solution Center, the computer must be turned on and functioning properly. Press this button to launch the Dell Solution Center, where you can find support and educational tools that Dell has installed on your computer. -
Page 11: Volume Control Buttons
A Tour of Your Computer : Dell Inspiron 2500 Systems Press the power button to turn on the computer. If the computer stops responding, press and hold the power button until the computer turns off completely (this may take several seconds). -
Page 12: Security Cable Slot
A Tour of Your Computer : Dell Inspiron 2500 Systems Security Cable Slot The slots (one on each side of the computer) let you attach a commercially available antitheft device to the computer. Complete instructions for installing antitheft devices are usually included with the device. -
Page 13: Right Side View
A Tour of Your Computer : Dell Inspiron 2500 Systems Your computer supports a CD drive, DVD drive, or CD-RW drive. Right Side View Audio Connectors file:///I|/SERVICE%20MANUALS/DELL%20MANUALS/LA..._checked%20ok/Inspiron/2500/2500%20SM/tour.htm (10 of 15)6/21/2004 12:45:24 AM... -
Page 14: Hard Drive
A Tour of Your Computer : Dell Inspiron 2500 Systems Attach record/playback devices such as a cassette player or CD player to the connector. Attach headphones or speakers to connector. Attach a microphone to the connector. Hard Drive The hard drive reads and writes data on a hard disk. -
Page 15: Pc Card Slot
A Tour of Your Computer : Dell Inspiron 2500 Systems Network Connector (Optional) If you ordered the optional integrated network adapter, use this connector to connect the computer to a network. If a network cable is connected to the network connector, the green light indicates that the network connection is active. -
Page 16: Ac Adapter Connector
A Tour of Your Computer : Dell Inspiron 2500 Systems Fan Exhausts HINT: The computer turns on the fan only when the computer gets hot. It may run most of the time or very seldom, depending on your use of the computer. Because the fan spins at a high rate of speed, it may make a noise. -
Page 17: Video Connector
A Tour of Your Computer : Dell Inspiron 2500 Systems HINT: Although the AC adapter works worldwide, power connectors vary among countries. Before using the AC adapter in a foreign country, you may need to obtain a new power cable designed for use with the electrical outlets in that country. -
Page 18: Usb Connectors
A Tour of Your Computer : Dell Inspiron 2500 Systems Parallel Connector Use this connector to attach a parallel device, such as a printer, to the computer. USB Connectors Use these connectors to attach USB-compatible devices such as a mouse, docking device, keyboard, printer, or scanner to your computer. -
Page 19: Power Conservation Modes
Power Conservation : Dell Inspiron 2500 Systems Back to Contents Page Power Conservation Dell™ Inspiron™ 2500 Systems Conservation Tips Power Conservation Modes Power Options Properties Conservation Tips You automatically conserve battery power each time you attach your computer to an electrical outlet. -
Page 20: Hibernate Mode
Hibernate mode requires a special file on your hard drive with enough disk space to store the contents of the computer memory. Dell creates an appropriately sized hibernate mode file before shipping the computer to you. -
Page 21: Power Schemes Tab
Minimal Power Management (Windows 2000 only) Max Battery (Windows 2000 only) HINT: Dell recommends that you continue to use the Portable/Laptop power scheme to maximize battery power conservation. Each preset power scheme has different time-out settings for putting the computer into standby mode, turning off the display, and turning off the hard drive. -
Page 22: Alarms Tab
Critical battery alarm check boxes are selected. The Power Mode in the Low battery alarm is set to none and the Power Mode if the Critical battery alarm is set to hibernate. Dell recommends that you continue to use these defaults. -
Page 23: Power Meter Tab
Power Conservation : Dell Inspiron 2500 Systems Power Meter Tab The Power Meter tab displays the current power source and amount of battery charge remaining. file:///I|/SERVICE%20MANUALS/DELL%20MANUALS/LAP..._checked%20ok/Inspiron/2500/2500%20SM/power.htm (5 of 9)6/21/2004 12:45:25 AM... -
Page 24: Advanced Tab
Power Conservation : Dell Inspiron 2500 Systems Advanced Tab The Advanced tab allows you to: Set icon and standby password options. Program the following functions: Activate standby mode (the default when you close the display). Activate hibernate mode (the default for the power button). -
Page 25: Hibernate Tab
Power Conservation : Dell Inspiron 2500 Systems HINT: If you are going to connect your computer to a USB port replicator, click None when you program the display-close option. This setting ensures that your computer does not enter standby mode or hibernate mode when you close (lower) the display. - Page 26 Power Conservation : Dell Inspiron 2500 Systems Intel® SpeedStep™ Tab If your computer has a Mobile Intel Pentium® III processor, the Power Options Properties window includes the Intel® SpeedStep™ tab. To change the Intel SpeedStep options, click the Advanced button and then click one of the following...
- Page 27 Power Conservation : Dell Inspiron 2500 Systems Back to Contents Page file:///I|/SERVICE%20MANUALS/DELL%20MANUALS/LAP..._checked%20ok/Inspiron/2500/2500%20SM/power.htm (9 of 9)6/21/2004 12:45:25 AM...
-
Page 28: Solving Problems
Solving Problems : Dell Inspiron 2500 Systems Back to Contents Page Solving Problems Dell™ Inspiron™ 2500 Systems Accessing Help Files Unexpected Characters Power Problems Drive Problems Start-Up Error Messages Network Problems Video and Display Problems Windows® Error Messages Sound and Speaker Problems... -
Page 29: Power Problems
Solving Problems : Dell Inspiron 2500 Systems To access Windows Millennium Edition (Me) Help 1. Click the Start button and then click Help. 2. Type a word or phrase that describes your problem in the Search box and then click Go. -
Page 30: Start-Up Error Messages
Start-Up Error Messages Operating system not found— Contact Dell for technical assistance. See "Contacting Dell" in the Dell Solutions Guide that came with your computer for the correct contact information. Insert bootable media— The operating system is trying to boot to a nonbootable floppy disk or CD. -
Page 31: External Speakers
Solving Problems : Dell Inspiron 2500 Systems Eliminate possible interference— Turn off nearby fans, fluorescent lights, or halogen lamps to check for interference. Rotate the computer to face a different direction— Eliminate sunlight glare, which can cause poor picture quality. -
Page 32: Printer Problems
If you cannot print to a parallel port printer Verify the printer cable connections— Ensure that the printer cable is connected (see "Connecting a Printer" in the Dell Solutions Guide that came with your computer). Test the electrical outlet— Ensure that the electrical outlet is working by testing it with another device, such as a lamp. -
Page 33: If You Cannot Print To A Usb Printer
Solving Problems : Dell Inspiron 2500 Systems Verify that the printer is recognized by Windows 1. Click the Start button, point to Settings, and then click Printers. If the printer is listed, right-click the printer icon, click Properties, and then select the Details tab. -
Page 34: Scanner Problems
Solving Problems : Dell Inspiron 2500 Systems Check the telephone jack— Disconnect the telephone cable from the modem and connect it to a telephone. Listen for a dial tone. Connect the modem directly to the telephone wall jack— If you have... -
Page 35: External Keyboard Problems
Solving Problems : Dell Inspiron 2500 Systems Check the touch pad settings— Click the Start button, point to Settings, click Control Panel (double-click Control Panel in Windows 2000), and then double-click the Mouse icon. Try adjusting the settings. External Keyboard Problems Disconnect the keyboard cable—... -
Page 36: If You Cannot Play A Dvd Movie
Solving Problems : Dell Inspiron 2500 Systems If you cannot play a music CD or install a program from a HINT: High-speed CD drive vibration is normal and may cause noise. This noise does not indicate a defect in the drive or the CD. -
Page 37: If The Cd-Rw Drive Stops Writing
Solving Problems : Dell Inspiron 2500 Systems Ensure that Windows recognizes the drive— Double-click the My Computer icon. If the DVD drive is not listed, perform a full scan with your antivirus software to check for and remove viruses. Viruses can sometimes prevent Windows from recognizing the drive. -
Page 38: Windows® Error Messages
Solving Problems : Dell Inspiron 2500 Systems Check the network cable connector— Ensure that the network cable connector is firmly connected to the connector on the computer and the network wall jack. Check the network lights on the network connector—... -
Page 39: General Program Problems
Solving Problems : Dell Inspiron 2500 Systems 4. Click Change/Remove and follow the prompts on the screen. 5. See the program documentation for installation instructions. General Program Problems A program crashes See the software documentation— Many software manufacturers maintain websites with information that may help you to solve the problem. -
Page 40: If Your Computer Gets Wet
Perform this procedure only after you are certain that it is safe to do so. If the computer is connected to an electrical outlet, Dell recommends that you turn off AC power at the circuit breaker before attempting to remove the power cables from the electrical outlet. -
Page 41: If You Drop Or Damage Your Computer
4. Remove and reinstall the battery. 5. Turn on the computer. If the computer does not turn on, or if you cannot identify the damaged components, contact Dell for technical assistance. Locate the correct contact information in "Contacting Dell" of the Dell Solutions Guide that came with your computer. - Page 42 Solving Problems : Dell Inspiron 2500 Systems Back to Contents Page file:///I|/SERVICE%20MANUALS/DELL%20MANUALS/LA...ecked%20ok/Inspiron/2500/2500%20SM/solving.htm (15 of 15)6/21/2004 12:45:27 AM...
-
Page 43: System Specifications
System Specifications : Dell Inspiron 2500 Systems Back to Contents Page System Specifications Dell™ Inspiron™ 2500 Systems Microprocessor Keyboard System Information Touch Pad PC Card Modem Memory Battery Ports and Connectors AC Adapter Video Environmental Audio Fixed Optical Drives Display... - Page 44 System Specifications : Dell Inspiron 2500 Systems PC Card CardBus controller O2Micro OZ6933 CardBus controller PC Card connectors two (supports two Type I or Type II cards or one Type III card) Cards supported 3.3 V and 5 V PC Card connector size...
- Page 45 System Specifications : Dell Inspiron 2500 Systems PS/2 keyboard/mouse 6-pin mini-DIN connector two USB-compliant connectors Modem/network adapter optional factory-configurable RJ- 11/RJ-45 (optional) connectors for Mini PCI card modem/network adapter Video Video type 128-bit hardware-accelerated video support Data bus Integrated Intel 3D AGP Graphics...
- Page 46 System Specifications : Dell Inspiron 2500 Systems Panel (typical) 1.3 W Backlight 3.4 W using battery; 4.9 W using AC adapter Controls brightness can be controlled through key combinations Keyboard Number of keys 87 (U.S., Canada, and locations that use traditional Chinese); 88 (Europe);...
- Page 47 System Specifications : Dell Inspiron 2500 Systems Modem Data/fax modem optional 56K, V.90 mini-PCI card modem Data/fax network adapter optional 10/100 LAN + 56K, V.90 mini-PCI card modem Battery Type 4-cell and 8-cell lithium ion Dimensions: Depth 88.5 mm (3.48 inches) Height 21.5 mm (0.83 inch)
- Page 48 System Specifications : Dell Inspiron 2500 Systems Input frequency 40 to 63 Hz Output current 4.5 A (maximum 4-second pulse); 3.5 A (continuous) Rated output voltage 20 VDC Dimensions: Height 27.94 mm (1.1 inches) Width 58.42 mm (2.3 inches) Depth 133.85 mm (5.25 inches)
- Page 49 System Specifications : Dell Inspiron 2500 Systems Altitude (maximum): Operating –15.2 to 3048 m (–50 to 10,000 Storage –15.2 to 10,668 m (–50 to 35,000 ft) Fixed Optical Drives Supported drives 12.5-mm drives: CD, CD-RW, and DVD Back to Contents Page...
-
Page 50: Drivers And Utilities
Dell provides software utilities and drivers that help you control certain features of your computer. The utilities and drivers for Dell-installed devices are installed and operative when you receive the computer. If you ever need to reinstall any of these drivers, you can use the Dell Drivers and Utilities CD that came with your computer. -
Page 51: Reinstalling Drivers And Utilities
1. Insert the Drivers and Utilities CD into the CD or DVD drive. 2. When the Dell Resource CD Launcher window appears, click the button for the driver or utility you wish to install. 3. Follow the screen prompts until the driver or utility is installed. -
Page 52: Windows Me
Drivers and Utilities : Dell Inspiron 2500 Systems 5. Click PCI Communication Device. 6. Click Properties. 7. Click Reinstall Driver. 8. Verify that Automatic search for a better driver (Recommended) is selected, and click Next. 9. In the Select Other Driver window, look under the Location column for a path containing WINME. - Page 53 Drivers and Utilities : Dell Inspiron 2500 Systems 3. In the Control Panel window, double-click the System icon. HINT: To see the System icon, you may need to click the View all control panel options link at the left side of the screen.
-
Page 54: Creating A Restore Point
4. Click File System. 5. Click the Troubleshooting tab, and make sure that Disable System Restore is unchecked. Before proceeding with any System Restore function, Dell recommends that you thoroughly read Microsoft's information about using System Restore. To access this information: 1. -
Page 55: Restoring The Computer To An Earlier Operating State
Drivers and Utilities : Dell Inspiron 2500 Systems 6. Click Next. 7. Click OK. Restoring the Computer to an Earlier Operating State 1. Turn on your computer. NOTICE: Before restoring the computer to an earlier operating state, save and close all open files and exit all open programs. - Page 56 Drivers and Utilities : Dell Inspiron 2500 Systems 2. Click the Start button, point to Programs—> Accessories—> System Tools, and then click System Restore. 3. Click Undo my last restoration. 4. Click Next. NOTICE: Save and close all open files and exit all open programs. Do not alter, open, or delete any files or programs until the system restoration is complete.
-
Page 57: Reinstalling Windows Me
Edition (Me) operating system. The options can potentially overwrite files installed by Dell and possibly affect programs installed on your hard drive. Therefore, Dell does not recommend that you reinstall your operating system unless instructed to do so by a Dell technical support representative. -
Page 58: Reinstalling Windows 2000
Reinstalling Microsoft® Windows® : Dell Inspiron 2500 Systems The Getting ready to run Windows for the first time window appears. 9. If the mouse tutorial starts, press <Esc> to exit and then press <y>. 10. Click the regional setting closest to where you live, and then click Next. - Page 59 Reinstalling Microsoft® Windows® : Dell Inspiron 2500 Systems 2. Shut down the computer. 3. Turn on the computer. 4. Press any key when the Press any key to boot from CD message appears on the screen. 5. When the Windows 2000 Setup window appears, ensure that the To setup Win2000 now, press ENTER option is highlighted.
- Page 60 Reinstalling Microsoft® Windows® : Dell Inspiron 2500 Systems 4. Ensure that Enable hibernate support is selected, and click Apply. 5. Click OK to close the Control Panel. Back to Contents Page file:///I|/SERVICE%20MANUALS/DELL%20MANUALS/LA...ecked%20ok/Inspiron/2500/2500%20SM/windows.htm (4 of 4)6/21/2004 12:45:30 AM...
-
Page 61: System Setup Program
System Setup Program : Dell Inspiron 2500 Systems Back to Contents Page System Setup Program Dell™ Inspiron™ 2500 Systems Standard Settings System Setup Program Pages Viewing the System Setup Program Pages Standard Settings The system setup program contains the standard settings for your computer. - Page 62 External USB keyboards function only when a Windows® operating system is running. 2. When the blue Dell logo appears, press <F2> immediately. If you wait too long and the operating system logo appears, continue to wait until you see the Windows desktop.
- Page 63 System Setup Program : Dell Inspiron 2500 Systems file:///I|/SERVICE%20MANUALS/DELL%20MANUALS/LAP..._checked%20ok/Inspiron/2500/2500%20SM/setup.htm (3 of 3)6/21/2004 12:45:30 AM...
-
Page 64: Serial Connector
Ports and Connector Pin-Outs : Dell Inspiron 2500 Systems Back to Contents Page Ports and Connector Pin-Outs Dell™ Inspiron™ 2500 Systems Serial Connector Parallel Connector PS/2 Connector USB Connectors Video Connector Serial Connector Use the 9-pin serial connector to attach a serial device to the computer. The serial port passes data in serial format (1 bit at a time over one line). -
Page 65: Parallel Connector
Ports and Connector Pin-Outs : Dell Inspiron 2500 Systems Signal ground Data set ready Request to send Clear to send Ring indicator Shell Frame ground Parallel Connector Use the 25-hole parallel connector to attach a parallel device to the computer. The parallel connector is used primarily for printers. - Page 66 Ports and Connector Pin-Outs : Dell Inspiron 2500 Systems Printer data bit 3 Printer data bit 4 Printer data bit 5 Printer data bit 6 Printer data bit 7 ACK# Acknowledge BUSY Busy Paper end SLCT Select AFD# Automatic feed...
-
Page 67: Usb Connectors
Ports and Connector Pin-Outs : Dell Inspiron 2500 Systems Signal Definition EXK_MSDATA External keyboard/keypad/mouse data KBD_DATA Keyboard data Signal ground EXK_MSPWR External keyboard/keypad/mouse supply voltage EXK_MSCLK External keyboard/keypad/mouse clock KBD_CLK Keyboard clock Shell Chassis ground USB Connectors Use the USB connectors to attach one or more USB devices, such as a mouse, to the computer. USB is a peripheral standard that enables automatic detection of USB-compliant peripheral devices. -
Page 68: Video Connector
Ports and Connector Pin-Outs : Dell Inspiron 2500 Systems Video Connector Use the 15-pin video connector to attach an external monitor to the computer. If the image does not appear on the monitor immediately, press <Fn><F8>. Signal Definition Red video... - Page 69 Ports and Connector Pin-Outs : Dell Inspiron 2500 Systems DDC_CLK Monitor Detect serial clock Shell Frame ground Back to Contents Page file:///I|/SERVICE%20MANUALS/DELL%20MANUALS/LAP...hecked%20ok/Inspiron/2500/2500%20SM/pinouts.htm (6 of 6)6/21/2004 12:45:31 AM...
-
Page 70: Removing And Replacing Parts
NOTICE: Only a certified service technician should perform repairs on your computer. Damage or inoperability due to servicing not authorized by Dell is not covered by your warranty. HINT: Unless otherwise noted, each procedure in this document assumes that a part can be replaced by performing the removal procedure in reverse order. -
Page 71: Recommended Tools
Removing and Replacing Parts : Dell Inspiron 2500 Systems 4. Turn off the computer and all attached devices. 5. Make sure the computer is not connected to a port replicator. 6. Disconnect the computer from the electrical outlet. NOTICE: To avoid possible damage to the system board, wait 10 to 20 seconds before you disconnect any attached devices. - Page 72 Removing and Replacing Parts : Dell Inspiron 2500 Systems NOTICE: When reinstalling a screw, you must use a screw of the correct diameter and length. Make sure that the screw is properly aligned with its corresponding hole, and avoid over tightening.
-
Page 73: System Components
Removing and Replacing Parts : Dell Inspiron 2500 Systems Video Memory Cache Card: Palm Rest to LED Board: Bottom Case Assembly: M2.5 x 4 mm (2 each) M2.0 x 4 mm (2 M2.5 x 20 mm (9 each) each) System Board:... - Page 74 Removing and Replacing Parts : Dell Inspiron 2500 Systems Hard Drive file:///I|/SERVICE%20MANUALS/DELL%20MANUALS/LA...hecked%20ok/Inspiron/2500/2500%20SM/remove.htm (5 of 46)6/21/2004 12:45:37 AM...
-
Page 75: Removing The Hard Drive
Removing and Replacing Parts : Dell Inspiron 2500 Systems NOTICE: Disconnect the computer and attached devices from electrical outlets and remove any installed battery. NOTICE: To avoid ESD, ground yourself by using a wrist grounding strap or by periodically touching an unpainted metal surface on the computer. -
Page 76: Replacing The Hard Drive
Removing and Replacing Parts : Dell Inspiron 2500 Systems Replacing the Hard Drive 1. Push the drive assembly into the hard drive opening on the left side of the computer. 2. Align the drive assembly tabs with the bottom case assembly slots and push down until it clicks into place. -
Page 77: Removing Media Bay Devices
Removing and Replacing Parts : Dell Inspiron 2500 Systems Media Bay Devices NOTICE: Disconnect the computer and any attached devices from electrical outlets, and remove any installed battery. NOTICE: To avoid ESD, ground yourself by using a wrist grounding strap or by periodically touching an unpainted metal surface on the computer. -
Page 78: Removing Memory Modules
Removing and Replacing Parts : Dell Inspiron 2500 Systems Removing Memory Modules file:///I|/SERVICE%20MANUALS/DELL%20MANUALS/LA...hecked%20ok/Inspiron/2500/2500%20SM/remove.htm (9 of 46)6/21/2004 12:45:37 AM... -
Page 79: Replacing Memory Modules
Removing and Replacing Parts : Dell Inspiron 2500 Systems 1. Remove the memory module cover. 2. To release a memory module from its connector, spread apart the tabs at each side of the module until the module pops up slightly. -
Page 80: Removing The Mini Pci Card Assembly
Removing and Replacing Parts : Dell Inspiron 2500 Systems NOTICE: Disconnect the computer and attached devices from electrical outlets and remove any installed battery. NOTICE: To avoid ESD, ground yourself by using a wrist grounding strap or by periodically touching an unpainted metal surface on the computer. -
Page 81: Removing The Keyboard Assembly
Removing and Replacing Parts : Dell Inspiron 2500 Systems NOTICE: The connectors are keyed for correct insertion; do not force the connections. NOTICE: If you are installing a modem card, fold and tuck the unused wiring harness under the card so that it does not interfere with the cover. - Page 82 Removing and Replacing Parts : Dell Inspiron 2500 Systems 3. Turn the computer over and open the display. NOTICE: Be careful when handling the keyboard. The keycaps are fragile, easily dislodged, and time- consuming to replace. 4. Insert a pry stick under the blank key to pry up the keyboard.
- Page 83 Removing and Replacing Parts : Dell Inspiron 2500 Systems 5. Lift the right end of the keyboard, and slide it slightly to the right to disengage the tabs at the left end. 6. Pivot the keyboard and balance it upright on the left side of the computer.
-
Page 84: Replacing The Keyboard Assembly
Removing and Replacing Parts : Dell Inspiron 2500 Systems 7. Disconnect the keyboard cable and lay the keyboard assembly aside. Replacing the Keyboard Assembly HINT: The cable connector the cable connector on the system board is outlined in white to help you orient. -
Page 85: Removing The Hinge Cover
Removing and Replacing Parts : Dell Inspiron 2500 Systems Display and Bezel Assembly NOTICE: Disconnect the computer and attached devices from electrical outlets and remove any installed battery. NOTICE: To avoid ESD, ground yourself by using a wrist grounding strap or by periodically touching an unpainted metal surface on the computer. -
Page 86: Removing The Display Assembly
Removing and Replacing Parts : Dell Inspiron 2500 Systems 1. Follow the instructions in "Preparing to Work Inside the Computer." 2. Use a nonmarring tool to loosen the hinge cover at the back and at each side of the computer. - Page 87 Removing and Replacing Parts : Dell Inspiron 2500 Systems 1. Remove the hinge cover. 2. Remove the 6-mm screws that secures the flex cable to the strain relief, and then use the pull loop to remove the flex cable from the system board.
- Page 88 Removing and Replacing Parts : Dell Inspiron 2500 Systems NOTICE: When reconnecting the flex cable, press down on both ends of the connector, not in the middle. Pressing the middle of the connector can damage fragile components. 3. Open the display and remove the two screws (marked with a "circle D") that secure the display assembly to the bottom case assembly.
- Page 89 Removing and Replacing Parts : Dell Inspiron 2500 Systems 14.1-Inch Display Bezel file:///I|/SERVICE%20MANUALS/DELL%20MANUALS/LA...hecked%20ok/Inspiron/2500/2500%20SM/remove.htm (20 of 46)6/21/2004 12:45:37 AM...
-
Page 90: Removing The Display Assembly Bezel
Removing and Replacing Parts : Dell Inspiron 2500 Systems NOTICE: Disconnect the computer and attached devices from electrical outlets and remove any installed battery. NOTICE: To avoid ESD, ground yourself by using a wrist grounding strap or by periodically touching an unpainted metal surface on the computer. -
Page 91: Removing The Display Panel
Removing and Replacing Parts : Dell Inspiron 2500 Systems 3. Remove the four 4-mm screws located across the top of the bezel. 4. Use a scribe at the indentations to pry loose the two rubber screw covers located at the bottom of the bezel. -
Page 92: Replacing The Display Panel
Removing and Replacing Parts : Dell Inspiron 2500 Systems HINT: If you find a kaption tape on the standard connector, remove Replacing the Display Panel HINT: Use a magnetic screwdriver to reassemble the display panel in the display. 1. Connect the flex cable to the two connectors (ensure that the ZIF connector is locked into place) on the back of the display panel. - Page 93 Removing and Replacing Parts : Dell Inspiron 2500 Systems 4. Starting on the left side, use a magnetic screwdriver to reinstall the four 3-mm screws that secure the display panel in the top cover. 5. Reinstall the display assembly bezel.
- Page 94 Removing and Replacing Parts : Dell Inspiron 2500 Systems NOTICE: To avoid ESD, ground yourself by using a wrist grounding strap or by periodically touching an unpainted metal surface on the computer. Removing the Display Assembly Bezel 1. Follow the instructions in "Preparing to Work Inside the...
- Page 95 Removing and Replacing Parts : Dell Inspiron 2500 Systems NOTICE: When reconnecting the flex cable, press down on both ends of the connector, not in the middle. Pressing the middle of the connector can damage fragile components. 3. Remove the display assembly bezel.
- Page 96 Removing and Replacing Parts : Dell Inspiron 2500 Systems Replacing the Display Panel HINT: Use a magnetic screwdriver to reassemble the display panel in the display. 1. Connect the flex cable to the two connectors (ensure that the ZIF connector is locked into place) on the back of the display panel.
-
Page 97: Microprocessor Thermal Cooling Assembly
Removing and Replacing Parts : Dell Inspiron 2500 Systems NOTICE: When reconnecting the flex cable, press down on both ends of the connector, not in the middle. Pressing the middle of the connector can damage fragile components. 3. Remove the display assembly bezel. -
Page 98: Removing The Microprocessor Thermal Cooling Assembly
Removing and Replacing Parts : Dell Inspiron 2500 Systems NOTICE: Disconnect the computer and attached devices from electrical outlets and remove any installed battery. NOTICE: To avoid ESD, ground yourself by using a wrist grounding strap or by periodically touching an unpainted metal surface on the computer. -
Page 99: Microprocessor Module
Removing and Replacing Parts : Dell Inspiron 2500 Systems 1. Follow the instructions in "Preparing to Work Inside the Computer." 2. Remove the keyboard assembly. 3. Remove the hinge cover. NOTICE: To ensure maximum cooling for the microprocessor, do not touch the heat transfer areas on the thermal cooling assembly. -
Page 100: Removing The Microprocessor Module
Removing and Replacing Parts : Dell Inspiron 2500 Systems NOTICE: Disconnect the computer and attached devices from electrical outlets and remove any installed battery. NOTICE: To avoid ESD, ground yourself by using a wrist grounding strap or by periodically touching an unpainted metal surface on the computer. -
Page 101: Replacing The Microprocessor Module
Removing and Replacing Parts : Dell Inspiron 2500 Systems b. Use the microprocessor extraction tool to remove the microprocessor module. c. To remove the microprocessor module, pull the module straight up. Do not bend the pins. Replacing the Microprocessor Module... - Page 102 Removing and Replacing Parts : Dell Inspiron 2500 Systems and pivot the top of the pry stick away from the clip to close the latch. Video Memory Cache Card (Optional) NOTICE: Disconnect the computer and attached devices from electrical outlets and remove any installed battery.
-
Page 103: Palm Rest Assembly
Removing and Replacing Parts : Dell Inspiron 2500 Systems Replacing the Video Memory Cache Card 1. Align the two screw holes and press down firmly to seat the card in its connector. 2. Replace the two screws. Palm Rest Assembly Removing and Replacing the Palm Rest Inserts file:///I|/SERVICE%20MANUALS/DELL%20MANUALS/LA...hecked%20ok/Inspiron/2500/2500%20SM/remove.htm (34 of 46)6/21/2004 12:45:37 AM... - Page 104 Removing and Replacing Parts : Dell Inspiron 2500 Systems 1. Keep the display open, and tilt the computer back so that you can access the bottom of the computer. 2. Slide and hold the latch release on the left side, and remove any device installed in the media bay.
-
Page 105: Removing The Palm Rest Assembly
Removing and Replacing Parts : Dell Inspiron 2500 Systems 5. Remove the palm rest inserts. 6. To replace a palm rest insert, align it with the slots on the computer. Then press along the outside edges of the palm rest insert until it snaps into place. - Page 106 Removing and Replacing Parts : Dell Inspiron 2500 Systems NOTICE: Disconnect the computer and attached devices from electrical outlets and remove any installed battery. NOTICE: To avoid ESD, ground yourself by using a wrist grounding strap or by periodically touching an unpainted metal surface on the computer.
-
Page 107: Led Board
Removing and Replacing Parts : Dell Inspiron 2500 Systems 8. Turn the computer over. 9. Use the pull loop to disconnect the palm rest flex cable from the touch-pad connector on the system board. 10. Carefully lift out the palm rest assembly. -
Page 108: Removing The Led Board
Removing and Replacing Parts : Dell Inspiron 2500 Systems NOTICE: Disconnect the computer and attached devices from electrical outlets and remove any installed battery. NOTICE: To avoid ESD, ground yourself by using a wrist grounding strap or by periodically touching an unpainted metal surface on the computer. -
Page 109: System Board Assembly
Removing and Replacing Parts : Dell Inspiron 2500 Systems System Board Assembly NOTICE: Disconnect the computer and attached devices from electrical outlets and remove any installed battery. NOTICE: To avoid ESD, ground yourself by using a wrist grounding strap or by periodically touching an unpainted metal surface on the computer. - Page 110 Removing and Replacing Parts : Dell Inspiron 2500 Systems 2. Remove the hard drive fixed optical drive. 3. Remove any installed Mini PCI cards. 4. If migrating the memory, remove all installed memory modules. 5. Remove the keyboard assembly. 6. Remove the hinge cover.
- Page 111 Removing and Replacing Parts : Dell Inspiron 2500 Systems NOTICE: Disconnect the computer and attached devices from electrical outlets and remove any installed battery. NOTICE: To avoid ESD, ground yourself by using a wrist grounding strap or by periodically touching an unpainted metal surface on the computer.
-
Page 112: Removing The Fan Assembly
Removing and Replacing Parts : Dell Inspiron 2500 Systems 5. Remove the palm rest assembly. 6. Remove a latch button from the bottom case assembly by squeezing the snap tabs in the center of the latch. Apply downward pressure to the tabs while squeezing them together (tweezers work well) to eject the latch button from the bottom of the case without loosening the upper latch assembly (spring and slider). - Page 113 Removing and Replacing Parts : Dell Inspiron 2500 Systems 1. Follow the instructions in "Preparing to Work Inside the Computer." 2. Remove the system board. 3. Remove the three 4-mm screws from the fan assembly. 4. Disconnect the two fan cables from the system board.
-
Page 114: Removing The Rj-11/Rj-45 Board
Removing and Replacing Parts : Dell Inspiron 2500 Systems 2. Remove one or both of the plastic connector covers (one or both of the covers may be installed) by slipping a nonmarring tool into the cutout at the top and pivoting the tool up to disengage the inner securing tab. - Page 115 Removing and Replacing Parts : Dell Inspiron 2500 Systems Back to Contents Page file:///I|/SERVICE%20MANUALS/DELL%20MANUALS/LA...hecked%20ok/Inspiron/2500/2500%20SM/remove.htm (46 of 46)6/21/2004 12:45:37 AM...
-
Page 116: Printed Documentation
Getting Started sheet (.pdf) (157 KB) Dell Inspiron 2500 Systems Solutions Guide (.pdf) (489 KB) Dell Inspiron 2500 Systems Removing and Replacing Parts (.pdf) (1171 KB) HINT: PDF files require Adobe™ Acrobat Reader, which can be downloaded from the Adobe website. - Page 117 4. Specify the location to save the unzipped files to and click Unzip. A message appears, stating that the files unzipped successfully. 5. Click OK. 6. Click Close. Viewing Tell Me How 1. Open the folder in which you saved the file. 2. Double-click the filename. file:///I|/SERVICE%20MANUALS/DELL%20MANUALS/LAP...ecked%20ok/Inspiron/2500/2500%20SM/document.htm (2 of 3)6/21/2004 12:45:38 AM...
- Page 118 Documentation: Dell Inspiron 2500 Back to Contents Page file:///I|/SERVICE%20MANUALS/DELL%20MANUALS/LAP...ecked%20ok/Inspiron/2500/2500%20SM/document.htm (3 of 3)6/21/2004 12:45:38 AM...
Need help?
Do you have a question about the Inspiron 2500 and is the answer not in the manual?
Questions and answers