Table of Contents
Advertisement
Quick Links
Advertisement
Table of Contents

Related Manuals for Motorola i885 Telus


Summary of Contents for Motorola i885 Telus
- Page 1 TELUS Handset User’s Guide NVN5375A...
-
Page 2: Table Of Contents
Contents Making Emergency Calls while in Mike’s Talk Around Mode ..........28 Setup Options ..........28 Getting Started........... 1 Battery ...............3 Making Phone Calls .........30 Activating your Mike Account ......6 Receiving Phone Calls ........30 Powering On and Off.........7 Call Icons ............31 Finding Your Phone Number and Private ID ..7 Entering the Number to Call......31 Handset Basics ..........8 Missed Phone Calls ........33... - Page 3 Storing Numbers Quickly.........45 Special Function Keys........58 Editing Entries ..........46 Message Center ........60 Viewing Entries..........46 Accessing the Message Center ......60 Deleting Entries ..........48 Message Center Options ........60 Checking Capacity ..........49 Receiving Messages ........61 Creating Pauses and Waits......49 Message Notifications ........61 Advanced Calling Features..... 51 Voice Mail............62 Call Waiting .............51 Advanced Voice Mail with Fax ......62...
- Page 4 Creating and Sending Messages ....71 Send My Info ..........104 Drafts...............81 Send Contact Information ......106 MMS Outbox ...........82 PT Manager ..........108 Receiving a Message ........83 Accessing PTV Features Navigating a Message........84 From PT Manager........108 Viewing Received Messages Turning PTV Features On and Off ....108 From the Message Center ......85 Setting One Touch PTT ........108 Actions for Received Messages ......86...
- Page 5 Media Center .......... 120 Playing a List and Using Repeat and Shuffle 132 Viewing the Media Center ......121 Working With Playlists........133 Forward Locked Items........122 Working With Podcast........136 DRM Items ............123 Deleting Audio Files ........139 Pictures ............123 DRM Items ............139 Videos ............124 Setting Audio and Visual Options....140 Audio Recordings ..........125 Memory Card ..........141...
- Page 6 ® Datebook ..........152 Bluetooth ..........166 ® Viewing Datebook .........152 Understanding Bluetooth Access Settings ..166 ®....167 Creating Events..........153 Setting Your Handset for Bluetooth ® Editing Events ..........155 Accessing Bluetooth ........168 ® Deleting Events ..........155 Making a Bluetooth Connection ....168 Receiving Reminders ........156 Setting Device Details ........171 Making Calls From Datebook and...
- Page 7 Using GPS with Map Software ......184 Using Settings ..........197 Voice Records........187 Profiles ............203 Creating Voice Records ........187 Viewing Profiles..........203 Playing Voice Records ........187 Switching Profiles..........203 Labeling Voice Records ........187 How Changing Settings Affects Profiles..203 Viewing Voice Records .........187 Temporary Profiles........204 Locking Voice Records........188 Creating Profiles..........205 Deleting Voice Records.........188...
- Page 8 Electromagnetic Interference/Compatibility...216 Medical Devices ..........216 Operational Warnings........217 Operational Cautions........218 Accessory Safety Information......219 MOTOROLA LIMITED WARRANTY ..221 Limited Warranty Motorola Communication Products (International) ........225 Index ............229...
- Page 9 Responsible Party Name: Motorola, Inc. communications. However, there is no guarantee that interference will not occur Address: 8000 West Sunrise Boulevard in a particular installation.
- Page 10 Motorola arises by operation of law in the sale of a reserves the right to change or modify any product.
-
Page 11: Getting Started
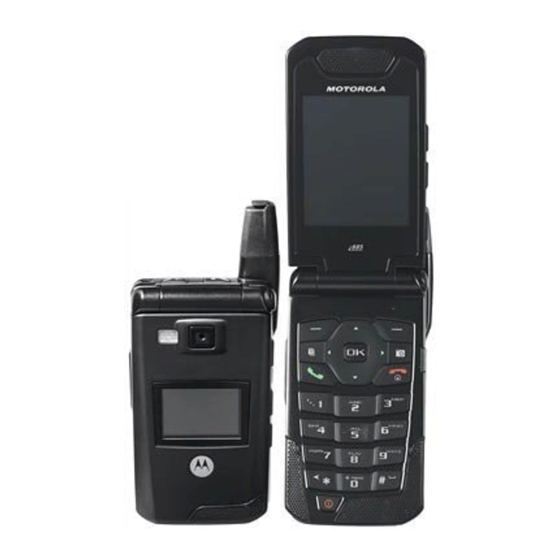
Getting Started Earpiece Retractable Multi-Function Button Antenna Speaker (on/off) Internal Display Spotlight Flip Open Button MP3 Music Option Keys Player Volume Light Sensor Controls Controls Camera Key Audio Jack Navigation Key Ok Key PTT button with Menu Key End Key Backlight Camera Lens... - Page 12 Getting Started Speakerphone Key — acts like s when Navigation key — press the arrows to scroll through menus and lists. the flip is closed; turns speakerphone on; used with voice names and voice records. OK Key — selects highlighted item; places Smart Key —...
-
Page 13: Battery
Battery Battery Your handset comes with a high performance battery. Removing the Battery Door 1 Make sure the handset is powered off. See Accesses the audio player when the flip is “Powering On and Off” on page 7. closed; plays audio files; pauses audio 2 Slide the release button back until it releases the files. -
Page 14: Inserting The Battery
Getting Started 3 Allow the battery door to pop, slide it forward 3 Replace the battery door and press it gently until and remove it from the back of the handset. you hear a click. Inserting the Battery 1 Remove the battery door. Charging the Battery 2 Insert the top of the battery into the battery area. -
Page 15: Charging Times
Battery 2 Open the connector cover. 4 When charging the battery for the first time, charge for 30 minutes longer than the time shown in “Charging Times”. Charging Times Check your battery and charger type against the grid to determine the appropriate charging times. Battery Charger Rapid... -
Page 16: Activating Your Mike Account
Battery Use and Maintenance • If you purchased your handset through an • The Motorola Approved Lithium Ion chargers Authorized Mike Network Dealer, your SIM provide optimum performance. Other chargers should already be active. -
Page 17: Powering On And Off
Powering On and Off Powering On and Off As your handset connects to the network, you will see a welcome message and a connecting The first time you power your handset on, a screen message. When the idle screen appears, the may appear asking you to update your browser handset is ready to use. -
Page 18: Handset Basics
Getting Started See “My Info” on page 111 for more information The screen shown above is the idle screen. The about this feature. idle screen appears when your handset is on, but not engaged in any activity. Handset Basics Text Area Display This area displays menus, messages, names, phone numbers, and other information. -
Page 19: Main Menu
Handset Basics 4 Press O to see the Security screen. Main Menu OK Key All your handset’s features can be accessed through the main menu. You can set the main Pressing O: menu to appear as a list or as large icons. •... -
Page 20: Status Icons
Getting Started VoiceRecord Record and play audio Shortcuts Create shortcuts to messages. See page 187. screens. See page 191. My Info View personal handset Profiles Apply groups of settings. information, including See page 203. phone number and Private Call Alert Lists call alerts. - Page 21 Handset Basics Phone In Use — Your handset is Speaker Off — Sounds active on a phone call. associated with Private calls and group calls are set to come Private In Use — Your handset is through the earpiece rather than active on a Private call.
-
Page 22: Locating Your Sim Card
Getting Started If your SIM card is not in the SIM card holder, it Hearing Aid — Your handset is may be in the box your handset came in, attached set for use with a hearing aid and to the SIM carrier. If this is the case, carefully is active on a phone call. -
Page 23: Changing The Pin
SIM Card Security When you receive your handset, the SIM PIN is Turning the PIN Requirement On and 0000. Change your PIN to prevent fraudulent use of the SIM card. When the SIM PIN requirement is on, you are Important: If you enter your PIN incorrectly 5 times, prompted to enter your PIN each time you turn on your SIM card is blocked. -
Page 24: Inserting And Removing Your Sim Card
Getting Started Important: If you unsuccessfully enter the PUK Inserting and Removing Your SIM code 10 times, your SIM card is Card permanently blocked and must be Important: Do not touch the gold-colored areas of replaced. If this happens, all data is your SIM card. - Page 25 SIM Card Security • Voice names 3 Open the SIM card holder. • Datebook events • Options set using the Personalize menu Inserting Your SIM Card 1 With your handset powered off, remove the back cover and battery. 2 Slide the latch towards the right to open the SIM card holder.
- Page 26 Getting Started 5 Close the SIM card holder. 2 Slide the latch away from the SIM card holder. latch 3 Open the SIM card holder. 6 Slide the latch towards the left to close the SIM card holder. Removing Your SIM Card Important: To avoid loss or damage, do not remove your SIM card from your handset unless absolutely necessary.
-
Page 27: Memory Card Slot
Memory Card Slot 4 Carefully slide your SIM card out of the SIM card Note: Protect your SIM card as you would any holder. delicate object. Store it carefully. Memory Card Slot Your i885 handset’s memory card slot enables you to use your handset with a removable flash memory card that you can purchase. -
Page 28: Accessories
Getting Started To optimize your handset’s performance, extend To order additional accessories, log on to our Web the antenna when you make or receive a call, and site at www.telusmobility.com or contact your Mike avoid touching the antenna with any body part. Dealer. -
Page 29: Mike's Direct Connect Service
Mike’s Direct Connect Tip: To let someone know that you want to talk to him or her on a Private call, send a call Service alert. See “Call Alerts” on page 21. Every Private ID number contains 3 parts — an There are two ways of communicating over Mike’s area ID, a fleet ID, and a member ID —... -
Page 30: From Contacts
Mike’s Direct Connect Service From the Recent Calls List With the Contacts type field highlighted, scroll left or right to display the Contacts type for the The recent calls list stores the last 20 calls you number you want to call. made or received. -
Page 31: Call Alerts
Call Alerts 2 Press and hold the PTT button on the side of Receiving Call Alerts your handset. Begin talking after your handset When you receive a call alert, you must answer, emits a chirping sound. queue, or clear it. You cannot receive phone calls 3 Release the PTT button to listen. -
Page 32: One-To-Many Group Calls
Mike’s Direct Connect Service 2 Press m. Responding to Call Alerts in the Queue 3 Select Delete. 4 Press A under Yes to confirm. After you queue a call alert, you can respond to it by making a Private call to the sender or sending a To delete all call alerts from the queue: call alert to the sender. -
Page 33: Making Group Calls
One-to-Many Group Calls Joining a Talkgroup Receiving Group Calls Your Mike sales representative creates Talkgroups To answer a group call: for you and assigns each Talkgroup to a Talkgroup Proceed as if answering a Private call. Only one number. You can choose a name for each of your person at a time may speak on a group call. -
Page 34: Mike's Talk Around Tm
Mike’s Talk Around • Call forwarding • Messages Mike’s Talk Around allows direct two-way • Call Timers handset-to-handset communications between two • Call alerts or more handsets equipped for Mike’s Talk Around. You can make and receive Mike’s Talk Around •... -
Page 35: Channels And Codes
Channels and Codes While in Mike’s Talk Around, this icon M appears Codes help minimize interference from unwanted on the display, indicating that there is no network messages and other disturbances when you are on signal and Mike’s Talk Around is active. the same channel as others. - Page 36 Mike’s Talk Around 5 When you are finished, press A under Back to Receive All return to the Talk Around idle screen. You can set your handset to receive Mike’s Talk Making and Receiving Code Calls in Around transmissions from any handset that is set to the same channel, regardless of the code (1-15), Mike’s Talk Around by setting the code to Receive All.
-
Page 37: Private Mike's Talk Around Calls
Private Mike’s Talk Around Calls Private Mike’s Talk Around Private Only Calls To limit Mike’s Talk Around to private conversation only, set your code to Pvt Only. In this mode, code You can have a private conversation with another calls will be ignored and only private calls can be person using Mike’s Talk Around. -
Page 38: Making Emergency Calls While In Mike's Talk Around Mode
Mike’s Talk Around Making Emergency Calls 2 Press and hold the PTT button. Begin speaking after your handset emits the Mike’s Talk Around while in Mike’s Talk Around tone. Mode 3 Release the PTT button to listen. The number or name of the person you are calling If you attempt to make an Emergency 911 call will appear in the first line of the display. - Page 39 Setup Options To access Setup Options in Mike’s Talk Around: To turn off Direct Launch: 1 From the main menu, select TA Options. 1 From the Setup screen, scroll to Direct Launch and press O. 2 Select Setup. 2 Select Off. You can set your handset to: Your handset now displays TA Options when you •...
-
Page 40: Making Phone Calls
Making Phone Calls Making Phone Calls Receiving Phone Calls When you receive a phone call, your handset rings, To make a phone call: vibrates, or lights up its backlights. With the Flip Open Answering a phone call 1 Enter the number you want to call. If the flip is closed, press t. -
Page 41: Call Icons
Call Icons Press e. -or- • Select the number from Contacts • Select a number stored in Datebook Close the flip. • Redial the last phone number called Call Icons • Say a voice name into your handset When you make a phone call, call icons appear in •... - Page 42 Making Phone Calls With the Flip Closed • Your handset places the call to the phone number assigned to the Contacts type 1 Press . to display the most recent call. displayed. 2 To view the rest of the recent calls list, press the If the Contacts type displayed is not a phone volume keys on the side of your handset.
-
Page 43: Missed Phone Calls
Missed Phone Calls Redialing the Last Number Using Speed Dial and Turbo Dial ® Press and hold s to place a call to the last phone Each phone number stored in Contacts is assigned number you called. a Speed Dial number, which you can use to enter that number. -
Page 44: Using Mute
Making Phone Calls With the Flip Open Opening the flip turns speakerphone off. If you want to dismiss the missed call message, Using Mute press A under Back. -or- Muting calls lets you listen to incoming sound If you want to view the missed call on the recent calls list, press A under View. - Page 45 Making Emergency Phone Calls Important: If you have not registered on the network, emergency calls cannot be placed while your SIM card is in your handset.
-
Page 46: Recent Calls
Recent Calls Recent Calls With the Flip Closed 1 Press .. The recent calls list contains information 2 If you want to view the rest of the recent calls associated with calls you have made and received list, press the volume controls. and call alerts you have received. -
Page 47: Ptv Items In Private Calls
PTV Items in Private Calls • The picture assigned to the number, if your When you select a call to view its details, you see handset is set to show pictures on the recent information such as the name associated with the calls list. -
Page 48: Contact Information From Other Handsets
Recent Calls Contact Information From Pictures Other Handsets The recent call list contains most recent picture sent to or received from a Private ID. Contact information in the recent calls list displays: To view the picture: • The name contained in the contact information 1 View the details of the call containing the picture. -
Page 49: Storing Items To Contacts
Storing Items to Contacts 3 If the call contains more than one event, select My Info From Other Handsets the event you want to read. My Info from other handsets always includes the Store Events to Datebook sender’s Private ID. Depending on how the sender has filled in My Info and set sending options, it may While viewing the event you want to store, press A under Save. -
Page 50: Deleting Items
Recent Calls 2 Press A under Delete. -or- Tip: If the item you want to store is a call, Save does not appear if the number is already If Delete is not one of your options: Press m. stored in Contacts. Select Delete. - Page 51 Making Calls From the Recent Calls List 3 To make a phone call, press t on the top of Scroll left or right to display the Contacts type for the number you want to call. your handset. -or- 4 To make a phone call, press s. -or- To make a Private call, press the PTT button.
-
Page 52: Contacts
Contacts Contacts • A picture — This picture appears on the display when you receive calls from the Private ID or any of the phone numbers stored in the entry. Contacts stores up to 600 numbers or addresses. You can assign the picture from the pictures Each Contacts entry can store several numbers or stored accessible through media center. -
Page 53: Accessing Contacts
Accessing Contacts Accessing Contacts Email email address From the main menu, select Contacts. -or- phone number If you are on a call: Press m. Select Contacts. Pager phone number Creating Entries Talkgroup Talkgroup number A number or address and a Contacts type are IP address required for all Contacts entries. -
Page 54: Assigning A Ring Tone Or Picture
Contacts Tip: Press A under Browse to select a name Scroll past the information you already entered. already in Contacts. Enter the additional information for the entry 3 If you want to assign a ring tone or picture to the using step 2 through step 6. -
Page 55: Storing Numbers Quickly
Storing Numbers Quickly Note: If you choose a picture that is stored on 3 If you want to create a voice name for a phone the memory card, that picture file is number, select Voice Name. automatically copied or moved to your As directed by the screen prompts, say and handset’s memory according to the rules repeat the name you want to assign to the... -
Page 56: Editing Entries
Contacts 6 If you want to add more information to the entry, • A small version of the picture assigned to the follow the applicable instructions in “Creating entry, if you have set Contacts to show pictures Entries” on page 43. in the Contacts list. - Page 57 Viewing Entries To select an entry: Viewing a Large Picture 1 From the Contacts list, select the entry you want To view a large version of the picture assigned to to view. an entry: 2 Scroll to view the numbers and addresses 1 Select the entry.
-
Page 58: Deleting Entries
Contacts To view entries: Showing Only Private IDs and Talkgroups 1 From the Contacts list, scroll to the entry you want to view. To set Contacts to show only entries that contain 2 If an entry has more than one number or Private IDs and Talkgroup entries: <>... -
Page 59: Checking Capacity
Checking Capacity Delete a Number or Address To program a pause: Press and hold * until the letter P appears. 1 From the Contacts list, scroll to the entry that The P represents a 3-second pause. contains the number or address you want to delete. -
Page 60: International Numbers
Contacts International Numbers When storing a number that you plan to use for international calls, use Plus Dialing: 1 Press and hold 0 for two seconds. A “0” appears, then changes to a “+”. Note: The network translates the “+” into the appropriate international access code needed to place the call. -
Page 61: Advanced Calling Features
Advanced Calling Turn Off Call Waiting To turn off Call Waiting during a call: Features 1 Press m. 2 Select In Call Setup > Call Waiting. Call Waiting 3 Set this option to Off. Call Waiting lets you receive a second call while on Tip: To turn Call Waiting back on while still on an active call. -
Page 62: Putting A Call On Hold
Advanced Calling Features Putting a Call on Hold Phone line 2 is active; calls to phone line 1 are being forwarded. 1 While on an active call, press m. Phone line 2 is active; calls to phone line 2 2 Select Hold. are being forwarded. -
Page 63: Turning Off Call Forwarding
Turning Off Call Forwarding Turning Off Call Forwarding To forward missed calls: 1 From the main menu, select Call Forward > If you do not want all your calls forwarded, turn the Forward > Detailed. feature off: 2 Select If Busy to specify a forwarding number 1 From the main menu, select Call Forward >... -
Page 64: Calling 2 People
Advanced Calling Features Note: Your handset comes pre-programmed to Merging 2 Calls into a 3-Way Call detailed forward to Mike’s Voice Mail. If After you put a call on hold and place a second you change your detailed call forwarding, call, you can combine these calls into a 3-way call: remember to reset the forwarding back to your access number or your phone... -
Page 65: Creating Pauses And Waits While Dialing
Creating Pauses and Waits While Dialing Making International Calls Note: You cannot make any other calls after you have joined a 3-way call, even if one party disconnects. Plus Dialing lets you place an international call to most countries without entering the local Creating Pauses and Waits international access code. -
Page 66: Call Timers
Advanced Calling Features For Ending Calls • Phone Lifetime — displays the total minutes of all your phone calls. To set your handset to end calls when you open • Prvt/Grp Reset — keeps a running total of all of the flip: your Private and group call minutes, until you 1 From the main menu, select Settings >... -
Page 67: Entering Text
Entering Text Using Word Mode In Word mode, T9 Text Input analyzes the letters You can enter text, numbers, and symbols into on the keypad button you press and arranges them your handset using Alpha, Word, Numeric, or to create words. As you type, T9 Text Input Symbol text input modes. -
Page 68: Special Function Keys
Entering Text Adding Words to the Database Capitalization Press and hold # to make the next letter typed 1 Select Alpha as your text input mode. uppercase (shift), to make all subsequent letters 2 Type the word using Alpha mode. typed uppercase (caps lock), or to go back to 3 Select Word as your text input mode. - Page 69 Special Function Keys Deleting Characters Press * or press A under Delete.
-
Page 70: Message Center
Message Center Accessing the Message Center The message center manages your messages. To access your voice mail messages, MMS When you receive the following types of mesages, MOSMS messages, fax mail, or Net messages, you can access them through the alerts, go to the message center: message center: 1 From the idle screen, press A under Mesg. -
Page 71: Receiving Messages
Receiving Messages • Voice Mail — access voice mail messages you If you are not on a phone call when you receive a have received. message, your handset sounds a notification tone every 30 seconds until you access the message or •... -
Page 72: Voice Mail
Message Center • Message Mail Only — Tones sound during Sending Unanswered Calls to Voice calls for mail messages; tones for all other Mail types of messages are held until you end calls. To send a phone call to voice mail instead of answering it: •... -
Page 73: Net Alerts
Net Alerts Fax Mail Indicator Your i885 handset is equipped with a Fax Mail indicator to notify you when you have received a fax through Mike's Advanced Voice Mail with Fax. When you receive a new fax, New FaxMail Message appears on the display. Your handset will alert you audibly until you press A under Call or A under Exit. -
Page 74: Text And Numeric Messages
Text and Numeric Reading from the Message Center Messages 1 From the main menu, select Messages > Inbox Mobile originated text messaging (MOSMS) lets > Text Msg Inbox. you send and receive short text messages to and 2 Select the message you want to read. -or- from other Mike handsets. -
Page 75: Creating And Sending Messages
Creating and Sending Messages Press m. Press A under Browse. Select Creating and Sending Contacts, Recent Calls, or Memo. Select the Messages number you want to enter. Repeat this action to enter more phone From the Message Center numbers. 1 From the main menu, select Messages. When you are finished, press under Back. -
Page 76: Quick Notes
Text and Numeric Messages From Contacts 4 Select [Create Text Msg]. The message is automatically addressed to the 1 From the Contacts list, scroll to the entry phone number you chose. containing the phone number you want to send the message to. 5 Follow step 5 through step 6 of “Creating and 2 If the entry has more than one phone number Sending Messages”... -
Page 77: Drafts
Drafts Creating New Quick Notes 3 If you want to change the way the quick note appears in this message: Select Msg. Edit the To create a quick note and save it in the list of quick note. When you are finished, press O. quick notes stored in your handset: This does not affect the quick notes stored in 1 From the main menu, select Messages. -
Page 78: Resending Messages
Text and Numeric Messages These icons appear next to messages in the Deleting Sent Messages outbox: To delete a sent message: Sent and confirmed. 1 From the main menu, select Messages > Outbox > Text Msg Outbox. Send attempted. 2 Scroll to the message you want to delete. Forwarded. -
Page 79: Sorting Messages
Sorting Messages Managing Memory 4 Select Lock. Unlocking a Message Your text inbox, outbox, and drafts folder have a 1 From the main menu, select Messages > set amount of memory available for storing Outbox > Text Msg Outbox. messages. 2 Scroll to the message you want to lock or The text inbox holds 20 messages. - Page 80 Text and Numeric Messages 4 Select Text Msg Setup. 5 Select Outbox/Draft Mem Mtr.
-
Page 81: Multimedia Messages
Multimedia Messages To go to the next page: Scroll right. -or- Multimedia Messaging Service (MMS) lets you Press #. -or- send and receive messages that may include text, pictures, videos, and audio recordings. Scroll to the end of the page and select MORE. To go to the previous page: Navigating the MMS Inbox, Scroll left. - Page 82 Multimedia Messages • Attach — one or more attachments. These may For information on ways to enter text from the be pictures, videos and audio recordings, keypad, see “Entering Text” on page 57. including pictures, videos, and voice records you Message Size create while creating the message.
- Page 83 Creating and Sending Messages Creating a Message From the When you are finished addressing the message, press A under Back. Message Center 3 To enter or edit the body of the message: 1 To begin creating a message: Select Message. From the main menu, select Messages.
-
Page 84: Adding More Message Options
Multimedia Messages Adding More Message Options Enter the phone number or email address from the keypad and press O. Repeat this action to 1 To view more message fields in a message you enter more phone numbers or email addresses. are creating, select MORE. -
Page 85: Replying To A Message
Creating and Sending Messages 8 If you want to set a date after which attempts to When you reply to a message you received, some deliver the message end: of the fields in your reply message are filled in automatically: Select Valid Until. - Page 86 Multimedia Messages 3 Press A under Create. -or- Select [Create Reply] to begin the body of your message without using any of these phrases. If Create is not one of your options: Press m. 4 Edit any message fields you want to change. Select Create Message.
- Page 87 Creating and Sending Messages 4 Select [Create MMS Msg]. More Ways to Address a Message The message is automatically addressed to the When you are filling in the To and Cc message phone number you chose. fields, you can select recipients from Contacts and the recent calls list.
- Page 88 Multimedia Messages 4 If the entry contains more than one phone 6 When you are finished selecting entries, press A under Done. number or email address, select the ones you want to send the message to. Quick Notes When you are finished selecting items within the entry, press A under Done.
- Page 89 Creating and Sending Messages Inserting Pictures, Videos, and Audio Removing an Inserted Item Recordings From the Media Center To remove an item inserted into the body of the message you are creating: When you are filling in the Message field, you can insert pictures, videos, and audio recordings from 1 Highlight the item you want to remove.
- Page 90 Multimedia Messages To discard the picture, press A under Discard. 4 If you want to attach more items, select [New Attachment]. You can then take another picture. 5 When you are finished, press A under Done. 7 When you are finished, press A under Done if Done is one of your options.
-
Page 91: Drafts
Drafts release A under Record. Releasing the key Removing an Attachment starts the recording. To remove an attachment in a message you are 7 If you want to end the video, press c or press creating: A under Stop. 8 To save the video, press c or press O. -or- 1 While you are creating a message, select Attach. -
Page 92: Mms Outbox
Multimedia Messages 2 Scroll to the draft you want to send. Drafts Icons 3 Press m. 4 Select Send. Draft. High priority. Editing a Draft Attachment. 1 From the main menu, select Messages > Drafts > MMS Draft. High priority with an attachment. 2 Select the draft you want to edit. -
Page 93: Receiving A Message
Receiving a Message 4 Press O or press A under Yes to confirm. Resending MMS Outbox Icons If a message was not sent from your handset, you can resend it. t Successfully sent. 1 From the main menu, select Messages > Outbox>... -
Page 94: Navigating A Message
Multimedia Messages 3 If the message fills more than one screen, scroll If a message contains a picture, video, or audio to read it. recording as an attachment, open the attachment to view the picture or play the video or audio To dismiss the message notification: recording. -
Page 95: Viewing Received Messages
Viewing Received Messages From the Message Center 2 Highlight the slide show. 3 Press O. To speed up the slide show, scroll right or scroll down. To repeat the part of the slide show you have just viewed, scroll left or scroll up. To view the slide show again, press A under Restart. -
Page 96: Actions For Received Messages
Multimedia Messages 3 Press O or press A under Yes to confirm. MMS Inbox Icons Read Messages u Unread message. 1 Scroll to the message you want to delete. -or- Read message. View the message you want to delete. r Reply sent. 2 Press m. -
Page 97: Locking And Unlocking
Actions for Received Messages Locking and Unlocking 3 Press the PTT button. Sending a Call Alert When you lock a message, it cannot be deleted until you unlock it. 1 View the message. 1 View the message you want to lock or unlock. 2 Highlight the Private ID or Talkgroup ID you want -or- to alert. -
Page 98: Going To A Website
Multimedia Messages These numbers may appear in the From field, the 4 Select Go To Website. To field, the Cc field, the subject line, or the body Note: The entire URL must appear in the of the message. message. Otherwise, you cannot go to the website. -
Page 99: Saving Attachments
Actions for Received Messages 2 Highlight the picture, video, or audio recording Saving Slide Shows you want to delete. When viewing a slide show in a message you have 3 Press m. received, you can save the parts of the slide show. 4 Select Delete Picture, Delete Video, or Delete If the slide show contains pictures, you can save Audio. -
Page 100: Message Transmission
Multimedia Messages Message Transmission • Replies — lets you create new reply phrases and edit or delete reply phrases you have After you start to send a message you have created. created or start to download a message you have •... - Page 101 Customizing MMS New Quick Notes and Reply Phrases To delete a Quick Note or reply phrase: 1 From the MMS Setup menu, select Quick Notes Note: These Quick Notes are not the same as or Replies. the quick notes used with MOSMS messages.
- Page 102 Multimedia Messages Clean-up Options For the Outbox • Off — Messages are never automatically 1 From the MMS Setup menu, select Cleanup > deleted. Sent Items. 2 Choose a clean-up option. • 5 Messages — If you have more than 5 messages, messages are deleted in the order 3 To automatically delete messages now, press O or press A under Yes.
-
Page 103: Managing Memory
Managing Memory Managing Memory Note: Messages are stored in your handset using the same memory space used to All messages in the MMS Inbox, the MMS drafts store Java applications data, items folder, and the MMS Outbox share the same accessible through the media center, and memory space. -
Page 104: Mike's Wireless Web Services
Mike’s Wireless Web 3 Once connected, the Homepage (or the last page visited) will be displayed. To access the Services Home menu page from any other menu in the microbrowser, press e. Your i885 handset is equipped with a microbrowser 4 To view additional text while visiting a site, use that can be used to access Mike's Wireless Web the navigation keys to scroll to read it. -
Page 105: Ending The Microbrowser Session
Ending the Microbrowser Session Using Your Handset as a Below is the list of available options: Modem • Exit Browser — closes the browser and returns you to the idle screen. Use this option when you want to return to the page currently viewed at a You can use your handset as a modem with a later time, without navigating through the entire laptop, handheld device, or desktop computer. -
Page 106: Connecting With Bluetooth
Mike’s Wireless Web Services 2 With the handset’s display facing up, insert a Check that the adapter is properly installed, and data cable’s connector into the accessory then follow the specific instructions outlined in the connector, until you hear a click. device’s user guide to connect the device to your handset. -
Page 107: Using Ptv Features
PTV Icons Using PTV Features When you make or receive a Private call, your handset automatically determines whether the handset you are in a Private with is able to receive Push to View (PTV) lets you exchange pictures, My each of these items. Your handset saves this Info, and contact information with other handsets information for as long as the Private ID is on your that have this capability. -
Page 108: Send Pictures
Using PTV Features If the icon appears dimly, you can send and Sending a Picture During a Call receive the indicated type of PTV item in the Note: You cannot talk or listen on a Private call current call. When the icon appears brightly, you while a picture is being transmitted. - Page 109 Send Pictures Sending a Stored Picture You can start from the camera or media center, or use the PT Manager. 1 While in a Private call: From the Camera or Media Center Press A under Picture. -or- 1 Capture a picture with the camera. See “Taking Press m.
-
Page 110: Receiving A Picture
Using PTV Features Private IDs and are able to receive pictures Receiving a Picture appears. -or- When someone sends you a picture, your handset To choose a Private ID from the recent calls list, emits a tone or vibrates and a message appears select A Recent Call. -
Page 111: Send Datebook Events
Send Datebook Events Accepting a Picture Clearing a Picture From The Display 1 When you see the message asking you if you If you want to remove a picture from your handset’s want to accept the picture, press A under Yes. display while still in the Private call in which you received it or while in a subsequent Private call 2 Wait while the picture is transmitted. - Page 112 Using PTV Features You can chose a recipient for the Datebook event Sending a Datebook Event From the you want to send during a Private call, from Contacts or the Recent Calls List Contacts, from the recent calls list, from PT 1 While viewing Contact or the recent calls list, Manager, or from Datebook scroll to or select the entry containing the Private...
- Page 113 Send Datebook Events Sending a Datebook Event From PT Select Repeat Event to send all occurrences of the event. Manager 6 Press the PTT button to send the event. PT Manager lets you select the Private ID you want to send the event to from Contacts or the recent Sending a Datebook Event From calls list.
-
Page 114: Send My Info
Using PTV Features Send My Info To choose a Private ID from the recent calls list, select A Recent Call. A list of calls containing Private IDs that are able to receive Datebook When you send My Info, the information you sent events appears. -
Page 115: Sending Contact Information
Send My Info Starting a Call by Sending Information Starting a Call by Sending My Info 1 From the main menu, select PT Manager > 1 From the main menu, select PT Manager > Send Contacts. -or- Send My Info. -or- From the main menu, select My Info. -
Page 116: Send Contact Information
Using PTV Features Send Contact Information Select Use PTT Feature > Send Contact. Select the Contacts entry or item in the recent When you send contact information, the calls list you want to send. information you sent appears on the display of the 3 Press the PTT button to send the information. - Page 117 Send Contact Information 4 Choose the Private ID you want to send the contact information to: Use the keypad to enter the Private ID you want. -or- Press A under Browse. Select Contacts, Recent Calls, or Memo. Select the number you want.
-
Page 118: Pt Manager
PT Manager Turning PTV Features On and PT Manager lets you quickly access PTV features, and other Private call features, from the main You can turn your handset’s ability to send and menu. receive pictures, and Datebook events on and off. Using PT Manager, you can send any type of PTV You cannot turn your handset’s ability to send and item, turn your handset’s ability to send and... - Page 119 Setting One Touch PTT • Go to the first screen for sending a picture, Setting the One Touch PTT to Any sending a Datebook event, sending My Info, or Other Option send contact information in a Private call 1 From the main menu, select PT Manager > Setting the PTT Button to Call the Configure >...
-
Page 120: Setting My Info Sending Option
PT Manager Turning Off One Touch PTT Automatic Sending 1 From the main menu, select Settings > 2-Way To control whether your information is sent Radio > One Touch PTT. automatically: 2 Select Off. 1 From the main menu, select PT Manager > Configure >... -
Page 121: My Info
My Info • Circuit Data — the number you use if you want to use your handset to transfer circuit data. See “Using Your Handset as a Modem” on page 95. My Info lets you view information about your You receive this number from TELUS Mobility. handset and send this information to other handsets. -
Page 122: Setting Sending Options
My Info You can also edit the information in Line 1, Line 2, 4 A checkmark appears next to the fields that will and Circuit Data, but your changes are only be sent. To add or remove the checkmark, select temporary. -
Page 123: Camera
Camera Taking Pictures 1 Access the camera. The camera in your i885 handset takes pictures 2 If you want to adjust the zoom, spotlight, picture and records videos. You can save these pictures quality, picture size, or a timer, set these options. and videos to your handset’s memory or the See “Setting Picture Options”... -
Page 124: Setting Picture Options
Camera Setting Picture Options 1X is the default. Spotlight When you take a picture, you can set the zoom, spotlight, picture quality, and picture size, and set a The Spotlight option turns on or off the camera’s timer to delay capturing the picture. spotlight to provide additional light for close-up pictures. -
Page 125: More Actions For Captured Pictures
More Actions for Captured Pictures More Actions for Captured • Medium — 320 x 240 • Small — 160 x 120 Pictures • Wallpaper1 — 176 x 220 After you capture a picture as described in “Taking • Wallpaper2 — 96 x 65 Pictures”... -
Page 126: Recording Videos
Camera Only entries that include phone numbers or 4 If you want to adjust the zoom, spotlight, video Private IDs are displayed. This icon g appears size, or video length, set these options. See next to entries that have pictures assigned. “Setting Video Options”. -
Page 127: Changing Storage Preference
Changing Storage Preference 3 Select the value you want for that option. Video Length Tip: You can also set zoom from the viewfinder The Video Length options let you choose how long by scrolling up and down and set picture you can record video. -
Page 128: Accessing The Media Center
Camera the handset. If the memory card is not in the Note: handset, even if you choose Prefer On Card, Note: The volume of the shutter sound is the media items are saved to your handset’s controlled by your handset’s speaker memory. -
Page 129: Managing Memory
Managing Memory Managing Memory While you are taking pictures, the percentage of free memory in the default storage location appears on the screen. To view details about memory on either the memory card or your handset, access the Memory Usage screen. To view your used memory, free memory, memory capacity, and number of files in handset memory: 1 Access the camera. -
Page 130: Media Center
Media Center For information on determining whether the files on a memory card can be accessed through the media center, see “Ensuring Files on a Memory The media center lets you access pictures, videos, Card Are Compatible With Your Handset” on page and audio recordings stored in your handset’s 141. -
Page 131: Viewing The Media Center
Viewing the Media Center Viewing the Media Center If you do not have a memory card in your handset, you have these filtering options: To access the media center: • All — all items accessible through the media From the main menu, select Media Center. -or- center. -
Page 132: Forward Locked Items
Media Center • Card: Audio — all audio recordings on the Accessing Items Listed memory card that are accessible through the To access a picture, video, or audio recording, media center. select it from the list of items in the media center. •... -
Page 133: Drm Items
DRM Items When you view items in the media center, one of All DRM items are forward locked. As with other these icons appears next to each forward locked items in media center, you can lock DRM items. item: See “Locking Items” on page 126. For more information about DRM items, see Forward locked. -
Page 134: Videos
Media Center If you zoom in until the picture is larger than the Setting as Wallpaper display, the Pan option appears above the left 1 Scroll to or select the picture you want to set as option key. To go into pan mode, press A under wallpaper. -
Page 135: Audio Recordings
Audio Recordings This icon a appears next to each audio recording Playing in the list of items. To play a video, select it from the list of items in the Tip: When viewing the list of items in the media media center. -
Page 136: Renaming Items
Media Center Locking Items 5 If you want to assign the audio recording as the ring tone for a Contacts entry: Select A Contact. Select the Contacts entry you want to assign the When you lock an item in the media center, it ring tone to. -
Page 137: Accessing The Camera
Accessing the Camera Under certain conditions, some DRM vendors will You can also select [Camera] from the list of items or press A under Camera when these options not charge you if you download an item multiple times within a given time frame. Please contact the appear. -
Page 138: Changing Storage Preference
Media Center To move the item, select Move To Phone or 4 Select On Phone to set your handset to save Move To Card. media items to the handset’s memory. -or- Some items cannot be copied or moved: Select Prefer On Card to set your handset to save media items to a memory card, if it is •... -
Page 139: Audio Player
Audio Player The audio player begins playing at the currently selected volume, even when Vibrate All is set to Your i885 handset includes an audio player that you can use to play audio files stored in your Playing Audio Files with the handset’s memory or on the memory card inserted Flip Closed in your handset. -
Page 140: Playing Audio Files With The Flip Open
Audio Player • To suspend the audio player, press .. This If Exit is not one of your options, press A under pauses the audio player and clears it from your Back or Cancel until it is. handset’s display. The next time you access the Playing Audio Files audio player, you can continue playing the song you were playing when you suspended it. -
Page 141: Adjusting The Volume
Adjusting the Volume How Your Audio Files Are Pause and Resume Organized To pause a playing audio file, press A under Pause or press O. The audio player groups the audio files on the To resume playing a paused audio file, press A memory card into folders and lists. -
Page 142: Playing Music While Files Are Loading
Audio Player • Albums — Songs grouped by album. The To play music while files are loading: albums are listed alphabetically by title. The 1 Access the audio player. songs on the albums are listed in the order that 2 From the loading screen, press A under View. they normally appear on the album. -
Page 143: Working With Playlists
Working With Playlists If you are not using the repeat or shuffle features, To set the audio player to play one song the audio player plays the audio file you select and repeatedly, select One. -or- then plays the rest of the files in the list or folder, in To turn off the repeat feature, select Off. -
Page 144: Creating A Playlist
Audio Player Creating a Playlist 8 If you want to change the order of the audio files on a playlist, see “Reordering a Playlist”. 1 Access the audio player. 9 Select Save. 2 Select Playlists. Editing a Playlist 3 Select [Create New]. 4 If you want to give the playlist a name, enter the After you have created a playlist, you can change name. - Page 145 Working With Playlists 5 Scroll to the place where you want the audio file Reordering Playlists to appear. To change the order of the playlists in the Playlists 6 Press A under Insert. folder: 7 Repeat step 3 through step 6 for all the items 1 Access the audio player.
-
Page 146: Working With Podcast
Audio Player Deleting All Playlists Add Any Audio File 1 Access the audio player. 1 Access the audio player. 2 Select Playlists. 2 Select Songs. 3 Press m. 3 Scroll to the audio file you want. 4 Press m. 4 Select Delete All Playlists. 5 Press O or A under Yes to confirm. - Page 147 Working With Podcast • Pressing O when you have scrolled to a 2 Select Highlights Only. If the podcast has no podcast displays a screen showing details of the highlights, this option is not displayed. podcast, but does not play the podcast. To play Adding Highlight Markers the podcast, press under A.
- Page 148 Audio Player Deleting Highlight Markers To send podcast information: To delete the beginning and end markers from a 1 When you have scrolled to, are playing, or have paused within the podcast, press m. highlight: 2 Select Forward Details. 1 While playing or paused within the highlight you want to delete the markers from, press m.
-
Page 149: Deleting Audio Files
Deleting Audio Files Deleting Audio Files 3 Scroll to the album, artist, or genre you want to delete. You can delete audio files from the memory card 4 Press m. one at a time, by album, by artist, or by genre. 5 Select Delete Album, Delete Artist, or Delete You can also delete all audio files from the memory Genre. -
Page 150: Setting Audio And Visual Options
Audio Player Setting Audio and Visual Viewing Visuals Options To view visuals on the display instead of the details of the song currently playing: You can customize the sound of the audio player 1 While viewing the details of the audio file by setting the equalizer. -
Page 151: Memory Card
Memory Card Ensuring Files on a Memory Card Are Compatible With The audio player on your i885 handset works with Your Handset a memory card. A memory card is a removable flash memory card When a memory card is connected to your that you can use to store pictures, videos, and computer, your computer lets you save files to the audio files from your handset or your computer. -
Page 152: File Formats
Memory Card • The Audio folder is for audio files you will play Note: Only files with names no longer than 32 using the media center. Files in this folder characters can be stored in your cannot be accessed from the audio player. handset’s memory. - Page 153 Ensuring Files on a Memory Card Are Compatible With Your Handset These types of audio files and picture files are AAC LC Bit Rates (kbits/sec) compatible with the media center: 32, 40, 48, 56, 64, 80, 96, 112, 128, 160, 192, 224, 256, 320. File Type Task Formats...
-
Page 154: Using A Memory Card With Your Handset
Memory Card Using a Memory Card With 2 Slide in the memory card. Push the memory card into the slot until it clicks into place. Your Handset Inserting a Memory Card 1 Open the memory card slot cover. 3 Close the memory card slot cover. 4 Your handset may prompt you to use the memory card to store new media items, go to the audio player, go to the camera, go to the... -
Page 155: Removing A Memory Card
Using a Memory Card With Your Handset To format a memory card: To set the media storage option in Settings: From the main menu, select Settings > 1 From the main menu, select Settings > Memory Card > Format Card. Memory Card >... -
Page 156: Using The Usb Mass Storage Feature
Memory Card 2 Open the memory card slot cover. 5 Close the memory card slot cover. Note: If you select the Memory Card > Remove Card option but do not remove the memory card, you cannot use the memory card until you remove it and insert it again. Using the USB Mass Storage Feature The USB mass storage feature lets you access the... - Page 157 Using the USB Mass Storage Feature Setting Your Handset to Use the 2 Open the connector cover. Feature To turn on your handset’s ability to use the USB mass storage feature: 1 From the main menu, select Settings > Memory Card > USB Connection. 2 Select Reader Enabled.
-
Page 158: Memory Cards Compatible With Your Handset
Memory Card Memory Cards Compatible With Your Handset If you want to purchase and use additional memory cards, Transflash and MicroSD memory cards are compatible with your i885 handset, and available at www.telusmobility.com or your local MIKE dealer. -
Page 159: Ring Tones
Ring Tones Setting Your Handset to Vibrate To set the ring tone your handset makes when you receive phone calls, call alerts, message You can set your handset to vibrate instead of notifications, or Datebook reminders: making a sound when you receive all phone calls, Private calls, group calls, call alerts, message 1 From the main menu, select Ring Tones. -
Page 160: Assigning Ring Tones To Contacts
Ring Tones 3 Select Vibrate from the list of ring tones. You can set the ring tone your handset makes when you receive phone calls or call alerts from 4 Select the features you want to set to make no someone you have stored in Contacts. -
Page 161: Viewing Ring Tone Assignments
Viewing Ring Tone Assignments Viewing Ring Tone center, and voice records created when your handset is in a call. Deleting some of Assignments these other items frees memory for ring tones. 1 From the main menu, select Ring Tones. 2 Make sure Vibrate All is set to Off. Deleting Custom Ring Tones 3 Highlight any ring tone. -
Page 162: Datebook
Datebook • A repeat — An option to store the event as a recurring event. Datebook stores up to 250 events. You can store • A reminder — If an event has a start time, you events over a 13 month period — 12 months after can set Datebook to remind you that the event is and 1 month before the current date. -
Page 163: Creating Events
Creating Events Creating Events To view an event: 1 Select the day the event occurs. Every Datebook event must have a subject and be 2 Select the event. stored to a date. Other information is optional. To change the current view: You may enter the information in any order by 1 While viewing Datebook, press m. - Page 164 Datebook When you are finished, press O. Select Date. 3 If you want to assign a location to the event: Enter the date you want. Select Location. 7 If you want to make the event a recurring event: Enter the location. See “Entering Text” on page Select Repeat.
-
Page 165: Editing Events
Editing Events Editing Events Assigning More Options To assign more options before storing an event: To change the details of an event: 1 If you have created a reminder for the event and 1 Select the day the event occurs. want to set the ring tone for that reminder: 2 Select the event. -
Page 166: Receiving Reminders
Datebook Receiving Reminders For Events With Numbers to Call If you stored a phone number, Private ID, or If you created a reminder for a Datebook event, Talkgroup number in the Subject or Location field when the reminder time occurs, your handset of a Datebook event, you can call or send a call notifies you with text on the display, a reminder alert to that number from the reminder for that... -
Page 167: Customizing Datebook Setup
Customizing Datebook Setup Making Calls From Datebook Making Calls From Datebook Reminders To make a phone call: To make a handset call: 1 Highlight or select the event containing the number you want to call. Press s. -or- 2 Press s. -or- Press m. - Page 168 Datebook • Daily Begin — sets the beginning of your day. This is the earliest time of day displayed in week view, if you have a 12-hour day view. • Delete After — sets the amount of time Datebook waits to delete an event after it occurs.
-
Page 169: Java Applications
Java Applications To run an application that does not have a shortcut on the main menu: Your handset arrives with Java applications 1 From the main menu, select Java Apps. preloaded. These preloaded applications 2 Select the application or suite of applications autoinstall the first time you open them. -
Page 170: Resuming Applications
Java Applications Resuming Applications Deleting Applications You can resume a suspended application at any To delete an application: time. This brings it to the foreground. 1 From the main menu, select Java Apps. 1 From the Java menu, select Suspended Apps. 2 Select the application you want to delete. -
Page 171: Storing Java Applications On The Memory Card
Storing Java Applications on the Memory Card Deleting Java applications frees memory. The Java application is placed in a folder called Midlets, which is automatically created the first Note: Java application data is stored in your time you insert the memory card into your handset. handset using the same memory used to store voice records, ring tones, and Moving an Application Back to Your... -
Page 172: Shortcuts On The Main Menu
Java Applications Deleting Applications From the 3 Scroll to the application you want to create a shortcut for. Memory Card 4 Press O. To delete an application from the memory card 5 Press A under Done. inserted in your handset: To remove a shortcut: 1 From the main menu, select Java Apps. - Page 173 Java Applications and GPS Enabled applications to access the location of your handset. Granting or Denying Permission Your handset protects your privacy by giving you If you choose By Permission, you must grant or the option to block all or some Java applications deny each Java application access to the location from accessing the location of your handset.
- Page 174 Java Applications • Only Once — If the application requests Setting Privacy for Each Java access to the location of your handset again, Application you are prompted to grant or deny permission. After a given Java application requests access to the location of your handset for the first time, you To grant this request: have the opportunity to set GPS privacy option for...
- Page 175 Java Applications and GPS Enabled • Never — When the application requests access to the location of your handset, the request is denied without notifying you.
-
Page 176: Bluetooth
Bluetooth ® Bluetooth Understanding Bluetooth ® ® Access Settings Your i885 handset is a Bluetooth device. Bluetooth devices create seamless voice and data A Bluetooth device can have either Automatic or connections with other Bluetooth devices, such as Ask security access. The first time a Bluetooth another Bluetooth handset, a Bluetooth pen, device connects to your i885 handset, you must headset, or desktop adapter. -
Page 177: Setting Your Handset For Bluetooth
You can configure the following aspects of handset comes with a default device name of Bluetooth: “Motorola Handset”. Renaming your i885 handset with a unique device name makes it easier for you • Power to distinguish your handset from other Bluetooth •... -
Page 178: Accessing Bluetooth
Bluetooth ® Making a Bluetooth Setting a Find Me Duration ® Connection You can change how long your handset remains discoverable to other devices. The default duration The following sections cover how to connect your is 1 minute. See “Sharing Your Handset’s handset to another Bluetooth device. -
Page 179: Bluetooth Bonds
Making a Bluetooth ® Connection Discoverable mode lasts for the duration selected Bluetooth Bonds ® under Find Me Duration in the Bluetooth Setup menu. During this time, other devices that are A bond is an encryption key that is generated when within range can detect your handset. - Page 180 Bluetooth ® Some Bluetooth devices ship with Bluetooth PINs. 7 Select Bond With if you are prompted to do so. Please refer to your Bluetooth device’s user guide Connecting to a Stored Device to locate this information. If a device ships without a Bluetooth PIN, then you If you have previously connected to a device, the can enter any PIN for that device.
-
Page 181: Setting Device Details
Setting Device Details Disconnecting From a Device Viewing Device Details To disconnect from a device: To view the name and the access setting of a device: 1 From the main menu, select Bluetooth > Hands Free. 1 From the main menu, select Bluetooth > Device History. -
Page 182: Sending Contacts, Datebook Events, And Media Center Items
Bluetooth ® 4 Select Access. Search for the device you want to transfer to by selecting [Find Devices]. 5 Select the setting you want. 7 If prompted, bond with the device. Deleting Devices Your handset connects to the device and 1 From the main menu, select Bluetooth >... -
Page 183: Receiving Items
Receiving Items Receiving Items 8 If prompted, bond with the device. Your handset connects to the device and You receive a prompt when your handset has an transfers the event. incoming transfer. You must either accept or reject the transfer. Sending Audio Files, Pictures, and Videos Audio files, pictures, and videos you receive must... - Page 184 Bluetooth ® You can choose to either store or discard the item. Items are stored as follows: • Contact entries are stored to Contacts. • Audio files, pictures, and videos are saved to your handset’s memory or to the memory card inserted in your handset and are accessible through the media center.
-
Page 185: Digital Rights Management
Installing Items Digital Rights To send the DRM installation to the background, press e. Management Understanding DRM Status When you download multimedia content available Icons online, such as audio, images, or Java applications, these items may be subject to DRM Depending on how a given third-party vendor has restrictions. -
Page 186: Managing Drm Items
Digital Rights Management handset that contains the link for purchasing the Tell-A-Friend item. The friend can then purchase the item quickly 1 Go to the location on your handset that contains and easily. Sending this type of message is called the item you want. - Page 187 Managing DRM Items To view the license of a DRM item: Under certain conditions, third-party vendors will let you download an item multiple times within a given 1 Go to the location on your handset that contains time frame, even if you deleted the item. Please the item you want.
-
Page 188: Gps Enabled
GPS Enabled IMPORTANT: Things to Keep in Mind Your handset’s GPS Enabled feature uses information from Global Positioning System (GPS) If you are using the GPS feature of your handset satellites orbiting the Earth to determine the while driving, please give full attention to driving approximate geographical location of your and to the road. -
Page 189: Making An Emergency Call
Making an Emergency Call Walking or driving very slowly may also The satellites used by the GPS feature of your substantially reduce GPS performance. handset are controlled by the U.S. government and are subject to changes implemented in accordance Even where location information can be with the Department of Defense GPS user policy calculated in such situations, it may take much and the Federal Radionavigation Plan. -
Page 190: Viewing Your Approximate Location
GPS Enabled In some cases, your local 911 emergency See “Enhancing GPS Performance” on page 181 response center may not be equipped to for information on how to help your handset receive GPS location information. For this determine your location. reason, and because the GPS location information Viewing Your Approximate reported is only approximate or may not be... -
Page 191: Enhancing Gps Performance
Enhancing GPS Performance Enhancing GPS Performance It may take your handset several minutes to complete the process of determining your location. During this time, a message usually appears on Sometimes the GPS feature of your handset may your handset’s display saying your handset is be unable to complete a location calculation scanning for satellites. -
Page 192: Updating Satellite Almanac Data
GPS Enabled • Hold your handset to enhance reception. • In a car. When using the GPS Enabled feature in Signals from GPS satellites are transmitted to a car, position your handset so that the GPS your GPS antenna, which is in your handset antenna has good access to GPS signals antenna. -
Page 193: Setting Privacy Options
Setting Privacy Options The almanac contains information about the 3 Select the privacy option you want: location of satellites, their operational status, and • Restricted — No Java or similar software other satellite information. Keeping this information applications may view the location of your updated enhances the performance of your GPS handset. -
Page 194: Using Gps With Map Software
GPS Enabled Using GPS with Map Software To turn the GPS Enabled security feature on or off: 1 From the main menu, select Settings > You can use the GPS feature of your handset to Security > GPS PIN. provide approximate location data to a laptop 2 Select On or Off. - Page 195 Using GPS with Map Software Software Compatibility 2 With the handset’s display facing up, insert the serial data cable’s connector into the accessory Your handset sends location information to your connector, until you hear a click. laptop or other device using the standard National Marine Electronics Association (NMEA) format.
- Page 196 GPS Enabled Your handset is now sending location data to your laptop or other device. To stop your handset from sending location data to your laptop or other device: Set NMEA OUT to Off. Each time you power your handset on, NMEA OUT is automatically set to Off.
-
Page 197: Voice Records
Voice Records Playing Voice Records 1 From the main menu, select VoiceRecord. A voice record is a recording you make with your 2 Select the voice record you want to play. handset and can play back. You can record notes to yourself when your handset is not in a call or 3 To stop the voice record while it is playing, press record phone calls when your handset is in a call. -
Page 198: Locking Voice Records
Voice Records Locking Voice Records Voice Records Icons One of these icons appears next to each voice When you lock a voice record, it cannot be deleted record: until you unlock it. 1 From the main menu, select VoiceRecord. A voice record made while your handset was not in a call. -
Page 199: Managing Memory
Managing Memory To delete all voice records: Note: Voice records are stored in your handset using the same memory space used to 1 From the main menu, select VoiceRecord. store Java application data, ring tones, 2 Scroll to any voice record. and wallpaper images. -
Page 200: Memo
Memo To store the memo number to Contacts: 1 From the main menu, select Memo. Memo lets you store a number, make a call to that 2 Press m. number, and save it to Contacts. 3 Select Store to Contacts. To create a memo: 4 To store the number as a new entry, select [New Contact]. -
Page 201: Shortcuts
Shortcuts Using a Shortcut If you know the shortcut number: Shortcuts lets you access most menu options by 1 From the idle screen, press m. pressing a number on your keypad or saying the voice name of the shortcut. You create the shortcut 2 On your keypad, press the number assigned to and then use it to take you to that screen any time. -
Page 202: Deleting Shortcuts
Shortcuts 8 Repeat step 4 through step 7 for all the items you want to move. 9 Press A under Done. To change the name or number assigned to a shortcut: 1 From the main menu, select Shortcuts. 2 Highlight any shortcut. 3 Press A under Edit. -
Page 203: Customizing Your Handset
Customizing Your Setting Your Handset to Vibrate Handset To set your handset to vibrate instead of making a sound when you receive phone calls, Private calls, Setting the Volume group calls, call alerts, message notifications, pictures sent using Push to View, and Datebook Of the Earpiece and Speaker reminders, see “Setting Your Handset to Vibrate”... -
Page 204: Changing The Look Of Your Handset
Customizing Your Handset Changing the Look of Your Tip: If you want to see what the wallpaper looks like, scroll to the wallpaper you want to view Handset and press A under View. Setting Wallpaper Placement Wallpaper After you choose a wallpaper, you can set it to A wallpaper is an image that appears as the appear on the idle screen only or on screens background on your handset’s display. -
Page 205: Setting The Menu View
Changing the Look of Your Handset 2 For the internal display, select Internal. -or- Setting the Menu View For the external display, select External. You can set the items on your main menu and Java applications menu to appear as large icons or a 3 Select how often you want the wallpaper to list: change. - Page 206 Customizing Your Handset Internal and External Display, Keypad, and Logo Flash Logo Backlight The logo backlight flashes rapidly when you A backlight lights the internal display, the external receive a phone call. It flashes slowly when you display, the keypad, and the logo when you make receive messages and reminders, until the alert or receive a call, open or close the flip, or press times out.
-
Page 207: Temporarily Turning Off Transmissions
Temporarily Turning Off Transmissions You can also set the PTT button backlight to light Note: When Transmitters is set to Off, your up and flash using this option: handset’s Bluetooth capability is disabled, and all active Bluetooth connections are 1 From the main menu, select Settings > 2-Way dropped. - Page 208 Customizing Your Handset • Clock — controls whether the time and date • Auto Ans — sets your handset to automatically appear on the idle screen; sets time and date answer an incoming call after a specified format; sets year. number of rings.
- Page 209 Using Settings 2-Way Radio Features Personalize Features The 2-Way Radio menu controls how your handset The Personalize menu makes main menu items handles Private calls and group calls: easier to access. • Tkgrp Silent — controls whether you hear • Menu Options — Reorder Menu lets you group calls to your Talkgroup.
- Page 210 Java applications coming out of the speaker. For more information on using this feature, go to www.motorola.com/iden/support. • Data — sets the volume of sounds that notify you that you are receiving a circuit data call.
-
Page 211: Security Features
Using Settings Memory Card Features Security Features The Memory Card menu controls how media items The Security menu lets you turn security features are stored and lets you remove and format the on and off and change passwords: memory card: •... -
Page 212: Advanced Features
Customizing Your Handset Advanced Features • Baud Rate — sets the baud rate at which your handset communicates with a laptop computer, The Advanced menu contains advanced and rarely PC, or similar device. used Settings features. • Alert Timeout — sets the amount of time a tone continues to sound when you receive a message notification, call alert, or Datebook reminder. -
Page 213: Profiles
Profiles Viewing Profiles To view the profiles stored in your handset: A profile is a group of settings saved together so that you can apply them to your handset easily. 1 From the main menu, select Profiles. 2 Select the profile you want to view. A profile contains these settings: Tip: The profile that is currently in effect on your •... -
Page 214: Temporary Profiles
Profiles When you do this, your handset either: A temporary profile is based on the profile in effect when you made the changes, but reflects the • Updates the profile in effect to reflect these changed settings. Making more changes further changes, without notifying you -or- updates the temporary profile, for as long as it is in •... -
Page 215: Creating Profiles
Creating Profiles 5 Press A under Create. 5 Enter the name you want to give the profile. See “Entering Text” on page 57. 6 Scroll through the list of options and set their When you are finished, press O. values. 7 Press A under Done. -
Page 216: Setting Call Filtering
Profiles To delete all profiles: 3 If you set the Phone option to Some Cntcs, select up to 5 Contacts entries that contain 1 From the main menu, select Profiles. phone numbers you want to be notified of calls 2 Press m. from. -
Page 217: Setting A Profile For Use With A Car Kit
Setting a Profile for Use With a Car Kit • All sets your handset not to sound a tone or 4 Select the profile you want. vibrate when you receive any message. Note: When you receive a type of message you have set not to sound a tone or vibrate, the messages notification screen appears as usual. -
Page 218: Using A Headset
Using a Headset Using a Bluetooth Headset You can use your i885 wirelessly with a Bluetooth If you use a headset or similar device with your headset. This type of wireless headset lets you handset, you can set your handset to send connect quickly to devices that are within range. - Page 219 Using a Remote PTT Button For phone calls, use the remote PTT button to answer calls, switch between calls, and end calls. Hold the remote PTT button for less than 2 seconds to answer calls and switch between calls. Hold the remote PTT button for more than 2 seconds to end calls.
-
Page 220: Understanding Status Messages
Understanding Status Status Message Description Messages Messages You are either out of coverage or Service Not having problems with provisioning. You may receive status messages under certain Available conditions. Before contacting TELUS Mobility The system is experiencing heavy System Busy Client Care, note the message, numeric code, and traffic. - Page 221 Status Message Description Status Message Description Messages Messages An operational fault was detected with Resource Not Your handset’s camera is temporarily Self Check Fail your handset. Note the numeric code, unavailable for use. Please try again Available + Number Code turn your handset off, and contact later.
- Page 222 Understanding Status Messages Status Message Description Status Message Description Messages Messages Bluetooth is not ready. Please try The object cannot be stored because Bluetooth Not Unable To again. you do not have enough space in Initialized Store: Space Contacts/Datebook/Media Center. Exceeded Unable to Bond Bonding has timed out.
-
Page 223: Safety And General Information
9 kHz and 300 GHz." Operation and EME Exposure "Attachment to Resolution 303 from July 2, 2002." Your Motorola radio product is designed to comply with the following national and international standards and guidelines regarding exposure of human beings to radio frequency electromagnetic... -
Page 224: Phone Operation
Two-way radio operation product in a Motorola approved clip, holder, holster, case or body harness for this product. Your radio product has been designed and tested... - Page 225 The SAR information reported to the FCC includes the must be tested and certified to the FCC that is does not FCC-accepted Motorola testing protocol, assessment exceed the limit established by the government-adopted procedure, and measurement uncertainty range for this requirement for safe exposure.
-
Page 226: Electromagnetic Interference/Compatibility
Any use of a Approved Accessories radio product must be in accordance with applicable regulations per airline crew instructions. For a list of approved Motorola accessories call 1-800-453-0920, or visit our website at Implantable Medical Devices www.motorola.com/iden. -
Page 227: Operational Warnings
Operational Warnings Operational Warnings • Should turn the phone OFF inmediately if there is any reason to suspect that the interference is taking place. For Vehicles with an Air • Should read and follow the directions from the manufacturer of the implantable medical device. Do not place a portable radio product in the area If you have any questions about using your over the air bag or in the air bag deployment area. -
Page 228: Operational Cautions
Safety and General Information Operational Cautions as grain, dust or metal powders, and any other area where you would normally be advised to turn off your Batteries vehicle engine. Areas with potentially explosive atmospheres are often but All batteries can cause property damage and/or not always posted. -
Page 229: Accessory Safety Information
Accessory Safety Information 2 Remove Battery and SIM card (if so equipped) • Before using any battery or battery charger, read from radio product. all the instructions for and cautionary markings on (1) the battery, (2) the battery charger, which 3 Shake excess liquid from radio product. - Page 230 Safety and General Information • Use of a non-recommended attachment to a • Maximum ambient temperature around the battery charger may result in a risk of fire, power supply or transformer of any battery electric shock, or injury to persons. charger should not exceed 40°C (104°F).
-
Page 231: Motorola Limited Warranty
What Does this Warranty Cover? product. Subject to the exclusions contained below, Accessories as One (1) year from the Motorola, Inc. warrants its Motorola iDEN Digital defined above. date of purchase by the Mobile and Portable Handsets ("Products"), first consumer... - Page 232 Product or may subscribe to or use with the Products, Accessory to abnormal usage or conditions; or (d) Accessories or Software is excluded from other acts which are not the fault of Motorola, are coverage. excluded from coverage.
- Page 233 (b) a written description of the What will Motorola Do? Motorola, at its option, problem; (c) the name of your service provider, if will at no charge repair, replace or refund the applicable;...
- Page 234 FOR ANY INDIRECT, INCIDENTAL, SPECIAL OR disassembly of such Motorola software or exercise CONSEQUENTIAL DAMAGES OF ANY KIND, OR of the exclusive rights reserved for Motorola, is LOSS OF REVENUE OR PROFITS, LOSS OF permitted. BUSINESS, LOSS OF INFORMATION OR DATA,...
-
Page 235: Limited Warranty Motorola Communication Products (International)
Communication b. the battery develops leakage. Products (International) MOTOROLA, at its option, will at no charge either repair the Product (with new or reconditioned Note: This Warranty applies in Singapore and parts), replace it (with a new or reconditioned the Philippines. - Page 236 Limited Warranty Motorola Communication Products (International) MOTOROLA cannot be responsible in any way for TIME, INCONVENIENCE, COMMERCIAL LOSS, any ancillary equipment not furnished by LOST PROFITS OR SAVINGS OR OTHER MOTOROLA which is attached to or used in INCIDENTAL, SPECIAL OR CONSEQUENTIAL...
- Page 237 1.Any of the seals on the battery enclosure of extent that it is based on a claim that the Product or cells are broken or show evidence of parts infringe a patent, and Motorola will pay those tampering. costs and damages finally awarded against the end user purchaser in any such suit which are 2.The damage or defect is caused by...
- Page 238 MOTOROLA software. that such purchaser will permit MOTOROLA, at MOTOROLA software may be used in only the its option and expense, either to procure for Product in which the software was originally...
-
Page 239: Index
Index visuals 140 Audio recordings 125 discoverable mode 168 Numerics playing 125 during an active call 170 headset 208 2-way radio 199 PINs 169 see also Private calls, group Backlight 197 calls, and call alerts reassigning a device name Battery 3-way calling 54 care 6 receiving items 173... - Page 240 Index queue 21 from Recent calls 20, 31, 40 Clock 198 receiving 21 group, see Group calls Contact information responding 21, 22 icons 31 receiving 38, 107 sending 21 international 55 Send via PTT 106 sorting 22 on hold 52 Contacts 20, 32, 42 viewing 21 Private calls 199...
- Page 241 gifting 123, 176 almanac data 182 type 42 installing items 175 best results 181 voice name 45 managing items 176 emergency calls 179 media center 123, 139 map software 184 renewing license 177 privacy options 183 Datebook 32 sharing items 175 security 183 Digital rights management, see status icons 123, 175...
- Page 242 Index Inbox 86 Lists, see menus MMS messages 93 mobile originated text ring tones 151 messaging 68 text messages 69 Media center 120 sent items 83 voice records 189 accessing audio player 127 status 10 Memory card 17 audio recordings 125 voice records 188 audio player 129 creating MMS messages 77...
- Page 243 see also mobile originated message center 85 text messaging quick notes 78, 91 Navigation key 2 receiving 61, 94 receiving 83 Net alerts 63 text and numeric 64 replying 86 Messages center 60 sending 71, 81, 83 One-to-one calls 19 Mike’s Talk Around 24 sent items 82 also see Private calls...
- Page 244 Index Pictures 123 see also MMS messages, setting 149 quick notes accessing the camera 113 setting in Contacts 150 see also Text messages, Contacts 42, 44, 47, 115, 124 vibrate 149 quick notes deleting from messages 88 viewing assigned 151 inserting in messages 79, Ringer 193 Radio frequency 213...
- Page 245 speak caller 200 State Tone 29 turning on and off 197 speak text 200 Status messages 210 Turbo Dial 33 speaker volume 200 voice 200 T9 Text Input, see text entry Video 116 Shortcuts 191 Talkgroups 22, 23, 199 Videos creating 191 Text display area 8, 31 deleting from messages 88...
- Page 246 Index Waits dialing 55 storing 49 Wallpaper 116, 124 Warranty 225 Wireless Web 94 Word mode 57...
Need help?
Do you have a question about the i885 Telus and is the answer not in the manual?
Questions and answers