pleasant hearth HWS-224172MH Series User Manual
High efficiency wood stove - small
Hide thumbs
Also See for HWS-224172MH Series:
- User manual (68 pages) ,
- Owner's manual (54 pages) ,
- Manual (65 pages)
Table of Contents
Advertisement
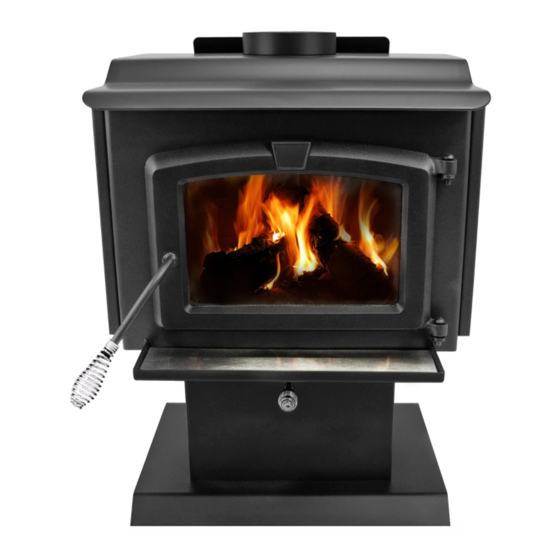
High Efficiency Wood Stove - Small
SAFETY NOTICE: IF THIS WOOD BURNING APPLIANCE IS NOT PROPERLY INSTALLED,
OPERATED, AND MAINTAINED, A HOUSE FIRE MAY RESULT.
TO REDUCE THE RISK OF FIRE, FOLLOW THE INSTALLATION INSTRUCTIONS. FAILURE
TO FOLLOW THE INSTALLATION INSTRUCTIONS MAY RESULT IN PROPERTY DAMAGE,
BODILY INJURY OR EVEN DEATH. CONTACT LOCAL BUILDING OFFICIALS ABOUT
RESTRICTIONS AND INSTALLATION INSPECTION REQUIREMENTS IN YOUR AREA.
BEFORE LIGHTING YOUR FIRST FIRE, REMOVE PLASTIC FILM OFF TRIM AND CLEAN THE
PLATED SURFACES WITH DENATURED ALCOHOL OR A GOOD QUALITY, NON-ABRASIVE LIQUID
GLASS CLEANER. APPLY WITH A VERY SOFT, CLEAN CLOTH. DO NOT USE PAPER TOWELS
TO CLEAN THE PLATED PARTS. FAILURE TO CLEAN ALL MARKS AND FINGERPRINTS FROM
THE PLATED SURFACES WILL CAUSE PERMANENT DAMAGE.
NOTE: Some states and provinces do not allow the exclusion or limitation of incidental or consequen-
tial damages. The above limitations may not apply to you.
This manual describes the installation and operation of the Model HWS-224172MH, non-catalytic
wood heater. This heater meets US Environmental Protection Agency's emission limits for wood
heaters. Please read this entire manual before you install and use your new room heater.
This stove is listed by OMNI-Test Laboratories
of Portland, Oregon to meet UL1482 for the US
and ULC-S627 for Canada. (UM) 84 HUD, mobile
home approved.
6440 W. Howard St.
Niles, IL 60714-3302
877-447-4768
W a r m i n g Y o u r H o m e.
Do Not Discard This Manual: Retain for Future Use
Questions, problems, missing parts? Before returning to your retailer, call our
customer service department at 877-447-4768 8:30 a.m. - 4:30 p.m. CST,
Monday - Friday or e-mail us at customerservice@ghpgroupinc.com.
W a r m i n g Y o u r H e a r t.
WARNING
6" Flue
required
Model Series:
HWS-224172MH
HWS-224172
WS-2417
LWS-124171
TESTED TO: UL 1482-1996/ULC-S627-00
REPORT NO. 418-S-03-2
60-10-002
05/13
Advertisement
Table of Contents

Related Manuals for pleasant hearth HWS-224172MH Series


Summary of Contents for pleasant hearth HWS-224172MH Series
- Page 1 NOTE: Some states and provinces do not allow the exclusion or limitation of incidental or consequen- tial damages. The above limitations may not apply to you. This manual describes the installation and operation of the Model HWS-224172MH, non-catalytic wood heater. This heater meets US Environmental Protection Agency’s emission limits for wood heaters.
- Page 2 CAUTION through the chimney. The amount of draft in your chimney After reading these instructions, if you have any doubt depends on the length of the chimney, local geography, nearby obstructions, and other factors. Too much draft about your ability to complete your installation in a may cause excessive temperatures in the appliance.
-
Page 3: Outside Air Kit Installation
• Electric screw driver with bits OPTIONAL BLOWER: MODEL PBAR-2427, 120 VOLTS, 60Hz, 1.0 AMPS, 2900 RPM • Silicone sealant DANGER: RISK OF ELECTRIC SHOCK. • Drills and saws necessary for cutting holes through DISCONNECT POWER BEFORE SERVICING UNIT. the wall or flooring in your home IMPORTANT: FOR OPTIMUM HEATER AN OUTSIDE AIR KIT (ITEM NO: OAK-MH) IS PERFORMANCE AT LOW BURN RATE, OPERATE... -
Page 4: Baffle Installation
BAFFLE INSTALLATION IMPORTANT! Install baffle bricks and baffle 2. Place insulation through flue pipe opening after bricks insulation before installing stove pipe on stove. are in place, covering the top of the bricks all the way across from side to side of stove. 1. -
Page 5: Installation
INSTALLATION Contact your local building inspector prior to installation. Figure 2 A permit may be required in your area. 1. Remove all parts from inside the stove body. 2. Select the proper location for the stove. These Twist spring handle on in a clockwise motion. -
Page 6: Floor Protection
FLOOR PROTECTION Figure 3 INSTALLATION ON A CONCRETE FLOOR An appliance installed on a concrete floor does not require floor protection. If carpeting or any other com- bustible floor covering is installed, a clearance around the stove must be maintained equivalent to the size of the floor protector described in the following section. - Page 7 VENTING SYSTEMS INSPECT APPLIANCE & COMPONENTS AND PRE-USE CHECK LIST The venting system consists of a chimney connector (also known as stove pipe) and a chimney. These get extremely hot during use. Temperatures inside the Place the appliance in a location near the final chimney may exceed 2000°F (1100°C) in the event of installation area and follow the procedures below: a creosote fire.
-
Page 8: Chimney Requirements
Typical Stove Systems Stove system with masonry chimney consists of: • Stove • Chimney Connector (stove pipe) • Thimble • Masonry Chimney • Hearth Pad Floor Protection Figure 4.1 Masonry Chimney Stove system with prefabricated metal chimney consists of: • Stove •... -
Page 9: Venting Components
CHIMNEY REQUIREMENTS CHIMNEY SYSTEMS Prefabricated Metal Chimney VENTING COMPONENTS • Must be a 6 inch (152mm) diameter (ID) high Chimney Connector: temperature chimney listed to UL 103HT (2100°F) or It is also known as flue pipe or stove pipe. The chimney CAN/ULC-S629. - Page 10 • Refer to manufacturers instructions for installation. Thimble Site constructed for masonry chimney installation: Components • A minimum length of 12 inches [05mm] (longer for thicker walls) of solid insulated factory-built chimney length constructed to UL 103 Type HT 6 inch (152mm) inside diameter.
-
Page 11: Installing Chimney Components
INSTALLING CHIMNEY COMPONENTS 10. Install trim collar around the sold pack chimney section. Chimney Connector Solid Pack Chimney with Metal Supports as a Thimble (Cont’d) Single wall connector or stove pipe. This must be at least 24 gauge mild steel. The sections must be attached to the appliance and to each other with the crimped (male) end pointing toward the stove. -
Page 12: Operation
Chimney Termination Requirements NOTE: Follow manufacturer’s instructions for clearance, • Chimney performance may vary. securing flashing and terminating the chimney. • Trees, buildings, roof lines and wind conditions • Must have an approved and listed cap affect performance. • Must not be located where it will become plugged •... -
Page 13: Mobile Home Installation
MOBILE HOME INSTALLATION 1. An outside air inlet must be provided for Figure 8 combustion when installing in a mobile home. See page 3 for installation information. 2. Appliance must be secured to the mobile home structure by bolting the pedestal through hearth pad and into floor. 3. - Page 14 WOOD STOVE QUICK START GUIDE ITEMS NEEDED FOR FIRST FIRE: • 10 - 15 Wadded Up Pieces of Newspaper • 10 - 20 Pieces of Dry Kindling • A Few Pieces of Seasoned Split Wood ADD NEWSPAPER ADD KINDLING OPEN AIR CONTROL CLOSE OPEN Pull damper control all the way...
-
Page 15: Do Not Burn
OPERATION 1. Remember to Ventilate well. Do not use a grate or elevate fire. Never burn with door 2. Allow the stove to cure before burning for long open as this may result in fire. Build wood fire directly on periods at high temperatures. -
Page 16: Glass Care
5. Attach glass gasket (from GHP Group replacement NEVER USE GASOLINE, GASOLINE-TYPE LANTERN parts page 19) to new glass and install in door frame. FUEL, KEROSENE, CHARCOAL LIGHTER FLUID, OR 6. Replace glass retainers with screws making sure not SIMILAR LIQUIDS TO START OR FRESHEN UP A to cross thread or overtighten. -
Page 17: Ash Disposal
IMPORTANT WAYS TO PREVENT AND KEEP UNIT FREE OF CREOSOTE 1. Burn with air control open for several minutes at HELPFUL HINTS numerous intervals throughout the day during the 1. What is the correct way to start a fire? heating season, being careful not to over-fire unit. a) You will need small pieces of dry wood (kindling) This removes the slight film of creosote accumulated and paper. - Page 18 the chimney than a low-pressure day (overcast and burning at only 60 percent of the fuel value of dry damp). Inside the home, normal household appliances, seasoned wood, will deposit creosote on the inside of your stove and along the inside of your chimney. such as clothes dryers and forced air furnaces compete 3.
- Page 19 QUICK REFERENCE MAINTENANCE GUIDE Start the first inspection after the first 2 months of use, CAUTION! Allow the appliance or if performance changes, and adjust your schedule to completely cool down before accordingly. Maintenance is required for safe operation performing any cleaning or maintenance. and must be performed to maintain your warranty.
- Page 20 Brick Pattern GHP Group reserves the right to make changes in design, materials, specifications, prices and discontinue colors and products at any time, without notice. Item No. Description Qty. Part No. Door Assembly 75-23-510 2. & 3. Glass (13.00”W x 8.38”H) and Gasket 75-23-511 1/8”...
- Page 21 Do not use ammonia based cleaners. A a said defect has been confirmed by GHP Group, or an authorized suitable cleaner is available at your nearest Pleasant Hearth dealer. representative’s inspection. Defective parts must be shipped back (at DO NOT CLEAN GLASS WHILE HOT AND DO NOT USE ABRASIVE GHP Group discretion), transportation prepaid, to the manufacturer.
-
Page 22: Warranty Registration
IF WARRANTY SERVICE IS REQUIRED Contact GHP Group Customer Service. Make sure you have your sales receipt and the model/serial number of your GHP Group product. Do not attempt to do any service work yourself, unless pre-approved by GHP Group in writing as this will void the warranty.
Need help?
Do you have a question about the HWS-224172MH Series and is the answer not in the manual?
Questions and answers