
Related Manuals for Seiko DPU-S245-00A-E


Summary of Contents for Seiko DPU-S245-00A-E
- Page 1 USER’S GUIDE Thermal Printer DPU-S245 SERIES Read this user’s guide carefully before using the printer. Keep this user’s guide in a place where it can be accessed quickly. Seiko Instruments Inc.
- Page 2 July 2009 Second Edition: January 2010 Copyright 2009, 2010 by Seiko Instruments Inc. All rights reserved. The information contained herein is the property of SII and shall not be reproduced in whole or in part without prior written approval of SII.
- Page 3 Product: Thermal Printer DPU-S245-00A-E, DPU-S245-01A-E Directive: Title 2004/108/EC EC Electromagnetic Compatibility Directive Standards EN 55022 EN 61000-3-2 EN 61000-3-3 EN 55024 Product: AC adapter PW-0904-W2-E Directive: Title 2004/108/EC EC Electromagnetic Compatibility Directive 2006/95/EC EC Low Voltage Directive Standards EN 55022...
- Page 4 Federal Communications Commission (FCC) compliance statement This equipment has been tested and found to comply with the limits for a Class B digital device, pursuant to part 15 of the FCC Rules. These limits are designed to provide reasonable protection against harmful interference in a residential installation.
- Page 5 Industry Canada (IC) compliance statement Operation is subject to the following two conditions: (1) this device may not cause interference, and (2) this device must accept any interference, including interference that may cause undesired operation of the device.
-
Page 6: Table Of Contents
INTRODUCTION Thank you for purchasing the DPU-S245 thermal printer. This USER’S GUIDE explains how to handle DPU-S245 thermal printer (hereinafter referred to as printer), specified AC adapter, specified battery charger, specified battery pack and specified AC cable (hereinafter, omit “specified”). Read through the SAFETY PRECAUTIONS and OPERATING PRECAUTIONS carefully before using the printer. -
Page 7: Safety Precautions
SAFETY PRECAUTIONS The following symbols are used in this User’s Guide in order to make use of the printer properly and prevent the printer from being damaged. Follow the instructions marked with the symbol. Failure to follow the guidelines marked with this WARNING symbol could result in severe personal injury or death. - Page 8 WARNING DO NOT use the printer, the AC adapter, the AC cable and the battery charger in countries where these items do not comply with the regulations. See Section 11 SPECIFICATIONS, List of Compliance with Regulation. Doing so, we do not assure the safety of these products and you will be responsible for violation of regulations.
- Page 9 DO NOT connect except specified battery pack with the battery charger. Doing so may cause explosion, overheating or fire leading to fire or injury. DO NOT put the printer into water in a place where it could get wet. Doing so may cause fire, a failure or other accidents. DO NOT touch the printer by wet hand.
- Page 10 CAUTION If the printer is not used for a long time, unplug the AC plug from the outlet and remove the battery pack from the printer. If not, it might cause fire or electric shock. When cleaning the printer, unplug the AC plug from the outlet and remove the battery pack from the printer.
- Page 11 DO NOT touch the cutter. Doing so may cause injury. Be sure to hold the battery cover to the printer when the battery pack is inserted in the printer. Fall of the battery pack due to the battery cover slid off may cause injury or any damages.
- Page 12 Precautions in the Battery pack (Option) WARNING If you find any of the following abnormalities in the battery pack, remove the battery pack from the printer and keep away from fire. When the battery pack gave out a nasty smell, reached an ...
- Page 13 DO NOT apply strong impact to the battery pack with a hammer or a nail, and DO NOT crush it. Doing so may cause liquid leakage, explosion, overheating or fire leading to fire or injury. DO NOT put the battery pack into water. Always keep it away from rain and water.
-
Page 14: Operating Precautions
OPERATING PRECAUTIONS Please follow the precautions below to enjoy and maintain the full performance of the printer. Using the Printer Be careful not to drop or bump the printer on a hard surface. DO NOT install the printer in direct sunlight or such areas. Suitable environment for the use of the printer is as follows: ·... -
Page 15: Precautions On Discarding
When the battery pack is used at low temperature, the length of time the printer can be used may be shortened. High-print-rate printing or using the printer under low temperature condition might cause irregular printouts or generate loud noise. This is not a failure in the printer, but an inherent paper phenomenon. - Page 16 Notations Used in this User’s Guide The following two types of notations are used throughout this User’s Guide to denote items of caution and items to remember: NOTE Operation Precautions This box contains items that when not followed may lead to a malfunction or to a deterioration of performance.
-
Page 17: Preparation
1 PREPARATION Once you have opened the carton, make sure it contains the printer and all accessories. Printer Printer User’s Guide/ SAFETY PRECAUTIONS (CD-ROM) 1 (piece) Keep the package and packing materials for future transportation or long-term storage. The following are available as options: Specified Battery pack Specified AC adapter Specified AC cable... -
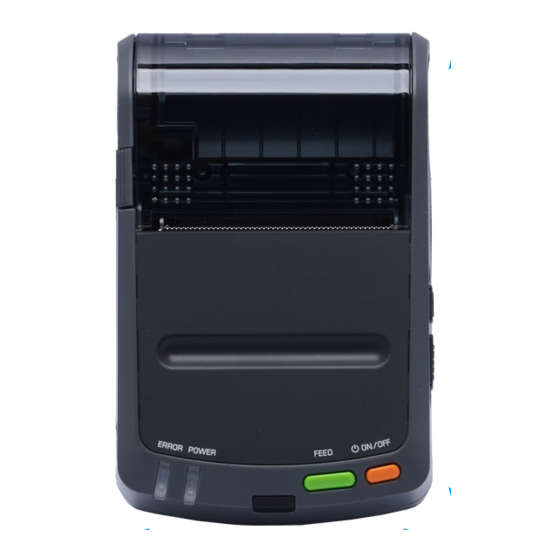
Page 18: Each Part Of Printer
2 EACH PART OF PRINTER (8) (9) (10) (12) (11) (14) (13) (1) POWER switch (3) POWER lamp The POWER switch turns the printer ON The POWER lamp lights when the printer or OFF. To turn the printer on, hold down turns on. - Page 19 (6) Interface connector (11) Paper cover The interface connector connects with the The platen roller is released from the interface cable. Open the rubber cover thermal paper after opening this cover. and insert the connector. Open this cover to replace the thermal paper or to clean the thermal head.
- Page 20 Lamp Display Lamp display POWER lamp ERROR lamp (Green) (Orange) Power OFF Power ON (Print-ready) Initializing Out-of-paper Blink Paper cover open Blink twice Battery low, power failure Blink Thermal head temperature error Blink twice Recharging Blink Function setting mode Function setting mode shifting Blink Blink FLASH memory accessing...
-
Page 21: Power Connection
3 POWER CONNECTION The printer can be powered with a battery pack or an AC adapter. Always refer to Section 11 SPECIFICATIONS before using the battery pack and the AC adapter. Installing a Battery Pack The battery pack should be fully recharged. See Section 8, Recharging the Battery Pack, for details on the recharging method. - Page 22 HINT If the battery pack starts to run out soon, it means that the battery life has expired. Purchase a new battery pack. When used in the condition of low temperature, operation time of the printer is shorter than average. ...
-
Page 23: Connecting The Ac Adapter
Connecting the AC Adapter (1) Connect the AC cable to the AC adapter. (2) Insert the DC jack of the AC adapter to the power connector of the printer. (3) Insert the AC plug of the AC cable to an electric outlet. NOTE Before installing or removing the AC adapter, turn the printer off. -
Page 24: Paper Setting
4 PAPER SETTING This printer can feed the paper roll. The printer function setting for cut sheets is different from that for paper roll. See Section 6 Function Setting for details. Setting the Thermal Paper (1) Push the paper cover open button to open the paper cover in the direction of the arrow. -
Page 25: Test Printing
5 TEST PRINTING After setting the thermal paper in the printer, perform test printing. In test printing, the printer's function setting and character strings for testing are printed. (1) Make sure that the thermal paper is set in the printer and the printer is turned off. If the thermal paper is not set, set the thermal paper as instructed in Section 4, Paper Setting, and turn the printer off. -
Page 26: Function Setting
6 FUNCTION SETTING This printer can be set various function according to operating conditions or uses. The settings are stored in the software DIP switches (hereinafter referred to as “SWDIP switch”) in the FLASH memory of printer. They can be set by using switches or by entering commands. -
Page 27: Changing Settings
HINT The printer enters the HEX Dump mode by pressing the POWER switch. This mode can be checked to see the printer's transmission status. See the Technical Reference for details. If you do not press any switch within 30 seconds after a message is printed, the printer turns off. - Page 28 (2) Changing SWDIP switch settings When the message shown at the following is printed in the function setting mode, press the POWER switch. Load Default Setting? Yes: Feed SW / No: Power SW HINT There are SWDIP switches from 1 to 4 in the printer, so set 8 bits within SWDIP switches respectively.
- Page 29 Operation 2: SWDIP switch setting (1) When the message shown at the following is printed, set the bits from the most significant bit (SWDIP*-8) to the least significant bit (SWDIP*-1). Input 8 bits. 1: Feed SW / 0: Power SW To set 1: Press the FEED switch.
- Page 30 Operation 3: Exiting function setting mode If pressing the FEED switch when the message shown at the following is printed, the printer returns to operation (1) and sets SWDIP switch 1 again. DIP Switch setting mode. Continue: Feed SW Quit: Power SW If pressing the POWER switch, the message shown at the following is printed.
- Page 31 SWDIP Switch Setting List : Default settings SWDIP switch 1 Function Setting Data 1 Busy control 0 Xon/Xoff 1 1 bit Stop Bit 0 2 bits Parity None None Even 1 8 bits Bit length 0 7 bits Baud Rate 1200 2400 4800...
- Page 32 SWDIP switch 2 Function Setting 1 Disable Auto Status Output 0 Enable 1 JIS code Kanji Code 0 Shift-JIS Code 1 24 dots Font Size 0 16 dots Auto Power 1 Disable 0 Enable 1 ANK Character Set 0 IBM Compatible Reserved 1 Fixed to 1 BHT-Ir/...
- Page 33 SWDIP switch 3 Function Setting Paper 1 Mark Roll Paper Mode 0 Roll Paper Print 100% 105% 110% Density TF50KS-E2D TP50KJ-R Prohibition PD160R-63 (TP-S245L-1) TL69KS-LH P220VBB-1 P300 P350 Paper KIP370 KIP470 PD160R-N AF50KS-E *1 *3 Select Prohibition KT55F20 F5041 KF50 AP50KS-D KRP440 AP50KS-FZ...
- Page 34 SWDIP switch 4 Function Setting Bluetooth Link Key 1 Disable selection (Bluetooth Link Key) 0 Enable Reserved 1 Fixed to 1 Busy Output When 1 Busy Error Occurs 0 UnBusy (Error) 1 Disable Mark Position Correct 0 Enable Bluetooth Baud 230400 57600 115200...
-
Page 35: Connecting To The Host Device
CONNECTING TO THE HOST DEVICE This printer supports serial and USB communication through an interface cable and infrared communication which conform to IrDA (Ver1.2). Moreover, the Bluetooth-supporting model supports Bluetooth (Ver.2.0+EDR) conformity wireless communication. The printer function setting differs depending on the printer model and the communication method which shall be used. - Page 36 Serial/USB Communication with an Interface Cable (1) Turn the printer off. (2) Open the interface connector cover and connect the interface cable. The connector of serial interface cable has lock for preventing from falling off. (3) Turn the printer on and send data from the host device to the printer. (4) Verify that the data is printed correctly.
- Page 37 Infrared communication by IrDA (1) Turn the printer off. (2) Turn the printer on without connecting the USB interface cable to it. (3) Place the infrared transmitter/receiver of the host device and the infrared transmitter /receiver of the printer as shown in the figure. (4) Check communication status from the host device.
- Page 38 Bluetooth-based Wireless Communication (Bluetooth-supporting model) (1) Turn the printer off. (2) Turn the printer on without connecting the USB interface cable to it. (3) Check communication status from the host device. (4) Send data from the host device to the printer. Verify that the printer prints it correctly.
-
Page 39: Recharging The Battery Pack
8 RECHARGING THE BATTERY PACK The battery pack is partially charged prior to shipping, and provides sufficient power to check the printer operation. To use the printer for an extended time, fully recharge the battery pack. This battery pack does not need to be used up or discharged before recharging. The battery pack can be recharged when it is installed in the printer connected with an AC adapter. - Page 40 HINT The printer can print or receive data while it is recharging the battery pack. During printing or receiving data, the POWER lamp lights continuously and the printer pauses to recharge. The printer recharges the battery again after printing and receiving data are completed. ...
- Page 41 NOTE When the battery charger is connected to the outlet, do not bring any metal object into contact with the metal terminal. Unplug the battery charger from the outlet after using. Remove the recharged battery pack from the battery charger within 24 hours. HINT ...
-
Page 42: Thermal Head Maintenance
9 THERMAL HEAD MAINTENANCE The thermal head of this printer does not require user maintenance. If paper powder accumulates, clean the thermal head to maintain maximum print quality for an extended time. Cleaning the Thermal Head (1) Turn the printer off. (2) Unplug the AC plug of the AC cable to the outlet. -
Page 43: Troubleschooting
10 TROUBLESHOOTING Check the following points before you make a request for repair. The power does not turn on. · Is specified AC adapter or battery pack being used ? · Are the AC cable and AC adapter connected correctly ? ·... -
Page 44: Specifications
11 SPECIFICATIONS Printer Specifications Specified Battery Pack Specifications (Option) Item Specification Model DPU-S245-00A-E Item Specification (Bluetooth-unsupporting model) Model BP-L0715-A1-E DPU-S245-01A-E Battery Lithium ion (Bluetooth-supporting model) Rated voltage 7.4 VDC Printing method Thermal Rated capacity 1500mAh Characters per line 24 Operating temperature Character size 14 to 122F (discharging) -
Page 45: Interface Specifications
Interface Specifications · Infrared interface · Serial interface Item Specification Item Specification Version IrDAVer 1.2 conformity Synchronous Asynchronous BHT-Ir protocol conformity Baud rate 1200, 2400, 4800, 9600, 19200, 38400, 57600 or 115200bps · Bluetooth interface Data length 7 or 8 bits Parity None, Even or Odd Item... - Page 46 List of Compliance with Regulation Please check the list below to see if the printer and its accessories can be operated in destination countries and comply with the regulations. ○: Compliance with regulation Regulation DPU-S245-00A-E DPU-S245-01A-E PW-0904-W2-E PWC-L07A1-W1-E under countries...
-
Page 47: Options And Consumable Parts
12 OPTIONS AND CONSUMABLE PARTS Options Name Model Specified Battery pack BP-L0715-A1-E Specified AC adapter PW-0904-W2-E Specified Battery charger PWC-L07A1-W1-E Specified AC cable (for specified AC adapter: PW-0904-W2-E and specified battery charger) For Japan CB-JP04-18A-E For USA, Canada CB-US04-18A-E For EU, EFTA CB-CE01-18B-E For United Kingdom CB-UK01-20A-E... - Page 48 Thermal Paper line Model Specification TP-S245L-1 58 mm width, 38mm diameter roll Specified Thermal Paper line Model Manufacturer Remark TF50KS-E2D Nippon Paper Industries Co. Use as the paper roll TP50KJ-R Nippon Paper Industries Co. Use as the paper roll TL69KS-LH Nippon Paper Industries Co.
- Page 49 Seiko Instruments Inc. 1-8, Nakase, Mihama-ku, Chiba-shi, Chiba 261-8507, Japan Print System Division Telephone:+81-43-211-1106 Facsimile:+81-43-211-8037 Seiko Instruments USA Inc. Thermal Printer Div. 2990. Lomita Blvd., Torrance, CA 90505, USA Telephone:+1-310-517-7778 Facsimile:+1-310-517-8154 Seiko Instruments GmbH Siemensstrasse 9, D-63263 Neu-lsenburg, Germany Telephone:+49-6102-297-0 Facsimile:+49-6102-297-222 Seiko Instruments (H.K.) Ltd.
Need help?
Do you have a question about the DPU-S245-00A-E and is the answer not in the manual?
Questions and answers