
Related Manuals for Thermal Arc 201 TS


Summary of Contents for Thermal Arc 201 TS
- Page 1 201 TS THERMAL ARC invERTER ARC wELdER Art # A-10139 Operating Manual Revision: AB Issue Date: May 20, 2011 Manual No.: 0-5149 Operating Features:...
- Page 2 WE APPRECIATE YOUR BUSINESS! Congratulations on your new Thermal Arc product. We are proud to have you as our customer and will strive to provide you with the best service and reliability in the industry. This product is backed by our extensive warranty and world- wide service network.
- Page 3 Manufacturer assumes no liability for its use. Operating Manual Number 0-5149 for: Thermal Arc 201 TS Power Source Arc Welder Part Number W1003802 Thermal Arc 201 TS System with Stick/TIG Kit & Case Part Number W1003803 Published by: Thermadyne Industries, Inc.
-
Page 4: Table Of Contents
TABLE OF CONTENTS SECTION 1: ARC WELDING SAFETY INSTRUCTIONS AND WARNINGS ........1-1 1.01 Arc Welding Hazards ..................1-1 1.02 Principal Safety Standards ................1-5 1.03 Declaration Of Conformity ................1-6 SECTION 2: INTRODUCTION ..................2-1 2.01 How to Use This Manual ................. 2-1 2.02 Equipment Identification ................. - Page 5 STICK (MMA) Welding Problems ..............5-2 5.03 TIG Welding Problems ................... 5-3 5.04 Power Source Problems ................5-4 APPENDIX 1: OPTIONS AND ACCESSORIES ............A-1 APPENDIX 2: REPLACEMENT PARTS ..............A-2 APPENDIX 3: 201 TS SYSTEM SCHEMATIC ............A-4 LIMITED WARRANTY & WARRANTY SCHEDULE...
- Page 6 TABLE OF CONTENTS Thermal Arc 201 TS Stick/TIG System Part Number W1003803 • Thermal Arc 201 TS power supply in toolbox • 26 TIG torch, 3.8m (12.5ft) with Integrated Controls & accessory Kit • Electrode holder, 5m (16.4ft) • Work lead, 5m (16.4ft) • 4 GP 3.2mm (1/8") dia stick electrodes • Thermal Arc 201 TS Gas Hose lead 4m (13ft) • Operating manual Art # A-10140...
-
Page 7: Arc Welding Safety Instructions And Warnings
THERMAL ARC 201 TS SAFE INSTRUCTION SECTION 1: ARC WELDING SAFETY INSTRUCTIONS AND WARNINGS WARNING PROTECT YOURSELF AND OTHERS FROM POSSIBLE SERIOUS INJURY OR DEATH. KEEP CHILDREN AWAY. PACEMAKER WEARERS KEEP AWAY UNTIL CONSULTING YOUR DOCTOR. DO NOT LOSE THESE INSTRUCTIONS. - Page 8 SAFE INSTRUCTION THERMAL ARC 201 TS WARNING WARNING FUMES AND GASES can be hazardous to ARC RAYS can burn eyes and skin; NOISE your health. can damage hearing. Welding produces fumes and gases. Arc rays from the welding process produce...
- Page 9 THERMAL ARC 201 TS SAFE INSTRUCTION 7. Do not weld on coated metals, such as galvanized, 1. Wear approved face shield or safety goggles. Side lead, or cadmium plated steel, unless the coating shields recommended. is removed from the weld area, the area is well 2.
- Page 10 SAFE INSTRUCTION THERMAL ARC 201 TS 4. Do not use welder to charge batteries or jump start vehicles. WARNING 5. Observe correct polarity (+ and –) on batteries. ENGINE FUEL can cause fire or explosion. Engine fuel is highly flammable.
-
Page 11: Principal Safety Standards
THERMAL ARC 201 TS SAFE INSTRUCTION nology Assessment, Biological Effects of Power Frequency Electric & Magnetic Fields - Background Paper, OTA-BP-E-63 (Washington, DC: U.S. Government Printing Office, May 1989): “...there is now a very large volume of scientific findings based on experiments at the cellular level and from studies with animals and people which clearly establish that low frequency magnetic fields and interact with, and produce changes in, biological systems. -
Page 12: Declaration Of Conformity
SAFE INSTRUCTION THERMAL ARC 201 TS 1.03 Declaration of conformity Manufacturer: Thermadyne Corporation Address: 82 Benning Street West Lebanon, New Hampshire 03784 The equipment described in this manual conforms to all applicable aspects and regulations of the ‘Low Voltage Directive’ (European Council Directive 73/23/EEC as amended by Council Directive 93/68/EEC) and to the National legislation for the enforcement of this Directive. -
Page 13: Introduction
INTRODUCTION THERMAL ARC 201 TS SECTION 2: INTRODUCTION 2.01 How to Use This Manual 2.02 Equipment Identification This Manual usually applies to the part numbers listed The unit’s identification number (specification or part on page i. To ensure safe operation, read the entire... -
Page 14: Symbol Chart
THERMAL ARC 201 TS INTRODUCTION 2.05 Symbol Chart Note that only some of these symbols will appear on your model. Wire Feed Function Single Phase Wire Feed Towards Workpiece With Three Phase Output Voltage Off. Three Phase Static Frequency Converter-... -
Page 15: Description
It also has STICK (MMA) welding mode pairs be carried out by appropriately qualified persons which uses standard general purpose STICK (MMA) approved by Thermal Arc. Advice in this regard can 2.5mm (3/32”) electrodes for light gauge work, be obtained by contacting an Accredited Thermal Arc generally less than 3.2mm (1/8”) thick and STICK... -
Page 16: Duty Cycle
Source must idle and be allowed to cool. 110VAC INPUT TIG (GTAW) Safe Operating Stick (MMA) Region Welding Current (amps) Art # A-10141 230VAC INPUT Safe Operating Region TIG (GTAW) Welding Current (amps) Art # A-10142 Figure 2-1: Thermal Arc 201 TS Duty Cycle Introduction Manual 0-5149... -
Page 17: Specifications
INTRODUCTION THERMAL ARC 201 TS 2.09 Specifications Power Source Part Number W1003802 Mains Power Nominal Supply Voltage AC 110V AC 230V Number of Phases Single Phase Single Phase Input Voltage Range AC 104- 127V AC 187- 253V Nominal Supply Frequency... - Page 18 INTRODUCTION Thermal Arc continuously strives to produce the best product possible and therefore reserves the right to change, improve or revise the specifications or design of this or any product without prior notice. Such updates or changes do not entitle the buyer of equipment previously sold or shipped to the corresponding changes, updates, improvements or replacement of such items.
-
Page 19: Installation, Operation And Setup
WARNING A. In locations in which freedom of movement Thermal Arc advises that this equipment is restricted, so that the operator is forced be electrically connected by a qualified to perform the work in a cramped (kneeling, electrician. - Page 20 THERMAL ARC 201 TS INSTALLATION 2. Connect ends of line Active (BROWN) and Neutral (BLUE) input conductors to a suitable power suply system that complies with all applicable local electrical codes. 3. Use Table 3-1 as a guide to select line fuses for the disconnect switch.
-
Page 21: Electromagnetic Compatibility
INSTALLATION THERMAL ARC 201 TS NOTE Damage to the PCA could occur if 265 VAC or higher is applied to the Primary Power Cable. Model Primary Supply Lead Minimum Primary Current & Duty Cycle Size (Factory Fitted) Current Circuit Size... -
Page 22: Setup For Welding
THERMAL ARC 201 TS INSTALLATION The size of the surrounding area to be considered will depend on the structure of the building and other activities that are taking place. The surrounding area may extend beyond the boundaries of the premises. -
Page 23: Stick (Mma) Setup
INSTALLATION THERMAL ARC 201 TS WARNING Before connecting the work clamp to the work and inserting the electrode in the electrode holder make sure the Primary power supply is switched off. CAUTION Remove any packaging material prior to use. Do not block the air vents at the front or rear of the Welding Power Source. - Page 24 THERMAL ARC 201 TS INSTALLATION STICK (MMA) Mode Sequence of Operation CAUTION Before any welding is to begin, be sure to wear all appropriate and recommended safety equipment. 1. Switch the ON/OFF Switch (located on the rear panel) to OFF.
-
Page 25: Lift Tig / Hf Tig (Gtaw) Setup
INSTALLATION THERMAL ARC 201 TS 3.07 LIFT TIG / HF TIG (GTAW) SETUP Set Process Selection Switch to LIFT TIG or HF TIG. Switch to 2T/4T Set Welding Current as specified by the Set DOWN Slope Electrode Manufacturer. Secure the gas cylinder in an... -
Page 26: Leak Testing The System
THERMAL ARC 201 TS INSTALLATION 7. Connect the other end of the supplied gas hose to gauge. Check for leaks using an approved the gas inlet fitting on the rear panel of the welder leak detector solution. and tighten with a wrench. Caution: DO NOT over c) If the high-pressure gauge drops and the tighten. -
Page 27: Operation
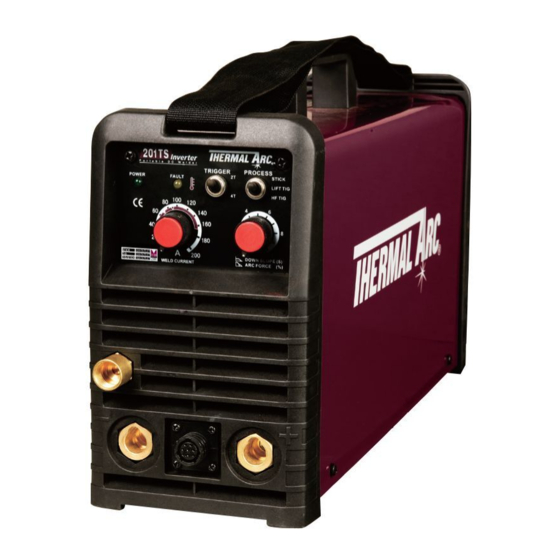
(G) Gas Outlet Positive Output Terminal Negative Output Terminal Art # A-10146 Figure 4-1: Thermal Arc 201 TS Controls A. POWER Indicator The POWER Indicator illuminates when the ON/OFF switch is in the ON position and the correct mains voltage is present. - Page 28 THERMAL ARC 201 TS OPERATION greater penetration control to be achieved. Down Slope C. TRIGGER Mode Switch (LIFT TIG Mode Only) operates in TIG mode only. It is used to set the time for 2T (Normal) Mode weld current to ramp down. Refer to Item C (Trigger...
-
Page 29: Welding Current Control Explanation
OPERATION THERMAL ARC 201 TS J. ON/OFF Switch (located on rear panel not shown) 4.03 STICK (MMA) Electrode Polarity This switch controls the Mains Supply Voltage to the Stick electrodes are generally connected to the "+" Posi- Power Source. tive Output Terminal and the work lead to the "−" Negative Output Terminal but if in doubt consult the electrode manufacturers literature for further information. -
Page 30: Gtaw Electrode Polarity
THERMAL ARC 201 TS OPERATION Metal Being Joined Electrode Comments Mild Steel E6011 This electrode is used for all-position welding or for welding on rusty, dirty, less-than-new metal. It has a deep, penetrating arc and is often the first choice for repair or maintenance work. -
Page 31: Tungsten Electrode Types
OPERATION THERMAL ARC 201 Ts 4.08 Shielding Gas Selection Alloy Shielding Gas Carbon Steel Welding Argon Stainless Steel Welding Argon Nickel Alloy Welding Argon Copper Welding Argon Titanium Welding Argon 4.09 Tungsten Electrode Types Electrode Type Welding Application Features Color Code... -
Page 32: Welding Position
THERMAL ARC 201 TS OPERATION 4.12 Welding Position The electrodes dealt with in this publication can be used in most positions, i.e. they are suitable for welding in flat, horizontal, vertical and overhead positions. Numerous applications call for welds to be made in positions intermediate between these. -
Page 33: Joint Preparations
OPERATION THERMAL ARC 201 TS 4.13 Joint Preparations In many cases, it will be possible to weld steel sections without any special preparation. For heavier sections and for repair work on castings, etc., it will be necessary to cut or grind an angle between the pieces being joined to ensure proper penetration of the weld metal and to produce sound joints. -
Page 34: Arc Welding Technique
THERMAL ARC 201 TS OPERATION 4.14 Arc Welding Technique Art # A-07696 A Word to Beginners For those who have not yet done any welding, the simplest way to commence is to run beads on a piece of scrap plate. Use mild steel plate about 6.4mm (1/4") thick and a 3.2mm (1/8") electrode. -
Page 35: Making Welded Joints
OPERATION THERMAL ARC 201 TS Heavy plate will require several runs to complete the 4.19 Making Welded Joints joint. After completing the first run, chip the slag out Having attained some skill in the handling of an elec- and clean the weld with a wire brush. It is important... - Page 36 THERMAL ARC 201 TS OPERATION Art # A-07702 Art # A-07700 Figure 4-16: Multi-runs in HV fillet weld C. Vertical Welds Figure 4-18: Multi run vertical fillet weld 1. Vertical Up Tack weld a three feet length of angle iron to your work bench in an upright position.
-
Page 37: Distortion
OPERATION THERMAL ARC 201 TS B. Expansion and Contraction of Parent Metal in the Art # A-07704 Fusion Zone: While welding is proceeding, a relatively small volume of the adjacent plate material is heated to a very high temperature and attempts to expand in all directions. -
Page 38: Overcoming Distortion Effects
THERMAL ARC 201 TS OPERATION 4.22 Overcoming Distortion Effects Art # A-07708 There are several methods of minimizing distortion Preheat Preheat effects. Weld A. Peening Dotted lines show effect if no preheat is used This is done by hammering the weld while it is still hot. -
Page 39: Service
SERVICE THERMAL ARC 201 TS SECTION 5: SERVICE 5.01 Maintenance and Inspection To clean the unit, open the enclosure and use a vacuum cleaner to remove any accumulated dirt and dust. The The only routine maintenance required for the power unit should also be wiped clean, if necessary;... -
Page 40: Stick (Mma) Welding Problems
THERMAL ARC 201 TS SERVICE 5.02 STICK (MMA) Welding Problems Description Possible Cause Remedy 1. Gas pockets or voids in weld metal Electrodes are damp. A. Dry electrodes before use. (Porosity). Welding current is too high. B. Reduce welding current. -
Page 41: Tig Welding Problems
SERVICE THERMAL ARC 201 TS 5.03 TIG Welding Problems Weld quality is dependent on the selection of the correct consumables, maintenance of equipment and proper welding technique. Description Possible Cause Remedy 1. Excessive bead build-up or poor Welding current is too low... -
Page 42: Power Source Problems
There are extremely dangerous voltages and power levels present inside this product. Do not attempt to repair unless you are an Accredited Thermal Arc Service Agent and you have had training in power measurements and troubleshooting techniques. If major complex subassemblies are faulty, then the Welding Power Source must be returned to an Accredited Thermal Arc Service Agent for repair. -
Page 43: Appendix 1: Options And Accessories
APPENDIX THERMAL ARC 201 Ts APPENDIX 1: OPTIONS AND ACCESSORIES Description Part Number 26 TIG Torch with 12.5ft lead, finger remote control, 50mm dinse connection and W4013601 accessory kit Foot Control, 8 pin amphenol, 15ft 600285 Slider Current Control with Torch Switch, 15ft, suits 1-1/8" dia. 26 TIG Torch Handle... -
Page 44: Appendix 2: Replacement Parts
There are extremely dangerous voltages and power levels present inside this product. Do not attempt to repair unless you are an Accredited Thermal Arc Service Agent and you have had training in power measurements and troubleshooting techniques. If major complex subassemblies are faulty, then the Welding Power Source must be returned to an Accredited Thermal Arc Service Agent for repair. - Page 45 APPENDIX THERMAL ARC 201 TS Art # A-10148 Manual 0-5149 Appendix...
-
Page 46: Appendix 3: 201 Ts System Schematic
THERMAL ARC 201 TS APPENDIX APPENDIX 3: 201 TS SYSTEM SCHEMATIC +15V J21-1 J21-2 J14-1 J14-2 J14-3 J12-1 +24V J12-2 J12-3 +24V J12-4 J20-1 J20-2 J20-3 J20-4 J20-5 J20-6 +24V J13-1 J5-1 J23-2 J13-2 J5-2 J23-1 J13-3 J5-3 J13-4 J5-4... -
Page 47: Limited Warranty & Warranty Schedule
LIMITED WARRANTY & WARRANTY SCHEDULE In accordance with the warranty periods stated below, Thermadyne guarantees the proposed product to be free from defects in material or workmanship when operated in accordance with the written instructions as defined in this operating manual. Thermadyne welding products are manufactured for use by commercial and industrial users and trained personnel with experience in the use and maintenance of electrical welding and cutting equipment. - Page 48 Customer Care UK: +44 (0)1257 261 755 / Fax: +44 (0)1257 224 800 Customer Care Italy +39 02 36546801 / Fax: +39 02 36546480 www.thermadyne.com A Global Cutting & Welding Market Leader ™ W O R L D H E A D Q U A R T E R S : 1 6 0 5 2 S w i n g l e y R i d g e R o a d , S u i t e 3 0 0 •...
Need help?
Do you have a question about the 201 TS and is the answer not in the manual?
Questions and answers