Western Digital Sentinel DS5100 Administrator And Maintenance Manual
Ultra-compact storage plus server
Hide thumbs
Also See for Sentinel DS5100:
- Quick install manual (6 pages) ,
- Datasheet (2 pages) ,
- Maintenance manual (107 pages)

Related Manuals for Western Digital Sentinel DS5100


Summary of Contents for Western Digital Sentinel DS5100
- Page 1 WD Sentinel DS5100/DS6100 ™ Ultra-compact Storage Plus Server Administrator and Maintenance Guide...
-
Page 2: Wd® Service And Support
Registration page on the user interface or online at http://register.wd.com. WD Guardian Services When you need a little help from an expert, we’ll take care of you! WD Guardian Services offers flexible, affordable and hassle-free technical support and extended warranty plans with a variety of benefits. - Page 3 00 800.2110.2110 (Chunghwa IDD) Thailand 001 800.2110.2110 Registering Your WD Product Register your WD product to get the latest updates and special offers. You can easily register your product on the user interface of the product software or online at http://register.wd.com.
-
Page 4: Table Of Contents
WD® Service and Support....... . ii WD Guardian Services ........ii Important User Information . - Page 5 Best Practices ......69 Setting up the WD Sentinel Server ......69 Setting up Client Computers .
- Page 6 Adding a Boot Drive ........87 WD RAID Storage Utility....... . . 89 WD Sentinel DS5100/DS6100 Administrator Reference Sheet .
-
Page 7: Important User Information
Ensure that you keep the door lock keys that come with your WD Sentinel device in a safe place. Unplug this product from the wall outlet and refer servicing to qualified service personnel under the following conditions: When the power cord or plug is damaged or frayed. -
Page 8: Handling Precautions
Do not use this product as a portable drive. Recording Your WD Product Information Remember to write down the following WD product information, which is used for setup and technical support. Your WD product information is found on the label on the bottom of the device. ... -
Page 9: Product Overview
Congratulations on your purchase of the WD Sentinel DS5100/DS6100 Ultra-compact Storage Plus Server. Designed for storage plus server capabilities, the WD Sentinel DS5100/DS6100 is ideal for small businesses that are looking for an ultra- compact unified storage solution with an integrated iSCSI SAN, NAS and server-based backup technology. - Page 10 Pre-configured Datacenter-class hard drives optimized for performance, quality and reliability. Protect your data on the 3.5” WD hard drives with either RAID (0, 1, 5, 10) or Windows Storage Spaces depending on user set up. Built with an Intel Xeon processor inside, WD Sentinel DS5100/DS6100 keeps your...
- Page 11 For details about WD Guardian Services, visit www.wdguardian.com. Why WD?: WD has been making hard drives for over 40 years. We know how to build drives to store and protect your data because we understand that your company’s data is paramount to your business success.
-
Page 12: Package Contents
Package Contents Ultra-compact Storage Plus Server 1 RJ-45 Ethernet cable 1 -1.8 meter power adaptor with cord (WD Sentinel DS5100) 2 -1.8 meter power adaptors with cords (WD Sentinel DS6100) 2 door lock keys ... -
Page 13: System Requirements And Compatibility Information
• Netherlands: www.shopwd.eu www.wdstore.eu • Rest of EU Countries: All others Contact WD Technical Support in your region. For a list of Technical http://support.wd.com Support contacts, visit and see Knowledge Base Answer ID 1048. System Requirements and Compatibility Information... -
Page 14: Technical Specifications
Internal hard drives 4 WD 3.5-inch SATA Best in Class hard drives with RAID-specific time-limited error recovery (TLER) Pioneered by WD, this feature prevents drive fallout caused by the extended hard drive error-recovery processes common to desktop drives. Approved Drive Models For a complete list of approved drive models, search for Answer ID 9443 in the WD Knowledge Base at http://support.wd.com. - Page 15 • Solid RED indicates drive fault (Drive must be replaced) Operating System Windows Server 2012 R2 Essentials Backups 50-client computer support for backup (Windows and Mac OS Client computers) Restore • Bare metal restore for Windows clients • File/folder level restore WD SENTINEL DS5100/DS6100 ADMINISTRATOR AND MAINTENANCE GUIDE...
-
Page 16: Product Views
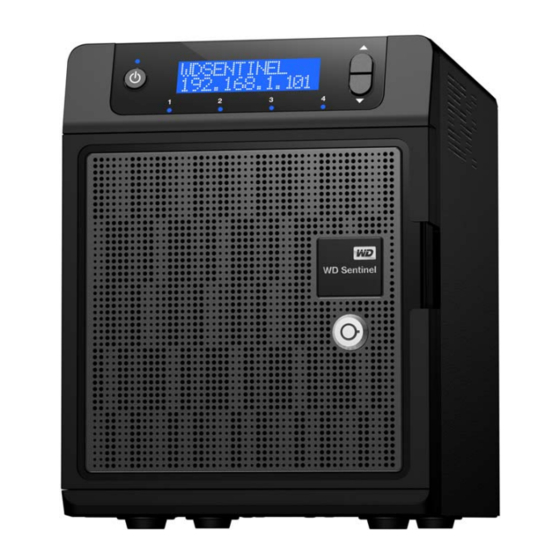
PRODUCT OVERVIEW Product Views Front View LCD Display Scroll buttons Power / Status LED Power button Status LEDs Drive Door Drive Door Lock WD SENTINEL DS5100/DS6100 ADMINISTRATOR AND MAINTENANCE GUIDE... -
Page 17: Back View
Back View Recovery button External DC In USB 3.0 ports Power port USB 2.0 ports Gigabit VGA port Ethernet ports 1 & 2 Gigabit Ethernet ports (for future use) System ® Kensington Security Slot WD SENTINEL DS5100/DS6100 ADMINISTRATOR AND MAINTENANCE GUIDE... -
Page 18: Indicators
For drive security, the device is equipped with a security slot that supports a security slot standard Kensington security cable. Visit http://www.kensington.com/ more information. LEDs The LEDs on the WD Sentinel identify the status of the unit. Color State Description Power LED Black WD Sentinel server is currently inactive. -
Page 19: Where To Find Help
Where to Find Help This manual provides step-by-step instructions and other important information regarding your WD product. It is meant for the person serving as the administrator of the WD Sentinel DS5100/DS6100. You can download translated versions and updates to this manual from http://products.wd.com/updates. -
Page 20: Connecting The Server And Getting Started
WD Sentinel server. Administrator—This is the person who performs the setup and routine management tasks on the WD Sentinel server. This person is also the holder of the Administrator password of your WD Sentinel server. Users—You can have up to 25 user accounts on your WD Sentinel server. These can be: –... -
Page 21: How The Wd Sentinel Fits Into Your Office
Note: For each user account, the WD Sentinel server enables the Administrator to set granular permissions for various shared folders as well as server resources, such as Remote Web Access. At all times, the users are only able to access the data on the server and other server resources for which they have permissions. -
Page 22: Connecting The Wd Sentinel Server To Your Network
Use the following steps to physically connect your WD Sentinel DS5100/DS6100 server to your network. Connect your monitor to the VGA port on the rear of your WD Sentinel server. Connect your USB keyboard and USB mouse to the USB ports on the back of your WD Sentinel server. -
Page 23: Setting Up Your Wd Sentinel Server (One Time Only)
CONNECTING THE SERVER AND GETTING STARTED Setting up your WD Sentinel Server (one time only) Your WD Sentinel server is now ready to be configured. This section describes how to use the one time setup wizard to configure your server for first use. - Page 24 The name can be up to 15 characters long, can contain letters, numbers and dashes (-), can not start with a dash, must not contain spaces, and must not contain only numbers. WD SENTINEL DS5100/DS6100 ADMINISTRATOR AND MAINTENANCE GUIDE...
- Page 25 This is the Administrator password. You will use it later to connect the client computers to your WD Sentinel server and to access the Administrator Dashboard.
- Page 26 This process can take an hour or more and may restart more than once. Do not interrupt the process. Do not power off or disconnect the WD Sentinel server. Review the information on the Configuration Completed screen, then click Close.
-
Page 27: Connecting Your Computers
CONNECTING THE SERVER AND GETTING STARTED Connecting your Computers Once you’ve set up your WD Sentinel server, you can connect up to 50 Windows PCs or Mac computers to your device. Installing the Connector software joins the client computer to your WD Sentinel Server and installs Launchpad and Dashboard. - Page 28 The installation process may take 30 minutes or more to complete. Once the installation is completed, follow the steps outlined in the Windows Server Essentials Connector Configuration Wizard. When the Connector Configuration is completed, click Finish. WD SENTINEL DS5100/DS6100 ADMINISTRATOR AND MAINTENANCE GUIDE...
- Page 29 CONNECTING THE SERVER AND GETTING STARTED Connecting a Mac Use the following procedure to connect your Mac computer to the WD Sentinel server. For steps on connecting a Windows PC using the Connector software, see “Connecting a Windows PC” on page 21.
- Page 30 Review the “Connect a Computer to the Server” wizard Introduction, then click Continue. Enter the name you gave your server in “Connecting the WD Sentinel Server to Your Network” on page 16, then click Continue. (Example: companyserver) The software checks to ensure that your Mac meets the required prerequisites.
-
Page 31: Managing The Wd Sentinel Server (Dashboard)
This chapter assumes you have followed the Administrator's Basic Install Guide to initialize the WD Sentinel server and have connected at least one computer to the server. To review the setup steps See “Connecting the Server and Getting Started” on page 14. of this manual. - Page 32 MANAGING THE WD SENTINEL SERVER (DASHBOARD) On the Dashboard Sign in page, enter the Administrator account name and password (created during setup) and click the right arrow: The Dashboard Home page displays: Settings and Help Alerts icon Navigation bar Category pane...
-
Page 33: Tips For Performing Dashboard Tasks
When you initially open the Dashboard, a list of task displays on the Home page. Some of the tasks listed are necessary to finish setting up your WD Sentinel server properly. To help you prioritize these tasks, we’ve provided list of tasks and the order that we suggest you perform these tasks. - Page 34 MANAGING THE WD SENTINEL SERVER (DASHBOARD) Enter the following information: a. First Name, Last Name: Enter the user’s first and last name. b. User account name: Enter a user account name. This is used to log into the Launchpad. c. Password, Confirm Password: Enter your password for the assigned user, then enter the same password to confirm the password.
-
Page 35: Performing Dashboard Tasks
For information about an additional task, backing up a computer to the WD Sentinel server, see “Backing up (Windows PC)” on page 58. Using the Home Page The Home page provides quick access to tasks and information that help you customize your server and configure key features. - Page 36 Home Page Tasks Pane The center pane displays the various tasks that can be performed to enhance the properties of the WD Sentinel server. This list of task and information changes depending on the category selected in the left Category pane.
-
Page 37: Managing User Accounts
MANAGING THE WD SENTINEL SERVER (DASHBOARD) Home Page Action Pane The Action pane displays a brief description of the selected task. You are also presented with the opportunity to open configuration wizards to act on the selected task or, in some cases, skip a task. -
Page 38: Managing Storage
MANAGING THE WD SENTINEL SERVER (DASHBOARD) Microsoft Online Help For detailed instructions on performing any of these tasks, consult Managing Storage The Storage section contains two tabs: The Server Folders tab allows you to view and manage the properties of the server folders. -
Page 39: Monitoring Applications
Microsoft Online Help Monitoring System Health and Alerts The Monitor page of the Dashboard includes tasks that help you view and manage the WD Sentinel server storage system. To open the Monitor module, click the Monitor icon on the navigation bar. The Monitor module includes two tabs, Health and Software Update, and related tasks in the panel on the right. - Page 40 Displays the status (Connected or Not connected) of the server's Ethernet 1 & 2 network connection(s). If you use both Ethernet ports and one fails, the other takes over, allowing the WD Sentinel server to remains operational over the network. System Temperature : The temperature within the server enclosure.
- Page 41 Your Drives” on page 42.) Health Tasks Find compatible hard drives To view a list of WD drives that can be used in the WD Sentinel server: Click Compatible Hard Drives in the Task pane. A pop-up screen lists each drive with its model number, description, and maximum capacity.
- Page 42 Complete the online form and click Submit Question. A diagnostic report of the WD Sentinel server is automatically attaches to the form. Your request is added to the WD Support queue and assigned a confirmation number. You will receive an email from WD Support regarding your question.
-
Page 43: Updating Software
WD Sentinel server. To update from a file: a. The software update files can also be downloaded from the WD Support site at http://support.wd.com. Once you download the available firmware updates for the WD Sentinel server, copy the file to a shared folder such as the Documents share on the server and select the file to update. -
Page 44: Managing Server Settings
To set a schedule for automatic updates: In the Automatic Updates section, click Enable. Click the Change link and select the day and time you want the WD Sentinel server to check for updates every week, and if an update is available, install it. (Example: every Sunday at 3:00 AM) Click Apply. - Page 45 Microsoft software. Anywhere Access Anywhere Access enables your network users to access WD Sentinel server resources from any location with an Internet connection, at any time, and on any device. You can access shared folders and files (that you have permission for) on the server as well as on your networked computer.
-
Page 46: Shutting Down And Rebooting The Server
(for example, moving the server to a different location), follow the procedures below to shut down or reboot the server It is very important that the WD Sentinel server be shut down or restarted in a clean and graceful manner through the Settings section in the Dashboard. -
Page 47: Managing Storage On The Wd Sentinel Server
RAID structure. The server automates the management of the RAID. Your WD Sentinel server uses RAID 5, which offers fast performance by striping data across all drives, This RAID level provides the system with both redundancy and optimum capacity. -
Page 48: Storage Spaces
Setting Up Your Drives Use the following steps to set up your WD Sentinel device drives. On the Dashboard Home page, click Setup>Set up your drives. Select Click to start setting up your drives. The Set Up Your Drives wizard displays. - Page 49 MANAGING STORAGE ON THE WD SENTINEL SERVER Select your storage method. Options are: Storage Spaces: A Windows Server 2012 technology that allows you to virtualize storage by grouping industry-standard disks into storage pools. Virtual disks called storage spaces are then created from the available capacity in the storage pools.
- Page 50 Enter the size, resiliency type, and size of your new storage space. then click Create Storage Space. Your storage space is created. Setting Up RAID Storage On the WD RAID Storage Utility screen, in the Storage area, select Adapter 0. Hover your mouse over the Operations tab, then select Create RAID. WD SENTINEL DS5100/DS6100...
- Page 51 On the Create Options pull-down menu, select a RAID option. It is a best practice to select RAID 5 for your WD Sentinel server storage. Click Submit. Click OK. Your RAID storage is created. Now, lets mount your new disk.
- Page 52 Follow the steps outlined in the New Simple Volume Wizard. Once the volume is created, click the to close the DIsk Management screen. On the WD RAID Storage Utility, click the to close the screen. Your RAID volume is now created and mounted.
-
Page 53: Using Usb Storage
Using USB Storage The WD Sentinel server has two USB 2.0 port and four USB 3.0 ports on the back panel of the unit. The USB 3.0 ports can connect to external USB 2.0 or USB 3.0 storage devices or to a UPS device for power outage conditions. -
Page 54: Moving A Server Folder
MANAGING STORAGE ON THE WD SENTINEL SERVER Click Browse and select a folder on the USB drive. Note that a shared folder cannot be created at the root of the USB drive. Click OK and follow the instructions on the screen. - Page 55 Before you move a folder ensure that: You’ve backed up your device (See “Backing up your WD Sentinel Server” on page 68.). None of the files within the folder you’d like to move are currently in use.
-
Page 56: Using The Wd Sentinel Server's Features
Recovering/Restoring (Mac) Backing up your WD Sentinel Server Recovering a WD Sentinel Server Image or Resetting the Boot Drives to Factory Defaults This chapter describes the routine tasks that both the Administrator and permitted users perform on the WD Sentinel server. - Page 57 USING THE WD SENTINEL SERVER’S FEATURES If your operating systems Do one of the following... is... Windows 7 From Start Menu • Click >All Programs >Windows Server 2012 Essentials>Windows Server Launchpad From Desktop: • Double-click the Launchpad icon From System Tray •...
- Page 58 USING THE WD SENTINEL SERVER’S FEATURES To access the Launchpad (Mac): Do one of the following: Double-click the Launchpad icon on your Mac Toolbar. Select Finder>Applications>Windows Server Launchpad Once you’ve accessed the LaunchPad Sign In screen, use the following steps to sign in and use the Launchpad.
- Page 59 USING THE WD SENTINEL SERVER’S FEATURES Selecting Launchpad Options (Windows PC or Mac Computer) To select Launchpad options: IF you want to... THEN... AND... Back up your Windows Click Continue to “Backing up (Windows Backup PC to the WD Sentinel PC)”...
- Page 60 USING THE WD SENTINEL SERVER’S FEATURES Clear the Automatically run the Connector when I sign in to Windows check box, and click OK. To disable the Launchpad after signing in (Mac): Sign in to the Launchpad. Click the menu arrow at the top right and select Settings from the drop-down menu.
- Page 61 USING THE WD SENTINEL SERVER’S FEATURES To uninstall the Launchpad (Connector Software) on a Windows PC: Note: When you uninstall Launchpad, you also uninstall Dashboard. They can not be uninstalled separately. If your operating systems Then... is... Windows 8 •...
-
Page 62: Accessing Shared Folders Over Your Network
If all shared folders are mounted on your Mac, click , then open Finder. Click the IP Address of your WD Sentinel under Shared to display your Shared Folders. The selected shared folder displays in Finder. WD SENTINEL DS5100/DS6100... -
Page 63: Accessing Computers And Shared Folders Remotely
This section assumes that the Administrator has completed the setup and configuration for Remote Web Access through the Dashboard. You can access files stored on the WD Sentinel DS5100/DS6100 anywhere, as long as you have access to the Internet. Note: You must use Internet Explorer 8 or higher to access a PC using the Remote Web Access feature. -
Page 64: Backing Up (Windows Pc)
Shared Folders Access shared folders on the WD Sentinel server. A user with "Read & Write" access to a particular shared folder is able to modify the contents of the existing files, upload new files, or delete files from the folder. - Page 65 USING THE WD SENTINEL SERVER’S FEATURES Scheduling Automatic Backups (Dashboard only) To set a schedule for future backups: Access the Dashboard. Click the Devices icon on the navigation bar to display a list of computers and servers on your network: Click Customize Backup for the computer in the Device Tasks panel.
- Page 66 USING THE WD SENTINEL SERVER’S FEATURES Select Back up all of my files and folders (Recommended). Review the backup information to ensure that it is correct, then click Save changes. The selected computer is now setup for automatic backup. Click Close.
- Page 67 USING THE WD SENTINEL SERVER’S FEATURES Initiating Backups By default, backups are performed at night for up to 50 client computers in a sequential order. If the client computer is asleep or hibernating at that time, the backup software can be enabled to wake up the client computer, back it up, and put it back to sleep.
-
Page 68: Backing Up With Time Machine (Mac)
To take advantage of the Time Machine backup capabilities, you must install the server connector software on your Mac (see “Connecting a Mac” on page 23) and create a user account within the WD Sentinel server (see “Adding a User Account” on page 27). Note: Your Mac must be connect to the same network as your WD Sentinel server. - Page 69 USING THE WD SENTINEL SERVER’S FEATURES Scheduling Automatic Backups (Time Machine) To set up and schedule Time Machine to back up files to your WD Sentinel server: Use one of the following methods to open Time Machine. Click the Time Machine icon in the Dock: ®...
- Page 70 6. Enter the user name and password of an account that has administrator permissions on this client computer, then click OK. Select Registered User. Enter your assigned WD Sentinel User Name and Password in the Name and Password fields: Click Connect. The Preferences screen returns.
-
Page 71: Recovering/Restoring (Windows Pc)
Open Time Machine Preferences on the Time Machine drop-down menu: Recovering/Restoring (Windows PC) The WD Sentinel server provides two options for recovering lost or corrupted data: Restore a Computer—Restores all data and settings of a Windows PC computer or a storage device connected to the WD Sentinel server. - Page 72 USING THE WD SENTINEL SERVER’S FEATURES Click Next. Select the information you’d like to restore from the list provided, then click Next. Select a location for your restored backup. You can accept the location provided in the field, or click Browse and select another location. Once you’ve selected a different location, click OK to close the Browse window.
-
Page 73: Recovering/Restoring (Mac)
USING THE WD SENTINEL SERVER’S FEATURES Click Next. The restored backup is copied to the selected location. Once done, the successfully restored screen appears. Do one of the following:. Click Open the Restore location to view your restored information. -
Page 74: Backing Up Your Wd Sentinel Server
If a Windows server backup can not be retrieved, this process will restore the unit to its factory default settings. Use the following steps to recover your WD Sentinel Server image or reset the boot drives to factory defaults. -
Page 75: Best Practices
WD Sentinel server for backup, be sure that the computer’s operating system is fully up-to-date. When adding client computers to the WD Sentinel server, it is best not to have any backups active. Using the WD Sentinel Server Efficiently ... -
Page 76: Replacing Drives
Avoid pulling a drive out unless there is a failure. When a drive needs replacement, the WD Sentinel server is still functional but subject to a second drive failure that would result in the loss of data. To minimize this vulnerable time, a good practice is to have another drive ready to replace the failed drive. -
Page 77: Troubleshooting
Make sure the power cord is connected correctly. Make sure that the wall outlet has power. Test it by plugging in another device. Confirm the network cable is properly connected to the WD Sentinel server and the network switch or router. - Page 78 Internet Explorer 8 or greater is required to access a Windows PC using the Remote Web Access feature of the WD Sentinel server. There is an Active X Client requirement that comes standard with these browsers. For more information, see Knowledge Base Answer ID 8578.
-
Page 79: Lcd Messages
Troubleshooting <Host Name> Displays the name of your WD Sentinel server. <IP Address> Displays the IP address of your WD If the IP address does not display, Sentinel server. ensure that your device is connected by ethernet cable to your router. - Page 80 S.M.A.R.T early detection found a Replace the defective drive as soon Failure premature drive failure condition on as possible to stop RAID from one of the data drives. going into a degraded state. WD SENTINEL DS5100/DS6100 ADMINISTRATOR AND MAINTENANCE GUIDE...
- Page 81 The reboot is normally automatic. If Update Reboot The system requires a reboot. it does not occur, perform a manual Required reboot. WD Software There is a WD software update Access and perform the update. Update available for download. • Access the Dashboard (See Available “Accessing the Dashboard”...
-
Page 82: Regulatory And Warranty Information
Consult the dealer or an experienced radio/television technician for help. Any changes or modifications not expressly approved by WD could void the user's authority to operate this equipment. Changes or modifications not expressly approved by the party responsible for compliance could void the user’s authority to operate the equipment. -
Page 83: Limited Warranty
Environmental Compliance (China) Obtaining Service WD values your business and always attempts to provide you the very best of service. If this Product requires maintenance, either contact the dealer from whom you originally purchased the Product or visit our product support website at http://support.wd.com... -
Page 84: Gnu General Public License ("Gpl")
Product, even if WD has been advised of the possibility of such damages. In the United States, some states do not allow exclusion or limitations of incidental or consequential damages, so the limitations above may not apply to you. -
Page 85: Appendix
SODIMM Memory Module Power Supply Boot Drive The WD Sentinel is also designed to be easily mounted on a rack. Before You Begin Ensure that you have the correct replacement unit. Review the procedures before beginning to replace a part. -
Page 86: Replacing A Hard Drive
APPENDIX Replacing a Hard Drive It is simple to replace a drive in your WD Sentinel server. First, make sure to go to the WD Store to purchase a compatible replacement drive. For a complete list of approved drive models, search for Answer ID 9443 in the WD Knowledge Base at http://support.wd.com. - Page 87 Using some force, snap the drive handle shut. Close and lock the door on the front of the server, making sure it snaps shut. The LED remains blank until the rebuild is complete. The rebuild percentage displays on the LCD. WD SENTINEL DS5100/DS6100 ADMINISTRATOR AND MAINTENANCE GUIDE...
-
Page 88: Replacing A Server Fan
WD Sentinel server fans. The fans in the WD Sentinel server are “cold swappable.” This means that the WD Sentinel server must be shut down prior to your fan replacement. To shut down your WD Sentinel server, follow the steps outline in “Shutting Down and Rebooting the Server”... - Page 89 Do not over-tighten the mounting screws. Reconnect all of the cables for the device. Restart the server. Important: Do not disassemble the fan. Return the entire assembly intact to WD, if instructed to do so. WD SENTINEL DS5100/DS6100 ADMINISTRATOR AND MAINTENANCE GUIDE...
-
Page 90: Removing The Unit Cover
Important: To avoid electrostatic discharge (ESD) problems, ground yourself by touching metal before handling the device. To shut down your WD Sentinel server, follow the steps outline in “Shutting Down and Rebooting the Server” on page 40. What you’ll Need: ... -
Page 91: Replacing The Sodimm Memory Module
The SODIMM memory module in the WD Sentinel server is “cold swappable.” This means that the WD Sentinel server must be shut down prior to your module replacement. To shut down your WD Sentinel server, follow the steps outline in “Shutting Down and Rebooting the Server”... - Page 92 Figure 8. Replace 4PL-SODIMM module Once the 2PL-SODIMM module has been added or updated, replace the PCBA back on the WD Sentinel device, ensuring that the cables are again attached to the assembly. Replace and tighten the six (6) screws holding the PCBA in place.
-
Page 93: Adding A Boot Drive
The boot drive in the WD Sentinel DS5100 server are “cold swappable.” This means that the WD Sentinel server must be shut down prior to adding a boot drive. To shut down your WD Sentinel server, follow the steps outline in “Shutting Down and Rebooting the Server” on page 40. - Page 94 APPENDIX Replace the unit cover and replace and tighten the five (5) exterior screws. Note: Do not over-tighten the exterior screws. Connect all external connections. Restart the server. WD SENTINEL DS5100/DS6100 ADMINISTRATOR AND MAINTENANCE GUIDE...
-
Page 95: Wd Raid Storage Utility
APPENDIX WD RAID Storage Utility The WD RAID Storage Utility allows you to configure and maintain the RAID storage on your WD Sentinel server. Accessing the WD RAID Storage Utility There are two main ways to access the WD RAID Storage Utility: ... - Page 96 Use the following steps to perform tasks on your RAID virtual disks. Initialization Use the following steps to create a background initialization of your RAID virtual disks. On the WD Raid Storage Utility Home screen, in the Storage Management pane, select the Virtual Disk. WD SENTINEL DS5100/DS6100...
- Page 97 Ensure that Background Initialization is selected, then click Start. Background Initialization begins. To Pause Initialization: On the WD Raid Storage Utility Home screen, in the Storage Management pane, select the Virtual Disk Hover over the Operation tab and select Pause Background Initialization from the menu.
- Page 98 Migration Use the following steps to migrate a virtual drive into a RAID configuration. On the WD Raid Storage Utility Home screen, in the Storage Management pane, select the Virtual Disk where the drive(s) you’d like to migrate reside. Hover over the Operation tab and select Migrate from the menu.
- Page 99 Consistency Check Use the following steps to perform a consistency check on your server disks. On the WD Raid Storage Utility Home screen, in the Storage Management pane, select the Virtual Disk you’d like to perform. Hover over the Operation tab and select Consistency Check from the menu.
- Page 100 Ensure that you have not selected your boot drive (Drive 0) when deleting virtual drives. When the drive is deleted, all data on the drive is erased. On the WD Raid Storage Utility Home screen, in the Storage Management pane, select the Virtual Disk you’d like to delete. WD SENTINEL DS5100/DS6100...
- Page 101 Hover over the Operation tab and select Delete from the menu. Read the Warning, then click OK. Read the message, then click OK. Your virtual drive(s) are deleted. Read the message concerning partition information, then click OK. Your virtual drive(s) are deleted. WD SENTINEL DS5100/DS6100 ADMINISTRATOR AND MAINTENANCE GUIDE...
-
Page 102: Wd Sentinel Ds5100/Ds6100 Administrator Reference Sheet
Provided below is a reference sheet that allows you to keep all of the useful information associated with your WD Sentinel DS5100/DS6100 server in one location. Enter the information identified below and keep this checklist in a safe location for future reference. -
Page 103: Index
33 accessing 25 monitoring 33 DC In connector 12 automatic backups 59 deleting a virtual drive 94 automatically updating WD software description of WD Sentinel DS5100/ DS6100 3 document conventions 2 drives backing up finding compatible 35 using Dashboard 62... - Page 104 Kensington security slot 12 RAID setting up 44 RAID storage 41 Launchpad rebooting the WD Sentinel server 40 accessing on a PC 50 recovering data backing up 61 PC 65 icon 50 recovering the WD Sentinel server 68...
- Page 105 Dashboard 59 Trash icon 55 PC 59 troubleshooting Time Machine 63 cannot access Windows PCs via Re- scheduling WD software updates 38 mote Access 72 server checklist 71 setting up 25 drive not connecting to network 71 shutting down 40...
- Page 106 WD Service 77 WD software automatic updates 38 manual updates 37 updating 37 Windows PC backing up 58 backing up via Dashboard 62 backing up via Launchpad 61 connecting to WD Sentinel 21 restoring 65 WD SENTINEL DS5100/DS6100 ADMINISTRATOR AND MAINTENANCE GUIDE...
- Page 107 Information furnished by WD is believed to be accurate and reliable; however, no responsibility is assumed by WD for its use nor for any infringement of patents or other rights of third parties which may result from its use. No license is granted by implication or otherwise under any patent or patent rights of WD. WD reserves the right to change specifications at any time without notice.
Need help?
Do you have a question about the Sentinel DS5100 and is the answer not in the manual?
Questions and answers