Table of Contents
Advertisement
Advertisement
Table of Contents

Related Manuals for NEC NEAX7400 ICS M110e


Summary of Contents for NEC NEAX7400 ICS M110e
-
Page 1: User Guide
NEAX7400 ICS M110e/M120e HYPERCORE TERM ® SERIES E TELEPHONES USER GUIDE... - Page 2 NEC Australia Pty. Ltd. has prepared this document for use by its employees and customers. The information contained ( In herein is the property of NEC Australia Pty. Ltd. and shall not be reproduced without prior written approval from NEC Australia Pty. Ltd.
-
Page 3: Table Of Contents
TABLE OF CONTENTS Keys and Lamps Terminal Setup with the Feature Key To Originate an Outside Call via Extension Line Key To Originate an Internal Call Outside Line Appearance Call Park To Originate a Call Using One-touch Buttons Call Pick-up ( Group ) Automatic Idle Return Call Pick-up ( Direct ) To Originate a Call Using Speed Calling... -
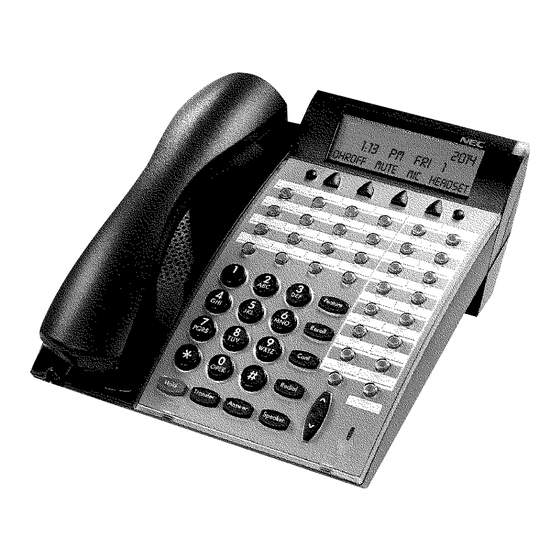
Page 4: Keys And Lamps
KEYS AND LAMPS FUNCTION KEYS Answer When LED on this key is lit, press key to answer a waiting call. Conf (Conference) Press key to establish a three-way conversation. LED on key lights when key is active. Feature Used to activate terminal setup functions and to program One-Touch Speed Dial/ Feature Keys. -
Page 5: Programmable Keys
PROGRAMMABLE KEYS These are examples of D term features available by pressing the programmable ® keys. Keys must be programmed by the telephone system administrator. AICM (Automatic Intercom) Press key to activate Automatic Intercom. CB (Call Back) Press key to activate. DICM (Dial Intercom) Press key to activate Dial Intercom. - Page 6 SOFT KEYS (FACTORY ASSIGNED FEATURES) Mic (Microphone) Press the Soft Key below “Mic” to activate or deactivate the Microphone. The Mic LED will illuminate when Mic is on. Help Press the Help Key. Press desired Soft Key for helpful information about that key.
- Page 7 TO USE THE SOFT KEYS Four soft keys are indicated in the LCD according to the status of the Multiline Terminal. Press the SCROLL (>>>>) key to scroll the display to show the desired key if there are other functions available. Press a desired key under the indicated 4 Soft Keys on the LCD.
-
Page 8: Terminal Setup With The Feature Key
TERMINAL SETUP WITH THE FEATURE KEY MICROPHONE ON/OFF The MIC lamp shows the status of the built-in microphone. To change microphone status: Press Feature and 1 to turn the microphone from on to off, or from off to on. TO SELECT RINGER TONE The D term Series E has 3 kinds of ringer tones that you can select. -
Page 9: To Originate An Outside Call Via Extension Line Key
TO PRESET RINGER VOLUME NOTE: Access to feature is based on data assignment. Press Feature and 0. Ringer activates. Press Key. Ringer volume decreases or increases. Press Feature Key to stop ringing. TO ADJUST TRANSMISSION/RECEIVING VOLUME (DURING VALID CALL) Press Feature and 4. The Transit Volume increases. Press Feature and 4 again. -
Page 10: Outside Line Appearance
OUTSIDE LINE APPEARANCE TO ORIGINATE Press the Outside Line Appearance key. Lift handset or press Speaker, receive Outside Line or distant PBX dial tone. Dial the desired number. TO ANSWER Press the flashing Line Appearance key (ringing and flashing LED alert user to incoming call). -
Page 11: Automatic Idle Return
TO VERIFY Press Conf button. Press desired One Touch button. Display indicates digits programmed. NOTE: When a station number is programmed on a one touch button, the associated LED will light when that station is in use. (Available for 32D terminals only). AUTOMATIC IDLE RETURN Press Speaker key. -
Page 12: Account Code
Access to feature is based on system assignments ACCOUNT CODE TO ENTER Lift handset or press Speaker, receive dial tone. Enter feature access code, receive service set tone. Enter Account Code (up to 10 digits). Receive dial tone and dial desired number. TO ENTER ACCOUNT CODE AFTER AUTHORISATION CODE Lift handset or press Speaker, receive dial tone. -
Page 13: Voice First/Tone First
VOICE FIRST/TONE FIRST Allows incoming station calls to your D term to either ring or go to voice ® announcement. Press Speaker. Receive dial tone. Dial Voice/Tone access code, LED VOICE display shows current mode receive (Time Display) feature dial tone. Press *, LED display shows mode TONE change, receive feature set tone. -
Page 14: Automatic Intercom
AUTOMATIC INTERCOM NOTE: Access to feature is based on data assignment. TO INITIATE Lift handset or press Speaker key. Called party Press AICM key. 2000 Tone burst is sent. (Time Display) TO ANSWER Calling party AICM key lights green indicating 2001 an incoming intercom call. -
Page 15: Dial Intercom
DIAL INTERCOM NOTE: Access to feature is based on data assignment. TO INITIATE Lift handset or press Speaker key. Press DICM key. Dial desired single digit intercom station number (0-9). Tone burst is sent. (Press 1 to change to ring tone signal). TO ANSWER DICM LED lights solid green, indicating an incoming intercom call. -
Page 16: To Place A Call On Exclusive Hold
TO PLACE A CALL ON EXCLUSIVE HOLD Press Hold twice. Line appearance Hold station number indicates interrupted wink. EHOLD 2001 term NOTE: If held line appears on other D ® (Time Display) stations, LED remains steadily lit red. TO RETRIEVE Lift handset or press Speaker. -
Page 17: Conference
CONFERENCE With call in progress, ask party to hold. Press Transfer, receive interrupted dial tone. Dial desired number. After call is answered, press Conf, Conf LED lights. Three-way conference is established. CONF 2000 2001 (Time Display) If one party hangs up, other two remain connected. Conf LED goes out. TO ESTABLISH A BROKER CALL While engaged in a call and wishing to consult a third party, press Transfer. -
Page 18: To Answer A Camped-On Call
TO ANSWER A CAMPED-ON CALL While engaged in a call, receive the camp-on indication (one short tone burst). Answer LED flashes. Press Answer. Call in progress is placed on hold. Connection to camped-on Outside line Outside line call is established. type number Press Answer to return to original call. -
Page 19: Call Park
TO ACTIVATE CALL WAITING Called station (STATION 2001) number Station 2001 press Speaker. BUSY 2000 Receive dial tone. (Time Display) Dial 2000 and receive busy. Called station number Press Transfer receive feature dial tone. CW SET 2000 (Time Display) Dial Camp-on (call waiting) access code. TO ANSWER CALL WAITING (STATION 2000) Hear burst of tone. -
Page 20: Call Pick-Up (Group)
TO RETRIEVE A PARKED CALL Dial Call Park local retrieval code and parked call location number (00-19). Station user is connected to parked call. CALL PICK-UP (GROUP) NOTE: Access to feature is based on data assignment. WHEN EXTENSION WITHIN YOUR PICK-UP GROUP RINGS Lift handset. -
Page 21: Outside Line Queueing (From Extension Dial Tone)
OUTSIDE LINE QUEUEING (FROM EXTENSION DIAL TONE) IF OUTSIDE LINE IS BUSY Press Speaker or lift handset dial outgoing access code (e.g.9). Receive Busy indication. Press Call Back key. Call is placed in queue (Time Display) for next available Outside Line. Replace handset. -
Page 22: Redial (Last Number Redial)
REDIAL (LAST NUMBER REDIAL) TO REDIAL THE LAST NUMBER DIALED Press Redial. Receive special dial tone. REDIAL[*/#] / SPEED[_]-1 2001 -Or- Press */#. The last number dialed REDIAL[*/#] / SPEED[_]-1 will be redialed and displayed. 2003 NOTE: Each time the Redial key is pressed the numbers dialed for the last five calls are displayed sequentially. -
Page 23: Call Forwarding-Busy
TO CANCEL Press Speaker. Receive extension dial CANCEL tone. Press FD-A plus * or dial Call (Time Display) Forwarding cancel-code. Receive service set tone. LED goes out at your station. Press Speaker. CALL FORWARDING–BUSY TO SET Press Speaker. Receive extension dial tone. Press FD-B or dial Call Forwarding –... -
Page 24: Call Forwarding - No Answer
CALL FORWARDING – NO ANSWER TO SET Press Speaker. Receive extension dial tone. Press FD-N or dial Call Forwarding – No Answer access code. Receive special dial tone. Dial destination station or external telephone number. Wait for service set tone. FD-A LED lights (at your station if FD-N key was used). -
Page 25: To Save And Repeat A Number
TO CANCEL Press Speaker. Receive dial tone. Press FD-DC or dial Call Forwarding - I’m Here cancel code. Dial station number to cancel. CANCEL (Time Display) Press Speaker. Call Forwarding Destination is cancelled. TO SAVE AND REPEAT A NUMBER TO SAVE Press Speaker. -
Page 26: Boss/Secretary Calling
TO PAGE (STATION A) Lift Handset. Receive dial tone PAGING (Time Display) Dial Internal Paging access code for the desired zone or all zones or press key assigned for desired zone or all zones. Page Station B. Remain off hook. TO ANSWER (STATION B) Paging station Station B dials Meet-Me answer code,... -
Page 27: Boss/Secretary Override
BOSS/SECRETARY OVERRIDE Example: Station 2000 is Boss, Station 2001 is Secretary. Boss is connected to 2003. Incoming call on Outside line connects to Secretary, but is intended for Boss. SECRETARY Boss’ station number Lift handset to answer Outside line, CW SET 2000 ask caller to hold. -
Page 28: Do Not Disturb
DO NOT DISTURB Press Speaker. Receive dial tone. Press DND or dial DND access (Time Display) code. LED lights. TO CANCEL Press Speaker. Receive dial tone. CANCEL (Time Display) Press DND. LED goes out. TIMED REMINDER Example: Station 2000 wants to be reminded of a 9.00 a.m. meeting. TO SET Press Speaker. -
Page 29: Privacy Release
PRIVACY RELEASE term term Example: D ® Station B is engaged in a conversation, and allows D ® Station A to enter the call in progress. Station 2000, while engaged in conversation, presses Conf key. Conf key flashes. Station 2001 lifts handset or presses Speaker. Station 2001 presses the line appearance of Station 2000. -
Page 30: Name Display
TO CANCEL Press Speaker. Receive dial tone. CANCEL (Time Display) Dial Return Message schedule cancel code. Receive set tone. Press Speaker. NOTE: Access to feature is based on data assignment. NAME DISPLAY term ® NOTE: Display D A name with up to 8 characters can be entered to display the name on other telephones when making a call. - Page 31 When the desired letter is displayed, depression of the Transfer key will change the letter to a lower case letter (default is upper case). Depress the Hold key to enter that letter and advance to the next entry. Repeat the previous two steps until the desired name is displayed and entered.
-
Page 32: Index
INDEX Account Code Answering a Camped-on Call Answering A Voice Call Hands Free Authorization Code Automatic Idle Return Automatic Intercom Boss/Secretary Calling Boss/Secretary Override Broker Call, Establishing Call Back (Station) Call Forwarding – All Calls Call Forwarding – Busy Call Forwarding - I’m Here Call Forwarding –... - Page 33 Establishing a Broker Call Exclusive Hold Executive Override Exit Forced Account Code Function Keys and Lamps Help Hold Internal Call Origination Internal Zone Paging with Meet-me Last Number Redial Manual Intercom Meet-me Page Microphone Key Name Display Number Save and Repeat Originating a Call Using Speed Calling (Individual Station)
- Page 34 (cont’d) Originating a Call Using Speed Calling (One-touch Buttons) Originating an Internal Call Originating an Outside Call Outside Call Origination Outside Line Appearance Outside Line Queueing Placing a Call on Exclusive Hold Placing a Call on Hold Privacy Release Return Message Schedule Saving and Repeating a Number Soft Key Speed Calling Call Origination...
- Page 36 This material contained herein is subject to change without prior notice at the sole discretion of NEC Australia Pty Ltd. term ® NEAX7400 and are registered trademarks of NEC Australia Pty Ltd FIRST EDITION AD-25180808 1ST PRINTING APR OCTOBER 1998 ISSUE 1...
Need help?
Do you have a question about the NEAX7400 ICS M110e and is the answer not in the manual?
Questions and answers