
Related Manuals for Whirlpool ACG 900 IX


Summary of Contents for Whirlpool ACG 900 IX
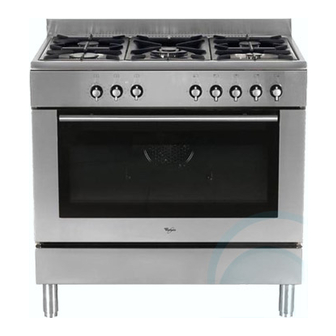
- Page 1 Users Guide Installation & Servicing Model ACG 900 IX NOTE TO INSTALLER: LEAVE THE OWNER’S GUIDE MANUAL WITH THE APPLIANCE. (Keep For Future Reference)
-
Page 2: Dimensions
WHEN YOU CALL FOR SERVICE RECORD HERE FOR EASY REFERENCE Costumer Service: 1300 363 344 Service call booking: 1300 361 166 Model Colour Whirlpool Europa S.r.l. Viale G. Borghi, 27 Serial Number Installation Date 21025 Comerio (VA) Italy Dealer's Name and Address... -
Page 3: Positioning
I N S TA L L AT I O N PROVISION FOR VENTILATION The room where the Cooker is installed should have permanent ventilation as follows: “Ventilation must be in accordance with AS5601/AG 601 - Gas Installations. In general, the appliance should have adequate BACK SIDE ventilation for complete combustion of gas, proper flueing and to maintain temperature of immediate surroundings within safe limits.”... -
Page 4: Gas Connection
GAS CONVERSION AND ADJUSTMENT GAS CONNECTION When used with natural gas all burners have been preset at our Should conform to gas utility regulations e.g. AS5601 Gas factory and further adjustment should not be necessary. Conversion installations; also refer to rangehood manufacturers kits to other gases are available from the place of purchase. - Page 5 - change the injector (see Fig. 1A) and replace it with another 2nd SECTION FOR THE USER one suitable for the new type of gas (see tab. 1) WARNING: Children should be kept away while the oven or grill is in use since accessible parts become hot.
-
Page 6: Automatic Electric Ignition
The small flame indicates the ‘low position’. - 1 Minute Tour - Turn the knob to it after the contents of a pan have boiled. Be safe Please read the rest of the instruction book which contains important information to help you use the appliance safely and efficiently. -
Page 7: To Use Electric Oven
HOW TO USE YOUR ELECTRIC OVEN When you turn the control knob to this position, the light will be - Before cooking in the first time we reccommend that the oven on for all the following operations. should be operated at 200° C for 30 minutes to remove any manufacturing greases and odours. - Page 8 conventional oven, using one tray only. Cooking results are a smoking and may start a fire. matter of personal preference and may easily be adjusted to suit Remember do not place pan or items directly onto the oven base. individual requirements by slight adjustment of the temperature Never leave unit unattended at hight heat settings.
-
Page 9: Use Of The Electric Grill
USE OF THE ELECTRIC GRILL C L E A N I N G USlNG THE GRILL Before cleaning the appliance, close the gas stopcock and unplug Turn the oven knob to the right and place it on the grill position appliance or disconnect power at the main circuit breaker of the electrical system. -
Page 10: Replacement Of Supply Cable
SERVICE INSTRUCTIONS IMPORTANT Do not use excessive water when cleaning the oven and avoid All service should be carried out be a authorised service water passing through the fan grill or ducts in the oven back . technician only. Avoid letting grease deposit collect around the upper heating REPLACEMENT OF THE SUPPLY CABLE element: it will cause smoking and may start a fire. -
Page 11: Oven Lights
DISASSEMBLE OF WORK-TOP S O M E S A F E T Y P O I N T In case it is necessary to repair or replace the inside components, act as follows: Do not use the appliance as a space heater. Remove the grids, remove burners and flame-spreaders (see fig. -
Page 12: Troubleshooting
OVEN DOES NOT WORK AT ALL PROBLEM SOLVER First, when the oven is equipped with timer, check appliance is Any of the following are considered to be abnormal operation not programmed to turn on later. If it is, turn to manual setting (i.e. and may require servicing: hand symbol). - Page 13 Users Guide Installation & Servicing Model ACG 900 IX...
-
Page 14: Overall Dimensions
WHEN YOU CALL FOR SERVICE RECORD HERE FOR EASY REFERENCE GENERAL INFORMATION ENVIRONMENTAL WARNING Waste packaging SECTION FOR THE QUALIFIED TECHNICIAN OV E R A L L D I M E N S I O N S Getting to know your new cooker Thank you for choosing one of our products. -
Page 15: Installation
I N S TA L L AT I O N Clearances to non- combustible materials PROVISION FOR VENTILATION POSITIONING Clearances to combustible materials Note: the cooker is fitted with a metallic rear hob protecting profile (”F”, see fig. 1) which must be assembled in following way: - put the profile (F) on the rear part of the cooker as in fig. -
Page 16: Special Note
TO FIX THE COOKER TO THE REAR WALL WARNING - IT IS RECOMMENDED THAT A SERVICE TAP AND UNION BE FITTED ADJACENT TO THE APPLIANCE INLET TO FACILITATE FUTURE SERVICING. VERY IMPORTANT FOR THE INSTALLER Before Leaving GAS CONVERSION AND ADJUSTMENT Fig. -
Page 17: Electrical Connection
2nd SECTION FOR THE USER WARNING: MINIMUM FLOW ADJUSTMENT FOR HOB-TOP TAPS Attention: WARNING - WARNING ELECTRICAL CONNECTION PROGRAMMER WITH COOKING END TIME WARNING: THIS APPLIANCE MUST BE EARTHED Connecting the mains cable IMPORTANT... - Page 18 - 1 Minute Tour - Be safe Gas and Electricity on WARNING Automatic electric ignition...
- Page 19 HOW TO USE YOUR ELECTRIC OVEN Defrosting with fan MULTIFUNCTIONAL OVEN The oven is fitted with: Natural convection N.B.: Oven thermostat knob Fan oven Medium grill Oven commutator knob Total grill Fan assisted total grill Note: Air forced lower heating element Always use the oven with the oven door closed.
- Page 20 GUIDE FOR FORCED CONVECTION COOKING (Back rolled electric element with fan) Food Thermostat Shelf Position Cooking Time setting °C (Counted from Bottom) Food Thermostat setting °C Cooking Time PLATE WARMING Warning:...
- Page 21 USE OF THE ELECTRIC GRILL C L E A N I N G USlNG THE GRILL Pan supports and burners Warning: burner cap notch for electrode in burner head electrode Oven Shelves To remove the shelves from the oven, To replace, Daily Bump Interior:...
-
Page 22: Service Instructions
SERVICE INSTRUCTIONS IMPORTANT All service should be carried out be a authorised service technician only. REPLACEMENT OF THE SUPPLY CABLE ALWAYS UNPLUG THE PLUG FROM THE CURRENT SOCKET OR SWITCH OFF THE CURRENT ON THE POWER SUPPLY LINE BY MEANS OF THE MAINS CIRCUIT SWITCH, BEFORE CARRYING OUT ANY MAINTENANCE ON THE OVEN. - Page 23 DISASSEMBLE OF WORK-TOP S O M E S A F E T Y P O I N T If you smell gas Open a window. Do not use any electrical switches. Immediately extinguish naked flames. Isolate appliance from gas mains supplies via the isolation stopcock. Contact local gas authority or emergency services as appropriate.
-
Page 24: Problem Solver
OVEN DOES NOT WORK AT ALL PROBLEM SOLVER LIGHT BULB DOESN’T COME ON Note: SMOKE COMING FROM OVEN THINGS TO TRY BEFORE CALLING FOR AN ENGINEER Burner does not burn well Burner does not ignite CLOCK/TIMER DOES NOT WORK If, after checking through this section, you cannot resolve your problem please call the number on the data plate fixed to the front cover of these instructions for service and spare parts.
Need help?
Do you have a question about the ACG 900 IX and is the answer not in the manual?
Questions and answers
Good day I have moved into a rental with a whirlpool ACG9001X but the symbols on the 3 oven control knobs ( left of front facia panel ) have worn off. Can you describe them