Table of Contents
Advertisement
Available languages
Available languages
Quick Links
Owner's manual
THANK YOU FOR BUYING A WHIRLPOOL PRODUCT
In order to receive a more complete assistance, please
register your product on
!
Before using the appliance carefully read the Safety
Instruction.
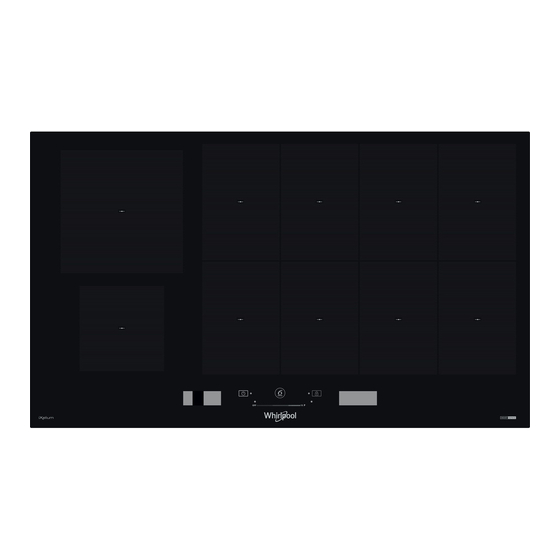
PRODUCT DESCRIPTION
CONTROL PANEL
6
1.
On/o button
2.
Indicator light - hob switched on
3.
"6
th
Sense" button (special functions)
4.
Indicator light - key lock active
www.whirlpool.eu/register.
1
2
7
5.
Key lock
6.
Cooking zone selection display
7.
Cooking zone o button
PLEASE SCAN THE QR CODE ON
YOUR APPLIANCE IN ORDER TO
REACH MORE INFORMATION
1
2
3
4
5
8
9
8.
9.
10.
1.
Cooktop
2.
Control panel
10
Slide touchscreen
Quick heat button
"Manage functions" display
EN
Advertisement
Table of Contents

Related Manuals for Whirlpool SMP2 9010 C/NE/IXL


Summary of Contents for Whirlpool SMP2 9010 C/NE/IXL
- Page 1 Owner's manual THANK YOU FOR BUYING A WHIRLPOOL PRODUCT In order to receive a more complete assistance, please PLEASE SCAN THE QR CODE ON www.whirlpool.eu/register. register your product on YOUR APPLIANCE IN ORDER TO REACH MORE INFORMATION Before using the appliance carefully read the Safety Instruction.
-
Page 2: First Time Use
ACCESSORIES POTS AND PANS components to cool down. If any error messages appear, call the service centre. Only use pots and pans made from ferromagnetic material which are suitable for use with induction hobs. To MINIMUM DIAMETER OF POT/PAN BASE FOR THE DIFFERENT determine whether a pot is suitable, check for the symbol COOKING AREAS (usually stamped on the bottom). -
Page 3: Setting The Cooking Time
Owner's manual the right display, the message “CHECK TOUCH AREA, remove the object within one minute“ will appear. Remove the object and wait until the message disappears. If TIMER the problem persists, disconnect and reconnect the power to the cooktop. When the hob is o , you can use the right-hand display as a timer. -
Page 4: Special Functions
SPECIAL FUNCTIONS In the right-hand display, the instructions to follow will appear (e.g.“Add Oil“ or “Add food“). At the end of each stage, the user must con rm in SENSE order to proceed with cooking. The 6 Sense button allows users to access a number of special features: If necessary, the pre-set power level can be changed at any time, using the •... -
Page 5: Pan Frying
Owner's manual CHEF CONTROL The rate of cooking can be adjusted at any time using the “+“ and “–“ buttons on the right-hand display. This function divides the hob into four cooking zones, activating these simultaneously at a pre-set power level. It allows you to move pots from one area to another, to allow you to continue cooking at di erent temperatures. -
Page 6: Cooking Table
Important: If the iXelium ™ logo appears on the glass, the hob has been treated with iXelium ™ technology, an exclusive Whirlpool finish which ensures perfect cleaning results, as • Do not use abrasive sponges or scouring pads as they may damage the glass. -
Page 7: Troubleshooting
Owner's manual TROUBLESHOOTING • Check that the electricity supply has not been shut o . Please note: The presence of water, liquid spilled from pots or any objects • If you are unable to turn the hob o after using it, disconnect it from the resting on any of the hob buttons can accidentally activate or deactivate the power supply. -
Page 8: After Sales Service
To receive assistance, call the number shown on the warranty booklet or follow • your telephone number. the website’s instructions on www.whirlpool.eu. If any repairs are required, please contact an authorized after-sales service When contacting our Client After sales service, always specify: (to guarantee that original spare parts will be used and repairs carried out •... - Page 9 Bedienungsanleitung DANKE, DASS SIE SICH FÜR EIN WHIRLPOOL PRODUKT ENTSCHIEDEN HABEN BITTE SCANNEN SIE DEN QR Für eine umfassendere Unterstützung melden Sie Ihr CODE AUF IHREM GERÄT, UM www.whirlpool.eu/register. Produkt bitte unter WEITERE INFORMATIONEN ZU ERHALTEN Lesen Sie vor Gebrauch des Geräts die Sicherheitshinweise aufmerksam durch.
-
Page 10: Erste Inbetriebnahme Des Geräts
ZUBEHÖR KOCHGESCHIRR dazu führen, dass die Temperatur zu schnell ansteigt und der Abschaltmechanismus nicht rechtzeitig ausgelöst werden kann, was Geschirr oder Kochfeld beschädigen Ausschließlich Töpfe und Pfannen aus ferromagnetischem NEIN könnte. In diesem Fall nichts berühren und warten, bis alle Teile abgekühlt sind. Material verwenden, die für die Verwendung mit Erscheint eine Fehlermeldung, wenden Sie sich an den Kundenservice. - Page 11 Bedienungsanleitung KOCHZONEN EINSCHALTEN/AUSSCHALTEN UND DIE LEISTUNG EINSTELLEN TOPF ZUGEBEN Einschalten der Kochzonen: Wenn ein aus verschiedenen Zonen bestehender Kochbereich verwendet wird, kann der Topf an einer beliebigen Stelle im aktiven Bereich aufgestellt werden. Schalten Sie das Kochfeld ein. Wenn bereits ein Gargefäß aufgestellt Das Kochfeld erkennt automatisch die gegenwärtige Platzierung des Topfes.
- Page 12 SONDERFUNKTIONEN SENSE FUNKTION Die “6 Sense“-Taste gestattet dem Nutzer den Zugang zu einer Reihe von Sonderfunktionen: • Kochassistent • Chef Control • Flexifull Auf der rechten Anzeige erscheinen die zu befolgenden Anweisungen In der rechten Anzeige für die Funktionssteuerung können Sie zwischen den (z.
- Page 13 Bedienungsanleitung Die Garstufe kann jederzeit mit den “+“ und “–“ Tasten auf der rechten Anzeige Bitte beachten: Versuchen Sie nicht den Topf oder die Pfanne während der angepasst werden. ersten Minute des Aufheizvorgangs zu bewegen, um die optimale Funktion des Kochfelds zu ermöglichen.
-
Page 14: Empfohlene Verwendung
Wenn das iXelium™-Logo auf dem Glas erscheint, wurde das Kochfeld mit der • Keine Scheuerschwämme oder Topfkratzer verwenden, da sie das Glas iXelium™ Technologie behandelt, eine exklusive Whirlpool-Ausführung, die beschädigen können. sowohl perfekte Reinigungsergebnisse gewährleistet als auch die Oberfläche •... -
Page 15: Lösen Von Problemen
Bedienungsanleitung LÖSEN VON PROBLEMEN • Sicherstellen, dass der Strom nicht ausgefallen ist. HINWEIS: Wasser, aus Kochgeschirr verspritzte Flüssigkeit oder Gegenstände • Lässt sich das Kochfeld nach dem Gebrauch nicht ausschalten, muss es von irgendwelcher Art können die versehentliche Aktivierung oder Deaktivierung der Stromversorgung getrennt werden. -
Page 16: Bevor Sie Den Kundendienst Rufen
Rufen Sie die Nummer in dem Garantieheft an oder folgen Sie den (nur dann wird garantiert, dass Originalersatzteile verwendet werden und eine Anweisungen auf der Internetseite www.whirlpool.eu. fachgerechte Reparatur durchgeführt wird). Wenn Sie den Kundendienst kontaktieren, immer die folgenden Angaben... -
Page 17: Description Du Produit
Manuel du propriétaire MERCI D’AVOIR CHOISI UN PRODUIT WHIRLPOOL A n de pro ter d’une assistance plus complète, veuillez VEUILLEZ SCANNER LE QR CODE www.whirlpool.eu/register. enregistrer votre produit sur SUR VOTRE APPAREIL POUR OBTENIR PLUS D’INFORMATIONS Lisez attentivement les consignes de sécurité avant d’utiliser l’appareil. -
Page 18: Première Utilisation
ACCESSOIRES POÊLES ET CASSEROLES de cuisson. Dans ce cas, ne touchez à rien et attendez que les parties intéressées refroidissent. Utiliser uniquement des casseroles et poêles réalisées en Si des messages d’erreur s’affichent, contactez l’assistance technique après-vente. matériau ferromagnétique qui sont adaptées à l’utilisation avec des plaques à... - Page 19 Manuel du propriétaire ACTIVER/DÉSACTIVER ET RÉGLER LA PUISSANCE DES ZONES DE CUISSON AJOUTER UN RÉCIPIENT Pour activer les zones de cuisson : En cas d’utilisation d’une zone de cuisson composée de plusieurs zones, le récipient peut être placé n’importe où dans la zone activée. La table de Allumez la table de cuisson.
-
Page 20: Fonctions Spéciales
FONCTIONS SPÉCIALES Les instructions à suivre sont visualisées sur l’a cheur droit (ex. “Ajouter l’huile“ ou “Ajouter les aliments“). À la n de chaque étape, l’utilisateur doit SENSE con rmer a n de poursuivre la cuisson. Le bouton “6 Sense“ permet d’accéder à plusieurs fonctionnalités particulières: Si nécessaire, le niveau de puissance prédé... - Page 21 Manuel du propriétaire FONCTION CHEF CONTROL La qualité et le type de récipient in uent sur les résultats et les temps de cuisson. Cette fonction divise la table de cuisson en quatre zones de cuisson et les active Si nécessaire, le niveau de puissance prédé ni peut être modi é au moyen des simultanément à...
-
Page 22: Nettoyage Et Entretien
Important : Si le logo iXelium™ apparaît sur le verre, la table de cuisson a été traitée avec la technologie iXelium™, une finition exclusive Whirlpool qui assure des résultats de • N'utilisez pas d'éponges abrasives ni de tampons à récurer car ils peuvent nettoyage parfaits, ainsi qu'un maintien de la surface de la table de cuisson brillante, endommager le verre. -
Page 23: Guide De Dépannage
Manuel du propriétaire GUIDE DE DÉPANNAGE • Contrôlez que l'alimentation électrique n'a pas été coupée. Veuillez noter: De l'eau, du liquide ayant débordé des casseroles ou tout objet • Si vous ne parvenez pas à éteindre la table de cuisson après l'avoir utilisée, posé... -
Page 24: Avant D'appeler Le Service Après-Vente
Pour obtenir du support, appeler le numéro disponible dans le livret de • votre numéro de téléphone. garantie ou suivez les consignes sur le site Web www.whirlpool.eu. Si des réparations sont nécessaire, contactez un service après-vente agréé Lorsque vous contactez notre Service Après-vente, toujours préciser: (vous aurez ainsi la garantie que les pièces défectueuses seront remplacées... - Page 25 Gebruikershandleiding DANK U WEL VOOR UW AANKOOP VAN EEN WHIRLPOOL PRODUCT SCAN DE QR CODE OP UW Voor verdere assistentie kunt u het apparaat registeren op www.whirlpool.eu/register. APPARAAT VOOR MEER INFORMATIE Lees de instructies aandachtig voordat u het apparaat gebruikt.
-
Page 26: Eerste Gebruik
ACCESSOIRES POTTEN EN PANNEN lichte vertraging wordt ingeschakeld, met schade voor de pannen tot gevolg. Raak niets aan als dit gebeurt en wacht tot alle onderdelen zijn afgekoeld. Gebruik alleen potten en pannen van ferromagnetisch Neem contact op met het servicecentrum als er een foutbericht verschijnt. materiaal geschikt zijn... - Page 27 Gebruikershandleiding BEREIDINGSZONE IN/UITSCHAKELEN KOOKVERMOGENS REGELEN POT TOEVOEGEN De kookzones inschakelen: Wanneer een bereidingszone wordt gebruikt die uit verschillende zones bestaat, kan de kookpot op eender welk punt van de actieve zone geplaatst Schakel de kookplaat in. Als een recipiënt al op zijn plaats staat, detecteert worden.
-
Page 28: Speciale Functies
SPECIALE FUNCTIES Op het rechterdisplay verschijnen instructies die u moet volgen (bijv.“Olie toevoegen“ of “Voedsel toevoegen“). Na elke fase moet de gebruiker SENSE bevestigen om verder te gaan met de bereiding. De “6 Sense“-toets dient om toegang te krijgen tot speciale functies: Het vooraf ingestelde vermogensniveau kan zo nodig op elk ogenblik •... - Page 29 Gebruikershandleiding CHEF CONTROL Deze methode tast het voedsel niet aan en voorkomt dat het aan de pan blijft plakken. Deze functie verdeelt de kookplaat in vier bereidingszones, die tegelijkertijd De kwaliteit en het type van de gebruikte potten en pannen kan van invloed worden ingeschakeld aan een vooraf ingesteld vermogensniveau.
-
Page 30: Aanbevolen Gebruik
Controleer voor het reinigen of de kookzones uitgeschakeld zijn en dat de restwarmte-indicatie (‘H’) niet wordt weergegeven. Belangrijk: Als het iXelium™ -logo op het glas verschijnt, dan is de kookplaat behandeld met de iXelium™ -technologie, een exclusieve afwerking van Whirlpool die perfecte • Gebruik geen schuursponsjes of schuurmatjes, omdat hiermee het glas wordt reinigingsresultaten garandeert en het oppervlak van de kookplaat langer glanzend beschadigd. - Page 31 Gebruikershandleiding PROBLEEMOPLOSSING • Controleer of er geen stroomuitval is. Let op: De aanwezigheid van water, gemorste vloeisto en uit pannen of • Als u er niet in slaagt de kookplaat na gebruik uit te schakelen, de stekker eventuele objecten op de toetsen van de kookplaat kunnen leiden tot het per uit het stopcontact trekken.
- Page 32 CONSUMENTENSERVICE Voor verdere assistentie kunt u het apparaat registeren op www.whirlpool.eu/ • het serienummer (nummer na het woord SN op het typeplaatje aan de register. onderkant van het apparaat). Het serienummer is ook vermeld in de documentatie; VOORDAT U CONTACT OPNEEMT MET DE KLANTENSERVICE:...
-
Page 33: Descrizione Prodotto
Manuale d’uso GRAZIE PER AVERE ACQUISTATO UN PRODOTTO WHIRLPOOL SI PREGA DI SCANSIONARE Per ricevere un’assistenza più completa, registrare il IL CODICE QR SUL PROPRIO www.whirlpool.eu/register. prodotto su APPARECCHIO PER OTTENERE MAGGIORI INFORMAZIONI Prima di utilizzare l’apparecchio leggere attentamente le istruzioni di sicurezza. -
Page 34: Primo Utilizzo
ACCESSORI PENTOLE E PADELLE leggero ritardo andando a danneggiare la pentola. In questi casi non toccare nulla ed attendere il ra reddamento delle parti coinvolte. Usare solo pentole e padelle ferromagnetiche adatte ai Se compaiono messaggi di errore dopo l’accaduto, chiamare l’assistenza. piani a induzione. -
Page 35: Blocco Tasti
Manuale d’uso Nota: Evitare di coprire con gli accessori i display e la tastiera a scorrimento. caso un utensile dovesse coprire uno dei display, il piano potrebbe non funzionare BLOCCO TASTI correttamente. Sul display di destra apparirà “CONTROLLARE AREA TOUCH, Per prevenire l’attivazione accidentale del piano durante le operazioni di pulizia o la rimuovere oggetto entro un minuto“. -
Page 36: Funzioni Speciali
FUNZIONI SPECIALI Nel display di destra compaiono le istruzioni da seguire (es. “Aggiungere olio“ o “Aggiungere cibo“). Al termine di ogni passaggio confermare per SENSE proseguire con la cottura. Con il tasto “6 Sense“ è possibile accedere alle funzioni speciali: Se necessario, è... - Page 37 Manuale d’uso CHEF CONTROL La qualità e il tipo di pentola possono incidere sul risultato o sui tempi di cottura. Divide il piano in quattro zone cottura e le attiva contemporaneamente a una In qualsiasi momento è possibile perfezionare l’andamento della cottura potenza prede nita.
-
Page 38: Utilizzo Consigliato
Importante: Se sul vetro è presente il logo iXelium™, il piano di cottura è stato trattato con la tecnologia iXelium™, una finitura esclusiva di Whirlpool che garantisce una • Non utilizzare spugne abrasive o pagliette in quanto possono rovinare il vetro. -
Page 39: Risoluzione Dei Problemi
Manuale d’uso RISOLUZIONE DEI PROBLEMI • Controllare che non ci siano interruzioni nella fornitura di energia elettrica. Nota: La presenza di acqua, liquido fuoriuscito dalle pentole o oggetti di • Se dopo avere utilizzato il piano di cottura, non si riesce a spegnerlo, qualsiasi genere posati su un qualsiasi tasto del piano possono provocare staccare il piano dalla rete elettrica. -
Page 40: Servizio Assistenza
Per le linee guida, la documentazione standard e altre informazioni sui prodotti: • Utilizzando il codice QR nel proprio apparecchio; Visitando il nostro sito web docs.whirlpool.eu/docs; • contattare il Servizio Assistenza Tecnica • Oppure, (al numero di telefono riportato sul libretto di garanzia). -
Page 41: Descripción Del Producto
Manual del usuario GRACIAS POR ADQUIRIR UN PRODUCTO WHIRLPOOL Para recibir una asistencia más completa, registre su ESCANEE EL CÓDIGO QR DE SU www.whirlpool.eu/register. producto en APARATO PARA OBTENER MÁS INFORMACIÓN Antes de usar el aparato, lea atentamente las Instrucciones de seguridad. -
Page 42: Primer Uso
ACCESORIOS OLLAS Y SARTENES sucede, no toque nada y espere a que todos los componentes se enfríen. Si aparece algún mensaje de error, llame al Servicio Postventa. Utilice solo ollas y sartenes fabricadas con materiales ACEPTAR ferromagnéticos y aptas para placas de inducción. DIÁMETRO MÍNIMO DE LA BASE DE LA OLLA/SARTÉN PARA LAS DISTINTAS Para saber si una olla es apta, busque el símbolo ZONAS DE COCCIÓN... - Page 43 Manual del usuario ACTIVAR/DESACTIVAR LAS ZONAS DE COCCIÓN Y AJUSTAR LA POTENCIA AÑADIR OLLA Para activar las zonas de cocción: Cuando utilice una zona de cocción compuesta por varias zonas, la olla puede colocarse en cualquier punto de la zona activa. La placa reconocerá Encienda la placa.
-
Page 44: Funciones Especiales
FUNCIONES ESPECIALES En la pantalla de la derecha aparecerán las instrucciones que debe seguir (p.ej. “Añadir el aceite“ o “Añadir los alimentos“). Al nal de cada fase, el SENSE usuario debe con rmar para seguir con la cocción. El botón “6 Sense“... - Page 45 Manual del usuario CHEF CONTROL La calidad y el tipo de la olla pueden afectar al rendimiento o a los tiempos de cocción. Esta función divide la placa en cuatro zonas de cocción y las activa La velocidad de cocción puede ajustarse en cualquier momento utilizando los simultáneamente en el nivel de potencia preestablecido.
-
Page 46: Limpieza Y Mantenimiento
Importante: Si aparece el logo de iXelium™ en el cristal, la placa está tratada con tecnología iXelium™, un acabado exclusivo de Whirlpool que asegura unos resultados de • No utilice esponjas o estropajos abrasivos, ya que podrían dañar el cristal. -
Page 47: Resolución De Problemas
Manual del usuario RESOLUCIÓN DE PROBLEMAS • Compruebe que no se haya interrumpido la alimentación eléctrica. Nota: La presencia de agua, líquido derramado de las ollas o cualquier objeto • Después de utilizar la placa de cocción, si no puede apagarla, desconéctela que se encuentre sobre cualquier botón de la placa puede activar o desactivar de la red eléctrica. -
Page 48: Servicio Postventa
Puede consultar los reglamentos, la documentación estándar e información adicional sobre productos mediante alguna de las siguientes formas: • Utilizando el código QR en tu aplicación; Visitando nuestro sitio web docs. whirlpool.eu/docs; • También puede ponerse en contacto con nuestro Servicio postventa (Consulte el número de teléfono en el folleto •...
Need help?
Do you have a question about the SMP2 9010 C/NE/IXL and is the answer not in the manual?
Questions and answers