
Related Manuals for Phonic ACAPELA 16


Summary of Contents for Phonic ACAPELA 16
- Page 1 ACAPELA 16 User's Manual Manual del Usuario DIGITAL LIVE MIXER MEZCLADORA DIGITAL EN VIVO...
-
Page 2: Important Safety Instructions
Acapela 16... -
Page 3: Table Of Contents
INTRODUCTION FEATURES GLOSSARY TABLET DOCK BASIC CONTROL USB CONNECTION FRONT PANEL REAR PANEL SOFTWARE CONTROL PARAMETERS SPECIFICATIONS APPENDIX DIGITAL EFFECT TABLE DIMENSIONS Phonic reserves the right to improve or alter any information within this document without prior notice V1.1 2/25/2014... -
Page 4: Introduction
Processing accomplished through a high quality at it alone; we won’t be offended. All we ask is that 40-bit floating point digital signal processor you keep this manual safe, just in case. Acapela 16... -
Page 5: Glossary
VGA-enabled display. HPF – High Pass Filter – a high pass filter will cut or significantly reduce all audio signals below a particular user-defined frequency, allowing – as the name suggests – high frequency sounds to pass through. Acapela 16... -
Page 6: Tablet Dock
In the dialog box that appears, enter an IP ad- dress, user name and password. The IP address The dock takes up the majority of the Acapela 16's is the same IP address that is entered in the front panel. This is where your iPad will sit, essentially NETWORK >... -
Page 7: Usb Connection
A and B connectors available for a USB mouse 7. If you don’t want to use the Acapela 16 for all or flash drive. The USB-B port labeled CH17/18 can your system sounds, you can enter your DAW or be used to utilize the audio USB interface. -
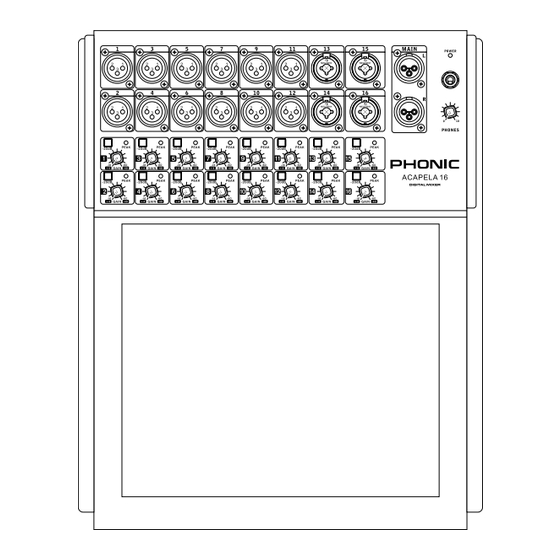
Page 8: Front Panel
Control Room mix. Any mixes that are soloed on input connectors – as amazing as it sounds – accept the Acapela 16 will then also be sent to the head- both XLR and ¼” phone jack inputs. phone output for monitoring. The level control that accompanies the headphone output will allow you to contour the output signal to a level that is right for you. -
Page 9: Rear Panel
10. Power Button 14. 17/18 USB Audio Port This button will turn the Acapela 16 on and off. Push- This USB-B port is for connection to any modern ing the power button twice in quick succession will Windows or Mac computer. -
Page 10: Software Control
Select Your Mix The main mixes of the Acapela 16 can be found across the top of the menu. The software itself will start with the first 8 channels shown on screen. This is the first option in the mix bar at the top. The next option along is for channels 9 to 16, followed by AUX 1-4 and GROUP 1-4. - Page 11 DHCP Server / Client: When your local network runs off a DHCP protocol, the network will automatically as- sign your Acapela 16 an IP address. If your network runs off a DHCP server, you can turn it on here. When the DHCP Server is set to “ON”...
- Page 12 64 and 128 bit. Key: Enter the security key for your wireless network here. Without this, the Acapela 16 will not be able to con- nect to the wireless network. The default key is 87654321. When connecting directly to the Acapela 16 through the Wi-Fi connection you will be prompted to enter the key as your Wi-Fi password.
- Page 13 In addition to the “Scenes” menu, you will find individual save pages for the EFX, EQ, GEQ and dynamics. These work in generally the same manner, but the saved data is confined to that particular feature. Acapela 16...
-
Page 14: Fader Groups
Fader Groups The Acapela 16 offers a number of pages that offer properties of the main page of the iPad control software that allows control of faders, EQ, panning, dynamics, on/off status and soloing, grouped into up to 8 channels per page. - Page 15 Pushing EQ here will allow users to jump straight into the EQ menu. GEQ: This is available for the MAIN mix only. This 31-band graphic equalizer can be viewed above the MAIN fader. Touching the icon will bring up the GEQ menu. Acapela 16...
- Page 16 Order: This function will allow you to determine which order the 3 signal processors (delay, dynamics, and equalizer) will occur on the corresponding channel. Touching the icon will allow you to enter the order menu. Acapela 16...
- Page 17 Dynamic Processor, EQ and Delay. Any order made find an output level meter for the channel’s dynamic up of the three processes can be selected. On the processor. Main mix, this can also be used to change between an EQ and GEQ. Acapela 16...
- Page 18 Solo Button: This will activate the solo function on the currently selected channel. When a channel is soloed, the signal will be diverted to the control room mix for monitoring. If the current channel has safe soloing applied, the word SAFE will appear within this button. Acapela 16...
-
Page 19: Aux Sends
Aux Mix: At the bottom right-hand side of the screen mine the destination of the currently selected aux you can push the left and right arrows to scroll through send. Any of the 8 multi outputs can be selected. the 8 different aux mixes. Acapela 16... -
Page 20: Group Sends
Pre/Post Meter buttons. The button for the is a short cut to activating and deactivating your EFX. channels is located directly above the Channel 4 button, while the master button is found immediately under the group mix master fader. Acapela 16... -
Page 21: Digital Effects
EFX window and will depend on the 15-band GEQ. These can be employed in addition EFX program selected. For information on available to the master 31-band EQ on the main. parameters, please check the EFX table. Acapela 16... - Page 22 You’ll see channels 1 to 18, AUX 1 to 4, Group 1 to 4, Multi 1 to 4 and the Main L and R mixes are all available. Phonic recommends avoiding channels 17 and 18 for this option unless you have correctly configured your computer to avoid an audio loop.
-
Page 23: Control Room
(PFLs) or after-fader listens (AFLs). AFLs will be blue, while PFLs are green. When so- loed, a red headphone icon will be displayed within the button. The word SAFE within the icon indicates that the channel has had a safe solo applied. Acapela 16... - Page 24 Left/Right Buttons: Use the left and right arrows to HPF, Shelf HPF, Shelf scroll through the different mixes. When in desktop mode, hover the cursor over the setting you wish to change and push the left button to lower the value and right to increase. Acapela 16...
- Page 25 Pre/Post Button: This adjusts the currently selected mix’s meter between that of a pre-fader and post-fad- er meter. This allows you to view the difference between the incoming input signal and the outgoing signal. Acapela 16...
-
Page 26: Phantom Power
The phantom power page offers 16 individual phantom power buttons, allowing +48V DC of phantom power to be applied to individual input channels. Activating phantom power on a channel will allow it to be used with condenser microphones and other products that require phantom power (DI boxes, for example). Acapela 16... - Page 27 Here you can select the dedicated delay parameter between milliseconds, meters and feet. You can also adjust the temperature control to better allow the Acapela to determine the best delay time based on the meter and feet settings selected. Acapela 16...
- Page 28 (in decibels) by which the signal will attenuate. Reset: This button, like on many of the other pages, will reset your current settings back to their default positions. Acapela 16...
-
Page 29: Parameters
2.5k, 3.15k, 4k, 5k, 6.3k, 8k, 10k, 12.5k, 16k, 20k Range -12 dB to 12dB, 0.5 dB steps Signal Generator Signals 100 Hz, 1 kHz, 10 kHz (Sine), Pink Noise Signal Level Range -50 dB to -10 dB, 1 dB steps Acapela 16... -
Page 30: Specifications
USB 2.0 (Audio) Selectable from CH1-16, CTRL RM, MAIN Power Supply Unit 100V - 240V, 50/60Hz, 90W Dimensions (H x W x D) 82 x 324 x 393 mm (3.2” x 12.8” x 15.5”) Weight 2.8 kg (6.2 lbs) Acapela 16... -
Page 31: Service And Repair
Phonic, at its option, shall repair or replace the defective unit covered by this warranty. Please retain the dated sales receipt as evidence of the date of purchase. - Page 33 GLOSARIO BASE CONTROL BÁSICO CONEXIÓN USB PANEL FRONTAL PANEL TRASERO SOFTWARE DE CONTROL PARÁMETROS ESPECIFICACIONES APENDICE TABLA DE EFECTO DIGITAL DIMENSIONES Phonic se reserva el derecho de mejorar o alterar cualquier información provista dentro de este documento sin previo aviso...
-
Page 34: Introducción
Características Felicitaciones por la compra dela mezcladora digital 12 entradas XLR mono micrófono/línea, además Acapela 16. En las próximas páginas veremos la de 4 entradas combo (XLR / TRS) configuración y el funcionamiento de esta fantástica F r e c u e n c i a d e m u e s t r e o d i g i t a l i n t e r n o nueva mezcladora digital. -
Page 35: Glosario
– Ese filtro reducirá o aumentará las señales de audio llevar las señales desde el mezclador a una por debajo de una determinada frecuencia. El nivel en pantalla VGA adecuada. el cual la señal se potencia / atenuada está determinada por el usuario. Acapela 16... -
Page 36: Base
A continuación, Control de escritorio puede utilizar las ranuras en la base para mantener la El Acapela 16 fue diseñado para que, incluso sin un iPad barra de soporte en su lugar. (o cualquiera otra tableta), pueda controlar todas las funciones, incluyendo la configuración del nivel, ecualiza-... -
Page 37: Conexión Usb
. 17 y el canal 18 a laderecha para crear un efecto 7. Si no desea utilizar el Acapela 16 para todos los estéreo correcto. sonidos del sistema, puede introducir su DAW... -
Page 38: Panel Frontal
LED de encendido Este LED le hará saber cuándo el Acapela 16 está encendido. Control de ganancia/GAIN Encontrarás un control de Gain para cada canal de entrada del Acapela 16. -
Page 39: Panel Trasero
10. Botón de encendido seguro o conveniente. Este botón cambiará el Acapela 16 de encendido a apagado. Al pulsar el botón de encendido dos veces 14. 17/18 Puerto USB Audio en rápida sucesión le permitirá cambiar la operación Este puerto USB-B es para la conexión a cualquier... -
Page 40: Software De Control
Seleccione su Mezcla Las principales mezclas del Acapela 16 se encuentran en la parte superior del menú. El software en sí comenzará con los primeros 8 canales que se muestran en la pantalla. Esta es la primera opción en la barra de mezcla en la parte superior. - Page 41 Dirección IP: Si no utiliza un servidor DHCP, puede introducir una dirección IP para su Acapela aquí . Máscara de red (Net Mask): Se puede introducir en este campo de su Acapela 16. Para la mayoría de las redes - y en particular si no está seguro de lo que es - esta debe mantenerse fija como “255.255.255.0”.
- Page 42 El cifrado se puede seleccionar entre 64 y 128 bits. Key / Clave: Ingrese la clave de seguridad para la red inalámbrica aquí. Sin esto, el Acapela 16 no será capaz de conectarse a la red inalámbrica. La clave por defecto es 87654321. Cuando se conecta directamente ael Acapela 16 a través de la conexión Wi-Fi se le pedirá...
- Page 43 Le recomendamos inicializar después de realizar una actualización de firmware. Además del menú “Scenes”, encontrará páginas de guarda individuales para la EFX, EQ, GEQ y dinámica. Estos funcionan generalmente de la misma manera, pero los datos guardados se limitan a esta característica en particular. Acapela 16...
- Page 44 Grupos de Faders El Acapela 16 ofrece una serie de páginas que ofrecen propiedades de la página principal del software de control de iPad que permite el control de los faders, EQ, panorama, la dinámica, el estado de encendido / apagado y los solos, agrupados en un máximo de 8 canales por página.
- Page 45 EQ a la izquierda de la pantalla. Empujar EQ aquí permitirá a los usuarios saltar directamente al menú de EQ. GEQ: Esta función está disponible sólo para la mezcla principal. Este ecualizador gráfico de 31 bandas se puede ver encima del fader principal. Al tocar el icono, aparecerá el menú GEQ. Acapela 16...
- Page 46 Orden: Esta función le permitirá determinar el orden de los 3 procesadores de señal (demora , dinámica y ecualizador) se producirá en el canal correspondiente. Al tocar el icono le permitirá entrar en el menú pedido. Acapela 16...
- Page 47 Seleccione la pantalla para ir inmediatamente a la configuración dinámica del procesador. Al lado de la pantalla, los usuarios pueden encontrar un medidor de nivel de salida para el procesador dinámico del canal. Acapela 16...
- Page 48 Acapela 16...
- Page 49 8 diferentes mez- Botones Aux Destination: Estos 4 botones determi- clas auxiliares. nan el destino del envio Aux seleccionado. Cualqui- era de las 8 salidas múltiples se puede seleccionar. Acapela 16...
- Page 50 EFX. pueden ajustar con los botones del medidor Pre/Post. El botón de los canales se encuentra justo encima del botón de Channel 4, mientras que el botón principal se encuentra inmediatamente debajo de group mix master fader. Acapela 16...
- Page 51 31 completamente saturado. bandas, mientras que el EFX2 incluye un ecualizador gráfico estéreo de 15 bandas. Estos se pueden emplear además de la ecualización maestra de 31 bandas en el MAIN. Acapela 16...
- Page 52 Acapela 16. Sólo tiene que seleccionar el icono de la pantalla y el menú de selección de canal aparecerá. Verá los canales 1 a 18, AUX 1 a 4, Grupo 1 a 4, Multi 1 al 4 y las mezclas MAIN L y R estarán disponibles.
- Page 53 (AFL). Los AFLs serán de color azul, mientras que los PFLs serán de color verde. Cuando esta en Solo, un icono de auricular rojo aparece en el botón. La palabra SAFE en el icono indica que el canal está en modo SOLO. Acapela 16...
- Page 54 Este menú es para un fácil ajuste del ecualizador paramétrico en pantalla, en los canales de entrada y salida. Las unidades Acapela 16 proporcionan un ecualizador paramétrico de 4 bandas en cada canal de entrada, salidas Multi 1 a 4 y Main Mix. Todos los parámetros se ajustan con los codificadores de datos o pantalla táctil.
- Page 55 Botón Pre/Post: Apague u enciende accionando el botón ON. Cuando está encendido, se ilumina el botón. On/Off: Apague u enciende accionando el botón ON. Cuando está encendido, se ilumina el botón. Acapela 16...
- Page 56 48 V DC a los canales de entrada de forma individual. Acti- vación de la alimentación fantasma en un canal permitirá que sea usado micrófonos de condensador y otros productos que requieren alimentación fantasma (cajas DI, por ejemplo). Acapela 16...
- Page 57 Aquí puede seleccionar el parámetro de retardo entre milisegundos, metros y pies. También se puede ajustar el control de temperatura lo cual permite que el Acapela pueda determinar el mejor tiempo de retardo basado en función de los ajustes en metros o pies seleccionados. Acapela 16...
- Page 58 Reset: Este botón, al igual que en muchas de las otras nar el nivel (en decibelios) por el cual páginas, se restablecerá la configuración actual de vuelta la señal se atenúa. a sus posiciones predeterminadas. Acapela 16...
-
Page 59: Parámetros
USB 2.0 (Audio Selecionable desde CH1-16, CTRL RM, MAIN Fuente de alimentación 100V - 240V, 50/60Hz, 90W Dimensiones (H x W x D) 82 x 324 x 393 mm (3.2” x 12.8” x 15.5”) Peso 2.8 kg (6.2 lbs) Acapela 16... - Page 60 Phonic, a su propia opinión, reparará o cambiará la unidad defectuosa que se encuentra dentro de esta garantía.
-
Page 61: Digital Effect Table
0 to 99% Feedback gain of input 1 Feedback 2 0 to 99% Feedback gain of input 2 FB HPF 20 Hz to 20 kHz Feedback High Pass Filter FB LPF 20 Hz to 20 kHz Feedback Low Pass Filter Acapela 16... - Page 62 Determines the modulation waveform Depth 0 to 100% Adjusts the depth of the Auto Pan effect Determines the direction of the panning effect LR / L R / R L Note: Reverb Effects are found on EFFECT 1 only. Acapela 16...
-
Page 63: Dimensions
DIMENSIONS DIMENSIONES 324 / 12.8 324 / 12.8 All measurements are shown in mm/inches. Todas las medidas están mostradas en mm/pulgadas. Acapela 16...
Need help?
Do you have a question about the ACAPELA 16 and is the answer not in the manual?
Questions and answers