Table of Contents
Advertisement
Quick Links
USER´S GUIDE
USER´S GUIDE
GUÍA DE USUARIO
GUÍA DE USUARIO
• Read this User's Guide before you start using your P-touch labeler.
• Keep this User's Guide in a handy place for future reference.
• Lea este manual de instrucciones antes de emplear la etiquetadora P-touch.
• Guarde esta guía de usuario para futuras referencias.
If you encounter any problems with your product, visit our Web site:
http://solutions.brother.com/
Si tiene algún problema con su producto, visite nuestro sitio web:
http://solutions.brother.com/
PT-7500/7600
Advertisement
Table of Contents

Related Manuals for Brother P-Touch PT-7500


Summary of Contents for Brother P-Touch PT-7500
- Page 1 PT-7500/7600 USER´S GUIDE USER´S GUIDE GUÍA DE USUARIO GUÍA DE USUARIO • Read this User’s Guide before you start using your P-touch labeler. • Keep this User’s Guide in a handy place for future reference. • Lea este manual de instrucciones antes de emplear la etiquetadora P-touch.
- Page 2 • The enclosed interface cable should be used in order to ensure compliance with the limits for a Class B digital device. • Changes or modifications not expressly approved by Brother Industries, Ltd. could void the user’s authority to operate the equipment.
-
Page 3: Compilation And Publication Notice
• Consult the dealer or an experienced radio/TV technician for help. Important • Changes or modifications not expressly approved by Brother Industries, Ltd. could void the user’s authority to operate the equipment. Compilation and Publication Notice Under the supervision of Brother Industries Ltd., this manual has been compiled and published, covering the latest product’s descriptions and specifications. - Page 4 (collectively referred to in this warranty as “this Product”). • If you purchased a product from someone other than an authorized Brother reseller in the United States or if the product was used (including but not limited to floor models or refurbished product), prior to your purchase you are not the Original Purchaser and the product that you purchased is not covered by this warranty.
- Page 5 If the problem reported concerning your Machine and/or accompanying Consumable and Accessory Items is covered by this warranty and if you first reported the problem to Brother or an Authorized Service Center within the applicable warranty period, Brother or its Authorized Service Center will repair or replace the Machine and/or accompanying Consumable and Accessory Items at no charge to you for parts or labor.
- Page 6 • This Limited Warranty (and Brother’s obligation to you) may not be changed in any way unless you and Brother sign the same piece of paper in which we (1) refer to this Product and your bill of sale date, (2) describe the change to this warranty and (3) agree to make that change.
-
Page 7: Important Information
Important Information Should you have questions, or need information about your Brother Product, we have a variety of support options for you to choose from: Customer Service 1-877-BROTHER (877-276-8437) Customer Service 1-901-379-1210 (fax) World Wide Web www.brother-usa.com Supplies/Accessories www.brothermall.com or 1-877-552-MALL (6255) BROTHER INTERNATIONAL CORPORATION 100 SOMERSET CORPORATE BLVD. -
Page 8: Safety Precautions
Before Using Your P-touch Labeler Thank you for purchasing the PT-7500/7600. Your new P-touch labeler is an easy to operate, feature packed labeling system that makes creating professional, high quality labels a breeze. In addition to easy label creation via pre-formatted label layouts, the P-touch labeler editing software features advanced label formatting, block formats, bar codes and auto-numbering functions. - Page 9 Do not use a damaged power cord. damage. Brother shall not assume any Do not overload the power outlet. responsibility for any accident or damage resulting from not using the specified AC adapter.
- Page 10 WARNING Batteries (Alkaline/Rechargeable) Follow these guidelines to avoid leakage, or damage to the batteries. Do not use metallic articles, such as If the batteries leak, make sure the fluid does tweezers or a metallic pen, when not come into contact with your eyes, as this exchanging the batteries.
- Page 11 CAUTION Tape Cutter Follow these guidelines to avoid personal injury and damage of the P-touch labeler. Do not open the tape compartment cover Do not apply excessive pressure to the cutter when operating the cutter unit. unit. AC adapter If you do not intend using the P-touch Always hold the plug when disconnecting labeler for an extended period of time, the power cord from the power outlet.
-
Page 12: General Precautions
Depending on the environmental conditions and the applied settings, some characters or symbols may be difficult to read. Use only Brother TZ tapes with this machine. Do not use tapes that do not have the mark. Do not pull or apply pressure to the tape in the cassette. Otherwise the tape cassette or P-touch labeler may be damaged. -
Page 13: Table Of Contents
Contents Before Using Your P-touch Labeler ..........i Safety precautions ..................i General Precautions ..............v Contents ..................vi 1. Getting Started ..............1 Unpacking Your P-touch Labeler ........... 1 General Description ..............3 Top view & bottom view ................3 Keyboard & LCD screen ................4 Back light ......................5 Power Supply ................. - Page 14 Inputting Label Data ..............20 Entering and editing text ................20 Entering an accented character ..............22 Entering a bar code ..................23 Entering a symbol ..................25 Formatting the Label ..............28 Specifying a label length ................28 Specifying a margin size ................28 Framing the text ..................29 Specifying the character size ..............30 Specifying the character width ..............31 Specifying the character style ..............32...
- Page 15 Using P-touch Editor 5.0 .............. 54 Starting P-touch Editor ................56 Layout window ....................57 Starting P-touch Editor Help ..............59 Transferring Data To/From a Computer ........61 Entering Transfer mode ................61 How to use P-touch Transfer Manager & P-touch Library ... 62 Starting up P-touch Transfer Manager ............62 Transferring label templates from the PC ..........64 Adding a user-defined character image to the text ........66...
-
Page 16: Getting Started
Getting Started Unpacking Your P-touch Labeler Check that the package contains the following before using your P-touch labeler. PT-7600 P-touch labeler Rechargeable battery pack (BA-7000) TZ tape cassette Strap belt CD-ROM User's Guide USB cable AC adapter (AD-18) (The design of the adapter may differ by country.) - Page 17 PT-7500 P-touch labeler Strap belt TZ tape cassette User's Guide AC adapter (AD-18) (The design of the adapter may differ by country.)
-
Page 18: General Description
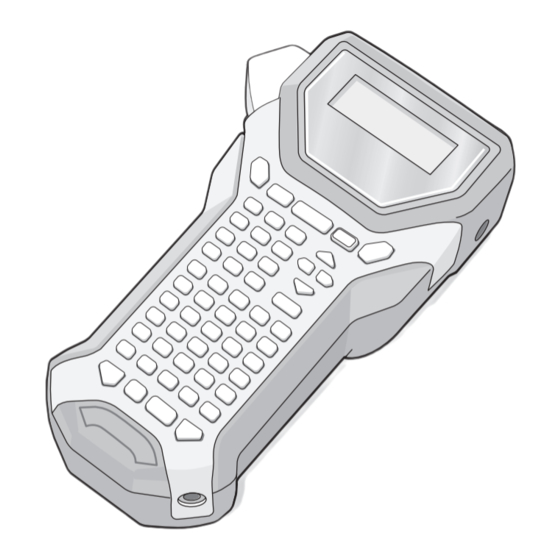
General Description Top view & bottom view Top view Display Tape cutter button Keyboard AC adapter connector USB port (for PT-7600 only) Back cover Release lever Battery compartment Print head Tape cassette compartment Tape exit slot Bottom view... -
Page 19: Keyboard & Lcd Screen
O PF keys (page 33) (PT-7600) B Width setting (page 31) Auto Format keys (page 33) C Size setting (pages 30 & 31) (PT-7500) D Length setting (page 28) P Feed key (page 35) E Caps mode (page 20) Q Print key (page 35) -
Page 20: Back Light
The P-touch labeler can be supplied with power in two or three ways. AC adapter (page 5) Batteries (page 6) Rechargeable battery pack (page 7) PT-7500 PT-7600 * The rechargeable battery pack is a consumable product. Therefore, there is no guarantee available for the deterioration of the products. -
Page 21: Batteries
Notes on the AC adapter Only use the AC adapter designed exclusively for this machine. Disconnect the AC adapter if you do not intend to use this P-touch labeler for an extended period of time. When the power is disconnected and without battery power, all text shown in the display and stored in the memory will be lost. -
Page 22: Rechargeable Battery Pack (For Pt-7600 Only)
Make sure that the batteries are inserted so that their poles point in the correct direction. With batteries installed, the P-touch labeler determines the remaining battery charge during printing and feeding. If a low battery charge is detected, the low battery indicator ()) comes on. - Page 23 Charging the rechargeable battery pack Insert the plug on the AC adapter cord into the connector on the machine and insert the AC adapter plug into a standard electrical outlet. While the rechargeable battery pack is charging, the charging indicator light lights up. Charging time is approx. 3 hours.
-
Page 24: Tape Cassettes
Notes on the rechargeable battery pack Be sure to use the suggested AC adapter (AD-18) Connect the AC adapter directly to the P-touch labeler to use it immediately after purchase or when the rechargeable battery pack’s charge becomes low. Disconnect the AC adapter from the P-touch labeler when installing or removing the rechargeable battery pack. - Page 25 Notes on tape cassettes Before installing the tape cassette, make sure that the end of the tape feeds under the tape guides. If the tape cassette to be installed has an ink ribbon and the ink ribbon is loose, use your finger to wind the toothed wheel in the direction of the arrow on the cassette until there is no slack in the ribbon.
- Page 26 Flexible ID Tape For applications that require more flexible labels, such as around sharp bends and cylindrical objects, we recommend using Flexible ID Tape. Labels made with Flexible ID Tape are not designed for use as electrical insulation. When wrapping labels around cylindrical objects, the diameter of the object should be at least 1/8"...
-
Page 27: Turning The P-Touch Labeler On/Off
Turning the P-touch Labeler On/Off Press o to turn on or turn off the P-touch labeler. If the P-touch labeler is powered by the AC adapter or batteries, the previous session’s text is displayed when the P-touch labeler is turned on again. This feature allows you to stop work on a label, turn off the machine, and return to it later without having to re- enter the text. -
Page 28: Label Type Modes
Label Type Modes Selecting a Label Type Mode Pressing a allows you to select one of the two regular modes for designing and printing your own custom labels, or any of the six special modes available for printing labels pre-formatted for identifying patch panels, cables, connectors and other components. Press a. -
Page 29: Rotate And Rotate & Repeat Modes
After selecting the Label Type mode NORMAL or VERTICAL, the label text can be entered, formatted, printed and cut as usual. With the Normal Label Type mode, the entered text is printed horizontally along the label. With the Vertical Label Type mode, the entered text is printed vertically along the label. -
Page 30: Flag Mode
Flag Mode Labels printed using this Label Type mode can be wrapped around cable or wire with the ends stuck together to form a flag. With the FLAG Label Type mode, each block of text is printed at both ends of separate labels. The length of the unprinted part of this label is equal to the circumference of the cable or wire. -
Page 31: Port And Panel1 Modes
Port and Panel1 Modes Labels printed using these Label Type modes can be used to identify various components or panels. With the Port Label Type mode, each block of the text is printed on a separate label, making these labels useful for identifying different components or ports that are not equally spaced. -
Page 32: Panel2 Mode
BLK LEN. (block length): * For the PORT Label Type mode: 0.80" to 8.00" (20.0 to 200.0 mm) Default: 1.20" (30.0 mm) * For the PANEL1 Label Type mode: 0.25" to 8.00" (6.0 to 200.0 mm) Default: 1.20" (30.0 mm) FRAME: * For the PORT Label Type mode: OFF,... - Page 33 BLOCK: 1 to 50 blocks Default: 1 LENGTH: 0.25" to 8.00" (6.0 to 200.0 mm) Default: 0.70" (17.5mm) MULTIPLE: x1 to x9 Default: 1 FRAME: OFF, 1 Default: OFF PRINT: FRONT, REVERSE Default: FRONT ROTATE: OFF, ON Default: OFF The number of blocks can be specified or changed only with the BLOCK parameter. Text blocks cannot be added or deleted in any other way.
-
Page 34: Basic Functions
Basic Functions Performing Basic Operations Choosing functions, parameters, settings and groups ” appears, press l to select the previous item or r to select the next If “ item. ” appears, press u to select the previous item or d to select the next If “... -
Page 35: Inputting Label Data
Inputting Label Data Entering and editing text Entering characters To type a lowercase letter, a number, a comma or a period, simply press the key for that character. To type an uppercase letter, press h to enter Shift mode, and then press the applicable letter. -
Page 36: Inserting Text
Adding a new line of text To end the current line of text and start a new one, press n. “ ” appears at the end of the line. The number of text lines that can be printed depends on the width of the tape. Maximum Number of Tape Width Lines That Can Be Printed... -
Page 37: Entering An Accented Character
Deleting text To remove characters to the left of the cursor’s current position, press b until all of the characters that you wish to delete are removed. To delete all of the text: Press g, then b. Press u or d to select either TEXT ONLY (to erase just the text) or TEXT&FORMAT (to erase all of the text and return all formatting functions to their default settings). -
Page 38: Entering A Bar Code
For each additional accented character, repeat steps Press n. To type in an uppercase accented character, press (or press , then to enter Caps mode) before pressing the letter key. Entering a bar code The Bar Code function allows bar codes to be printed as part of labels. Since this machine is not specifically designed for special bar code label-making, some bar code readers may not be able to read the labels. -
Page 39: Setting Bar Code Parameters
Setting bar code parameters Press g, then c. Press l or r until the parameter that you wish to change is displayed. Press u or d until the desired setting is displayed. Repeat steps until all parameters are set as you wish. Press n. -
Page 40: Entering A Symbol
The following special characters can only be added to bar codes created using protocols EAN128 and CODE128. Symbol Character Symbol Character Symbol Character (SPACE) Symbol Control Character Symbol Control Character Symbol Control Character FNC3 FNC2 FNC4 FNC1 Entering a symbol There are 164 symbols and pictures available with the Symbol function. - Page 41 • To add a single symbol or the last one in a series, skip to step • To add a series of symbols to the text, press g, then n. For each additional symbol, repeat steps through Press n. A symbol can also be selected by typing in the corresponding code from the table below.
- Page 42 Category Symbols 1 2 1 3 1 4 NUMBER PICTOGRAPH ELECTRICAL / ELECTRONIC PROHIBITION WARNING COMMUNICATIONS AUDIO/VISUAL...
-
Page 43: Formatting The Label
Category Symbols OTHERS *A maximum of 16 most recently selected symbols are PERSONAL automatically saved in the PERSONAL symbol category for CATEGORY quick and easy symbol use. PERSONAL symbol category becomes full Once the , newly selected symbols will overwrite older ones unless the Symbol Save function is set to OFF (Refer to Specifying if the PERSONAL symbol category is continually updated on page 44... -
Page 44: Framing The Text
Framing the text Press g, then B. Press u or d until the desired frame setting is displayed. Press n. The selected setting is applied to the entire text. The following frame styles are available. Frame Frame Sample Sample Setting Setting... -
Page 45: Specifying The Character Size
Specifying the character size The character size can be specified for all text in the label or only for the text in the line that the cursor is in. With the default character size setting AUTO, the largest possible text size is automatically selected depending on the width of the installed tape and the number of lines in the text. -
Page 46: Specifying The Character Width
Specifying the character width Formatting the Global width of all text Press t. Press l or r until GLB WIDTH is displayed. Press u or d until the desired character width setting is displayed. Press n. The selected setting is applied to the entire text. Formatting the width of a line Move the cursor to the line of text whose character width you wish to change. -
Page 47: Specifying The Character Style
Width NORMAL NARROW MINIMUM WIDE Size 6 points Specifying the character style Formatting the Global character style of all text Press t. Press l or r until GLB STYL is displayed. Press u or d until the desired character style setting is displayed. Press n. -
Page 48: Using The Pre-Formatted Auto Format Templates
Specifying the alignment for all lines in the text Press t. Press l or r until ALIGN is displayed. Press u or d until the desired setting is displayed. Press n. The selected setting is applied to the entire text. The following alignment settings are available. -
Page 49: Printing Labels
Template Tape Width Template Fields Sample Name Label Length 1" × 4.05" 1 SYMBOL? 2 TEXT1? SIGN (24 mm × 102 mm) 3 TEXT2? 3/4" × 4.05" 1 NAME? BADGE (18 mm × 102 mm) 2 COMPANY? 1/2" × 3.55" 1 TITLE? FILING (12 mm ×... -
Page 50: Feeding Tape
Feeding tape To feed out 1" (23 mm) of tape, press f. The message “FEED” is displayed. Press to feed out any leftover printed tape after pressing to quit printing. Printing a label To print out a label, press p. The message “WORKING”, then “COPIES” followed by the number of the label being printed is displayed. - Page 51 If the Cut function is set to 1 or 3, the message “CUT TAPE TO CONTINUE” appears after each label is printed. Press the tape cutter button to cut off the label and continue printing. Be sure to cut the tape within 5 minutes from the time that the message appears. Selecting how tape is For the different options available for cutting the tape, refer to fed and cut...
- Page 52 If the Cut function is set to 1 or 3, the message “CUT TAPE TO CONTINUE” appears after each label is printed. Press the tape cutter button to cut off the label and continue printing. Be sure to cut the tape within 5 minutes from the time that the message appears. Selecting how tape is For the different options available for cutting the tape, refer to fed and cut...
- Page 53 Press r so that the second number in the range displayed below BLOCK NO. is flashing. Press u or d until the desired block number is displayed (or use the number keys to type in the desired setting). Press n (or p). START appears in the Print Option menu. Press n (or p) to begin printing the specified number of labels.
-
Page 54: Storing And Recalling Files
Combining special printing functions Many of the special printing functions can be combined, depending on various conditions, such as which Label Type mode is selected or whether a template is being used. For example, by combining the operations for the Repeat Printing function and the Numbering function to print two copies of a label with “1”... -
Page 55: Recalling Text That Has Been Stored
If the maximum number of characters has already been stored, the error message “MEMORY FULL!” appears in the display. If this occurs, an existing text file must be deleted before the new one can be stored. If a file is already stored under the selected file number, the message “OVERWRITE?”... - Page 56 Press n. The message “OK TO CLEAR?” (or “CLEAR ALL?” if all files were selected) appears. Press n. The text stored in the selected files is deleted. If you do not wish to delete the selected text file(s), press instead of step To view other parts of the selected text file, press To remove a text file from those that are to be deleted, display the text file, and then...
-
Page 57: Machine Adjustments
Machine Adjustments Various functions are available for changing and adjusting the operation of the P-touch labeler. Selecting how tape is fed and cut The Cut function enables you to specify how the tape is fed out after it is printed. The settings of the Cut function consist of combinations of two different cut methods: cut-pause (where the machine stops printing so the label can be cut) and chain printing (where the last copy is not fed out to be cut, reducing the amount of tape that is wasted). -
Page 58: Adjusting The Display Contrast
Adjusting the display contrast The display can be made lighter or darker by selecting a setting between -2 and +2. (The default setting is 0.) Select a higher value to increase the contrast (make the display darker). Select a lower value to decrease the contrast (make the display lighter). Press g, then Z. -
Page 59: Specifying If The Personal Symbol Category Is Continually Updated
Press g, then Z. Press l or r until LENGTH ADJUST is displayed. Press u or d until the desired setting is displayed, and then press n. Specifying if the PERSONAL symbol category is continually updated You can specify whether symbols continue to be added to the PERSONAL symbol category (with the older symbols deleted) when the category becomes full (ON) or symbols are no longer added after the PERSONAL symbol category becomes full (OFF). -
Page 60: Cleaning
Cleaning Occasionally, certain parts of the P-touch labeler may need to be cleaned. Dust or dirt may become attached to the P-touch labeler’s print head and rollers, particularly when the unit is used outdoors or in a very dusty environment. With use, the tape cutter may become covered with adhesive, making it difficult to cut the tape. - Page 61 Notes on cleaning the print head & rollers If a blank horizontal streak appears through the label text, clean the machine’s print head. The print head can be cleaned more easily if the optional print head cleaning cassette (TZ-CL4) is used. Notes on cleaning the tape cutter If the tape cannot be cut correctly, clean the tape cutter blades.
-
Page 62: Using P-Touch Labeler With A Computer (For Pt-7600 Only)
Using P-touch Labeler With a Computer (for PT-7600 only) This P-touch labeler is equipped with a USB port, allowing you to connect it to a ® ® computer running Microsoft Windows . You will need to install the printer driver to use your printer with your computer. -
Page 63: System Requirements
CD-ROM Precautions Do not scratch the CD-ROM. Do not subject the CD-ROM to extremely high or extremely low temperatures. Do not put heavy objects on the CD-ROM or apply force to the CD-ROM. The software contained on the CD-ROM is meant for use with your purchased machine only. - Page 64 Installing the P-touch Editor 5.0 The installation procedure may change depending on the Operating System on your PC. Windows Vista® is shown here as an example. Start your PC making sure to log on as a user with Administrator privileges. Insert the CD-ROM into the CD-ROM drive.
-
Page 65: Installing The Printer Driver
Installing the Printer driver Read the contents of the “Before installing the printer driver” dialog box, and then check [Yes, confirmed] and click [OK]. The installation procedure for the printer driver differs depending on the operating system being used. ® - For Windows XP (page 50) ®... - Page 66 ® For Windows Vista / Windows When the message confirming installation of software published by Brother appears, click [Install]. When prompted, connect your P-touch labeler to the PC by using a USB cable, and then hold down g and press o to turn on...
-
Page 67: Uninstalling The P-Touch Editor 5.0
/ Windows From the “Control Panel”, go to “Programs” and open “Programs and Features”. The “Uninstall or change a program” window appears. ® For Windows Choose “Brother P-touch Editor 5.0”, and click [Remove]. ® ® For Windows Vista / Windows Choose “Brother P-touch Editor 5.0”, and click [Uninstall]. -
Page 68: Uninstalling / Replacing The Printer Driver
Choose ”Brother PT-XXXX”, and click ”File”-”Delete” or right click on the icon and then click [Delete]. ® ® For Windows Vista / Windows Choose ”Brother PT-XXXX”, or right click on the icon and then click [Delete] ® ® (Windows Vista ) / [Remove device] (Windows ®... -
Page 69: Using P-Touch Editor 5.0
® For Windows Click the ”Drivers” tab and choose ”Brother PT-XXXX”. Then, click [Remove]. Go to step ® For Windows Vista Click the ”Drivers” tab and choose ”Brother PT-XXXX”. Then, click [Remove...]. ® For Windows Click the ”Drivers” tab, and then click ”Change Driver Settings”. - Page 70 Only the first 999 rows of a database linked to a template are read by the P-touch labeler machine. Only the first line of text typed into a database field is read by the P-touch labeler machine. Therefore, if you wish to print from a database with more than one line of text, create the template and database with separate fields for each line of text.
-
Page 71: Starting P-Touch Editor
The Help files allow you to learn step by step how to create a label layout. • When you choose [Check for Updates] with a computer connected to the Internet, you will be taken to the Brother Solutions Center (http:// solutions.brother.com). Use the Brother Solutions Center to check for the latest... -
Page 72: Layout Window
Layout window Express Mode This mode provides easy label creation with text and images. The layout window consists of the following sections: 1Menu bar Commands are categorized under each menu (File, Edit, View, and Insert, etc.) by function. 2Command bar The command bar contains the New/Open, Paper, Text, Frame, Image, etc. - Page 73 Professional Mode This mode provides full-scale label creation for creating the templates. The layout window consists of the following sections: 1Menu bar Commands are categorized under each menu (File, Edit, View, and Insert, etc.) by function. 2Standard toolbar A group of frequently used commands (New Layout, Open, Save, Print, etc.) are provided in this toolbar.
-
Page 74: Starting P-Touch Editor Help
See the P-touch Editor Help for details. Starting P-touch Editor Help This section explains how to start P-touch Editor Help for Windows. The following is ® the example for Windows Vista Starting from Start button Click [Start]-[All Programs (or Programs)]- [Brother P-touch]-[P-touch Editor 5.0]. - Page 75 In the [New/Open] dialog, click [Help-How To]. Starting from P-touch Editor Click Help menu and choose P-touch Editor Help. Express Mode Professional Mode Starting from Snap Mode Right click the mouse and choose P-touch Editor Help.
-
Page 76: Transferring Data To/From A Computer
Printing the Help description The information given in P-touch Editor Help can be printed. Use your normal printer to print the P-touch Editor Help information. In the [Contents] tab, choose any topic you want to print. Click on the Toolbar. Choose the range of topics to be printed, and click [OK]. -
Page 77: How To Use P-Touch Transfer Manager & P-Touch Library
P-touch Library: This application allows you to manage P-touch labeler label templates and other data on the computer. Starting up P-touch Transfer Manager Click the [Start] button, then choose [All programs (Programs)] - [Brother P- touch] - [P-touch Tools] - [P-touch Transfer Manager 2.1]. P-touch Transfer Manager starts up. - Page 78 Layout window 1Menu Commands are categorized into each menu (File, Edit, View, Tool, and Help) by function. 2Toolbar There are icons for frequently used commands. Click on one to access that command. 3Selecting the printer model (Only for P-touch Transfer Manager) Select the printer model to send data to.
-
Page 79: Transferring Label Templates From The Pc
Explanations of the Icons Icon Button name Function Transfer Transfers the label templates and other data on your (Only for P-touch PC to the P-touch labeler (when connecting USB Transfer Manager) interface cable). Backup Backs up the data you have transferred to the P-touch (Only for P-touch labeler using the P-touch Transfer Manager. - Page 80 Drag the transfer data to the folder you created. Drag the transfer data from All contents, Layouts or another folder under Filter. When transferring multiple sets of data, you can move all the transfer data to the folder you created. Key Assign numbers are automatically assigned to transferred data inside the folder you made in the previous step.
-
Page 81: Adding A User-Defined Character Image To The Text
Click [OK]. The data in the folder selected in the folder view is transferred to the P-touch labeler. If you have selected specific data in the list view, only that selected data is transferred to the P-touch labeler. Adding a user-defined character image to the text If a user-defined character image (a bitmap character not usually available on the P- touch labeler) is assigned to a PF key, that character can be added to any label that you create on the P-touch labeler. - Page 82 Using a template not linked to a database Using a template not linked to a database is the same as using any of the preset Auto Format templates. For details on using Auto Format templates, refer to Using the pre- formatted Auto Format templates on page 33.
-
Page 83: Using Downloaded Database Data
If the Cut function is set to 1 or 3, the message “CUT TAPE TO CONTINUE” appears after each label is printed. Press the tape cutter button to cut off the label and continue printing. Be sure to cut the tape within 5 minutes from the time that the message appears. Selecting how tape is For the different options available for cutting the tape, refer to fed and cut... - Page 84 Searching the database To search for a specific record, refer to on page 70. Using database data in a Label Type mode This function enables you to select the range of database fields to print. Press a, and then select the Label Type mode as described in chapter 2. Press g, then a.
-
Page 85: Backing Up Label Templates
Searching the database While selecting a database record to be used in a template or while selecting a database record whose data is to be added to a label, the database can be searched for records containing specific characters or records with a specific number. To search the database for a record containing specific characters: Press g and e until the search screen is displayed. - Page 86 Select the P-touch labeler to back up from, then click The backup confirmation message is displayed. Click [OK]. A new folder with a name containing the current date is created inside the P-touch labeler folder, and all the P-touch labeler’s data is transferred to that new folder.
-
Page 87: Starting Up The P-Touch Library
Starting up the P-touch Library You can use the P-touch Library to access labels you wish to edit. Click the [Start] button, then choose [All programs (Programs)] - [Brother P- touch] - [P-touch Tools] - [P-touch Library 2.1]. The P-touch Library starts up. - Page 88 Check the items to be used as search conditions and set the search items. The search items that can be set are as follows. Settings Details This sets the method for combining multiple search items. If you choose Multiple Parameters AND, files are searched for those that satisfy all the conditions.
-
Page 89: Appendix
Appendix Resetting the P-touch Labeler You can reset the internal memory of your P-touch labeler when you want to clear all saved label files, or in the event the P-touch labeler is not working properly. Turn off the machine and then while holding down g and R, press o to turn the machine back on. - Page 90 Problem Cause Solution A label will not print if there is no Has text been entered? text entered. Is the tape cassette installed Check that the tape cassette is correctly, and is there enough tape installed correctly, and that there is remaining? enough tape remaining.
-
Page 91: Error Message List
Problem Cause Solution All files stored in the internal Have the batteries and AC adapter memory are lost if the batteries and been disconnected? AC adapter are disconnected for longer than two minutes. All data stored in the internal Label files saved Is there enough power remaining in memory is lost if the batteries previously are now empty. - Page 92 Error Message Cause Solution • Press n to use the • The message appears when changing from a different PANEL2 Label Type mode. Label Type mode to the All text is cleared. BLOCK NO. CHANGE PANEL2 Label Type mode • Press b to select a CLEAR TEXT? and the current block number is different from the...
- Page 93 Error Message Cause Solution On 3/4" (18 mm) tape: • This message appears if you • Reduce the number of lines CHECK THE NUMBER try to print or use the or install a wider tape. OF LINES! 5 MAX Preview function when the number of lines in the text is greater than the maximum On 1/2"...
- Page 94 Error Message Cause Solution • This message appears if a • Install a 3/4" (18-mm)-wide INSERT 3/4" TAPE tape cassette. 3/4" (18-mm)-wide tape cassette is not installed when printing an Auto Format template created for 3/4" INSERT 18mm TAPE (18-mm)-wide tape. •...
- Page 95 Error Message Cause Solution • This message appears if no • Store a text file before trying files are stored in the to recall or delete one. NO FILES! memory when you try to recall or delete one. • Press n to reduce. •...
-
Page 96: Machine Specifications
Machine Specifications Main Unit Item Specification Input Device Keyboard (56 key) Display 16 characters x 2 lines (132 dot x 48 dot) * Line indicator and 15 characters = 16 characters LCD Contrast 5 levels (+2, +1, 0, -1, -2) Back light Printing Print method... - Page 97 Item Specification Characters Internal character set Total of 373 characters (62 alphanumeric, 164 sym- bols, 147 accented characters.) Text buffer Maximum 512 characters. Fonts Helsinki Character size Auto*, 48 pt, 36 pt, 24 pt, 18 pt, 12 pt, 9 pt, 6 pt * 62 pt Maximum (one line of only uppercase text and numbers on 1"...
-
Page 98: Operating Environment: Windows® (For Pt-7600 Only)
Item Specification Other Operating tempera- ° 50 ~ 95 F / 20 ~ 80% humidity (without ture / humidity condensation) ® Operating Environment: Windows (for PT-7600 only) Item Specification ® ® ® ® Microsoft Windows XP/Windows Vista / Windows Memory ®... -
Page 99: Index
Index Contrast function......43 copies ........... 35 AC adapter ........5 cursor..........20 Accent function......22 Cut function ........42 alignment ........33 cut-pause ........42 arrow keys......4, 19, 20 Auto Format function ....33 Auto Reduction function ....43 database record range .... - Page 100 length adjustment......43 Length function ......28 indicators ........4 length indicator ....... 4 block number ......4 local formatting bold text style ......4 character size ......30 Caps ..........4 character style ......32 center text alignment ....4 character width ......
- Page 101 P-touch Editor troubleshooting ......74 starting ........54 template ........66 uppercase letters ......20 user-defined character image ..66 recalling ........40 Repeat Printing function ....35 return key ......4, 19, 21 version .......... 44 right text alignment ....... 33 Vertical mode........
-
Page 102: Contact Information (For Usa Only)
For purchasing accessories and certain Brother products: http://www.brothermall.com Accessories and Supplies To order Brother accessories or supplies by Visa, MasterCard, Discover or American Express, you may call toll free 1-877-552-MALL (6255), or complete the order form in your user's guide and fax both sides of the form to 1-800-947-1445. - Page 103 Printed in China Impreso en China LW5478001...
Need help?
Do you have a question about the P-Touch PT-7500 and is the answer not in the manual?
Questions and answers