
Related Manuals for Omron Walking styleX


Summary of Contents for Omron Walking styleX
- Page 1 Step counter Walking style • Instruction Manual • Mode d’emploi • Gebrauchsanweisung • Manuale di istruzioni IM-HJ-304-E-01-05/08 5320903-8B...
- Page 3 1 Introduction The OMRON Walking style X can measure the intensity and amount of exercise from your walking, in addition to measuring the number of steps and the number of calories burned. This makes it a useful guide for planning an exercise program based on the intensity and amount of activity.
- Page 4 2 Use of the OMRON Walking style X 2.1 Cautions • Contact your doctor or healthcare provider before beginning a weight reduction or exercise program. • Keep the unit out of the reach of young children. • If young children swallow any small piece, immediately consult a doctor.
-
Page 5: Know Your Unit
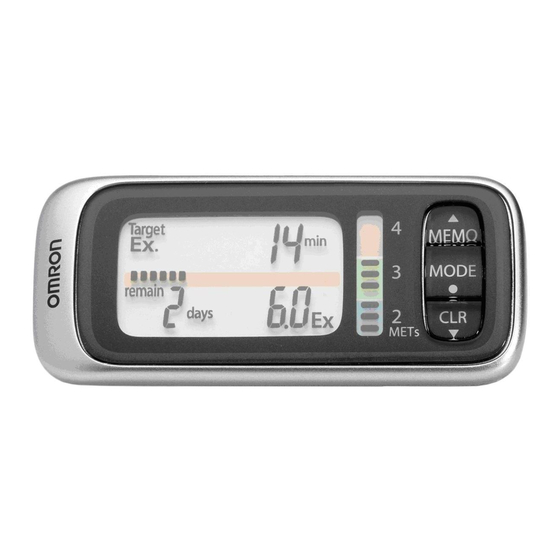
4 Know your unit ■ Main Unit MEMO (Memory) button MODE button CLR (Clear) button Display (Back of unit) Battery cover SET button Battery cover Strap screw attachment ■ Display Remaining Ex required indicator (Refer to Chapter 7.2) Walking intensity (METs) indicator (Refer to Chapter 7.2) Battery low... - Page 6 Depending on the material, the clip may cause damage or scratches to your clothes if it is attached or removed roughly. 6.2 How to attach the OMRON Walking style X We recommend attaching the unit to your belt, your pocket, your bag or hanging it from your neck.
- Page 7 Do not hang the unit from your waist or a bag. 6.3 Actual use of the OMRON Walking style X 1 Start walking. Note: In order to avoid counting steps that are not part of a walk, the unit does not display the step count for the first 4 seconds of walking.
- Page 8 7 Checking the measurement result 7.1 Button operation flow Press to change the display. Target display (Refer to Chapter 7.2) Ex steps/Ex quantity display (Refer to Chapter 7.2) Step count/Time display (Refer to Chapter 7.2) Calories/Distance display (Refer to Chapter 7.2) Trip steps display (Refer to Chapter 7.2) ■...
-
Page 9: Target Display
7.2 About the individual displays Target display This displays your progress towards the 21 Ex per week. This helps you achieve your goal. Time required to reach Remaining Ex required indicator Ex target This scale has 21 segments. Each This displays the amount segment = 1 Ex, and the segments of walking time (minutes) count down to the target as you... - Page 10 Step count/Time display Steps Time Calories/Distance display Calories burned Distance walked Trip steps display Trip steps In addition to the normal step count, this counts the number of steps since the step count was reset. This is useful for counting the number of steps for an event, etc.
-
Page 11: Memory Function
8 Memory function The measurements for each day (steps, calories burned, distance walked, Ex steps, and Ex quantity) are automatically stored in memory and reset to 0 at midnight (0:00) each day. 8.1 Recall data (Except for the Trip steps display) 1 Press to select the type of display you want to see. -
Page 12: Reset Function
9 Reset function 9.1 Resetting the weekly target Reset the weekly target if you want to change the day from which the weekly target starts. 1 Press repeatedly untill the Target display is selected. 2 Press for at least 2 seconds. •... -
Page 13: Battery Life And Replacement
10 Battery life and replacement If the symbol blinks or appears on the display, replace the battery with a new (CR2032) battery. Blinking Battery power is low. Appears Battery power exhausted. continuously The unit stops counting steps. Notes: • Do not replace the battery around midnight (0:00). The measurement results of the day when the battery was removed will be added to the measurement results for the day the battery was inserted. -
Page 14: Deleting All Settings
10.1 Replacing the battery 1 Loosen the screw of the battery cover on the back of the unit, and remove the battery cover by pulling it off in the direction of the arrow. Use the supplied screwdriver or use a small screwdriver to loosen the screw on the battery cover. -
Page 15: Maintenance And Storage
Please observe the following storage conditions. • Do not disassemble or modify the unit. Changes or modifications not approved by Omron Healthcare will void the user warranty. • Do not subject the unit to strong shocks or vibrations, drop it, step on it, or leave it at an angle. -
Page 16: Trouble Shooting
13 Trouble shooting Phenomenon Cause Rectification Insert a new 3V lithium Battery weak or battery type CR2032 Blinks or appears exhausted. (refer to Chapter 10.1). continuously. Polarities of Insert battery in correct battery (+ and -) alignment (refer to aligned in wrong Chapter 10.1). -
Page 17: Technical Data
These specifications are subject to change without notice. * New battery life based on OMRON testing. OMRON HEALTHCARE EUROPE B.V. guarantees this product for 2 years after date of purchase. The guarantee does not cover battery, packaging and/or damages of any kind due to misusage (such as dropping or physical misuse) caused by the user. - Page 18 Correct Disposal of This Product (Waste Electrical & Electronic Equipment) This marking shown on the product or its literature, indicates that it should not be disposed of, with other household wastes at the end of its working life. To prevent possible harm to the environment or human health from uncontrolled waste disposal, please separate this from other types of wastes and recycle it responsibly to promote...
- Page 19 OMRON HEALTHCARE CO., LTD. Manufac- 24, Yamanouchi Yamanoshita-cho, turer Ukyo-ku, Kyoto, 615-0084, Japan OMRON HEALTHCARE EUROPE B.V. EU-repre- Kruisweg 577, sentative 2132 NA Hoofddorp, The Netherlands www.omron-healthcare.com OMRON DALIAN CO., LTD. Produc- Economic & Technical Development Zone tion facility Dalian 116600, China OMRON HEALTHCARE UK LTD.
Need help?
Do you have a question about the Walking styleX and is the answer not in the manual?
Questions and answers