Table of Contents
Advertisement
Quick Links
INSTRUCTION MANUAL
Pedometer
Model: HJ-325
Alvita Ultimate
HJ-325-ZB
5341974-1A
INTRODUCTION
Thank you for purchasing the OMRON HJ-325 Pedometer.
Fill-in for future reference
DATE PURCHASED: ___________
• Staple your purchase receipt here
• Register your product online at
www.register-omron.com
This Pedometer features advanced 3D Smart Sensor
technology - so it knows exactly when you're taking a step.
It's more accurate than other pedometers which use a
simple pendulum design. Use this in your pocket, bag or on
your hip for added convenience. Use this unit everyday to
monitor your fitness achievements! Your Pedometer comes
with the following components:
Pedometer
Battery (CR2032 installed)
Strap
Clip
Holder
Instruction Manual
Please read this instruction manual thoroughly before using
the unit. Please keep for future reference.
IMPORTANT SAFETY INFORMATION
To assure the correct use of the product basic safety
measures should always be followed including the
warnings and cautions listed in this instruction manual.
SAFETY SYMBOLS USED IN THIS
INSTRUCTION MANUAL
Indicates a potentially hazardous situation
WARNING
which, if not avoided, could result in death or
serious injury.
Indicates a potentially hazardous situation
which, if not avoided, may result in minor or
CAUTION
moderate injury to the user or patient or
damage to the equipment or other property.
OPERATING THE DEVICE
Contact your physician or healthcare provider before
beginning a weight reduction or exercise program.
Keep the unit out of the reach of young children. The
unit contains small pieces that may be swallowed.
Immediately contact your physician if any piece is
swallowed.
Please use caution when wearing the unit around your
neck so as to avoid possible strangulation. Do not place
the unit around the neck of children.
If battery fluid gets in your eyes, on your skin or
clothing immediately rinse with plenty of clean water.
Contact a physician immediately.
Read all information in the instruction manual and any
other literature included in the box before using the
unit. Operate the unit only as instructed. Do not use for
any other purpose.
Do not insert the battery with the polarities in the
wrong direction.
Do not throw the battery into fire. The battery may
explode.
Dispose of the device, battery, and components
according to applicable local regulations. Unlawful
disposal may cause environmental pollution.
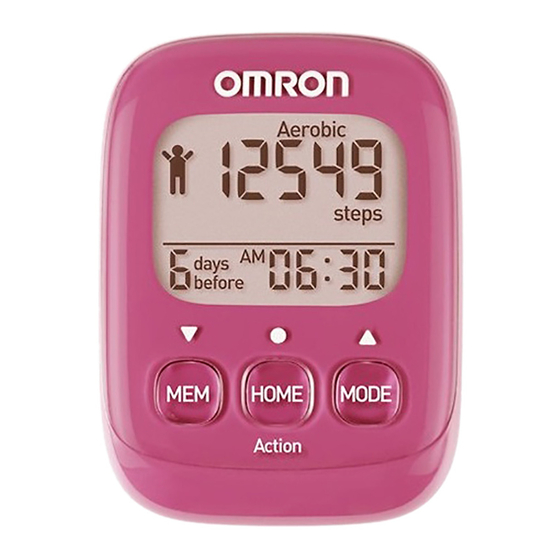
KNOW YOUR UNIT
Front of unit
Display
Low battery
indicator
/▼ button
/ ▲button
/ ● button
NOTE:
Remove the protective film from the face of the unit.
Back of the main unit
Strap attachment
Battery cover
Battery cover lock
Components
Strap and Clip
How to attach
How to connect
How to release and
the strap to the
the strap and
fasten with a clip
main unit
the clip
Create a loop
to attach the
strap.
To release To fasten
Holder
Attach/remove the holder as illustrated below.
OPTIONAL STRIDE LENGTH
MEASUREMENT
This pedometer contains a feature to calculate your walking
stride, if you would like to adjust it, please follow these
instructions.
How to measure your stride length
1. Walk 10 steps with your normal stride as
illustrated below.
2. Measure the distance from START to END in
inches.
3. Calculate your stride length by dividing the total
distance by 10.
Example:
Total distance = 320''
320 ÷ 10 = 32 inches (2 feet 8 inches)
Conversion Chart
12 inches = 1 foot
24 inches = 2 feet
36 inches = 3 feet
48 inches = 4 feet
SETTINGS
The unit comes with the battery installed. When you use the
unit for the first time, follow the steps below. For setting
range details refer to "SPECIFICATIONS".
NOTE:
If the initial settings are not correct, the measurement
results may not be accurate.
1. Press and hold any button for 2 seconds.
After "HELLO" has been displayed, "lb" and "kg"
flash on the display.
2. Setting the weight units.
A) Press
or
to select
A)
the mode.
B) Press
to confirm the
setting.
3. To set the height/stride
length unit, repeat steps A)
B)
and B) in step 2 above.
4. To set the distance unit,
repeat steps A) and B) in
step 2 above.
5. Setting the weight.
A) Press
or
to select the desired value for a
setting.
• Press
(
) to advance (go back) one.
• Hold
(
) down to advance (go back)
rapidly.
B) Press
to confirm the setting.
6. To set the height, repeat steps A) and B) in step 5
above.
7. To set the stride length, repeat steps A) and B) in
step 5 above.
8. To set the hour, repeat steps A) and B) in step 5
above.
9. To set the minute, repeat steps A) and B) in step 5
above.
All the settings are completed.
Adjust the settings
1. Press and hold
and
at the same time.
"lb" or "kg" flash on the display.
2. Follow the procedure from step 2 of "SETTINGS".
USING THE UNIT
The unit accurately counts in a pocket, bag or anywhere you
want to put it. The unit may be placed in the upper front
pocket of your clothing, in the front pocket of your pants, in
a bag, or attached to your belt or pants.
Simply bring the unit with you wherever you go.
NOTE:
In order to avoid counting steps that are not part of a walk,
the unit does not display the step count for the first
4 seconds of walking. If you continue walking for more
than 4 seconds, it displays the step count for the first
4 seconds and then continues to count.
The unit may not count steps correctly in the
following conditions:
1. The unit moves irregularly.
• When the unit is placed in a bag and the bag moves
irregularly.
• When the unit swings from your belt, the top of
your pants or a bag.
2. Walking at an inconsistent pace.
• When you shuffle or wear sandals.
• Starting and stopping or other forms of inconsistent
walking.
3. Up and down movement.
• Standing up and/or sitting down
movement.
• Playing sports other than walking.
• Ascending or descending
movement on stairs or on a steep
slope.
4. Vibrations from a moving vehicle.
• Such as riding a bicycle, automobile, train or bus.
5. Walking extremely slowly.
READING THE CURRENT DISPLAY
Press
to view the various measurements.
Step count display
Distance display
Calories display
Aerobic steps display
Calories
By measuring the intensity of your activity, the unit can
calculate the amount of calories burned.
Aerobic steps
Aerobic steps are the physical exercise that helps us stay
healthy. Aerobic steps are counted separately when
walking more than 60 steps per minute and more than 10
minutes successively. If a rest of less than 1 minute is taken
after a continuous walk of more than 10 minutes, this will
be regarded as part of "a continuous walk".
The battery saving mode
After 5 minutes with no button being pressed, the display
will automatically turn off. However, the unit continues
counting steps. This mode extends the battery life.
Press
,
or
to activate the display again.
MEMORY FUNCTION
The unit stores up to 7 days of data on the unit. The current
day's data is automatically stored in memory when the time
reaches 12:00AM (0:00). The display will return to 0.
NOTE:
The time must be correctly set in the unit.
1. Press
to select the type of measurement you
want to see (steps, distance, etc.).
2. Press
to view the results (days 1-7) in memory.
The display changes with each press of
as shown below.
NOTE:
If no button is pressed for more than 1 minute, the display
will return to the current day's data.
Advertisement
Table of Contents

Related Manuals for Omron HJ-325


Summary of Contents for Omron HJ-325
- Page 1 5341974-1A After “HELLO” has been displayed, “lb” and “kg” flash on the display. Distance display INTRODUCTION Thank you for purchasing the OMRON HJ-325 Pedometer. /▼ button / ▲button 2. Setting the weight units. Fill-in for future reference / ● button...
- Page 2 SPECIFICATIONS LIMITED WARRANTY Low battery indicator Follow the procedure below to delete all the previous Your OMRON HJ-325 Pedometer, excluding the battery, is Model: HJ-325 When the low battery indicator appears on the display, measurement results and settings, including the time,...
Need help?
Do you have a question about the HJ-325 and is the answer not in the manual?
Questions and answers