Omron Walking Style HJ-113 Instruction Manual
Pocket
Hide thumbs
Also See for Walking Style HJ-113:
- Instruction manual (2 pages) ,
- User manual ,
- Instruction manual (2 pages)
Table of Contents
Advertisement
Advertisement
Table of Contents

Subscribe to Our Youtube Channel
Related Manuals for Omron Walking Style HJ-113


Summary of Contents for Omron Walking Style HJ-113
- Page 1 INSTRUCTION MANUAL Pocket Pedometer HJ-113 Model...
-
Page 2: Table Of Contents
CONTENTS Before Using the Unit Introduction ..................3 Important Safety Information............4 Know Your Unit ................6 Main Unit ................6 Components ................7 Aerobic Step Function ..............8 Calorie Display ................8 Stride Length Measurement .............9 Operating Instructions Battery Installation .................10 Battery Replacement ..............11 Setting the Time ................12 Setting the Weight ................14 Setting the Stride Length..............15 Attaching the Pedometer ..............16... -
Page 3: Before Using The Unit
Before Using the Unit INTRODUCTION Thank you for purchasing the Omron HJ-113 Pocket Pedometer. ® Fill-in for future reference DATE PURCHASED: ______________ Staple your purchase receipt here. A pedometer is a great motivational tool to track your distance, the number of steps you take and how many calories you burn. -
Page 4: Important Safety Information
IMPORTANT SAFETY INFORMATION To assure the correct use of the product basic safety measures should always be followed including the warnings and cautions listed in this instruction manual. SAFETY SYMBOLS USED IN THIS INSTRUCTION MANUAL Indicates a potentially hazardous situation which, if not avoided, could result in death or WARNING serious injury. -
Page 5: Care And Maintenance
IMPORTANT SAFETY INFORMATION Use only Omron authorized parts and accessories. Parts and accessories not approved for use with the device may damage the unit. CARE AND MAINTENANCE Do not disassemble or modify the unit. Changes or modifications not approved by Omron Healthcare will void the user warranty. -
Page 6: Know Your Unit
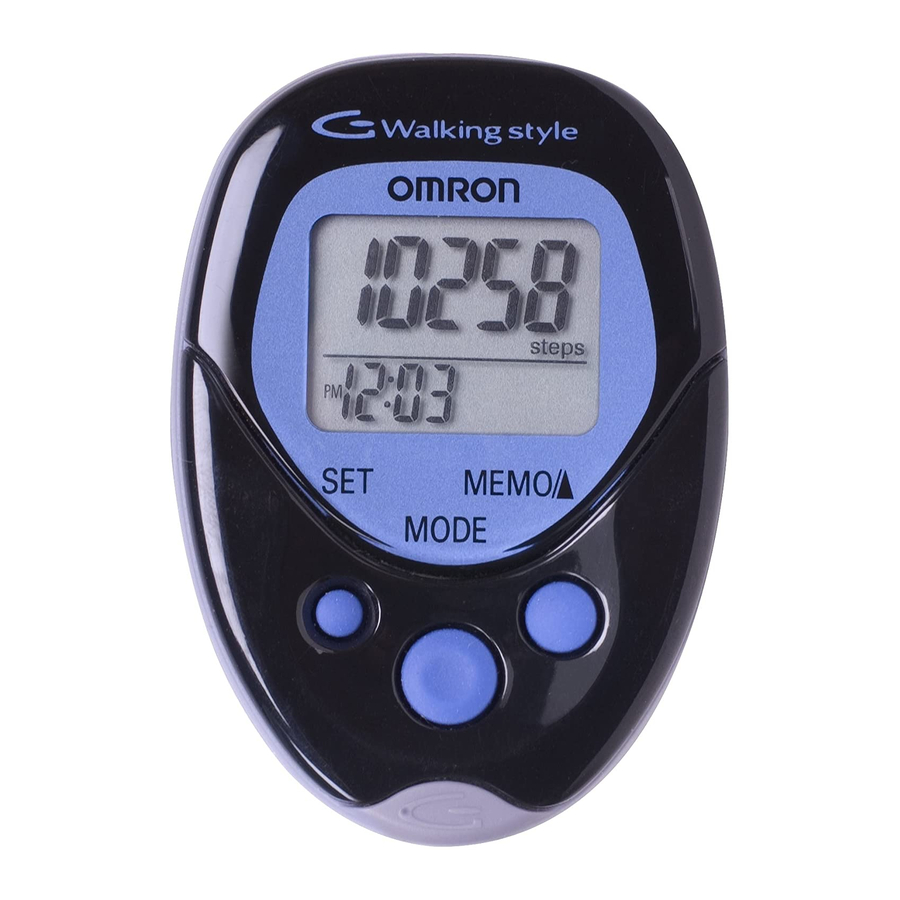
KNOW YOUR UNIT KNOW YOUR UNIT Main Unit Display SET Button MEMO/▲ Button Holder MODE Button Strap Clip Back of the main unit SYSTEM RESET Button Battery Cover Screw of Battery Cover... -
Page 7: Components
KNOW YOUR UNIT Components Holder Use this holder when attaching the unit to your belt or the top of your pants. 1) Attach the main unit 2) Fasten the holder clip to the holder. to your pants. Holder Clip How to attach the strap How to connect the strap and the to the main unit clip... -
Page 8: Aerobic Step Function
AEROBIC STEP FUNCTION The unit displays the total number of aerobic steps in a day that satisfies the following two conditions: (The total duration you walked as the number of aerobic steps is also displayed.) • Walk more than 60 steps per minute •... -
Page 9: Stride Length Measurement
STRIDE LENGTH MEASUREMENT Measure your stride length before beginning to set the pedometer. How to measure your stride length 1. Walk 10 steps with your normal stride as illustrated below. 2. Measure the distance from START to END in inches. 3. -
Page 10: Operating Instructions
Operating Instructions BATTERY INSTALLATION Remove the Screw on the Battery Cover located on the back of the main unit. Use the supplied screwdriver or use a commercially available small screwdriver to remove the screw on the battery cover. Open the Battery Cover. Insert the battery. -
Page 11: Battery Replacement
BATTERY REPLACEMENT When the battery is removed from the unit the settings and all data stored in the memory will be erased. Be sure to write important memory data in a notebook. Low Battery Indicator NOTES: • When the Low Battery Indicator starts to blink, the unit stops counting, the value of the latest number of steps is turned on, and the time is displayed as ''_:_ _''. -
Page 12: Setting The Time
SETTING THE TIME Setting range: 12:00 AM-11:59 PM Install the battery. (Refer to “Battery Installation” on page 10) The hour flashes on the display. If the MEMO/▲ or SET Button is not pressed for 5 minutes, complete setting and display the number of steps and time. - Page 13 SETTING THE TIME Press the SET button to set the minute. The weight flashes on the display.
-
Page 14: Setting The Weight
SETTING THE WEIGHT Setting range: 70 to 300 lb. The weight flashes on the display. Press the MEMO/▲ Button to advance by increments of 1 lb. Press and hold the button to advance weight in 10 lb increments. NOTE: Press the MODE Button to return the weight to 88. -
Page 15: Setting The Stride Length
SETTING THE STRIDE LENGTH Setting range: 1'00'' to 4'00'' feet The stride length flashes on the display. Press the MEMO/▲ Button to advance by increments of 1 inch. Press and hold the button to advance the stride in 4 inches increments. NOTE: Press the MODE Button to return the stride length to 1'08''. -
Page 16: Attaching The Pedometer
ATTACHING THE PEDOMETER The unit may be placed in the upper front pocket of your clothing, in the front pocket of your pants, in a bag, or attached to your belt or pants. Place the unit in your pocket. Do not place the unit in the back pocket of your pants. Attach the clip on the edge of your pocket to prevent the unit from dropping. - Page 17 ATTACHING THE PEDOMETER The unit may not count steps correctly in the following conditions: 1. The memory is displayed or the unit is being set. 2. The unit is not positioned correctly. • When the front of the main unit is placed in the angle of less than 60°...
-
Page 18: Changing The Display
CHANGING THE DISPLAY Press the MODE Button to change the display Each time you press the MODE Button, the display will change. Number of Calories with aerobic steps amount of fat Number of steps Distance with minutes burned... -
Page 19: Using The Memory Function
USING THE MEMORY FUNCTION This unit can store up to seven days of data for the number of steps, number of aerobic steps, calories and distance. The data is stored starting with the oldest day. The current day data is automatically stored in memory when the time reaches 12:00AM. -
Page 20: Using The System Reset Function
USING THE SYSTEM RESET FUNCTION Use the SYSTEM RESET function in the following cases: • When the battery is replaced • When you want to delete the memory • When the display becomes unrecognizable Press the SYSTEM RESET Button on the back of the main unit with a thin stick that is not easily breakable. -
Page 21: Care And Maintenance
Remove the battery if the unit will not be used for three months or longer. Always replace the battery with a new one. Use the unit consistent with the instruction provided in this manual. CAUTION Changes or modification not approved by Omron Healthcare will void the user warranty. -
Page 22: Troubleshooting Tips
TROUBLESHOOTING TIPS Problem Cause Solution The battery is low The Low Battery Replace the battery with or worn. Indicator blinks. a new one (CR2032). Insert the battery in The polarities of correct alignment. battery (+ and -) Refer to BATTERY are aligned in the INSTALLATION on page Nothing is... -
Page 23: Specifications
SPECIFICATIONS Model: HJ-113 Power Supply: 3 VDC (1 lithium battery CR2032) Measurement Range: Steps: 0 to 99,999 steps Aerobic Steps: 0 to 99,999 steps Minutes for Aerobic Steps: 0 to 1,440 minutes Calories: 0 to 99,999 kcal Amount of Fat Burned: 0.0 to 199.9 g Distance: 0.00 to 999.99 miles... -
Page 24: Fcc Statement
FCC STATEMENT NOTE: POTENTIAL FOR RADIO/TELEVISION INTERFERENCE (for U.S.A. only) This product has been tested and found to comply with the limits for a Class B digital device, pursuant to part 15 of the FCC rules. These limits are designed to provide reasonable protection against harmful interference in a residential installation. -
Page 25: Warranty
WARRANTY Limited Warranty Your Omron HJ-113 Pocket Pedometer, excluding the battery, is warranted to be free from defects in materials and workmanship appearing within 1 year from the date of purchase, when used in accordance with the instructions provided with the unit. -
Page 26: Notes
NOTES... - Page 27 NOTES...
- Page 28 Manufactured for : OMRON HEALTHCARE Co., Ltd. Distributed by : OMRON HEALTHCARE, INC. 1925 West Field Court Lake Forest, IL 60045 U.S.A. www.omronhealthcare.com © 2012 OMRON HEALTHCARE, INC. Made in China 9058776-0B...
Need help?
Do you have a question about the Walking Style HJ-113 and is the answer not in the manual?
Questions and answers