Table of Contents
Advertisement
Quick Links
Advertisement
Table of Contents

Related Manuals for M3 Mobile MC-6200S


Summary of Contents for M3 Mobile MC-6200S
- Page 1 User’s Manual Ver 1. 4E (MC-6200S)
- Page 2 The content of the manual is provided “as-is” and be subject to change at any time without notice. M3 MOBILE Co., Ltd. makes no warranty of any kind with regard to this manual, including, but not limited to, the implied warranties of merchantability and fitness for a particular purpose, Programs in this product are subject to copyright protection.
- Page 3 Danger 1. Never attempt to alter or modify the construction of the device or its components in any way. It may cause fire, injury, electric shock, or serious damage to user or the device itself. 2. Do not use this product in a potentially explosive environment or near inflammable gases.
-
Page 4: Table Of Contents
Content 1. Greetings ..............7 Components ......................7 How to use the manual ....................7 2. Introduction of M3 ........... 8 Overview of M3 ......................9 How to charge ....................11 Input button function ....................12 Reset button function ....................13 Soft Reset ...................... - Page 5 Watch ....................... 46 Alarm ........................ 47 Network and Dial-up Connections ................47 How to make new connection in M3 ................. 48 How to set up high-speed internet with M3 Modem ........48 Display ........................54 Desktop ......................54 Setting ......................54 Volume and Sound ....................
- Page 6 9. How to use application software ......89 Calculator ........................ 89 Image Viewer ......................90 10. How to use utility programs ......... 91 Menu Setting (Menus)....................92 Backlight ........................92 Button setting (Buttons) ................... 92 MS-Backup ......................93 Quick start (Qstart)....................94 Task Manager ......................
-
Page 7: Greetings
1. Greetings Congratulate your purchase of M3 MOBILE Co., Ltd.‟s M3. M3 is a palm-size PC using the Windows CE 4.2(CE.NET). M3 helps you to keep abreast of important business and/or personal information and is easy to handle. M3 adopts Microsoft Windows CE 4.2(CE.NET), which is one of the latest operation systems. -
Page 8: Introduction Of M3
2. Introduction of M3 M3 is a palm-size PC based on the Windows CE 4.2(CE.NET) operating system and powered by XScale PXA255 processor and 16 bits color TFT-LCD screen. “Microsoft Windows Powered Logo” is a Windows OS of Microsoft Corporation and offered by the corporation for built-in system device in operation. -
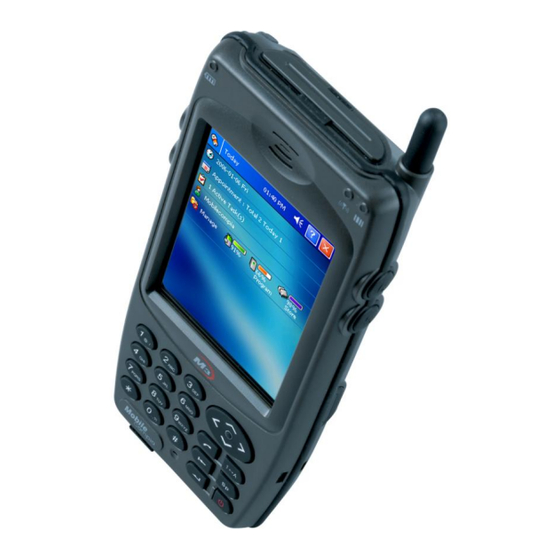
Page 9: Overview Of M3
Overview of M3 The pictures below provide information on M3‟s various buttons, ports and other functions. Laser scanner window CF/SD extension slot Camera window Antenna Function Key Stylus pen Camera button Touch Scanner screen button Reset switch Navigation button Infrared communication Port (IrDA) LCD power... - Page 10 LED status: LEDs show the current status of M3. LED signals present as follows: Classification LED status Description On charge Charge LED Green Charge completed Flashing Blue GSM/GPRS standby mode(Within a phone/internet accessible area) GSM/GPRS Kept blue GSM/GPRS communication mode (Voice, or internet in use). status LED Blue OFF GSM/GPRS turned off or out of coverage area...
-
Page 11: How To Charge
Body charge LED Additional battery Additional Warning: battery Plug in as DC 5V charge LED sticker directs upwards picture shows. [Charge in the cradle] [Charge through the additional charger] To confirm the completion of the battery charge, check out the color of the upper left LED in the terminal in case of the built-in battery or the lower right LED in the cradle for the additional battery. -
Page 12: Input Button Function
Input button function The following is the description of M3 hardware function buttons and other interfaces. Hardware Input function Input Action Function Power button Press Power On/Off Press and hold Back light On/Off ESC button Escape function Press Function button Function mode change Press Scanner button... -
Page 13: Reset Button Function
Function button: It is used to change the Function Mode. Every time your press you can confirm the change of mode by looking at the Function Icon on the tray bar. Navigation button: It consists of up, down, left, and right movement. Press the Movement button to select an icon or item on the display or make a movement in documents. -
Page 14: Hard Reset
Hard Reset If you encounter serious application program problems in M Device or a problem unsolved by soft reset, you must restart M3 with hard reset. If you press the reset button for more than 4 seconds, the screen will fade out. It will turn off all powers. After that if you press the reset button once again, the system will enter the hard reset mode and re-load OS in the flash ROM. -
Page 15: Usb Cradle
USB Cradle ‟s USB Cradle supports charging function and USB port connection. ‟s USB cradle: The following procedure describes how to connect M 1. Connect the battery charger to USB cradle. 2. Connect the battery charger to the power outlet. 3. -
Page 16: Getting Started
3. Getting started This chapter explains the way to use M3 for the first time. Take the following procedure. 1. Click the Reset button: Unpack the M3 package. When using it for the first time, the battery power is not connected to M3. If you lightly click the Reset button, the battery power is automatically connected to M3. - Page 17 Warning: Plug in as the DC 5V sticker to be upward as the picture! 3. Set up the stylus pen: When M3 is started, on-screen Set-up Wizard will appear. (The on-screen set-up wizard will also appear after a hardware reset) The Set-up Wizard will arrange the tough screen.
-
Page 18: How To Connect To A Desktop Pc
4. How to connect to a desktop PC To be able to properly manage abundant data and files, you need to link M3 to either desktop PC or notebook. This chapter describes the ways to connect M3 and desktop PC, to conduct synchronization and to transmit data and files. -
Page 19: Microsoft Activesync
Microsoft ActiveSync Understanding of ActiveSync program Sync is an abbreviation of “Synchronization” and refers to the process of making data in PDA and desktop computer to be same by linking both data. By linking M3 and computer, you can make data in both devices in the same status (synchronization) or install, copy, move, delete programs for business purpose and others. -
Page 20: How To Connect M3 To Activesync
How to connect M to ActiveSync Connect M3 to a desktop PC using a USB cable. Make the partnership between desktop PC and M3 through ActiveSync, then proceed with the synchronization of desktop PC and M3. Use a USB cable to link M3 to the desktop PC. The table below shows available communication devices (USB, serial, infrared) according to operation system. -
Page 21: How To Set Up A Partnership
How to set up a Partnership When you first connect M3 to the desktop computer, Microsoft ActiveSync will ask you if you are going to set up a partnership. Once the partnership set-up is finished, you can synchronize data with M While M can set up the partnership with two desktop computers, the email message can be received only through one computer. - Page 22 4. Window for setting up synchronization appears. To synchronize specific kind of data, select the item then click next. Most popular items include Calendar (schedule), Contacts (contact numbers), Tasks (works), and Xinbox (email, mail box). We recommend you to select and use these items. In the item list, two types of email items are available: Inbox and Xinbox.
-
Page 23: How To Connect M3
How to connect M3 How to synchronize data If you see the Microsoft ActiveSync window in the desktop PC, you can find an option icon. If you click this option icon, taps such as “Sync Options”, “Sync Mode”, “Rules” will appear. “Sync Options” is a menu that you can select an item to synchronize. “Sync Mode”... -
Page 24: How To Search M3 Contents In A Desktop Pc
For those items that cannot complete synchronization without user intervention, ActiveSync and portable device display them as “not completed” 1. Connect M3 to the desktop computer and carry out synchronization. 2. When there are not completed items, click Resolve items in Tools menu. 3. -
Page 25: Overview Of Microsoft Windows Ce 4.2
5. Overview of Microsoft Windows CE 4.2 This chapter will deal with Microsoft Windows CE 4.2(CE.NET Korean version), which is the operating system of M The content of Microsoft Windows CE 4.2(CE.NET Korean version) introduced in this chapter is as follows: ... - Page 26 After emptying the recycle bin, you cannot restore files and data previously in the recycle bin. So be careful when you delete files, data in the bin. Warning Internet explorer: Search the web or intranet. Microsoft Internet Explorer can search the web or intranet of companies. M uses Microsoft Pocket Internet Explorer 6.0.
-
Page 27: Taskbar
Taskbar Windows CE 4.2(CE.NET)‟s taskbar is designed to be simple and user-friendly. The picture below shows the configuration of the taskbar. Start icon Taskbar Start Icon Start icon is the starting point of M program. If you point the start menu with the stylus pen, you can see various menus including program, bookmark, document, setting, help, and operation. -
Page 28: Taskbar
Taskbar Taskbar shows a variety of information including how to key in character, battery, network connection, status of running programs, etc. If you press and hold the taskbar with the stylus pen, the right button function menu will appear. The right button function menu is composed of task manager and features. For more information on the task manager, refer to the cheaper 9. - Page 29 Screen rotation: It changes the direction of screen. Screen rotation feature let you use your M3 display in either portrait or landscape mode. To rotate the screen: 1. Press the short-cut icon and select the screen rotation. 2. Run application programs. You can use this function in various programs such as My Computer, Media player, My Documents, Internet Explorer, Microsoft WordPad, Image Viewer, Personal organizer Management, etc.
- Page 30 To use infrared communication: 1. Locate M Infrared communication port to be in series with an infrared (IrDA) 3‟s port with other device. 2. Press a short cut icon > Infrared communication menu. 3. Infrared communication program is started and the connection status message will appear as the picture above.
- Page 31 Wireless LAN: You can use internet with Wireless LAN. Wireless LAN supports IEEE 802.11b. How to make a connection with Wireless LAN: 1. Turn on the AP (Access Point) which supports IEEE 802.11b. 2. TAP on „WLAN ON‟under QUICK MENU icon on the tray bar. 3.
- Page 32 Transcriber: When you want to key in characters in making document or setting, start Transcriber. Using the stylus pen to draw characters you want on the input panel, this program will recognize the characters by itself and transform them into typeface characters. To start the Transcriber, run the program as the following order: start →...
- Page 33 Keyboard: Press this icon to activate the keyboard input. Upper/lower case Selection: Press this icon to change upper and lower case letter. If you select upper case, capital letter and its character will appear on the number key pad. It serves the same function with Shift key.
- Page 34 Status Indicator Icon: The following is a list of icon that can appear on the taskbar‟s status area of M3. Status indication icon on the taskbar Icons Details Low battery. Battery in charging. Connected to Desktop PC by USB Quick connection icon Phone program icon Function Status icon Bluetooth Status / Menu icon...
-
Page 35: How To Use Bluetooth
6. How to Use Bluetooth Bluetooth Power On/Off - The user can on/off the power of Bluetooth by selecting the Bluetooth Tray Icon. <Bluetooth ON> <Bluetooth OFF> ▪ Switch to ON( )/OFF( ) by clicking BT ON/OFF on the popped up menu. Options Menu - Accessibility Tab : Change of BT Device Name, Setting for Discoverable/Connectable Mode and Auto ON. -
Page 36: Paring Wizard
- Service Tab : Services in BT device File Transfer Service : Enable File transfer service - When enabled, the File transfer between the user‟s BT and other BT is possible. Authentication - When enabled, only authenticated users can use File Transfer service. - Page 37 ▪ When the user can not find the required device on the list, user can click next button to move to device search page. Before searching for devices user can specify the type of a device so that only that type of device can be detected. ▪...
-
Page 38: Bt Manager
BT Manager Setting for BT Favorite / Connection Menu per service that Bluetooth supports. - My Bluetooth Favorites ▪ User can register frequently used BT device for Bluetooth connect into „My Bluetooth Favorites‟. ▪ When the BT device on Favorite List is activated, user can make a connection to it by clicking the device. - Page 39 - Generic Serial ▪ User can make a serial connection with other BT device that supports serial communication. ▪ On Bluetooth Serial communication, three ports are supported. - Inbound Port: COM4, Outbound Port: COM4, COM9 ▪ When connecting for Bluetooth Serial communication, user can allocate the com ports for outbound communication.
- Page 40 - ActiveSync Connection ▪ User can establish an ActiveSync connection to Bluetooth PC Device. ▪ User selects ActiveSync Connection on BT Manager. After detecting device and searching service procedure user can make an ActiveSync connection to the selected device. ▪ On PC Device ActiveSync setting should be set to the COM Port which is used for Bluetooth Connection.
- Page 41 ▪ Under Services Tap on BT Options menu, user can authenticate the File Transfer Service. (User can set FTP user account and folder to share) ▪ To enable Secure Connection, user needs to disable FTP Service first and then check Secure Connection under Security settings on FTP Server menu.
- Page 42 - Business Card Exchange ▪ Using Bluetooth, user can exchange the personal contact information(Vcard) with other BT Device. ▪ To enable Business Card Exchange Service user needs to enable the Push service under Services tap on Options menu. Before enabling the Push service user should set the My Business Card first under Settings.
- Page 43 - LAN Access Connection ▪ User can have an internet access using Bluetooth. To do this, there should be Bluetooth connection established to the BT device that has Internet Service. ▪ When Connecting to LAN Service, user might need to input the User name and Password.
-
Page 44: How To Set Up M3
7. How to set up M You can set up various configurations of M such as date/time. Network, Display,Volume, Power, System, etc. at the control panel. If you press start > setting > control panel, control panel window will appear. On View option in the menu, you can change the view mode into large icons, small icons, or detailed, etc, or to arrange icons. -
Page 45: Regional Settings
Regional Settings You can set up region, numbers, currency, time, and date. 1. Select Go to Start> setting > control panel. 2. Open regional setting icon. 3. Select the tap that falls into the category of information to be changed. 4. -
Page 46: Data/Time Features
Data/Time Features You are able to set up date, time, standard time zone, watch and alarm. Date/time You can set up standard time zone, year, day and time. The setting method is as follows: 1. Press the downward arrow in the standard time zone until it reaches your location. If the previously set value is appropriate, move on to the following. -
Page 47: Alarm
Alarm You can set the alarm to be informed at a certain time on a certain date. There are 4 alarm events that you can set. On each event, you can assign the time and the date. Following steps explain how to set up the alarm. 1. -
Page 48: How To Make New Connection In M3
How to make new connection in M3 How to set up high-speed internet with M Modem ※ Internet setting is set to the corresponding country as default. User can change the settings using GPRS Setting option on the GSM Phone Program. For detailed manual setting you can refer to the following explanation. - Page 49 2. Select make new Connection. Enter the name of connection. check dial-up connection, and press next..
- Page 50 3. Select Hayes Compatible on COM1 4. Press [configure..], and set [Device properties] . Port Settings Tab : Set a Baud Rate to 115200. other data remain as the picture below. Call Options Tab : On Extra settings Enter special modem commands “+CGDCONT=1”,”IP”,”apn_name” then press OK.
- Page 51 5. After done with configuration, input “*99***1#” in the „Phone number‟ edit box and leave all the rest untouched. As last press „Finish‟ button. 6. Now the connection icon would have been generated on the „Network and Dial- UP Connections‟ Window as the picture below. On the window which pops up by double-clicking on this icon, user needs to input the username and the password, provided by the SIM card or Network provider.
- Page 52 After using Internet, press button from taskbar to disconnect 7. On the internet explorer, select View >Internet Options and under Autodial name on the Connection Tab, you can choose the name which has been generated. If the configuration setting was not correct, the name would not be diaplayed. Now you can use internet just by running Internet Explorer without extra procedure for Dial-Up Connecting.
- Page 53 Internet connecting through desktop PC This connection method is used in “ PC connection” in control panel, and with partnership setting, Internet is available through USB Active Sync. This method is a economical way when user downloads upgrade program or files to PDA while CDMA connection is used.
-
Page 54: Display
Display You can set the wallpaper image of M , change the color of background screen, or change the backlight set. If you call the right button menu and select “properties” you can see display properties window. Desktop You can change the desktop image of the background screen. 1. -
Page 55: Volume And Sound
Volume and Sound You can make a volume adjustment and select the sound to be used. Volume To adjust the volume of the system and set the sound: 1. Select Go to Start>Setting>Control Panel. 2. Open volume and sound icons and select volume tap. 3. -
Page 56: User Information
User information Enter information such as name, company, address, company phone number, home phone number in the user information tab. To display the owner information on the start screen for system start, click „Show User Information‟ check box. Memo Enter additional user information or other information in the memo box. To show the memo on the initial screen when the system starts, click‟... -
Page 57: System
System The system feature window will display information of M Here you can see the information on M including system, memory, the names of devices, and copyright details. General information contained in the window includes operating system data such as software version, processor, memory, user information, etc. -
Page 58: Password
Password You can set up password to keep unauthorized users away from M To set up password: 1. Select the password setting tab. 2. Enter the password in the password box. 3. Re-enter the password in the password confirmation box. 4. -
Page 59: Internet Settings
Internet Settings If you want to use the Internet using Internet Explorer program, carry out the following procedure. General Click the general tap. 1. Enter a webpage which will be started with the activation of Internet Explorer in the start page box. 2. -
Page 60: Security
Security Click the security tap to set up security option. 1. To allow cookies, click Cookie check box. 2. Click an appropriate security option among TLS 1.0, SSL 2.0, SSL 3.0, etc. 3. Click “Warn When Switching to Secure and Non-Secure Area”. If you select this option, Internet Explorer will issue a warning when you access to non-secure websites. -
Page 61: Storage Manager
Storage Manager The storage manager enables you to manage flash ROM(Disk1). In general, Disk1 is used for a space to back up personal organizer management. You can create/eliminate disk partitions or format a disk. Disk1 is installed as one of the basic options. 1. -
Page 62: Power
Power ‟s battery status and to be turned off while it is not used for a You can set up to show M while. Battery Check out M3 „s battery status. 1. Select Go to Start>Setting>Control Panel. 2. Open the power icon and select the battery tap. The battery tap contains general information on the battery status. -
Page 63: How To Optimize Battery Longevity
How to optimize battery longevity When you work outside office or home, you will especially want your battery to last as long as possible. There are several tips for longer battery life. A. If possible, use external power supplies. If possible, always connect your device to external power supplies using battery charger. In particular, it is strongly recommended to use external power in the following cases: ... -
Page 64: Removal Of Programs
Removal of Programs Remove the installed programs. 1. Select Go to Start>Setting>Control Panel. 2. Open the Program removal icon. 3. Select the program to be deleted from the program list. 4. Click Delete. You can only remove those programs installed in RAM. If you cannot delete a program, see detailed information in Windows CE Help in M3 or the program documents. -
Page 65: How To Use Personal Organizer
8. How to use personal organizer The Pims and Utility in M3 contains SmartMemo, SWRecorder, Today, InfoBox and MS- Backup. These programs can be run either individually or simultaneously. Using ActiveSync, you can synchronize information from Microsoft Outlook on PC to InfoBox on M3. At each synchronization ActiveSync compares M3 with PC and updates both M3 and PC to the latest information. -
Page 66: Today
Today To get the Today window as below, select Start > Programs > Pims > Today. Today window displays the summarized information of user‟s day schedule. Today window consists of sound, time, date, schedule, task, user information and manage item. If you click each item, you can view and edit it. -
Page 67: Infobox
InfoBox Toolbar Daily View View contacts View task Weekly view Monthly View Schedule (Appointment) Appointment Input / Edit 1. In order to make a new appointment, tap on„InfoBox‟at the left bottom of InfoBox window or press the desired date for awhile and select „New appointment‟. 2. - Page 68 3. You can insert Subject, Location, Time, Period, Notify and Status. 4. On the „Note‟, „Ctgry‟and „Attnd‟ tap, you can input a memo, select a category and attendant. 5. When you press on a date on „Appt‟ tap, the calendar window will be displayed so that you can select a date.
- Page 69 View / Delete Appointment list 1. Once the appointment data is saved, you can view it by pressing the relevant date. 2. To delete the saved appointment, press the desired data from the list for awhile and select „Delete Appointment‟. 3.
- Page 70 Anniversary Anniversary Input / Edit 1. In order to make a new anniversary, tap on „InfoBox‟ at the left bottom of InfoBox window or press the desired date for awhile and select „New anniversary‟. 2. In order to edit existing anniversary data, press the desired item from the list for awhile and select „Edit Appointment‟.
- Page 71 6. On „Note‟ tap, you can input a memo. 7. On „Ctgry‟tap, you can select, release and edit the category. 8. On „Attnd‟tap, you can select the attendant. (Only the contact with email address will be displayed on the attendant list.) 9.
- Page 72 Task Task Input / Edit 1. In order to make a new task, tap on „InfoBox‟ at the left bottom of InfoBox window or press the desired date for awhile and select „New Task‟. 2. You can also input a new task by pressing the Icon( ) on the tool bar and then press the icon( ) on the left-up side of task list.
- Page 73 6. On „Note‟ tap, you can input a memo. 7. On „Ctgry‟ tap, you can select, release and edit the category. 8. To save and exit the Task input/edit window, press the icon( ) on the right-up side. View / Delete Task list 1.
- Page 74 Contacts Contacts Input / Edit 1. In order to make a new contact, tap on „InfoBox‟ at the left bottom of InfoBox window and select „New Contacts‟. 2. You can also input a new contacts by pressing the icon( ) on the tool bar and then press the icon( ) on the left-up side of contact list.
- Page 75 7. On „Note‟tap, you can input a memo. 8. On „Ctgry‟ tap, you can select, release and edit the category. 9. To save and exit the contacts input/edit window, press the icon( ) on the right- up side.
- Page 76 View / Delete Contacts list 1. Once the contacts data is saved, the data will be displayed on the contacts list. 2. To delete the saved contacts, press the desired data from the list for awhile and select „Delete Contacts‟. 3.
- Page 77 Daily/Weekly/Monthly View Toolbar Month display/change Anniversary display Year display/change Display by category Appointment display Return to current date Move page Task display 1. Year display / change - You can change the year by selecting it from the list (if you press „Select Year‟, you can input it yourself.) 2.
- Page 78 5. Anniversary display - When this button is pressed, the saved anniversary will be displayed on daily/weekly/monthly list. - When the „down sign‟ beside anniversary icon is pressed, you can view the anniversary data by category. 6. Display by category - When this button is pressed, the appointment, anniversary, task data will be displayer by category on daily/weekly/monthly list.
- Page 79 Daily view 1. When daily view is selected, the relevant appointment, anniversary and task on that day will be displayed. 2. Appointment, Anniversary and Task will be displayed on the list with white, gray and blue ground respectively. Weekly view 1.
- Page 80 Monthly view 1. When monthly view is selected, the relevant appointment, anniversary and task on that month will be displayed. 2. If you press the relevant date, Appointment, Anniversary and Task will be displayed on the list with white, gray and blue ground respectively. 3.
-
Page 81: View Contacts
View contacts How to sort the contacts list 1. The default way of sorting is by Name. There are four ways in total. These are by All, by Name, by Company and by Categories. How to view the contacts 1. When the name on the contacts list is pressed, the detailed information of the relevant contacts will be displayed. - Page 82 View task How to sort the task list 1. The default way of sorting is by category. There are four ways in total. These are by Category, by Status, by Priority and by Dates. View task 1. When the view task button is pressed, you can see the detailed information of task. The icon( ) indicates the completion and the icon( , , ) indicates the priority (low,high,normal respectively).
-
Page 83: Smartmemo
SmartMemo Settings Category 1. Using menus above the window, you can create, edit and delete the category. 2. Using the left-up menu, you can either create new main category or delete existing main category (by long press of the category name). 3. - Page 84 Memo Menu Color Change 1. If you press the palette icon( ) on the left-bottom of window, you can change the pen color. 2. You can choose the pen color from the selection on the left and using the right scroll bar, you can adjust the brightness of color.
- Page 85 Mode Change 1. If you press the left-down pen icon( ), you can choose the mode. Opaque/Transparent pen Partial/Total erase Erase current page Delete current page Delete entire memo Save and Exit Alarm Setting 1. If you press the alarm icon( ) on the right-bottom side, you can set the alarm for the relevant memo.
- Page 86 Page Move / Exit 1. If you press the icon( ) on the right-above side, you can move from page to page.(Maximum 10 pages) 2. The current page you can check with page number on the right-above of page. 3. To save and exit, you can press the icon( ) on the right-above.
-
Page 87: Swrecoder
2. You can delete, copy and move the memo by pressing the relevant memo for awhile. SWRecoder Settings Toolbar Play Stop Record Pause Status Time Option Menu Forward, Backward Progress bar 1. On the toolbar, you can play, stop, record, forward, backward and move. If you press the option menu, you can set the channel and sample rate. - Page 88 Saving / Sorting 1. You can save the recorded data to My Documents, Flash Disk, SD MMC Card, and CF Card. The data will be saved as „ave‟ file under Voice_Memo folder on the relevant saving path. 2. On the menu left-above, you can select the saving path. 3.
-
Page 89: How To Use Application Software
9. How to use application software Calculator M3 offers a calculator application. Using this application you can do a simple calculation. To run the calculator, select Go to start > Programs > Application > Calculator. -
Page 90: Image Viewer
Image Viewer You can see the image file using the image viewer. To run the image viewer, select Go to Start> Programs> Application Programs> Image Viewer. The viewer supports various image files such as jpg, gif, bmp, tif, png, etc. Viewer icons and functions Icon Name... -
Page 91: 10. How To Use Utility Programs
10. How to use utility programs You can use M3 more conveniently by using utility programs. After selecting Go to Start> Programs> Utilities, you can use a range of utility programs such as Menu setting, backlight, button setting, Qstart, Task manager, Contrast, etc. -
Page 92: Menu Setting (Menus)
Menu Setting (Menus) In the Menu, you can select the programs to be included in the bookmark The installed programs will automatically appear on the program list. Click it to the programme to be added You can see the added item in Start> Programs>Bookmark Backlight If you click the backlight menu in the utility programs, you can select the level of brightness of the screen. -
Page 93: Ms-Backup
MS-Backup Backup How to set the saving location and name. 1. Under the Backup tap On the Backup Manager window, you can assign the saving location to Flash Disk, SD MMC Card and CF Card. 2. In the Name box, you can input the backup name to save with. 3. -
Page 94: Quick Start (Qstart)
Restore How to restore 1. Under the Restore tap on the Backup Manager window, you can restore the data by pressing the „Restore Start‟ button after setting the type, Location and the file name to be restored. When the restore is complete, the device will restart automatically. -
Page 95: 11. How To Use Microsoft Application
11. How to use Microsoft application Command Prompt M3 has a window console for pocket CMD. You can use DOS commands using the pocket CMD. -
Page 96: Microsoft Media Player 9 Series
Microsoft Media Player 9 Series It is the Microsoft의 Media player that enable user to enjoy digital music and films. Media player supports four multimedia formats such as ASF, WMA, MP3, and WAV formats. If an audio data does not have any of these formats (ASF, WMA, MP3, WAV), you can change the digital audio data into an appropriate format file via “Microsoft Media Manager”... - Page 97 Volume adjustment: Adjust the volume by moving the volume adjustment slider. If you move the slider to the left, the sound will decrease the volume while moving to the left will increase the volume. Track switch: You can select the previous or next track to be played. Internet Explorer Icon: Start Internet Explorer.
- Page 98 In the Favorites, you can find the list of your favorite streaming media files. In the default mode, the Web Favorite playlist is empty. Web Favorite playlist can be created or edited by the following ways: To create new playlist: 1.
-
Page 99: View
Favorites: You can quickly play the multimedia files by using the Favorites. Favorites are in the designated playlist. To add a multimedia file or streaming media file in the Favorites: 1. Play multimedia file to add to the Favorites. 2. Select File > Favorites > Add Favorites while the multimedia file is loading. 3. -
Page 100: Internet Explorer
Web Icon Move on to the Media player‟s website. Internet Explorer Explorer Menu Icon File Menu Address bar Content window Status Line [Vertical Screen] [Horizontal screen]... -
Page 101: Menu Bar
You can search the Internet or Intranet using M3‟s pocket Internet Explorer 6.0(Pocket Internet Explorer). To access to ISP or the network, the device has in-built wireless modem. To set up the pocket Internet Explorer, refer to the chapter 6. How to set up M3. You can use the Pocket Internet Explorer in the same way as the one in the desktop PC. - Page 102 6. Click the Find Next to initiate search. 7. To cancel the search process, click the Cancel. Work Offline: When you search webpage in the Internet, it will store web pages in the cache in the Temporary Internet Files located at the My Computer. It is faster to browse web pages left in the cache than to go back to the Internet sites.
- Page 103 Add Favorite: In order to access more easily, add web pages to the Favorite To add the current page to the Favorite: 1. Move on to the page to add. 2. Select Favorite > Add to Favorite. It will bring up the Add Favorite window. 3.
-
Page 104: Microsoft Wordpad
Microsoft WordPad You can create or edit a document using Microsoft WordPad. The buttons and Menu are similar to Microsoft Word in desktop PC. Normally, WordPad is saved as pwd file format; you can also save it as an rtf or doc format document. - Page 105 Print: Print the current document. To use the print function, connect M3 to a desktop PC and set up printer. Recent document: Show documents that you have opened recently. Close: Finish the WordPad and close the program. Edit ...
-
Page 106: How To Convert The Document Type
Font size change Font type change How to convert the document type If the device received email with the attachment of Word document or templates created in Word 6.0 or higher when there is an email program such as InBox installed in M3, WordPad will convert the file in order to open it in M3. -
Page 107: Windows Explorer
Windows Explorer Microsoft‟s Windows Explorer will operate in M3 in the same manner it does in PC. Reference: If you enter URL in the address bar, you can access to the Internet. File Menu File Open: open the selected folder or file. ... -
Page 108: Icon Menu
Paste: Paste the cut or copied folder/file in the current folder. Shortcut Paste: Create a hot key for cut or copied folder/file. Select All: Select all files and folders in the current file. View Address bar: Display an address bar in Windows explorer. ... -
Page 109: Appendix A
Appendix A Product Specification The following is the specification of hardware and devices. Specification Windows CE.NET 4.2(CE.NET) (Operating System) Processor Intel XScale PXA255 Memory RAM 64MB SDRAM Memory FLASH 64MB Flash (expendable up to 256MB) Audio / Voice Stereo audio output terminal, Speaker, microphone Infrared IrDA standard communication port... -
Page 110: Troubleshooting
Troubleshooting This chapter provides tips to efficiently use M3 and ways to solve malfunction problems. In particular, it will deal with the following problems. Battery power Reset Common problem Data/file backup Synchronization with a PC ... -
Page 111: Battery Power
Battery power The following are steps to prevent an unexpected system failure in M3 due to power. When you use M3 for the When you purchase M3, there are occasions that the first time battery is discharged. Thus use M3 after charging up the battery with the charger. -
Page 112: Common Problems
blocked) a hardware reset. To do a hardware rest, you have to press and hold the reset button on the button of M3 for more than 4 seconds. Then M3‟s battery power will be blocked, thereby cutting off the power of M3. - Page 113 If M3‟s program memory is not sufficient, it can slow down the speed. Click Go to Start> Settings> Control Penal> System, then expand the program memory area with the slider in the memory tab. If storage memory area occupies too much space, backup programs in the storage area to PC so as to empty the space.
- Page 114 in left and right directions. Too small text size Sometimes it is hard to read a text when running MS WordPad or Internet Explorer. In WordPad, click View Menu bar> Zoom/Focus then select the size that you want. In Internet Explorer, you can select the size after clicking View Menu bar>...
-
Page 115: Data/File Backup
Data/File Backup Data/File Backup Sometimes you have to conduct a hardware reset due to unexpected problems. Thus you should backup data/files to desktop PC and flash ROM. To backup data/files in a desktop PC, connect M3 to PC. For detailed information on the connection methods, refer to the chapter 4. -
Page 116: Synchronization With Pc
Synchronization with PC When connection USB cable is not in connection with a desktop PC or is not with desktop PC does connected properly. Check out if the USB cable and the USB not happen. port of desktop PC is properly connected. Check out if the USB cable is properly inserted to the USB port of M3. -
Page 117: Infrared (Irda) Communication
Infrared (IrDA) Communication When Infrared(IrDA) Arrange M3 and the IrDA ports of other devices. The communication does distance should be no more than 1m. operate Remove obstacles that possibly block communication between M3 and other devices. Check out if M3 has IrDA OBEX communication protocol installed. -
Page 118: Glossary
Glossary Backup. A copy or copies of data stored in M3 file, desktop PC, CompactFlash card or other safe storage files. Battery charger. Supply external power suitable for operating M3 by switching the AC power of standard household outlet to low power DC power. ... - Page 119 write. Data stored in RAM will be kept while the power is on. Remote connection. Connection between M3 and remote computer or server. Reset. The process of restarting M3 and initialize the OS again. When the user carries out Reset, the data in opened files will be lost. However, data that has already been saved will be restored.
Need help?
Do you have a question about the MC-6200S and is the answer not in the manual?
Questions and answers