Table of Contents
Advertisement
Advertisement
Table of Contents

Related Manuals for Konica Minolta DImage X60


Summary of Contents for Konica Minolta DImage X60
- Page 1 INSTRUCTION MANUAL...
-
Page 2: Before You Begin
Konica Minolta. Beware of counterfeit batteries; the use of these batteries will damage the product and may cause fire. Konica Minolta is a trademark of Konica Minolta Holdings, Inc. DiMAGE is a trademark of Konica Minolta Photo Imaging, Inc. Apple, Macintosh, Power Macintosh, and Mac OS are registered trademarks of Apple Computer Inc. -
Page 3: For Proper And Safe Use
FOR PROPER AND SAFE USE Lithium-ion batteries This camera operates on a small, but powerful lithium-ion battery. Misuse or abuse of the lithium-ion battery can cause damage or injury through fire, electric shock, or chemical leakage. Read and understand all warnings before using the battery. DANGER •... - Page 4 GENERAL WARNINGS AND CAUTIONS Read and understand the following warnings and cautions for safe use of the digital camera and its accessories. WARNING • Only use the battery specified in this manual. • Only use the specified charger or AC adapter within the voltage range indicated on the unit.
- Page 5 The continued use of a damaged product or part may cause injuries or fire. • Take the product to a Konica Minolta service facility when repairs are required. • Handling the cord on this product may expose you to lead, a chemical known to the State of California to cause cancer, and birth defects or other reproductive harm.
- Page 6 CAUTION • Do not use or store these products in a hot or humid environment such as the glove compartment or trunk of a car. It may damage the camera, charger, and battery which may result in burns or injuries caused by heat, fire, explosion, or leaking battery fluid. •...
- Page 7 DiMAGE X Digital Camera: Declaration on Conformity Tested To Comply Responsible Party: Konica Minolta Photo Imaging USA Inc. With FCC Standards Address: 725 Darlington Avenue, Mahwah, NJ 07430 FOR HOME OR OFFICE USE This device complies with Part 15 of the FCC Rules. Operation is subject to the following two conditions: (1) This device may not cause harmful interference, and (2) this device must accept any interference received, including interference that may cause undesired operation.
-
Page 8: Table Of Contents
TABLE OF CONTENTS The getting up and running section covers how to prepare the camera for use. It contains important information about power supplies and memory cards. The basic operation of this camera is covered in the recording - basic operation section between pages 21 and 31, and the playback - basic operation section between pages 32 and 35. - Page 9 Focus range..........................26 Focus signals...........................27 Special focusing situations ......................27 Flash modes ..........................28 Flash range - Automatic operation ..................29 Flash signals..........................29 Display button - recording mode .....................29 Digital subject programs ......................30 Spot AF............................31 Playback - basic operation ........................32 Single-frame playback display....................32 Rotating images........................33 Deleting single images ......................33 Display button - playback mode ....................34 Index playback.........................34...
- Page 10 Playback - advanced operation......................54 Playing back voice memos and audio captions ..............54 Playing back movies and audio recordings................55 Navigating the playback menu ....................56 Deleting image and audio files ....................58 Audio caption...........................59 Locking files..........................60 Image pasting ..........................60 Copy and E-mail Copy ......................62 Slide show ..........................65 Dissolve ...........................65 Crop frame..........................66...
- Page 11 Data-transfer mode ..........................80 System requirements.......................80 Connecting the camera to a computer ..................81 Connecting to Windows 98 and 98SE..................82 Automatic installation ....................82 Manual installation ......................83 Removing the driver software - Windows................85 Folder organization........................86 Disconnecting the camera from the computer ................88 Windows 98 / 98 Second Edition................88 Windows XP, 2000 Professional, and Me..............88 Macintosh........................89 Changing the memory card - data-transfer mode ..............90...
-
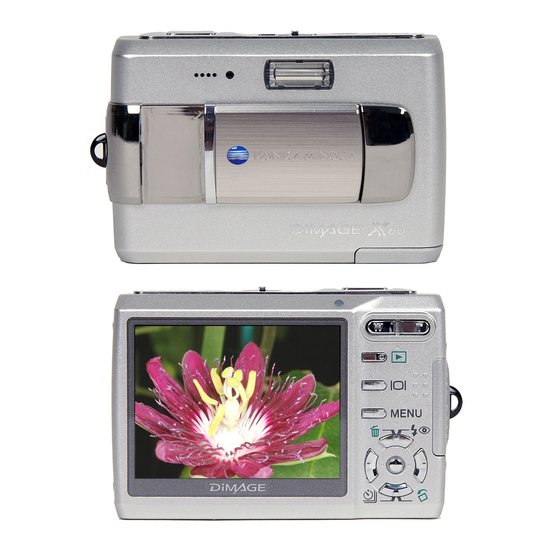
Page 12: Names Of Parts
NAMES OF PARTS * This camera is a sophisticated optical instrument. Care should be taken to keep these surfaces clean. Please read the care and storage instructions in the back of this manual (p. 106). Mode switch (p. 21) Self-timer lamp (p. 38) Flash* (p. - Page 13 Zoom lever (p. 23) Indicator lamp Playback button (p. 32) Speaker LCD monitor* Controller Menu button Display button (p. 29, 34) Tripod socket Battery-chamber door (p. 15)
-
Page 14: Getting Up And Running
GETTING UP AND RUNNING CHARGING THE BATTERY Before the camera can be used, the lithium-ion battery must be charged. Before charging the battery, read the safety warnings on pages 3 and 4 of this manual. Only recharge the battery with the supplied battery charger. The battery should be recharged before each shooting session. -
Page 15: Inserting The Battery
INSERTING THE BATTERY This digital camera uses one NP-700 lithium-ion battery. Before using the battery, read the safety warnings on pages 3 and 4 of this manual. When replacing the battery, the camera should be turned off (p.19). 1.Slide the battery-chamber door toward the side of the camera to release the safety catch. -
Page 16: Battery-Condition Indicator
BATTERY-CONDITION INDICATOR This camera is equipped with an automatic battery-condition indicator displayed on the LCD monitor. The indicator changes from white to red when battery power is low. Full-battery indicator - the battery is fully charged. This indicator is displayed when the camera is on. Low-battery indicator - the battery is partially charged. -
Page 17: Ac Adapter (Sold Separately)
AC ADAPTER (SOLD SEPARATELY) Always turn off the camera before changing between power supplies. The AC adapter AC-4 or AC-5 allows the camera to be powered from a household outlet. The AC adapter is recommended when the camera is interfaced with a computer or during periods of heavy use. -
Page 18: Installing And Removing A Memory Card
INSTALLING AND REMOVING A MEMORY CARD Always turn off the camera and confirm the indicator lamp is not lit before changing the memory card, otherwise the card may be damaged, and data lost. This camera has approximately 15 MB of internal storage so images can be recorded without a memory card. -
Page 19: Internal-Memory Indicator
3.To eject a memory card, press the card into the slot and release. The card can now be pulled out. 4.Close card-chamber door and slide it toward the camera to engage the safety catch. INTERNAL-MEMORY INDICATOR The internal-memory indicator in the recording and playback modes indicates the camera’s internal memory is being used. -
Page 20: Setting The Date And Time
SETTING THE DATE AND TIME After initially inserting a memory card and batteries, the camera’s clock and calendar must be set. When images are recorded, the image data is saved with the date and time of recording. If the clock and calendar have not been set, a message is displayed for a few seconds each time the camera is turned on. -
Page 21: Recording Mode - Basic Operation
RECORDING MODE - BASIC OPERATION This section covers basic recording operation. To prepare the camera for use, read pages 14 through 20. HANDLING THE CAMERA While using the LCD monitor, grip the camera firmly with your right hand while supporting the camera body with your left. -
Page 22: Lcd Monitor Display
LCD MONITOR DISPLAY Recording mode Flash modes (p. 28) Automatic digital subject program display (p. 25) Image size (p. 42) Image quality (p. 42) Battery-condition indicator (p. 16) Focus frame Internal-memory indicator (p. 19) Drive mode (p. 37) Frame counter (p. 43) Camera-shake warning Focus signal (p. -
Page 23: Using The Zoom Lens
USING THE ZOOM LENS This camera is equipped with a unique 6.3 - 18.9mm zoom lens. This is equivalent to a 38 to 114mm lens on a 35mm camera. The lens is operated by the zoom lever at the back of the camera. -
Page 24: Basic Recording Operation
BASIC RECORDING OPERATION Slide the mode switch to the digital-subject-program or recording position. The operation for both modes is the same. Automatic Digital Subject Program Selection is only active in the digital-subject-program mode. Place the subject anywhere within the focus frame. Make sure the subject is within the focus range of the lens (p. -
Page 25: Automatic Digital Subject Program Selection
AUTOMATIC DIGITAL SUBJECT PROGRAM SELECTION Automatic Digital Subject Program Selection chooses between program AE and one of four digital subject programs. The digital subject programs optimize camera settings for various conditions and subjects. Automatic Digital Subject Program Selection is only available in the digital-subject-program mode. -
Page 26: Focus Lock
FOCUS LOCK The focus-lock function is used when you want to compose the image with the subject off-center and outside the focus frame. Focus lock may also be used when a special focusing situation prevents the camera from focusing on the subject. This function is controlled with the shutter-release button. -
Page 27: Focus Signals
FOCUS SIGNALS This digital camera has a quick, accurate autofocusing system. The focus signal in the lower right corner of the LCD monitor indicates the focus status. The shutter can be released regardless if the camera can focus on the subject or not. Focus confirmed - the LCD monitor focus signal is white, and the focus frame turns red. -
Page 28: Flash Modes
FLASH MODES The flash can be used when taking still images. To select the flash mode, press the up key of the controller (1) on the back of the camera until the desired mode is displayed. Press the shutter- release button to set the mode. The active flash mode is displayed in the top left corner of the LCD monitor. -
Page 29: Flash Range - Automatic Operation
FLASH RANGE - AUTOMATIC OPERATION The camera automatically controls the flash output. For well-exposed images, the subject must be within the flash range. Because of the optical system, the flash range is not the same at the lens’ wide-angle position as it is at the telephoto position. The flash range can be changed with camera sensitivity (ISO), see page 46. -
Page 30: Digital Subject Programs
DIGITAL SUBJECT PROGRAMS Digital subject programs optimize the camera’s exposure, white-balance, and image-processing systems for specific conditions and subjects. Set the mode switch to the Digital Subject Program position. Simply press the left and right keys of the controller to select the appropriate subject program;... -
Page 31: Spot Af
Night portrait - for deep, subtle night scenes. The use of a tripod is recommended. When used with flash, the subject and background exposures are balanced. The flash can only be used with close subjects such as with a portrait of a person. When using the flash, ask your subjects not to move after the burst;... -
Page 32: Playback - Basic Operation
PLAYBACK - BASIC OPERATION Images can be viewed in the playback mode. The playback mode has additional functions, see page 54. The camera does not need to be turned on with the lens cover to play back images. To view recorded images, press the playback button (1). -
Page 33: Rotating Images
ROTATING IMAGES Press the down key of the controller (1) to rotate the displayed image 90° left , 90° right, and horizontally. The image is displayed in the selected orientation until changed. DELETING SINGLE IMAGES To delete a displayed file, press the up key of the controller (1). -
Page 34: Display Button - Playback Mode
DISPLAY BUTTON - PLAYBACK MODE The display button controls the LCD monitor display. Each time the button is pressed, the display switches between full display and image only. Image only Full display INDEX PLAYBACK To view the recorded images in a 6-frame index, press the left side of the zoom lever (W). -
Page 35: Enlarged Playback
ENLARGED PLAYBACK In single-frame playback, a still image can be enlarged by up to 6X in 0.2X increments. With the image to be magnified displayed, press the right side of the zoom lever (T) to activate the enlarged playback mode. The degree of magnification is displayed on the LCD monitor. -
Page 36: Recording - Advanced Operation
RECORDING - ADVANCED OPERATION MOVIE RECORDING This camera can record digital video with sound. Simply slide the mode switch to the movie/audio recording position (1). The frame counter shows the total recording time for the next movie clip. Total recording time varies with the frame rate, see page 53. -
Page 37: Drive Modes
DRIVE MODES The drive modes control the rate and method images are captured. Indicators indicating the selected drive mode appear on the monitor. If auto reset (p. 45) is active, the drive mode is reset to single-frame advance when the camera is turned off. -
Page 38: Self-Timer
Self-timer Used for self-portraits, the self-timer delays the release of the shutter for approximately ten seconds after the shutter-release button is pressed. The self-timer drive mode is selected with the down key of the controller (p. 37). With the camera on a tripod, compose the picture as described in the basic recording operation section (p. -
Page 39: Continuous Advance
Continuous advance The continuous advance drive mode takes up to four images when the shutter-release button is pressed and held. With the image-size setting of 2560 x 1920, the maximum rate of capture is 1.6 fps. The continuous advance drive mode is selected with the down key of the controller (p. -
Page 40: Navigating The Recording Menus
NAVIGATING THE RECORDING MENUS The recording menu displayed varies with the position of the mode switch. Pressing the menu button (1) turns the menu on and off. The four- way keys of the controller (2) move the cursor in the menu. Pressing the central button of the controller enters a setting. - Page 41 Still image recording Image size 2560x1920 Sensitivity* Auto Color mode* Color Quality Standard Metering mode* MultiSegment Voice memo White balance* Auto comp. Date imprint Key func.* Auto reset Digital zoom Inst. playback * White balance, custom key function, camera sensitivity, metering mode, and color mode options are not available when the mode switch is in the digital-subject-program position.
-
Page 42: Image Size And Image Quality
IMAGE SIZE AND IMAGE QUALITY Changing image size affects the number of pixels in Number of pixels LCD monitor each image. The greater the image size, the larger (hor. X vert.) the file size. Choose image size based on the final 2560 2560 X 1920 use of the image - smaller images are more suitable... -
Page 43: Color Mode
Approximate file sizes. Size 2560 X 1920 2048 X 1536 1600 X 1200 640 X 480 Quality Fine 2.4MB 1.6MB 1.0MB 200KB Standard 1.2MB 820KB 520KB 130KB Economy 650KB 440KB 290KB 90KB Approximate number of stored images: 15MB internal memory & 64MB memory card Internal Card Internal... -
Page 44: White Balance
WHITE BALANCE White balance is the camera’s ability to make different types of lighting appear neutral. The effect is similar to selecting daylight or tungsten film, or using color compensating filters in conventional photography. One automatic and four preset white-balance setting are available with still image and movie recording;... -
Page 45: Custom Key Function
CUSTOM KEY FUNCTION In the recording mode, a function can be assigned to the left/right keys of the controller. This function is specified in Image size Exp. comp. section 1 of the recording menu (p. 40). This function Quality White balance cannot be used with the digital subject programs. -
Page 46: Camera Sensitivity - Iso
CAMERA SENSITIVITY - ISO Five camera sensitivity settings can be selected with a still image: Auto, 50, 100, 200, 400; the numerical values are based on an ISO equivalent; the higher the number, the more sensitive the camera. Sensitivity can be changed in section 2 of the recording menu (p. -
Page 47: Metering Modes
METERING MODES The metering mode is selected in section 2 of the recording Sensitivity Auto menu (p. 40). Metering cannot be changed with the movie Metering mode MultiSegment recording or digital subject programs. Exp. comp. Auto reset Multi-segment metering: uses 256 segments to measure luminance and color. -
Page 48: Exposure Compensation
EXPOSURE COMPENSATION The camera exposure can be adjusted to make the final picture lighter or darker by as much as ±2Ev in 1/3 increments with still image and movie recording; exposure compensation cannot be used with digital subject programs. When auto reset (p. 45) is active, exposure compensation is reset to 0.0 when the camera is turned off. -
Page 49: Voice Memo
VOICE MEMO Voice memo allows an audio track up to fifteen second to be recorded with a still image. The function is activated in section 3 of the recording menu (p. 40). When the function is active, the microphone indicator (1) is displayed in the top left corner of the monitor. -
Page 50: Date Imprinting
DATE IMPRINTING The date and time of recording can be printed directly on a still image. The imprinting function must be activated before the image is taken. Once activated, the date will continue to be imprinted until the function is reset; a yellow bar is displayed behind the frame counter on the monitor to indicate the imprinting function is active. -
Page 51: Digital Zoom
DIGITAL ZOOM The digital zoom is activated in section 3 of the recording menu (p. 40). The digital zoom increases the magnification of the greatest telephoto setting of the optical zoom by up to 4.0X in 0.1X increments. Although the images recorded with the digital zoom are interpolated to the set image size, the quality of the images may not be equal to images taken without the digital zoom;... -
Page 52: Recording Mode
RECORDING MODE The recording-mode menu options switches between movie and audio recording. This option is located in section 1 of the movie/audio menu (p. 40). AUDIO RECORDING Audio can be recorded without an image. About 31 minutes 43 seconds of audio can be stored on the 15MB internal memory. -
Page 53: Frame Rate & Movie File Sizes
15 fps 2 min. 55sec. The writing speed of the memory card may prematurely end the recording of a movie clip. Test the card before important events. Check the Konica Minolta web site for the latest compatibility information: North America: http://kmpi.konicaminolta.us/ Europe: http://www.konicaminoltasupport.com/... -
Page 54: Playback - Advanced Operation
PLAYBACK - ADVANCED OPERATION The basic functions in this mode are described in the basic playback section on pages 32 through 35. This section covers how to playback movie clips and audio tracks as well as the advanced function on the playback menu. PLAYING BACK VOICE MEMOS AND AUDIO CAPTIONS When a voice memo (p. -
Page 55: Playing Back Movies And Audio Recordings
PLAYING BACK MOVIES AND AUDIO RECORDINGS Movie clips and audio recordings are played back the same way. Use the left/right keys of the controller to display the movie or audio file; audio files are displayed with a blue screen. Play Play Press the center of the controller to play... -
Page 56: Navigating The Playback Menu
NAVIGATING THE PLAYBACK MENU Navigating the menu is simple. The menu button turns the menu on and off (1). The left/right and up/down keys of the controller (2) control the cursor and change settings on the menu. Pressing the center button of the controller selects menu options and sets adjustments. - Page 57 Delete – Slide show – DPOF set – AudioCaption – Dissolve Date print Lock – Crop frame – Index print – Image pasting – Frame capture – E-mail copy – Copy – Edit movie – Index to menu functions Audio caption, 59 Dissolve, 65 Image pasting, 60 Copy, 62...
-
Page 58: Deleting Image And Audio Files
DELETING IMAGE AND AUDIO FILES Deleting permanently erases the file. Once deleted, a file cannot be recovered. Care should be taken when deleting images. Single, multiple, or all files can be deleted in section 1 of the playback menu (p. 56). Files must be unlocked before they can be deleted (p. -
Page 59: Audio Caption
AUDIO CAPTION A still image can have a fifteen-second audio caption attached to it. This function replaces a voice-memo audio track recorded with an image. Files must be unlocked to use this function (p. 60). To attach audio to the images in the internal memory, remove the memory card from the camera. -
Page 60: Locking Files
LOCKING FILES Single, multiple, or all files can be locked. To lock images in the internal memory, remove the memory card from the camera. A locked file cannot be erased by a delete function. However, the formatting function (p. 74) will erase all files whether locked or not. The lock function is in section 1 of the playback menu (p. - Page 61 Nine frame choices are shown on the LCD monitor. Select the frame with the controller. Press the center button to continue. Pressing the menu button at any time during the operation cancels the routine. The camera memorizes any settings entered. :sel.
-
Page 62: Copy And E-Mail Copy
COPY AND E-MAIL COPY The copy function in section 1 of the playback Delete menu (p. 56) makes exact copies of image, movie, DPOF set – Audio or audio files and can store the copied data on Date print Lock another memory card or in the internal memory. - Page 63 If images exceeding a total of 28MB have been selected, a warning appears and the copy routine is canceled. Divide the number of files into two or three batches. The amount of data that can be converted into E-mail copies depends on the amount of free memory remaining.
- Page 64 E-mail Copy When the image(s) to be converted to an e-mail file are selected, the copy routine begins and a screen appears indicating the Copied to 102KM_EM. name of the folder containing the copied images; press the central button of the controller to return to the menu. Camera Notes The copy-unsuccessful message appears when one or all of the images could not be copied.
-
Page 65: Slide Show
SLIDE SHOW Section 2 of the playback menu (p. 56) controls the slide- Slide show Enter show function. This function automatically displays and Dissolve plays all image, audio, and movie files on the memory card Crop frame or in the camera’s internal memory in order. To display Frame capture images in the internal memory, remove the memory card Edit movie... -
Page 66: Crop Frame
CROP FRAME A portion of a still image can be copied and saved in the memory location being used. To crop and save an image in Slide show the internal memory, remove the memory card from the Dissolve camera. E-mail Copy images cannot be cropped. Crop frame Enter Frame capture... -
Page 67: Frame Capture
FRAME CAPTURE The frame-capture option in section 2 of the playback menu (p. 56) allows a single frame from a movie clip to be copied Slide show – and saved as a still image in the memory being used. The Dissolve copied image has the same image size as the original movie. -
Page 68: Movie Editing
MOVIE EDITING The edit-movie option in section 2 of the playback menu (p. 56) allows an unwanted section to be cut from a movie clip. Slide show – The movie to be edited must first be displayed in the Dissolve playback mode before opening the playback menu. - Page 69 Preview edit. Press the center controller button to preview the edit. The arrow above the bar indicates the playback frame. :function :play Pause Rew Fwd Vol After playback, use the down key to continue if the edit is acceptable. To make changes to the edit, use the up key of the controller to return to the previous steps to adjust the start and end points.
-
Page 70: About Dpof
ABOUT DPOF This camera is supported by DPOF™. The DPOF (Digital Print Order Format) allows direct printing of still images from digital cameras. After the DPOF file is created, the memory card is simply taken to a photofinishing service or inserted into the memory-card slot of DPOF compatible printers. -
Page 71: Date Print
When the this-frame or all-frames setting is chosen, a screen appears requesting the number of copies of each image; a maximum of nine copies can be ordered. Use the up/down keys of the controller to set the required number of copies. If the all-frames setting was used to create a print order, any additional images recorded afterwards are not included in the order. -
Page 72: Setup Mode
SETUP MODE The setup menu is used to control the camera’s functions and operation. The navigating the setup menu section covers the operation of the menu. The section is followed by detailed descriptions of the settings. NAVIGATING THE SETUP MENU The setup menu is opened from the other menus. -
Page 73: Language
Navigating the menu is simple. The four-way keys of the controller (1) control the cursor and change settings on the menu. Pressing the center button of the controller selects menu options and sets adjustments. Use the left/right keys of the controller to highlight the appropriate menu tab; the menu changes as the tabs are highlighted. -
Page 74: Lcd Monitor Brightness
LCD MONITOR BRIGHTNESS The brightness of the LCD monitor can be set in eleven levels. The brightness setting screen is opened from section 1 of the setup menu (p. 72). Set LCD brightness High Use the left/right keys of the controller to adjust the brightness, the monitor image changes accordingly. -
Page 75: File Number (#) Memory
100KM026. The first three digits are the folder’s serial number, which increases by one each time a new folder is created. The next two letters refer to Konica Minolta, and the last three numbers indicate the camera used; 026 indicates a DiMAGE X... -
Page 76: Audio Signals
AUDIO SIGNALS Audio signals Every time a button is pressed, an audio signal gives a positive confirmation of the operation. The audio signals Focus signal can be turned off in section 2 of the setup menu (p. 72). Two Shutter FX audio signals are available. -
Page 77: Video Output
VIDEO OUTPUT Camera images can be displayed on a television. The video output can be changed between NTSC and PAL in section 3 of the setup menu. North America uses the NTSC standard and Europe uses the PAL standard. Check which standard is used in your region to play back images on your television set. -
Page 78: Reset Default
RESET DEFAULT This function in section 3 of the setup menu (p. 72) affects all modes. When selected, a confirmation screen appears; choosing “Yes” resets the following functions and settings, “No” cancels the operation. Recording mode Focus area Wide focus frame p. -
Page 79: Date And Time
Setup menu LCD Brightness Normal p. 74 File number (#) memory p. 75 Folder name Standard p. 75 Audio signals p. 76 Focus signal p. 76 Shutter FX p. 76 Volume p. 76 Auto-power-save period 3 minute p. 76 Transfer mode Data storage p. -
Page 80: Data-Transfer Mode
Digital Camera Software CD-ROM (p. 82). No special driver software is required for other Windows or Macintosh operating systems. Customers who have bought a previous Konica Minolta DiMAGE or SLR digital camera and have installed the Windows 98 driver software must repeat the installation procedure. -
Page 81: Connecting The Camera To A Computer
CONNECTING THE CAMERA TO A COMPUTER A fully charged battery should be used when the camera is connected to a computer. The use of the AC adapter (sold separately) is recommended over the use of the battery. Before connecting the camera, confirm data storage is selected in the transfer-mode option in section 3 of the setup menu (p.72). -
Page 82: Connecting To Windows 98 And 98Se
With the camera properly connected to My Computer: Windows Windows XP or Mac OS X, a window may Desktop: Mac OS open to download image data; follow the instructions in the window. A drive icon, or volume, appears in My Computer or the desktop;... -
Page 83: Manual Installation
Manual Installation To install the Windows 98 driver manually, follow the instructions in the connecting-the-camera-to-a- computer section on page 81. When the camera is plugged into the computer, the operating system will detect the new device and the add-new-hardware-wizard window opens. Place the Digital Camera Software CD-ROM in the CD-ROM drive. - Page 84 The add new hardware wizard will confirm the location of the driver. The letter designating the CD-ROM drive will vary between computers. Click “Next” to install the driver in the system. three drivers located: MNLVENUM.inf, USBPDR.inf, or USBSTRG.inf. The last window confirms the driver has been installed.
-
Page 85: Removing The Driver Software - Windows
Click on the locations to display the files. The driver should be indicated with Konica Minolta, the camera name, or “USB Mass Storage Device.” Under certain conditions, the driver name may be different. However, the driver will be indicated by either a question mark or exclamation point. -
Page 86: Folder Organization
FOLDER ORGANIZATION Once the camera is connected to the computer, image and audio files can be accessed by double clicking on icons. Image folders are located in the DCIM folder. The misc. folder contains DPOF print files (p. 70). To copy images and audio recordings, simply drag and drop the file icon into a location in the computer. - Page 87 Copy images (p. 62) are placed in a folder with a name ending in “CP.” E-mail Copy images are placed in a folder ending in “EM.” When a new folder is created, the first three digits in the folder name is one greater than the largest folder number in the memory location.
-
Page 88: Disconnecting The Camera From The Computer
DISCONNECTING THE CAMERA FROM A COMPUTER Never disconnect the camera when the indicator lamp is lit - the data or memory card may permanently be damaged. Windows 98 / 98 Second Edition Confirm that the indicator lamp is not lit. Turn the camera off, and then disconnect the USB cable. -
Page 89: Macintosh
The hardware devices connected to the system are displayed. Click the display-device-components check box. Highlight the device to be stopped by clicking on it then click “Stop.” A confirmation screen appears to indicate the devices to be stopped. Clicking “OK” stops the device. The safe-to-remove-hardware message appears. -
Page 90: Changing The Memory Card - Data-Transfer Mode
CHANGING THE MEMORY CARD - DATA-TRANSFER MODE Never remove or insert the card when the indicator lamp is lit - the data or memory card may permanently be damaged. Windows XP, 2000 Professional, and Me 1. Stop the USB connection using the unplug-or-eject-hardware routine (p. 88). 2. -
Page 91: Remote Camera System Requirements
REMOTE CAMERA SYSTEM REQUIREMENTS For the camera to be connected directly to Minimum system requirements the computer and used as a remote Pentium II 300MHz or later imaging device, the computer must be equipped with a USB port as a standard Windows XP, 2000 Professional, interface. -
Page 92: Connecting The Remote Camera
CONNECTING THE REMOTE CAMERA Before the camera can be connected to a computer, the remote camera driver must be installed, see page 91. A fully charged battery should be used when the camera is connected to a computer. The use of the AC adapter set (sold separately) is recommended over the use of the battery. -
Page 93: Notes On Remote Camera Operation
NOTES ON REMOTE CAMERA OPERATION When using the remote camera, exposure, white balance, and camera sensitivity are set to auto. The optical and 4X digital zoom are active. There are no menu controls. The flash is disabled. There is no audio. The camera can be focused periodically by pressing the shutter-release button partway down. -
Page 94: Pictbridge
PICTBRIDGE Confirm the transfer-mode option in section 3 of the setup menu is set to PictBridge. To print the images in the camera’s internal memory, remove the memory card from the camera. Connect the camera to a PictBridge compatible printer using the camera’s USB cable. The larger plug on the cable is connected to the printer. -
Page 95: Notes On Printing Errors
The number of prints in the print run are displayed as well No. of prints: as the print parameters selected with the menu. See the Print size: Printer setup menu navigation section for more information (p. 96). Press Layout: Printer setup the central button of the controller to begin printing, or press Print quality: Printer setup... -
Page 96: Navigating The Pictbridge Menu
NAVIGATING THE PICTBRIDGE MENU Pressing the menu button (1) turns the menu on and off. The four-way keys of the controller (2) move the cursor in the menu. Pressing the central button of the controller enters a setting. The options that can be changed vary with the printer. Activate the menu with the menu button. -
Page 97: Batch Print
Batch print – Paper size Printer setup DPOF print – Index print – Layout Printer setup Print quality Printer setup Data print Printer setup Index to menu functions Batch print, 97 Index print, 97 Print quality, 99 Data print, 99 Layout, 98 DPOF print, 99 Paper size, 98... -
Page 98: Paper Size
Paper size The paper size of the print can be specified in section 2 of the PictBridge menu. The printer Paper size Printer setup setup option uses the size set with the printer. Layout Print quality Highlight the current size setting in the menu Data print and press the center button of the controller to open the paper-size screen. -
Page 99: Print Quality
Print quality The print quality can be set in section 2 of the PictBridge menu. The printer-setup option uses the quality set with the printer. The fine quality can be specified with the camera. Data print Data can be printed with the image. The printer-setup option uses the options set with the printer. -
Page 100: Kodak Easyshare Software
KODAK EasyShare SOFTWARE The all-in-one digital photography software solution gives you an effortless way to organize, print, and share your pictures. Organize your pictures Kodak EasyShare software automatically organizes your pictures so you can find and view them quickly. Or create custom albums and sort pictures your own way. Create beautiful prints Turn your digital pictures into great prints with no hassles –... - Page 101 1.Close all software applications that are open on you computer (including antivirus software). 2.Place the Digital Camera Software CD-ROM into the CD-ROM drive. 3.Install the software: Windows OS-based computer – The launcher appears. Click the install Kodak EasyShare software button to begin the installation routine. If the install window does not appear, see software notes below.
-
Page 102: Dimage Master Lite
DiMAGE MASTER LITE DiMAGE Master Lite is your entrance into digital imaging. Image-processing tools Color, contrast, saturation, and sharpness can be optimized to bring out the best in your images. Advanced RAW image processing for specific model DiMAGE cameras ensures high-quality results. Image information Detailed information on how and when the image was recorded as well as file specifications can be viewed. - Page 103 For a complete description of DiMAGE Master Lite, refer to the pdf manual on the supplied DiMAGE Instruction Manual CD-ROM. The manual is located in the manual folder on the CD-ROM and organized in language folders. Copy the file to your computer for reference.
-
Page 104: Quicktime System Requirements
QUICKTIME SYSTEM REQUIREMENTS To install QuickTime, follow the instructions in IBM PC / AT Compatible the installer. QuickTime is not supplied with Pentium processor-based PC the camera in all sales regions. Users can or compatible computer download the latest version of QuickTime free of charge from the Apple Computer web site: Windows 98, Me, 2000, or XP. - Page 105 Problem Symptom Cause Solution Make sure the subject is within Subject is too close. the autofocus range (p. 26) or use the macro mode (p. 30). Pictures are Focus signal is not sharp. red. A special situation is Use the focus-lock function to preventing the autofocus focus on an object at the same system from focusing (p.
-
Page 106: About The Lithium-Ion Battery Charger Cord
ABOUT THE LITHIUM-ION BATTERY CHARGER CORD The AC cord is designed for the current of the sales region. Only use the cord in the region it was purchased. Region Product code Continental Europe, Korea, Singapore (220-240V) APC-150 China (220-240V) APC-151 Great Britain, Hong Kong (220V-240V) APC-160 United States, Canada, Taiwan, Japan (100V-120V) -
Page 107: Cleaning
• A special built-in battery supplies power to the clock and memory when the camera battery is exhausted or removed. If the camera resets each time the battery is replaced, the built-in battery is exhausted. It must be replaced at a Konica Minolta service facility. -
Page 108: Memory Cards
LCD monitor. Memory cards should not be used to permanently store image data. Always make a copy of camera files on an appropriate storage device or recording media. Konica Minolta has no Lock responsibility for any loss or damage to data. -
Page 109: Before Important Events And Journeys
Before important events and journeys • Check the camera’s operation; take test pictures and purchase spare batteries. • Konica Minolta has no responsibility for any damage or loss incurred by equipment malfunction. Operating temperatures and conditions • This camera has been designed for use in temperatures from 0°C to 40°C (32°F to 104°F). -
Page 110: Technical Specifications
English, German, French, Spanish, Italian, Swedish, Russian, Korean, Japanese, and Chinese (Simplified and Complicated). Battery: Konica Minolta NP-700 lithium-ion battery. Battery performance (recording): Approximately 150 frames: based on the CIPA (Camera & Imaging Products Association) standard: NP-700 lithium-ion battery, 2560x1920 image size,... - Page 111 standard image quality, no instant playback, no voice memo, flash used with 50% of the frames. Battery performance (playback): Approximate continuous playback time: 200 min.: NP-700 lithium-ion battery. External power source: Optional AC-4 or AC-5 adapter Dimensions: 83.5 (W) X 56 (H) X 22 (D) mm 3.3 (W) X 2.2 (H) X 0.9 (D) in.
- Page 112 © 2005 Konica Minolta Photo Imaging, Inc. under the Berne Convention and the Universal Copyright Convention. 9222-2812-11 P-A504 Printed in Japan...
Need help?
Do you have a question about the DImage X60 and is the answer not in the manual?
Questions and answers