Table of Contents
Advertisement
Quick Links
Advertisement
Table of Contents

Related Manuals for WayteQ N410


Summary of Contents for WayteQ N410
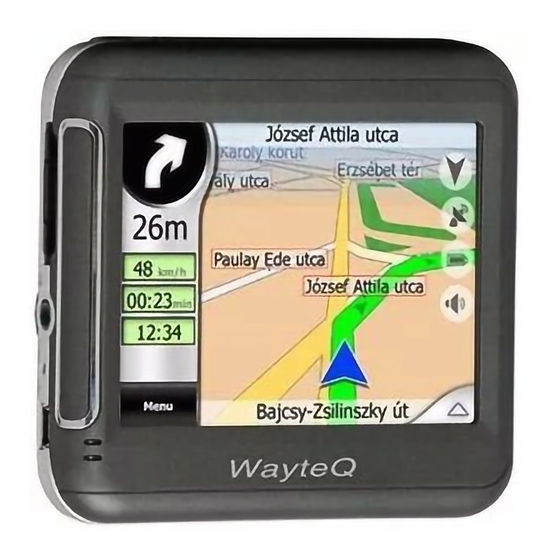
- Page 1 WayteQ N410 GPS Navigator Owner’s Manual English Version WayteQ Technology...
-
Page 2: Table Of Contents
2.2 Charging by Car Adapter.....................7 2.3 Install the cradle and Car Mount .................7 GPS Initial Start Up ......................8 B Functions Operation ........................9 Powering On & Off........................9 Main Interface ...........................9 Navigation.......................10 Music........................10 Photo ........................11 E Book........................13 Video ........................14 Setup ........................15 WayteQ Technology... -
Page 3: Precaution And Notice
In the box you will find Portable navigation device (PND) SD memory card (Plugged in the unit)* AC adapter Car adapter Car mount system Carry case* Owner’s manual Software manual* USB cable to connect to your PC Warranty Card* * optional accessories WayteQ Technology... -
Page 4: Basic Operation
A. Basic Operation 1. Understanding Product Components 1.1 Front components Touch Screen Charge Indication 1.2 Back components Speaker 1.3 Top components WayteQ Technology... -
Page 5: Left-Side Components
This card cannot be used to Store MUSIC and VIDEO files. Please use another SD card to do this and exchange them as necessary. The provided SD card is defaulted as “lock". You have to set as "unlock" before reading it. WayteQ Technology... -
Page 6: Right-Side Components
We recommend that you charge the unit for 12 hours in order to achieve the full charge. Subsequent charge times may be shorter. Plug the mains adapter into the socket on the rear of the unit marked 5V. Plug the adapter into the main supply. WayteQ Technology... -
Page 7: Charging By Car Adapter
Plug the car adapter into the socket marked 5V on the rear of the unit. Plug the other end on the adapter into the car’s 12V accessory socket. If possible fix the power cable so that it does not obscure instruments or controls. 2.3 Install the Cradle and Car Mount Install car Mount System WayteQ Technology... -
Page 8: Gps Initial Start Up
For updated and more information about Microsoft Active Sync, please visit the Microsoft website. 3. GPS Initial Start Up First start up should be in an open location without obstructions. Hold still while getting up to 4 GPS satellite signals. Then you can program your trip. Note: WayteQ Technology... -
Page 9: B Functions Operation
B. Functions Operation Powering On & Off (1)Press the “Power” button to power the equipment on and you can see the power-on image as shown below. Press the “Power” button again to turn the unit off. Main Interface WayteQ Technology... -
Page 10: Navigation
2. Music 1. Tap ”Music” icon on the main interface to enter the music playback function as the interface of document list: 2. Tap the file you want to choose to enter the following interface: Repeat Random File shift WayteQ Technology... -
Page 11: Photo
Tap the “X” to return the of file list interface. 3. Photo Tap the “photo” icon on the main interface to enter the picture browse function as the interface of document list: Double click on the file name to enter the following interface: WayteQ Technology... - Page 12 Tap “Previous” button to display the previous picture, tap “Next” button to display the next picture. Tap “Full Screen” button to display the picture in full screen as follows: The picture will be displayed automatically at full screen mode, and tap the screen to return to the following interface: WayteQ Technology...
-
Page 13: E Book
Document Name Page select Current Page/ Total Page Tap “Previous Page” button to turn to the previous page and tap “Next Page” to turn to the next page. Tap “Page select” button to choose the page which you want WayteQ Technology... -
Page 14: Video
Tap the “X” to return the of E Book list interface. 5. Video Tap “Video” icon on the main interface to enter the Video playback function as the interface of document list: WayteQ Technology... -
Page 15: Setup
Tap “Full Screen” button to play the movie in full screen. During play in full screen, tap the screen to return to the interface above. 6. Setup Tap the setup icon of the system to enter the Setup main list as the following interface: WayteQ Technology... - Page 16 Tap the “Volume” button to enter the interface of sound setting as follows: Tap the “Power” button to enter the interface of power setting as follow: Tap the “Backlight” button to enter the interface of backlight setting as follow: WayteQ Technology...
- Page 17 In the “Back Light” menu, choose the left button to decrease the brightness gradually, choose the right button to increase the brightness gradually. Tap the “Date & Time” button to enter the setting interface to adjust the date & time,as follows: WayteQ Technology...
- Page 18 Tap the “Skin” button to enter the interface of language and skin settings as follows: Tap the “System Information” button to enter the interface of the system information setting as follows: Tap the “USB” to set the USB working mode. WayteQ Technology...
- Page 19 Repeat each time to complete the calibration process. When completed, tap screen to return to the Settings screen. This document is for guidance only and does not form part of any contract, and may be subject to change without notice. WayteQ Technology...
Need help?
Do you have a question about the N410 and is the answer not in the manual?
Questions and answers