Table of Contents
Advertisement
Quick Links
User's Manual
Welcome to use our GPS navigator
●We reserve the final explanation right on this User's Manual.
●Specifications are subject to change without notice. Sorry for any inconvenience
caused!
●Please make a copy of the important data. We assume no responsibility for the data
loss.
●This manual has been carefully checked. Please contact our service center when any
typing mistake is found.
●Please read the operating instruction carefully and use the accessories only provided
by the original factory to avoid any unexpected damage. No warranty will be executed
if you are not following the instruction or connecting with the incompatible
accessories, we assume no responsibility for any loss and damage caused hereby.
●The electronic navigation data may be not in conformity with the actual transporting
marks due to the traffic construction development. Please be sure to comply with the
real road condition and follow the traffic rules. Operating and viewing the GPS during
driving may cause severe traffic accident. Our company will not be responsible for
any loss caused by the unexpected accident.
●Users can update and upgrade software from website at his/her option.
●Any discrepancy between the pictures with real products hereinafter, the real one
prevails
.
1
Advertisement
Table of Contents

Related Manuals for WayteQ X985BT


Summary of Contents for WayteQ X985BT
- Page 1 User’s Manual Welcome to use our GPS navigator ●We reserve the final explanation right on this User’s Manual. ●Specifications are subject to change without notice. Sorry for any inconvenience caused! ●Please make a copy of the important data. We assume no responsibility for the data loss.
-
Page 2: Chapter One Product Introduction
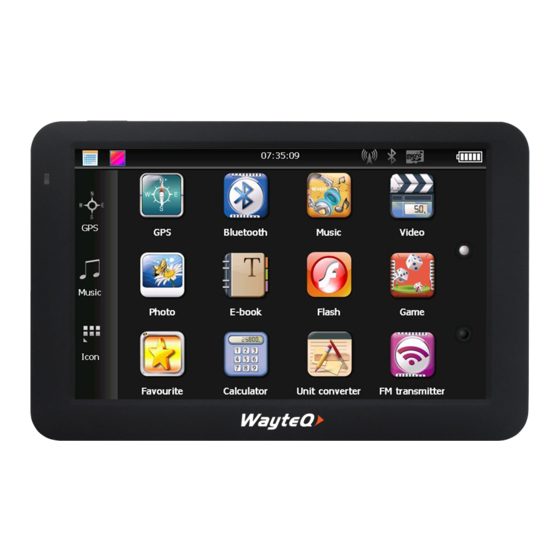
Chapter One Product introduction 1. 1 Introduction Welcome to use the GPS navigator, which is mainly used for navigating and also has the optional function of video playing, audio playing, Bluetooth hands free, FM, Bluetooth, photo viewing, and E-Book etc. ◆High performance, low-power consumption Mstar MSB2531A CPU;... -
Page 3: Chapter Two Features And Specifications
Chapter Two Features and specifications Main Features 2.1 Main features ◆Operating system: Microsoft Windows CE 6.0; ◆5.0’’TFT LCD display with resolution of 800*480 pixels; ◆Hi-Fi stereo earphone and built-in Hi-Fi speaker, volume adjustable; ◆Button and touch-screen operation; ◆Built-in sensitive GPS antenna; ◆The navigating software could run the SD card directly;... - Page 4 DC9-24V, 5V/1.5A Car Charger When charging, the red light is on; Status of the LCD when charge finished, the blue light is light Operating System Microsoft Windows CE 6.0 Navigation SD card Software ASF,AVI,WMV,3GP,MP4,FLV; Video Player Audio Player MP3 and WMA E-Album, JPG, BMP, PNG Photo viewer EBook Viewer...
-
Page 5: Product Appearance
2.3 Product appearance Chapter Three Manual Instruction 3.1 Power supply and charge If this navigator is first used, please use AV adaptor to fully charge it. 3.1.1 Power supply There are three types of supplying power: battery, adaptor, USB cable. GPS navigator uses the Li-battery to supply power when it is not connected with adaptor. -
Page 6: Power On/Off
pull out the adaptor while charging. When it is fully-charged, the LED will turn to Blue. If low battery or no battery, please charge it immediately. 3.1.3 Use the car charger to supply power ; Connect the DC part of the adaptor with the power interface 2. - Page 7 stylus. 【relative information】 :It can be no response in the following condition: 1. The shift between pictures is delayed or stopped. 2. The program select function cannot work normally, such as long time to carry out or cannot be activated. 3.
-
Page 8: Connect With Computer
3、Drawing: Click one point and hold to move on the screen. 【Note】Any broken stylus, ball pen or any acute and harsh object will destroy the LCD if you use it to operate the device. SD/MMC card The attached SD/MMC card contains the navigation software, map data and media file. -
Page 9: Chapter Four Primary Function
Enter into USB mode indicates it is connected to the PC, the PC can auto recognize new GPS navigation, GPS navigation will stop the current operation and switch into the PC connected interface., 【Note】Data security: Please copy the data to the outer storage device every time before you update your system data. - Page 10 Picture 4-1 Click desktop date, as Picture 4-2: Picture 4-2 Double-click the date icon enter the date setting interface, show in Picture 4-3...
- Page 11 Picture 4-3 Click the top left corner of the interface change the desktop display background, show in Picture 4-4 Picture 4-4 Click / to enter into navigation map...
-
Page 12: Function Introduction
Click / to open the audio player Click / to quickly open the desktop application. 4.1.2 Function introduction : Navigation Provide navigation service This device can answer and make phone after connecting with Bluetooth mobile phone via Bluetooth Support CMMB; Play ASF,AVI,WMV,3GP,MP4 and FLV formats video files, support progress selection, Video player pause, full screen play;... - Page 13 arrive the destination safely and rapidly. The system can let you enjoy the individual charm and enjoy your trip by many different ways such as vision map, vivid animation, voice indication, and words indication. The specific navigation functions are depended on your choice of navigating software.
- Page 14 Video player interface and operation This chapter introduces how to use GPS video player to play video file. 4.3.1 Function features Support ASF,AVI,WMV,3GP,MP4 and FLV file formats video files; Support full screen play, progress selection, file selection; Before video playing, please copy your video file (ASF, AVI, WMV, 3GP, MP4 and FLV formats) copy to any folder in memory card.
- Page 15 Picture 4-6 Close close current folder; Previous display previous page; page Next page display next page; video folder display video folder name; name Video name Display video name; Click selected video enter into video play interface, as Picture 4-7:...
- Page 16 Picture 4-7 Close click it to close video player; play it is paused, click it to play; next play next video; Click it to switch into video play interface, select your files list favorite movie(as Picture 4-6) Click it and left move it to decrease system volume; Volume click it and right move to increase volume;...
-
Page 17: Audio Player Interface And Operation
time played time/ total time; Audio player interface and operation This chapter will introduce how to use GPS audio player to play your favorite music, make it become your portable MP3. 4.4.1 Function features: Audio player support MP3 and WMA formats files; you can set the play order as you like. Before audio player work, please copy your audio files into any folder in another SD card. - Page 18 Picture 4-9 Function description: Close click it to close current folder; Previous display previous page; page Next page display next page; audio folder display the audio folder; name audio name Display audio name Click selected audio to enter into audio player interface, as Picture 4-10:...
- Page 19 Picture 4-10 Close close audio player; turn to background play Previous song Play previous page; play/pause to pause/play, click to play, click again it to play stop Click it to stop playing next song Click it to play next song; volume volume adjustment, left move to decrease volume, right indicates...
-
Page 20: Function Features
display music name Music name display the total time and the played time; time Photo viewer interface and operation This chapter introduces how to use GPS photo viewer to view photos. 4.5.1 Function features: 1.Support JPG、BMP and PNG formats view; 2.Support photo rotate, photo zoom in/out, automatic play etc. - Page 21 Picture 4-11 Picture 4-12 Close click it to close current folder; Previous page display previous page; Next page display next page;...
- Page 22 photo folder display photo folder; name File name Display file name Click selected photo to enter into photo play interface, as Picture 4-14: Picture 4-13 close click it to close photo viewer; Zoom out zoom out current photo; Zoom in zoom in current photo;...
- Page 23 file name, Display current photo name and its format. format E-Book reader interface and operation The chapter introduces how to use GPS e-book reader. 4.6.1 Function features Support TXT format reading; Support page selection, and file selection; Before opening the E-Book reading, please copy your text files into any folder in memory card. 4.6.2 Operation methods: Click button, the folder interface is as below Picture 4-14:...
- Page 24 Picture 4-15 text folder interfaces Close click it to current folder; Previous display previous page; page Next page display next page; E-Book display E-Book folder name folder name File name Display the file name. Click selected file name into E-Book reader, as Picture 4-16:...
- Page 25 Picture 4-16 E-Book reader interfac close click it to exit E-Book reader Previous page read previous page Next page read next page; click it to switch into current folder interface, select your book; as Picture folder 4-15; Font setting As picture 4-17 Color setting As Picture 4-18 add bookmark...
- Page 26 Picture 4-17 Font setting interface set the font as bold set the font as normal decrease words size Font size indicates increase words size...
- Page 27 Picture 4-18 color setting interface set color RGB Select text color, words color or selected background color decrease/increase the background color, font color and selected background color Color preset return to E-Book interface...
- Page 28 Picture 4-19 bookmark list interface return to E-Book interface click selected bookmark return to E-Book interface, skip to selected bookmark display current reading progress delete selected bookmark Flash interface and operation This chapter introduces how to use GPS Flash. 4.7.1 Function features: Flash play;...
- Page 29 4.7.2 Operation methods: Click「Flash」 button, open Flash interface as Picture 4-20: Picture 4-20 Picture 4-21 Close click it to close current folder;...
- Page 30 Previous click it to display page; page Next page click it to display next page; Video folder Video folder name name Video name Video name Click it to enter into Flash interface, as Picture 4-22: Picture 4-22 close click it to close video player; play indicates the movie is paused, click it to continue to play stop...
- Page 31 Volume - click it to decrease volume; progress left/right move to adjust progress via stylus, left move to adjustment backward, right move to forward; File name display current Flash name; Picture 4-29 4.9 Bluetooth setting and operation description: This chapter introduces how to connect the Bluetooth function and the phone to makes calls and receive calls. Operation methods: Click buttons open to Bluetooth interface, as Picture 4-36:...
- Page 32 Dial to dial phone numbers Phone book Display phone book Phone record display current phone record Bluetooth information lead the text message Dial internet set search mobile phones, lead the Bluetooth setting information management Open Bluetooth open/close Bluetooth function Click Bluetooth setting button, open Bluetooth setting as Picture 4-37:...
- Page 33 Picture 4-37 close click it to exit current interface now no Bluetooth phone is connected Device name PIN code connection click it to connect/disconnect status Modify click it to modify pin password, as Picture 4-33 password Pairing click it to enter pairing history, as Picture 4-34 history Search mobile search Bluetooth device, as Picture 4-35...
- Page 34 3 Click “/ ”button, enter into modify the name interface, as Picture 4-38 Picture 4-38 Set as your need, click button to switch from letters and numbers, click / to save. 4 click “/ ”button, enter into modify PIN password interface, modify the code as you want, click / to save.
- Page 35 Picture 4-40 click it to disconnect Bluetooth device click it to connect Bluetooth device click it to delete selected Bluetooth device click it to clear up all the history Bluetooth ”button to search Bluetooth device, as Picture 4-41: Click“/ Picture 4-41 Close click it to exit current interface...
- Page 36 Search Bluetooth Search Bluetooth device stop stop Bluetooth search connect Connect Bluetooth disconnect Disconnect Bluetooth Click selected mobile phone“N73gps”click “/ ”to connect, input the passwords to connect the Bluetooth device, close current interface, enter into below interface, as Picture 4-42: Picture 4-42 8 Close current interface, enter into below interface, all the buttons will turn to colorful pictures, it indicates it is paired, as Picture 4-43:...
- Page 37 Picture 4-43 close click it to close current interface dial dial phone numbers Phone book display phone book of paired phones Call history display current call history A2DP Lead into the SMS of paired phones Bluetooth set to search mobile phones, lead to the setting information management of paired phones Open Bluetooth...
- Page 38 Picture 4-44 Close click it to exit current interface number display the phone number you are inputting display area .it is made of ten numbers from zero to nine and “*” “#” Numeric “+” keyboard backspace click it to delete the last number Dial phone Click phone numbers...
- Page 39 Picture 4-45 11 If there is any call, display call and the phone number, as Picture 4-46: Picture 4-46 Click “ / ” button to reject calls, click / button to answer; Enter into below interface, as Picture 4-47:...
- Page 40 Picture 4-47 When the phone is connected, you can hear the talker through the GPS, and you can talk to him via the microphone, click button, you can switch the call between GPS navigation and the phone. Click / in Bluetooth interface, open the phonebook interface, as Picture 4-43: Picture 4-48 13 C lick...
- Page 41 Picture 4-49 4 Click / button enter into Bluetooth interface, as Picture 4-50: Picture 4-50 Bluetooth, audio/video long distance control are connected. Volume- Volume-...
- Page 42 Volume indicates Volume indicates Volume+ Volume+ play/pause play/pause Previous song Previous song Next song Next song stop stop 15 Click」/ button in Bluetooth interface, lead to the information in paired phones, as Picture 4-51: Picture 4-51 click it to read unread text message click it to view the read text message click it to view the sent message click it to vie unsent message...
- Page 43 click it to dial selected phone number 16 C lick multi-media / to enter into dial internet interface, as Picture 4-52: Picture 4-52 ”button enter into connect state, as Picture 4-53 Click“ Picture 4-53 Click / button enter into IE explorer; the program will start a browser, as Picture 4-54:...
- Page 44 Picture 4-54 return to previous return to previous website website go to next website go to next website Refresh interface Refresh interface stop opening the stop opening the webpage webpage click it to enter into small keypad, as Picture click it to enter into small keypad, as Picture 4-50 4-50 website Display the website...
- Page 45 Picture 4-55 4.10 Favorite Click button, enter into application management interface, as Picture 4-56: Picture 4-56 close click it to close current folder; click it to add new application into application management delete click it to delete selected application operation click it to start the operation Click button, enter into add application interface, as Picture 4-57;...
- Page 46 Picture 4-57...
- Page 47 Picture 4-58 Click it to select the application you want to delete, click button, and click YES to delete the application, as Picture 4-59:...
- Page 48 Picture 4-59 Click the application you want to start, click button to start the application, as Picture 4-60: Picture 4-60...
- Page 49 Click button to exit widgets interface. Games interface and operation: 4.11 enter into games interface, as Picture 4-57: Click Picture 4-61 4.12 Unit conversion icons enter into below interface as Picture 4-61: Click...
- Page 50 Picture 4-62 4.13 Calculator to enter into calculator interface, as Picture 4-63: Click / Picture 4-63...
-
Page 51: Usb Setting
4.14 USB setting Click button, open USB setting mode interface, as Picture 4-64; Picture 4-64 4.15 Volume setting o enter into volume adjustment interface, the volume setting includes: Click Speaker volume adjustment; click screen volume setting... - Page 52 Picture 4-65 close exit volume adjustment application; System provides ten levels volume (from mute Volume- to maximum), click it to decrease the volume by one level. System provides ten levels volume (from mute Volume+ to maximum), click it to increase the volume by one level.
-
Page 53: Backlight Setting
4.16 Backlight setting to enter into backlight setting, backlight setting adjustment as Picture 4-66: Click Picture 4-66 Close exit the backlight setting; click it to decrease the brightness till the lowest brightness - brightness; click it to increase the brightness till the strongest Brightness+ brightness;... -
Page 54: Time Setting
System will close the backlight after no operation for Time some time, enter into power save state. You can set the interval time as “never”, “three minutes”, “two minutes”, interval “1 minute”, “30 seconds”, “10 seconds” six options. 4.17 Time setting Click / to enter into time setting interface, time setting includes: System time setting;... -
Page 55: Screen Calibration
4.18 Screen calibration button, system popup “calibration” interface, as Picture 4-68: Click Picture 4-68 Click to enter into calibration interface via stylus, click +arrow, the arrow will move as: center, top left, lower left, top right, lower right, set the position as you like, click OK save it. If you don’t want to save the setting, keep 30 seconds, the system will exit the setting interface. -
Page 56: System Information
Picture 4-69 4.19 FM transmitter setting Click button set the receiving frequency of navigation and FM transmitter; enter into FM transmitter interface as Picture 4-70: Picture 4-70 FM transmitter is to transmit the audio signal into receiving device, Take FM 90.0mhz for example, now the navigation frequency is same as receiving frequency, is 90.0MHZ, now the two devices are in same frequency band, which make the navigation can output the sound. -
Page 57: Language Selection
Picture 4-71 4.21 Language selection Click / to enter into language setting interface, language setting includes: system remind words selection; Picture 4-72 Select language to set system language. 4.22 Navi Path Click enter into navigation path setting interface, as Picture 4-73: Picture 4-73... -
Page 58: Factory Restore
4.23 Factory restore button to enter into below interface as Picture 4-74: Click Picture 4-74 Click / to restore factory setting, click to return previous interface. -
Page 59: Gps Information
4.24 GPS Information Click / button, enter into GPS information interface, as Picture 4-75: Picture 4-75 4.28 Wince Click button, as Picture 4-90:... -
Page 60: Chapter Two: Trouble Shooting Handle And Maintenance Of
Picture 4-90 Chapter Two: Trouble shooting handle and maintenance of If your GPS can’t work, please check as below instruction, if the problems still can’t be solved, please contact our service center. Troubles Reason Solution Can’t startup low battery power supply power to system and battery through external power supply power supply is cut off... - Page 61 click the touch screen via stylus, backlight is close the screen will be brighter click buttons, no any touch screen is calibrate the screen again correct action not calibrated Play Without sound volume is too low Increase the volume earphone is not Insert the earphone well well connected communicate...
- Page 62 source. 【Note】If you carry the unit by air, please put the GPS together with your luggage to pass the X-ray detection system. Avoid scanning by the magnetic head detector (at the passage used for passing) or the magnetic bar (held by the security checker), or it will destroy the system date in the unit.
Need help?
Do you have a question about the X985BT and is the answer not in the manual?
Questions and answers