Primera optical disc publisher pro User Manual
Automated optical disc duplication & printing system
Hide thumbs
Also See for optical disc publisher pro:
- Specification sheet (2 pages) ,
- User manual (61 pages)
Table of Contents

Subscribe to Our Youtube Channel
Related Manuals for Primera optical disc publisher pro


Summary of Contents for Primera optical disc publisher pro
- Page 1 020608-510914-(07) Automated Optical Disc Automated Optical Disc Duplication & Printing System Duplication & Printing System *after registering your product. See www.primerawarranty.com for terms and conditions. © 2008 All rights reserved...
- Page 2 Notices : The information in this document is subject to change without notice. NO WARRANTY OF ANY KIND IS MADE WITH REGARD TO THIS MATERIAL, INCLUDING, BUT NOT LIMITED TO, THE IMPLIED WARRANTIES OF MERCHANTABILITY AND FITNESS FOR A PARTICULAR PURPOSE.
-
Page 3: Table Of Contents
Table of Contents Section 1: Getting Started..................1 A. Choosing a Good Location ..............1 B. Unpacking and Inspection...............2 C. Identifying the Parts .................3 D. PC System Requirements.................5 E. Mac System Requirements ..............5 Overview of Operation ................6 Section 2: Hardware and Software Set-Up ............9 A. -
Page 5: Section 1: Getting Started
Section 1: Getting Started THANK YOU… ...for purchasing the Disc Publisher Pro. It’s is the perfect all-in- one solution for producing professional looking CD-R and DVD-R discs. A wide variety of disc formats are supported, including audio CDs, Video Cds, data discs and more. Operation is simple and completely automatic once a job has been started. -
Page 6: Unpacking And Inspection
B. UNPACKING AND INSPECTION While unpacking your Publisher, inspect the carton to ensure that no damage has occurred during shipping. Make sure that all supplied accessories are included with your unit. The following items should be included: • Optical Disc Publisher •... -
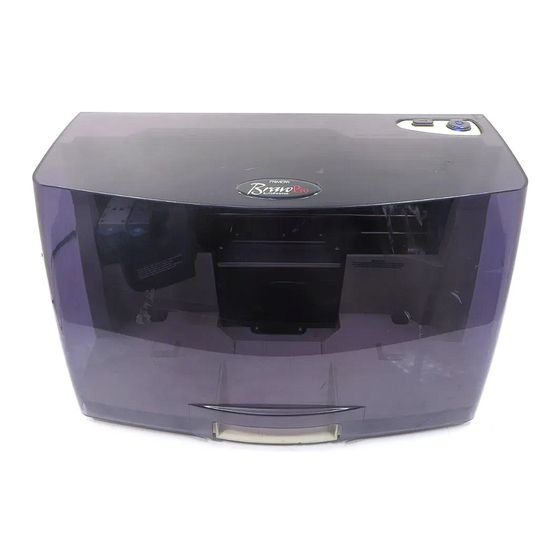
Page 7: Identifying The Parts
C. IDENTIFYING THE PARTS Front Panel and Top This illustration shows the Publisher, its Control Panel, Buttons, LED indicator lights, Input and Output Bins and other components. Control Panel / Front Cover Status Lights Ink Cartridge Carrier Color Ink Cartridge Monochrome Black Cartridge Power Button... - Page 8 The Control Panel contains LED Status Lights and Buttons to control the Publisher. The LED Status Lights indicate that Power is ON. They also blink in certain patterns to indicate an error or other condition of the Publisher. See Section 5 for a full explanation of the LED Status Light conditions.
-
Page 9: Pc System Requirements
The Power Input Port connects to the included power cable. The internal power supply is a switching 100V~240V power supply. The Power Switch shuts off all power to the Publisher. D. PC SYSTEM REQUIREMENTS Before getting started, it is important for you to verify that your PC meets the minimum system requirements. -
Page 10: Overview Of Operation
F. OVERVIEW OF OPERATION Your new Publisher is an automated, precision device intended for continuous-duty publishing of discs. The following is a description of the complete process of duplicating and printing a CD/DVD job on your Publisher: 1. Up to 50 blank discs may be loaded at one time into the Input Bin. - Page 11 4. The Recorder Trays then automatically shut. If a disc does not record properly (meaning that all or part of that disc is not recordable), the Robotic Disc Transporter picks it out of the CD Tray and sends it to the Reject Area. 5.
- Page 12 8. Print time varies according to which print mode has been selected (Section 3-A). In most cases, print time takes no more than 2 minutes. After printing the first disc, the Publisher's Printer Disc Tray opens automatically. The Robotic Disc Transporter moves the finished disc to the Output Bin.
-
Page 13: Section 2: Hardware And Software Setup
Section 2: Hardware and Software Setup Setup This section will describe the step-by-step process of setting up your Publisher. This includes information on how to load the supplies (ink and disc media) necessary to start producing discs. A. INSTALLING THE PC SOFTWARE The Installer Disc has a QuickStart menu that will guide you through the process of setting up your duplicator. -
Page 14: Hardware Setup
Due to the wide variety of printable-surface CD/DVD media, you may find that certain brands of discs provide higher print quality than others. For maximum print quality, use CD/DVD media authorized by Primera. Refer to the following steps when loading discs in to the Publisher:... - Page 15 • Open the front cover of the Publisher • The Publisher will automatically position the cartridge carrier and Robotic Disc Transporter to the center position allowing for easy access to the bins. • Load the Input Bin (the bin located on the right-hand side of the Publisher) with 50 blank discs and place the bins on the mounting pegs.
-
Page 16: Step 3: Connecting The Usb Cable/Installing The Driver
Step 3: Connecting the USB 2.0 Cable Connect the Publisher to your PC or Mac with your beige USB 2.0 Cable. If you are using a PC: If you are using a PC, after a few moments, Windows will tell you it has found new hardware and is looking for software to Windows XP Windows Vista... - Page 17 You will see a notice like the one shown below depending on which operating system you are using. Click Install Anyway or Install this driver software anyway to continue installing the printer driver for your Publisher. Windows XP Message Windows Vista Message If you are using a Macintosh: When connecting USB to a Mac it may be necessary to Add the printer via the Printer Setup Utility.
-
Page 18: Step 4: Installing Ink Cartridges
2. Click Add. Select the Disc Publisher Pro from the list of available printers. Click Add again. Step 4: Installing Ink Cartridges • With the cover open, press the Ink Cartridge Button to move the Ink Cartridge Carrier to the load position and open the ink cartridge covers. -
Page 19: Section 3: Creating Discs On A Pc
Section 3: Creating Discs on a PC There are two main components to creating discs, printing and burning. SureThing CD Labeler is used to design the printing on your discs. PTPublisher controls the recording and allows you to select the image to be printed to your discs. Both applications will be described in detail in this section. - Page 20 3. The Publisher will close the drive and read the contents of the disc. It will display disc type (CD/DVD) and show the size of the disc in Megabytes. Verify this information is correct and click the next arrow to continue. 4.
- Page 21 4A2 - Double Click on the file to add it to your project. You may add any BMP, JPG or SureThing (.std) file. SureThing files are automatically formated correctly. BMP or JPG files should be 4.72" x 4.72" square. For best print quality the image resolution should be atleast 300 dpi.
- Page 22 Choose the 120mm DiscTemplate from the window that appears. Using the buttons on the left navigation window, you may add your own background, choose a pre-made back- ground, choose from several text effects or insert a picture. Click the down arrow on the button to view all options.
- Page 23 Print Quality, Outer Margin and Inner Diameter are automatically adjusted to fit that media. If you are not using media sold by Primera you can adjust these settings by changing the quality setting or toggling the size of the printed outer margin or inner diameter. You can save your adjusted settings by clicking Save my Media.
-
Page 24: Using Ptpublisher
B. USING PTPUBLISHER The PTPublisher program is divided into six areas. Refer to the following for a description of each area. 1. Open Project Panel This panel allows you to open a previously saved project. It will also display the last few saved projects. To open or close this or any panel click on the down or up arrow on the upper right corner of the panel. - Page 25 4. Robot Status Panel This panel displays a picture of currently connected robot. The current status is also displayed. Important errors such as low ink will be displayed here. Click "more status" to view status regarding the printer, recorder drive, currently running jobs and job history log.
-
Page 26: Creating A Print Label Using Surething
C. CREATING A PRINT LABEL USING SURETHING The SureThing Disc Labeler software included with your Publisher is a great tool for creating professional looking discs. You can use SureThing's Smart Designs to quickly label a disc, or easily import your own design in many popular file formats. The Help section included with the software will provide complete instructions on all the features in this package. -
Page 27: Advanced Printer Driver Functions
4A. Open the text panel by clicking the arrow on the text button. Add text by selecting one of the options below. To create text that follows the curve of the disc choose Add Circular Text. 4B. You may also choose from several SureThing smart designs. - Page 28 Click on the Disc Publisher Pro icon with the right mouse button and select Printing Preferences. NOTE: Most applications allow you to change these same printer driver options from their "Print" and/or "Printer Setup" screens. This means that you don't have to go back to the main printer setup window each time you want to change a setting or option in the printer driver.
- Page 29 Paper Size The paper size option will be set to CD for printing onto printable surface CDs and DVDs. The remaining options apply if you have purchased the business card adapter kit. Non-printable Outer Margin Adjust this value to print all the way to the outer edge of a CD. This is useful if you are printing full coverage images.
- Page 30 Ink Cartridge Color + Black is best for images that have large areas of black graphics or text. Although you can print these same images with just the color cartridge, often the blacks will look darker with this setting. Color Only is default setting and is best for most images. With this setting the printer only uses the color cartridge to produce all colors including gray scale black and white images.
- Page 31 This number is incremented by 0.1mm so a change of 10 for inner diameter changes the diameter by 1mm. Set the diameter to 230 for Primera TuffCoat media. Cartridge Alignment The Cartridge Alignment prints a test print and then automati-...
- Page 32 Center The Print Image NOTE: Your printer comes from the factory pre-calibrated to print the image in the center of the CD. You can use this adjustment if you need to fine-tune this location. If you ever wish to verify your factory-calibrated Vertical and Horizontal calibration settings, you can run a simple calibration procedure to assure that your images will be centered when printed on a CD.
- Page 33 5. Along the Vertical axis of the printed disc, find the number whose lines touch. For example, in the above illustration, Enter the number 2 into the Vertical box of the Calibration window and 0 for the Horizontal axis. 6. Select the OK button. Your images should now be centered when printed on a disc.
-
Page 34: Using Other Graphics Programs
Clean/Purge Select Clean/Purge button to send a simple test pattern to the printer. Be sure to have a disc in the Publisher's input bin and the front cover closed. The test pattern, shown below, purges ink through nozzles of your ink cartridge to clear any blockages. -
Page 35: Using Kiosk Mode
When creating images in other graphics programs we recommend creating a 4.72 x 4.72 square image that has a 300 dpi resolution. F. USING KIOSK MODE Kiosk Mode allows you to use both of Publisher's Bins as input, doubling your disc capacity from 50 discs to 100 discs. In this mode, the finished discs will be deposited out through the front "reject area"... -
Page 36: Section 4: Creating Discs On A Mac
Section 4: Creating Discs on a Mac A. TUTORIAL: COPY A CD OR DVD 1. Double click the Discribe Icon to launch the program. You will see a splash screen followed by Discribe's Quick Start Menu. 2. Click the Copy a CD/DVD button. 3. - Page 37 4. Select the drive that contains your master as the source drive. 5. Click the Burn… button. At this point, if you are using a Disc Publisher Pro or XRP for the first time on this comput- er, you will be prompted, "You must choose a robot and a recorder to write a disc."...
- Page 38 YOU MUST CLICK Page Setup and set Format For to Disc Publisher PRO! Also set the option to select a paper size to correspond with the type of disc you are using. 10. Print Settings will launch the Printer Driver settings when clicked.
-
Page 39: Using Discribe 5.3
B. USING DISCRIBE 5.3 B.1 Starting a Project The initial Discribe starter window provides 3 project types: Audio CD, Data CD and Copy CD / DVD. Choose one. Many more projects are available once the data picker window is open. Once you are in one of the main three project types you may choose any of the other available project types by clicking the drop down box at the top of the screen and selecting one of the projects. - Page 40 Universal Disk Format (UDF). Use this project type to create a data DVD for a Mac and a PC. DVD Video/Audio. This project type can be used to create DVD videos from properly formatted Video_TS and Audio_TS folders on your hard drive. Note: Video_TS and Audio_TS folders must first be created by a DVD authoring program.
- Page 41 B.4 Queue Projects To queue a project choose the Queue Job button at the bottom of the Data Picker window instead of the Burn button. If you have not yet saved your project, you will be prompted to do so at this time. The Robot Write Window described in Section 4B.5 will be displayed.
- Page 42 B.5 Robot Write Window For any project Use the Robot Write Window to choose the print file, change print quality settings and choose the number of copies in a project. Print settings are explained in more detail in Section 4D. Other settings on this screen can usually be left at their default values.
- Page 43 An optional Kiosk Kit is available from your Primera reseller that contains a custom output bin to catch the finished discs as they leave the Disc Publisher.
-
Page 44: Printed Label Format Requirements
• Check Ignore Read Errors if you know your master may have scratches but you would like to copy it anyway. Be aware that copies may not be playable or may have notice- able quality problems. • Always check BURN-Proof/JustLink. This prevents bad discs resulting from inadequate hardware C. -
Page 45: Printing Only
4. Before you print or save your image in another format, either hide the template layer or delete the template layer. The circular shape and center cut out should not be printed. Use it only as a guide to layout your image. D. - Page 46 The following is a description of the printer driver settings: • Cartridge to use The Black and Color setting will use both cartridges when printing your image. Color will only use the Color Cartridge, and Black Only will only use the monochrome cartridge for printing.
- Page 47 For the discs that Primera sells, use the following guide for Inner Diameter: − 23 mm for Primera's Tuff-Coat media −...
-
Page 48: Configuration Utility
F. CONFIGURATION UTILITY The Configuration Utility is a program that installs with your Publisher software. This utility allows you to monitor ink levels, maintain and calibrate ink cartridges and align printing on the disc. The Configuration Utility can be launched from the Print Center in OSX by doing the following: 1. - Page 49 Clean Cartridge Cartridges that sit idle in the Publisher for a period of time may start to experience some drying of ink in the tiny nozzles that make up the print head. Clicking the Clean Cartridge button will cause the Publisher to pick a disc and place in into the printer tray.
- Page 50 Image Centering The Image Centering button will print a test pattern on your disc to help you center the printed image on your disc. If you see a half moon sliver of whited un-printed space on the outside or inside of your disc, you may need to run this calibration.
- Page 51 Once the print has finished, you will see the following dialog box: Look at the finished alignment disc and pick the numbers that come closest to lining up with one another. For instance, on the disc shown in this manual, the vertical alignment is 2 and the horizontal alignment is 0.
-
Page 52: Section 5: Interpreting The Publisher's Indicator Lights
Section 5: Interpreting the Publisher's Indicator Lights The Power and Busy LED indicator lights located on the top of the Publisher can tell you a lot about what is happening inside the Publisher. To accurately interpret what it means when these lights are on, off, or flashing, please refer to the following: Ink Cartridge Power... -
Page 53: Section 6: Maintenance And Troubleshooting
Section 6: Maintenance and Troubleshooting The Publisher is designed to operate for extended periods of time with very little attention. In fact, no regular maintenance is recommended other than cleaning the outside case. NOTE: Do NOT attempt to oil or grease the Publisher's Robotic Arm shaft or other components. -
Page 54: Mac Software Test
C. MAC SOFTWARE TEST This will confirm that the hardware, software, and your computer are all communicating properly. To perform a software test please do the following: 1. Launch Discribe. 2. Click one of the options from the quick-launch menu (i.e. -
Page 55: Transporting The Publisher
Publisher. Source Location Primera Knowledge Base www.primera.com/knowledgebase.html PTPublisher Software Help files Open the software. Click on the SureThing Software Help files Open the software. -
Page 56: Section 7: Technical Specifications
Section 7: Technical Specifications Model Optical Disc Publisher Pro Configurations CD-R Publisher DVD+/-R Publisher Printing Method Ink-Jet Printing Resolution 4800 x 1200 dpi, 2400 x 1200 dpi, 1200 x 1200 dpi, 600 x 600 dpi Ink Types Dual Cartridges: One 3-color (CMY) - Page 57 Dimensions 17.8"W x 11"H x 17.6"D (452.12mmW x 279.4mmH x 447.4mmD) EMC Certifications FCC Class B, CE Safety UL, UL-C, CE Tow years Warranty Technical Specifications...
-
Page 58: Index
Index Activity Log..................19 Alignment Calibration..............45 CD Tray ....................7 Centering Test Print...............46 Color Matching.................26, 42 Connections, Rear Panel..............4 Controls, Front Panel...............3 Current Projects Panel ..............20 Disc Output Location ..............30 Identifying the Parts................3 Ink Levels and Cartridge Maintenance........29 Ink Saturation.................27 Input Bin....................4 Inner Diameter .................27, 43 Job History Log ................21 Kiosk Mode Setup and Use ..........31, 39, 42... - Page 61 Printed in the United States of America P/N 510914...
Need help?
Do you have a question about the optical disc publisher pro and is the answer not in the manual?
Questions and answers