
Related Manuals for Primera PX450e


Summary of Contents for Primera PX450e
- Page 1 151211-511250-(02) (Color Printer 450) User’s Manual An online version of this manual can be found at http://primera.eu/europe/manuals.html *after registering your product. See www.primerawarranty.com © 2011 All rights reserved for terms and conditions.
- Page 2 : The information in this document is subject to change without notice. NO WARRANTY OF ANY KIND IS MADE WITH REGARD TO THIS MATERIAL, INCLUDING, BUT NOT LIMITED TO, THE IMPLIED WARRANTIES OF MERCHANTABILITY AND FITNESS FOR A PARTICULAR PURPOSE. No liability is assumed for errors contained herein or for incidental or consequential damages in connection with the furnishing, performance, or use of this material.
- Page 3 A. Choosing a Good Location ..............1 B. Unpacking and Inspection..............2 C. Identifying the Parts ................3 D. Computer Specifications ..............4 A. Connecting Power................5 B. Connecting the USB Cable/Installing the Printer Driver ....5 C. Installing Media ..................7 D. Installing the Ink Cartridge .............10 E.
- Page 5 ...for choosing an PX450e Color Point-of-Sale Printer. The PX450e Printer will print full color point of sale images quickly and reliably. This User's Manual is your complete step-by-step guide to quickly and easily setting up and printing with your new Printer! •...
- Page 6 While unpacking your printer, inspect the carton to ensure that no damage has occurred during shipping. Make sure that all supplied accessories are included with your unit. The following items should be included: • Printer • Power Adapter • Separate Power Cord •...
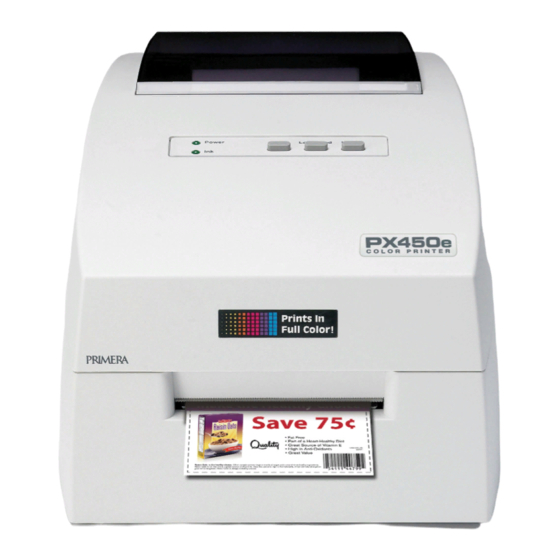
- Page 7 This illustration shows the front of the printer with its control buttons and LED indicator lights. Media Sensor Bar Power LED Ink LED Top Cover Ink Button Cutter Load/Feed Button Unload Button indicates that the printer is on and ready to receive print jobs.
- Page 8 This illustration shows the input ports and power switch found on the rear panel of the printer. Fan-fold Media Slot Power Switch USB Port Power Input Port For optimal printing speed you must have a PC with the following minimum specifications: •...
- Page 9 1. Locate the Power Adapter supplied with your printer. 2. Plug the Power Adapter into the Power Input Port on the rear panel of the printer. 3. Plug the Power Cord of the adapter into an available wall outlet or surge protecting power strip.
- Page 10 4. Select "Install the software automatically" and click You may see a notice like the one shown here stating that the Printer has not passed Windows Logo Testing. Click to continue installing the printer driver for your Printer. Hardware and Software Settings...
- Page 11 Your printer will utilize a wide variety of continuous media. Most inkjet receptive media within the provided size specifications will work in your printer. Primera carries a variety of media that has been converted and is ready for use with your printer.
- Page 12 4. Place the media roll between the Roll Core Holders and release the spring-loaded Media Guide to hold the roll. The Roll Core Holders allow the roll to move freely. 5. Place the leading edge of the media between the Throat Guide and the side of the printer.
- Page 13 For narrow media it may be necessary to adjust the media sensor position. The scale on the Media Sensor Bar represents the distance from the sensor to the left edge of the media. Adjust the sensor to be roughly centered on the media. The media sensor is used to automatically detect when a label is fed into the printer and to stop the printer when the media is depleted.
- Page 14 Your printer has a built-in ink tracking system. This system is designed to warn you if your ink cartridge is low on ink. This ensures your labels will print properly. In order to make this system work properly, the Ink Cartridge must be changed using the procedure listed below.
- Page 15 Cartridge alignment is optional and is only necessary if you would like to improve print quality. Cartridge alignment will align the Color Ink Cartridge for bidirectional printing and calibrate the printer to each individual cartridge. Align the cartridge via the printer settings which are described in Section 4.
- Page 16 The printer has an integrated cutter that is designed to cut media on a continuous roll. By default the printer will auto- matically cut the media immediately after the image is printed. You can adjust when the cutter will cut and the cut position by accessing the settings in the Printer Preferences.
- Page 17 Every one-hundred cuts the cutter will cut twice (one cut, one cycle) to clean the blades. If you are using Primera wristband stock the default Cut Position is set so that you do not cut through the adhesive portion of the the stock.
- Page 18 Refer to the following steps to change or verify your default printer driver preferences. Click the Start button; choose Printers and Faxes. Right-click on the Color Label 450 icon and select Printing Preferences from the drop-down menu. The preferences screen will appear. Printer Settings...
- Page 19 This setting allows you to set the height and width of your print image in .01" or .1mm increments. There are two settings for orientation, Portrait and Landscape. If your text and graphics print left to right or as shown on the screen, select portrait .
- Page 20 Best for Photos mode is best used for photographic images where accurate color reproduction is essential. Images printed in this mode will look lighter than those printed in Photo mode. Skin tones especially will look more natural in this mode. Exact color matching of the printed image to the screen may not be possible since there are factors that affect this out of the drivers control.
- Page 21 This number can also be used to calculate total number of prints you can get from one cartridge and also ink cost per label. Use the following formula: Prints Remaining X 100 / Percentage of Ink Remaining = Total Prints from a Full Cartridge. In the example above 300 X 100 / 83 = 361 prints from a full cartridge.
- Page 22 Clicking on the Details button will allow you to view information about printer settings stored in the printer. There is also a Print Counter in the details window to help you count the number of prints printed since the last time it was reset.
- Page 23 Do not present. The media does not move after the last image is printed. This means that part of the last image printed is still in the printer. The media is not cut. Cut after No Activity. Use this setting to print multiple images/pages/documents consecutively and then cut after all have been printed.
- Page 24 This will be factory calibrated. If fine-tuning is needed, increase this setting to move the image right on the media; decrease this setting to move the image to the left on the media. The unit of measure is 0.1mm. This setting allows you to fine-tune the image starting position on your media.
- Page 25 When the printer driver is installed in Section 2, a configuration INI file is also installed. You can edit the settings in the file to control some advanced printer functions. Configuration settings are located here: C:\Documents and Settings\All Users\Application Data\PTI\Drivers\Color Label 450\pt_lp450.ini C:\ProgramData\PTI\Drivers\Color Label 450\pt_lp450.ini Many of these settings will increase or decrease the time it takes to print the media.
- Page 26 ; 0 = DBGLVL_ZERO ; 1 = DBGLVL_TRACE ; 2 = DBGLVL_DUMP ; 3 = DBGLVL_INFORM (default if not specified) ; 4 = DBGLVL_WARNING ; 5 = DBGLVL_ERROR ; 6 = DBGLVL_FATAL DebugThreshold = 3 ; Number of passes override ;For 600x600 NumPasses can be: 1,2,3,4,6,8,12,16 ;...
- Page 27 ; 0 = disable horizontal scan ; 1 = enable scan at the end of each print (fast but may not be as accurate - if printing is full bleed or too close the the edge of the label then it may scan at the beginning of the next label). NOTE: when Output mode is set to Present or Cut then it will always scan at the beginning of the first label ;...
- Page 28 ;; 1 = Reflective Mode (e.g. Black mark on back) ;; 2 = Continous Stock (don't use sensor) ;; 255 = Use printer setting (this is default) TOF_Sensor = 255 ; Flash frequency - for LX400 ; Number of times per second to blink the LED ;...
- Page 29 When printing on media other than continuous, the PX450e decides where to start printing by detecting the start of a die- cut label, detecting a black mark on the back or detecting a thru-hole that corresponds to the start of the label.
- Page 30 . If you have purchased label stock from someone other than Primera, test the unit with the label sample material that came with the unit. If it prints correctly, your paper stock may not be compatible. The media sensor needs to see the difference between a label and a backing material by seeing through the paper stock for light variations.
- Page 31 Often times a space on the right (printer’s left) side indicates a margin around the media that is not being accounted for. The printer is factory calibrated for a 2mm margin. A larger margin around the media will cause a right (printer’s left) side space. Often the page size is not large enough for the media.
- Page 32 If there is a media jam in the printer mechanism, first attempt to remove the jam by opening the Top Cover and removing the jam from the printer output area. If the jam can not be located, it is possible to remove a cover over the printer input area.
- Page 33 User's Guide should, in most cases, solve the problem. If you still have difficulty, contact the technical support number using one of the methods listed below. Primera Knowledge Base www.primera.com/knowledgebase.html NiceLabel Software Help files Open the software. Click on the Email Support sales@primera.eu...
- Page 34 Printing labels is not recommended as this printer was designed for continuous media. However, since the printer is capable of sensing labels, the following information that is specific to labels is provided with no representations regarding reliability. Label Sensing Methods Label Width Liner/Media Width Gap Between...
- Page 35 Distance from edge of 1.90" (48.3mm) 0.20" (5.1mm) media to edge of thru-hole Reflective/Black Equal to distance 0.10" (2.5mm) Mark Width* between labels Max Outer Diameter (OD) 5.0" (127mm) Inner Core Diameter (ID) see roll specifications below Stock Thickness 0.006” (152 micron) Distance from edge of Printer driver assumes 2 mm gap.
- Page 36 Inkjet 4800 x 1200 dpi, 1200 x 1200 dpi, 600 x 600 dpi #53376 Color (CMY) 16.7 million Continuous Paper Stock, Roll-fed pressure- sensitive labels, roll-fed tags Moveable see-through sensor for die-cut labels and reflective for tags with black stripe sensing (not recommended) Calculates actual number of prints remaining based upon ink usage of graphics being printed (patent-pending)
- Page 37 Cartridge Alignment..............11, 16 Cleaning the Ink Cartridge............29 Configuration ..............12, 19, 21 Connecting Power................5 Cut Position ..................20 Cutter ....................12 Ink Low LED ..................3 Ink Saturation ..................16 Installing Media ................7 Installing the Ink Cartridge ............10 Installing the Printer Driver ............5 Left Margin Offset ..............20, 26, 31 Load/Feed Button ................3 Media Sensor Bar ................3 Media Specifications...............30...
- Page 40 Printed in the United States of America P/N 511250...
Need help?
Do you have a question about the PX450e and is the answer not in the manual?
Questions and answers