Advertisement
Quick Links
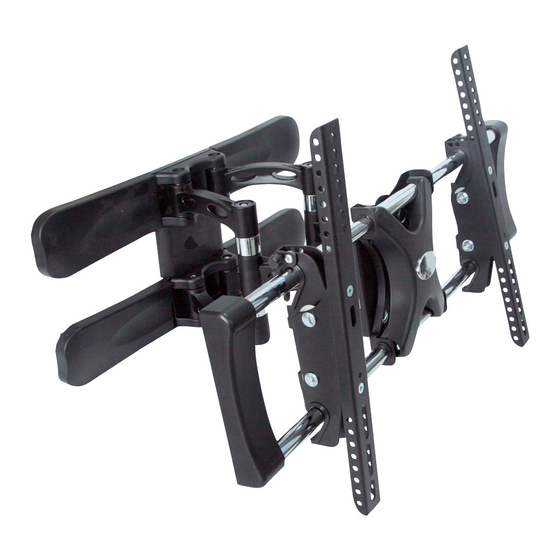
Adjusting the display
Adjusting the display
This mount provides a wealth of display adjustment to offer the best viewing from a
number of seating positions. See Fig. 6.
Vertical Tilt Adjustment Angle
Vertical adjustment angle is -5º to 15º.
Left to Right Pan Adjustment Angle
The display can pan ±60º from left to right. Choose the desired position and use
provided Wrench to tighten the front bolt on the top of the Arm Assembly.
Left to Right Swivel Adjustment Angle
The display can swivel ±60º from left to right. Choose the desired position and use
provided Wrench to tighten the back bolt on the top of the Arm Assembly.
Stowing the Display -Positions the display against the wall Grasp the side edges of the
display, swivel and pull the display into the center position, and then push the display
straight back towards the wall into the stowed position.
Note:
Note:
Use care when stowing the display to ensure that cables do not become pinched.
±60°
°~
°
-5
15
±5°
-12-
Lateral Tilt adjustment angle is ±5º.
±60°
±60°
Pyle Audio
Fig. 6
1600 63rd st , Brooklyn, NY, 11204
(718)236-8000
Multifunctional wall mount
INSTALLATION GUIDE
Item No.:PSW976S
Item No.:PSW976S
"
Ideal for Flat Panels from 32 to 50
Weight Capacity:15kg/33lbs~60kg/132lbs
Adjustable Tilt
Adjustable Roll Control
Bulit in leveler system
IMPORTANT:
IMPORTANT: If don't understand about right install ways, please
consult to normal installing specialist.
"
.
.
www pyleaudio com
MADE IN CHINA
Advertisement

Subscribe to Our Youtube Channel
Related Manuals for Pyle PSW976S


Summary of Contents for Pyle PSW976S
-
Page 1: Installation Guide
The display can swivel ±60º from left to right. Choose the desired position and use provided Wrench to tighten the back bolt on the top of the Arm Assembly. Item No.:PSW976S Item No.:PSW976S Stowing the Display -Positions the display against the wall Grasp the side edges of the display, swivel and pull the display into the center position, and then push the display straight back towards the wall into the stowed position. - Page 2 Contents of the ox: Hardware shown as actual size Contents of the ox: Hardware shown as actual size Step 5:Using Cable Management Step 5:Using Cable Management Make sure that none of these parts are missing before beginning This mount includes a cable management feature, where cables can be routed along length of the Arm Assembly.
- Page 3 WARNING We are not responsible for any personal injury or product damage due to mishandling, incorrect mounting, incorrect assembly or incorrect use of this product. Note: The supplied wall mounting hardware is not for use on steel stud walls or cold cinder block walls.
-
Page 4: Plastic Cover
Following examples shows how to use bolts, spacers and square washers. Installing the Plastic Cover Installing the Plastic Cover Step 3: Step 3: 1.Some displays have vertical backs. No spacer is required. Install the bracket directly Secure the separated Plastic Cover over the Wall Plate by pushing them to the back of display by using bolts and square washers provided. - Page 5 2. Some displays have cur ved backs with Brick, Concrete and Stone wall: Brick, Concrete and Stone wall: recessed mounting lands(Fig.a). It will Using a awl or nail to make where the nails are located. Distance between two nails require the use of spacer. For this display, ”...
- Page 6 Step 2: Step 2: Attach mount to wall Attach mount to wall After determining the height of stand, follow the installation instructions in below to install wall mount to different kinds of wall -wooden, brick, concrete and stone. First, determine the height of stand The best height of stand is parallel to eyelevel of a person who sitting on a couch.
Need help?
Do you have a question about the PSW976S and is the answer not in the manual?
Questions and answers