NetComm NTC-6000 Series User Manual
3g m2m router
Hide thumbs
Also See for NTC-6000 Series:
- User manual (63 pages) ,
- Command manual (32 pages) ,
- Quick start manual (20 pages)
Table of Contents
Advertisement
Quick Links
Advertisement
Table of Contents

Related Manuals for NetComm NTC-6000 Series


Summary of Contents for NetComm NTC-6000 Series
- Page 1 User Guide NTC-6000 Series – 3G M2M Router...
- Page 2 Copyright© 2014 NetComm Wireless Limited. All rights reserved. The information contained herein is proprietary to NetComm Wireless. No part of this document may be translated, transcribed, reproduced, in any form, or by any means without prior written consent of NetComm Wireless.
-
Page 3: Table Of Contents
LED indicators ....................................... 7 Interfaces ........................................8 Configuring your Router ................................10 Setting Up the Cellular Router ..................................10 Installation and configuration of the NTC-6000 Series router....................11 Powering the router ..................................... 11 Installing the router ...................................... 11 Advanced configuration ................................12 Status ...................................... -
Page 4: Overview
Overview Introduction This document provides you all the information you need to set up, configure and use the NetComm Wireless NTC-6000 Series router. Target audience This document is intended for system integrators or experienced hardware installers who understand telecommunications terminology and concepts. -
Page 5: Product Introduction
Product overview An NTC-6000 series router allows you to build wide area networks utilizing the superior speeds supported by 3G UMTS networks. Employing an embedded 3G UMTS modem module the router offers downlink speeds of up to 7.2Mbps and uplink speeds of up to 5.76Mbps. -
Page 6: Product Features
Software Development Kit (SDK) for the creation of custom applications Dual system management - recovery mode to restore router system software in the event of corruptions locally or remotely. TR 069 functionality for ACS server management. NetComm Wireless 3G M2M Router www.netcommwireless.com... -
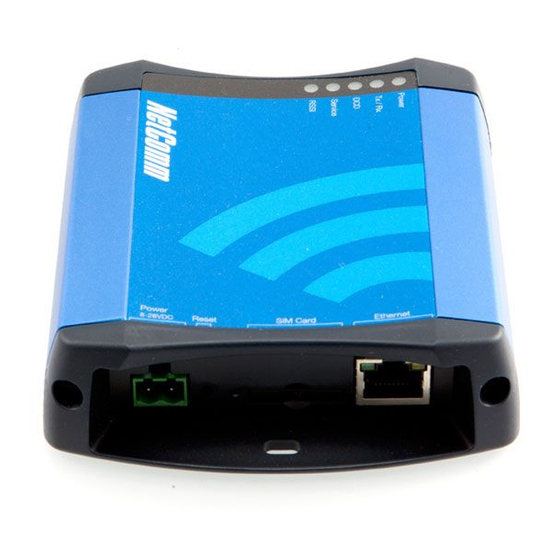
Page 7: Hardware Overview
Hardware overview LED indicators There are a total of five LED’s on the router. Listed below are the specifications of the LEDs and their corresponding colours. Figure 1: NTC-6000 Series LEDs DISPLAY DESCRIPTION POWER (red) Solid ON The red Power LED indicates power has been applied to the router from the DC power input jack. -
Page 8: Interfaces
If you change your mind after holding the reset button down for more than 15 seconds, you can cancel the factory reset by removing the power source before releasing the button or by releasing the button and quickly pressing it once more. NetComm Wireless 3G M2M Router www.netcommwireless.com... - Page 9 Ethernet Port For direct connection to your devices through a hub or network router. SIM Card Reader For insertion and removal of SIM card. Table 3: Router Interface Ports www.netcommwireless.com NetComm Wireless 3G M2M Router RouterRouter/...
-
Page 10: Configuring Your Router
When power is correctly supplied to the router, the red power LED on the panel illuminates. Polarity of DC Power Plug Screw Terminal Figure 5 – Locking Two-way Power Terminal Block SIGNAL DESCRIPTION Voltage + Ground Table 4 - Locking power block pin outs NetComm Wireless 3G M2M Router www.netcommwireless.com... -
Page 11: Installation And Configuration Of The Ntc-6000 Series Router
Ensure the external power source is switched on and wait 2 minutes for your NTC-6000 Series router to start up. To check the status of your router, compare the LED indicators on the device with those listed in the... -
Page 12: Advanced Configuration
Advanced configuration The NTC-6000 Series router comes with pre-configured settings that should suit most customers. For advanced configuration, log in to the web-based user interface of the router. To log in to the web-based user interface: Open a web browser (e.g. Internet Explorer, Firefox, Safari), type http://192.168.20.1... -
Page 13: Status
Status The status page of the web interface provides system related information and is displayed when you log in to the NTC-6000 Series router management console. The status page shows System information, LAN details, Cellular connection status, Packet data connection status and Advanced status details. You can toggle the sections from view by clicking the buttons to show or hide them. - Page 14 The channel number of the current 3G/2G connection. Module PRIID Revision Module version used for customization. Module PRIID PRI part number The part number of the Module PRIID. Table 7 - Status page item details NetComm Wireless 3G M2M Router www.netcommwireless.com...
-
Page 15: Networking
The data connection page allows you to configure and enable/disable the connection profile. To access this page, click on the Networking menu, and under the Wireless WAN menu, select the Data connection item. Figure 8 – Data connection settings www.netcommwireless.com NetComm Wireless 3G M2M Router RouterRouter/... - Page 16 To manually configure a connection profile: Click the Edit button corresponding to the Profile that you wish to modify. The data connection profile settings page is displayed. Figure 9 - Data connection profile settings NetComm Wireless 3G M2M Router www.netcommwireless.com...
- Page 17 WAN IP address of the router’s internal NAT IP address. This may be disabled if a framed route configuration is required and local devices require WAN IP addresses. www.netcommwireless.com NetComm Wireless 3G M2M Router RouterRouter/...
- Page 18 Status page. When there is a mobile broadband connection, the WWAN section is expanded showing the details of the connection and the Status field displays Connected. To see details on the connected session, you can click the Show data usage button. Figure 11 - WWAN connection status section NetComm Wireless 3G M2M Router www.netcommwireless.com...
-
Page 19: Operator Settings
The GSM All and the WCDMA all options allow you to force the device to lock to either 2G networks only, or 3G networks only. Click the Save button to save and apply your selection. www.netcommwireless.com NetComm Wireless 3G M2M Router RouterRouter/... -
Page 20: Sim Security Settings
PIN. The PIN settings page lists the status of the SIM at the top of the page. If you are not redirected to the PIN settings page, to unlock the SIM: Click on the Networking menu from the top menu bar, and then click SIM security settings. NetComm Wireless 3G M2M Router www.netcommwireless.com... - Page 21 In situations where the router will be unattended, this is not desirable. Note: Select Remember PIN if you do not want to enter the PIN code each time the SIM is inserted. Click the Save button. If successful, the router displays the following screen: www.netcommwireless.com NetComm Wireless 3G M2M Router RouterRouter/...
- Page 22 Figure 16 - SIM security settings - SIM unlock successful NetComm Wireless 3G M2M Router www.netcommwireless.com...
- Page 23 Enabling/Disabling SIM PIN protection The security PIN protection can be turned on or off using the PIN protection toggle key. Figure 17 - PIN Settings www.netcommwireless.com NetComm Wireless 3G M2M Router RouterRouter/...
- Page 24 PIN fields, then enter the desired PIN into the New PIN and Confirm new PIN fields and click the Save button. Figure 18 - PIN settings - Change PIN When the PIN has been changed successfully, the following screen is displayed: Figure 19 - SIM security settings – PIN unlock successful NetComm Wireless 3G M2M Router www.netcommwireless.com...
- Page 25 You will be issued a PUK to enable you to unlock the SIM and enter a new PIN. Enter the new PIN and PUK codes. Click the Save button when you have finished entering the new PIN and PUK codes. Figure 20 - SIM security - SIM PUK locked www.netcommwireless.com NetComm Wireless 3G M2M Router RouterRouter/...
-
Page 26: Lan
DNS servers. With DNS masquerading ON, the DHCP server embedded in the NTC-6000 Series router hands out its own IP address (e.g. 192.168.20.1) as the DNS server address to LAN clients. The downstream clients then send DNS requests to the NTC-6000 Series router which proxies them to the upstream DNS servers. - Page 27 DHCP server is located on the Wireless WAN or LAN connections, the clients behind the NTC-6000 Series router are able to communicate with the DHCP server when DHCP relay is enabled. This enables the NTC-6000 Series router to accept client broadcast messages and to forward them onto another subnet.
- Page 28 In the IP Address fields, enter the IP address that you wish to reserve for the device. If the Enable toggle key is not set to ON, click it to switch it to the ON position. Click the Save button to save the settings. NetComm Wireless 3G M2M Router www.netcommwireless.com...
- Page 29 Clone button and the details will be copied to the address reservation list fields. Remember to click the Save button under the Address reservation list section to confirm the configuration. Figure 25 - Dynamic DHCP client list www.netcommwireless.com NetComm Wireless 3G M2M Router RouterRouter/...
-
Page 30: Routing
In the Metric field enter the metric for the route. The metric value is used by the router to prioritise routes. The lower the value, the higher the priority. To give the route the highest priority, set it to 0. Click the Save button to save your settings. NetComm Wireless 3G M2M Router www.netcommwireless.com... - Page 31 Figure 28 - Active routing list Deleting static routes From the static routing list, click the icon to the right of the entry you wish to delete. Figure 29 - Deleting a static route www.netcommwireless.com NetComm Wireless 3G M2M Router RouterRouter/...
- Page 32 Using the Version drop down list, select the version of RIP that you would like to use. Select the interface for which you want RIP to apply. You can choose the LAN interface, the WWAN interface or BOTH. Click the Save button to confirm your settings. NetComm Wireless 3G M2M Router www.netcommwireless.com...
- Page 33 IP address (VRRP IP) or on a command prompt type: arp –d <ip address> (i.e. arp –d 192.168.20.1) to clear the arp cache.(old MAC address). Note: For more detail on configuring VRRP, please visit the product page on the NetComm Wireless website at http://support.netcommwireless.com/product/m2m-wireless-series/ntc-6908 and click on FAQs/Self Help.
-
Page 34: Port Forwarding
If the Source port range specifies a single port then the destination port may be configured to any port. If the Source port range specifies a range of port numbers then the Destination port range must be the same as the Source port range. Click the Save button to confirm your settings. NetComm Wireless 3G M2M Router www.netcommwireless.com... - Page 35 Figure 33 - Port forwarding settings To delete a port forwarding rule, click the button on the Port forwarding list for the corresponding rule that you would like to delete. www.netcommwireless.com NetComm Wireless 3G M2M Router RouterRouter/...
- Page 36 Click the DMZ toggle key to turn the DMZ function ON. Enter the IP Address of the device to be the DMZ host into the DMZ IP Address field. Click the Save button to save your settings. NetComm Wireless 3G M2M Router www.netcommwireless.com...
- Page 37 When DMZ is enabled, MAC/IP/Port filtering rules and the router firewall are ignored but the router will still honour the configuration of the Remote router access control settings listed under Administration Settings. Figure 35 - Router firewall toggle key www.netcommwireless.com NetComm Wireless 3G M2M Router RouterRouter/...
- Page 38 In the Current MAC / IP / Port filtering rules in system section, click the +Add button. Figure 37 - Current MAC / IP/ Port filtering rules in effect Enter the details of the rule in the section that is displayed and click the Save button. NetComm Wireless 3G M2M Router www.netcommwireless.com...
- Page 39 The new rule is displayed in the filtering rules list. You can edit the rule by clicking the Edit button or delete the rule by clicking the button. Figure 39 - Completed filtering rule www.netcommwireless.com NetComm Wireless 3G M2M Router RouterRouter/...
-
Page 40: Vpn
IPSec operates on Layer 3 of the OSI model and as such can protect higher layered protocols. IPSec is used for both site to site VPN and Remote Access VPN. The NTC-6000 Series router supports IPsec end points and can be configured with Site to Site VPN tunnels with third party VPN routers. - Page 41 Figure 41 – IPSec profile edit www.netcommwireless.com NetComm Wireless 3G M2M Router RouterRouter/...
- Page 42 Select the IPSec certificate to upload by clicking the Browse button. Table 11 - IPSec Configuration Items Note: For more detail on configuring IPSec, please visit the product page on the NetComm Wireless website at http://support.netcommwireless.com/product/m2m-wireless-series/ntc-6908 and click on FAQs/Self Help.
-
Page 43: Openvpn Server
Support for OpenVPN is available on several operating systems, including Windows, Linux, Mac OS, Solaris, OpenBSD, FreeBSD, NetBSD and QNX. Note: For more detail on configuring OpenVPN, please visit the product page on the NetComm Wireless website at http://support.netcommwireless.com/product/m2m-wireless-series/ntc-6908 and click on FAQs/Self Help. - Page 44 Set network information button. If you do not enter the remote subnet here, any packet requests from the server to the client will not be received by the client network because it is not aware of the remote client’s subnet. NetComm Wireless 3G M2M Router www.netcommwireless.com...
- Page 45 Figure 44 – OpenVPN server profile settings www.netcommwireless.com NetComm Wireless 3G M2M Router RouterRouter/...
- Page 46 If it is not selected, the OpenVPN connection allows for secure communication links between this router and the remote OpenVPN server only. Use the Authentication type options to select the Authentication type that you would like to use for the OpenVPN client. NetComm Wireless 3G M2M Router www.netcommwireless.com...
- Page 47 In the Profile name field, type a name for the OpenVPN P2P profile you are creating. On the router designated as the server, leave the Server IP address field empty. On the router designated as the client, enter the WAN IP address/host domain name of the server. www.netcommwireless.com NetComm Wireless 3G M2M Router RouterRouter/...
- Page 48 Upload button to send it to the slave. Perform the same for the other router, uploading the slave’s secret key file to master. When they are uploaded click the Save button to complete the peer-to-peer OpenVPN configuration. NetComm Wireless 3G M2M Router www.netcommwireless.com...
-
Page 49: Configuring The Pptp Client
PPTP client. The PPTP client list is displayed. Figure 49 - PPTP client list Click the +Add button to begin configuring a new PPTP client profile. The PPTP client edit screen is displayed. Figure 50 - VPN PPTP client edit www.netcommwireless.com NetComm Wireless 3G M2M Router RouterRouter/... - Page 50 Click the Save button to save the changes. The VPN will attempt to connect after your click Save. Click the Status button at the top left of the interface to return to the status window and monitor the VPN’s connection state. Note: For more detail on configuring PPTP Client, please visit the product page on the NetComm Wireless website at http://support.netcommwireless.com/product/m2m-wireless-series/ntc-6908 and click on FAQs/Self Help.
- Page 51 Click the +Add button to begin configuring a new GRE tunnelling client profile. The GRE Client Edit screen is displayed. Figure 52 – GRE client edit Click the Enable GRE Tunnel toggle key to switch it to the ON position. www.netcommwireless.com NetComm Wireless 3G M2M Router RouterRouter/...
- Page 52 Click the Save button to save the changes. The VPN will attempt to connect after your click Save. Click the Status button at the top left of the interface to return to the status window and monitor the VPN’s connection state. Note: For more detail on configuring GRE, please visit the product page on the NetComm Wireless website at http://support.netcommwireless.com/product/m2m-wireless-series/ntc-6908 and click on FAQs/Self Help.
-
Page 53: Services
In the Username and Password fields, enter the logon credentials for your DDNS account. Enter the password for the account again in the Verify password field. Click the Save button to save the DDNS configuration settings. www.netcommwireless.com NetComm Wireless 3G M2M Router RouterRouter/... -
Page 54: Network Time (Ntp)
Network time (NTP) The NTP (Network Time Protocol) settings page allows you to configure the NTC-6000 Series router to synchronize its internal clock with a global Internet Time server and specify the time zone for the location of the router. This provides an accurate timekeeping function for features such as System Log entries and Firewall settings where the current system time is displayed and recorded. -
Page 55: Data Stream Manager
(in NMEA format) through a serial port (by means of a USB-to-Serial cable). In each case, the logical flow of data is from Endpoint A to Endpoint B. Customers interested in developing their own applications to create custom endpoints and streams can contact NetComm Wireless about our Software Development Kit. - Page 56 Serial port (generic): This creates a generic serial port as an endpoint defaulting to the commonly used settings as shown below. Figure 57 - Serial port (generic) endpoint configuration TCP server: This creates a TCP server endpoint with the following options available. Figure 58 - TCP server endpoint configuration NetComm Wireless 3G M2M Router www.netcommwireless.com...
- Page 57 The client will attempt re-connection indefinitely every Retry timeout interval. Figure 61 - UDP client endpoint configuration www.netcommwireless.com NetComm Wireless 3G M2M Router RouterRouter/...
- Page 58 A type is Serial port (generic), the Mode can be set to various Modbus server and client types. This means that upon arrival at Endpoint A, the data will be transformed into the chosen Modbus format, ready to be sent to Endpoint B. NetComm Wireless 3G M2M Router www.netcommwireless.com...
- Page 59 Figure 65 - Edit data stream Click the Save button. The new stream appears in the Data stream list. Figure 66 - Data stream list www.netcommwireless.com NetComm Wireless 3G M2M Router RouterRouter/...
-
Page 60: Legacy Data Managers
Modem emulator allows you to connect legacy equipment such as an RTU or PLC to the serial port of the router in place of a traditional dial-up modem. The NTC-6000 series router emulates the dial-up modem’s behaviour and passes the serial data over the IP network. - Page 61 Selects the mode of operation for the chosen profile. Mode may be TCP, UDP or GMTP. Auto answer When enabled the router accepts incoming connections (enables server mode) Table 12 - Modem emulator options www.netcommwireless.com NetComm Wireless 3G M2M Router RouterRouter/...
- Page 62 PADD server mode and PADD client mode can be run at the same time. The PADD configuration page is shown below. Figure 68 – PADD A whitepaper with full Instructions on configuring PADD Mode is available at http://support.netcommwireless.com/product/m2m/ntc-40wv NetComm Wireless 3G M2M Router www.netcommwireless.com...
-
Page 63: Watchdogs
Connect-on-demand session is idle, or the PDP context is disabled by the user. Therefore, we recommended that you disable this feature if Connect-on-demand is configured or if the PDP context is intentionally disconnected on occasion. www.netcommwireless.com NetComm Wireless 3G M2M Router RouterRouter/... - Page 64 Note: The Periodic Ping timer should not be set to a value of less than 300 seconds to allow the router time to reconnect to the cellular network following a reboot. To disable the periodic ping reset monitor, set Fail count to 0. Figure 70 – Ping watchdog settings NetComm Wireless 3G M2M Router www.netcommwireless.com...
- Page 65 Click the Save button to save the settings. Note: The randomise reboot time is not persistent across reboots; each time the router is due to reboot, it randomly selects a time less than or equal to the Randomise reboot time. www.netcommwireless.com NetComm Wireless 3G M2M Router RouterRouter/...
-
Page 66: Snmp
The Download button displays the Management Information Base (MIB) of the router. The MIB displays all the objects of the router that can have their values set or report their status. The MIB is formatted in the SNMP-related standard RFC1155. NetComm Wireless 3G M2M Router www.netcommwireless.com... -
Page 67: Snmp Traps
To send a manual SNMP Heartbeat, click the Send heartbeat button. When you have finished configuring the SNMP traps, click the Save button to save the settings. Note: When a factory reset is performed via SNMP, the SNMP settings are preserved. www.netcommwireless.com NetComm Wireless 3G M2M Router RouterRouter/... -
Page 68: Tr-069
Note: You must have your own compatible ACS infrastructure to use TR-069. In order to access and configure the TR-069 settings you must be logged into the router as the root user. Note: When a factory reset of the router is performed via TR-069, the TR-069 settings are preserved. NetComm Wireless 3G M2M Router www.netcommwireless.com... - Page 69 ACS inform messages. In the Inform Period field, enter the number of seconds between the inform messages. Click the Save button to save the settings. www.netcommwireless.com NetComm Wireless 3G M2M Router RouterRouter/...
-
Page 70: Gps (Ntc-6908 Only)
To access the GPS configuration screen, select the Services item from the top menu bar then the GPS item on the left. Finally, select the GPS configuration menu item. To use the GPS function, set the GPS operation toggle key to ON and click the Save button. Figure 74 – GPS configuration NetComm Wireless 3G M2M Router www.netcommwireless.com... - Page 71 You may manually force the router to check for an update regardless of the next scheduled update time by clicking the Update Now button. When you have finished configuring the settings, click the Save button to save the changes. www.netcommwireless.com NetComm Wireless 3G M2M Router RouterRouter/...
- Page 72 Resets the odometer reading to 0 and the Odometer start time to the current time. Odometer Toggles the Odometer function on and off. Specifies the minimum distance that the router must travel from its current position before the Threshold Odometer reading increases. Table 14 - Odometer configuration options NetComm Wireless 3G M2M Router www.netcommwireless.com...
-
Page 73: Sms Messaging
Ability to trigger the NTC-6000 Series router to download and apply a configuration file To access the SMS messaging functions of the NTC-6000 Series router, click on the Services menu item from the top menu bar, and then select one of the options under the SMS messaging section on the left hand menu. - Page 74 “192.168.20.3” on port “2002” at the same time. To disable redirection to a TCP or UDP address, clear the TCP server address and UDP server address fields and click the Save button. NetComm Wireless 3G M2M Router www.netcommwireless.com...
-
Page 75: New Message
When you have finished typing your message and you are ready to send it, click the Send button. www.netcommwireless.com NetComm Wireless 3G M2M Router RouterRouter/... - Page 76 Add to White list. Click this button to add the sender’s mobile number to the white list on the router. Delete button. Click this button to delete the corresponding message. Refresh button. Click this button to refresh the inbox or outbox to see new messages. Table 16 - Inbox/Outbox icons NetComm Wireless 3G M2M Router www.netcommwireless.com...
-
Page 77: Diagnostics
We highly recommended that you use the white list and a password when utilising this feature to prevent unauthorised access. See the White list description for more information. www.netcommwireless.com NetComm Wireless 3G M2M Router RouterRouter/... - Page 78 This is enabled by default and it is strongly advised that you leave this feature enabled to maintain security. Send Set command acknowledgement replies The NTC-6000 Series router will automatically reply to certain types of commands received, such as commands, or...
- Page 79 Destination number field and optionally define a password in the Password field. When you have finished adding numbers click the Save button to save the entries. www.netcommwireless.com NetComm Wireless 3G M2M Router RouterRouter/...
-
Page 80: Sending An Sms Diagnostic Command
Send Set command acknowledgement replies toggle key is set to ON. If the Send command error replies toggle key is set to ON, the router will send a reply if the command is correct but a variable or value is incorrect, for example, due to misspelling. NetComm Wireless 3G M2M Router www.netcommwireless.com... -
Page 81: Sms Command Format
VARIABLE=VALUE1 ; set VARIABLE2=VALUE2 PASSWORD set VARIABLE1=VALUE1; set VARIABLE2=VALUE2; set VARIABLE3=VALUE3 If required, values can also be bound by an apostrophe, double apostrophe or back tick. For Example: “set VARIABLE=’VALUE’” “set VARIABLE=”VALUE”” “set VARIABLE=`VALUE`” “get VARIABLE” www.netcommwireless.com NetComm Wireless 3G M2M Router RouterRouter/... - Page 82 Note: Authenticated FTP addresses may be used following the format as defined in RFC1738, for example: ftp://username:password@serveraddress/directory/filename.cdi ssh.genkeys Instructs the router to generate new public SSH keys. ssh.clearkeys Instructs the router to clear the client public SSH key files. Table 18 - List of basic SMS diagnostic commands NetComm Wireless 3G M2M Router www.netcommwireless.com...
- Page 83 “Rx 0 byte, Tx 0 byte, Total 0 byte” current session when wwan down Up time of current 3G 1 days 02:30:12 or 0 days 00:00:00 when statistics.usage_current wanuptime session wwan down www.netcommwireless.com NetComm Wireless 3G M2M Router RouterRouter/...
- Page 84 SMS, and then restore the connection status to the Waiting state unless there is a traffic which triggers a connection in which case the connection status will be set to Up. NetComm Wireless 3G M2M Router www.netcommwireless.com...
-
Page 85: Sms Diagnostics Examples
PASSWORD get wanip Not required get rssi Send SMS to check the mobile signal strength Required PASSWORD get rssi Not required get imei Send SMS to check the IMEI number Required PASSWORD get imei www.netcommwireless.com NetComm Wireless 3G M2M Router RouterRouter/... - Page 86 Send SMS to set the LED mode timeout to 10 minutes Required PASSWORD set ledmode=10 Not required get ledmode Send SMS to retrieve the current LED mode Required PASSWORD get ledmode Retrieve current SSH protocol Not required get ssh.proto NetComm Wireless 3G M2M Router www.netcommwireless.com...
- Page 87 Generate set of public/private keys on the host Required PASSWORD execute ssh.genkeys Not required execute ssh.clearkeys Clear client public keys stored on host Required PASSWORD execute ssh.clearkeys Table 23 - SMS diagnostics example commands www.netcommwireless.com NetComm Wireless 3G M2M Router RouterRouter/...
-
Page 88: System
The Log pages are used to display or download the System log and IPSec logs on the router. System log The System Log enables you to troubleshoot any issues you may be experiencing with your NTC-6000 Series router. To access the System Log page, click on the System menu. The System Log is displayed. - Page 89 To configure the NTC-6000 Series router to output log data to a remote syslog server: Click on the System menu from the top menu bar. The System log item is displayed.
- Page 90 IPSec VPN tunnels will be disconnected as a change in logging level requires the IPSec service to be restarted. To download the IPSec log, click the Download IPSec log button and you will be prompted to save the file. NetComm Wireless 3G M2M Router www.netcommwireless.com...
-
Page 91: System Configuration
The backup / restore functions can be used to easily configure a large number of NTC-6000 Series router by configuring one router with your desired settings, backing them up to a file and then restoring that file to multiple NTC-6000 Series routers. -
Page 92: Updating The Firmware
Series router. When firmware files have been uploaded, they can also be installed from this page. PDF files, such as this user guide may also be uploaded for access on the router’s help page. For more information on application development, contact NetComm Wireless about our Software Development Kit. Figure 88 - Upload page Updating the Firmware The firmware update process involves first updating the recovery image firmware and then updating the main firmware image. - Page 93 The recovery firmware image is flashed and when it is complete, the router displays “The firmware update was successful” and returns to the main Upload screen. Figure 91 - Recovery firmware flash process www.netcommwireless.com NetComm Wireless 3G M2M Router RouterRouter/...
- Page 94 Hold down the reset button on the router for more than 15 seconds (when all LEDs stop flashing) to reboot and restore the factory default settings of the router. See the Restoring factory default settings section for more information. NetComm Wireless 3G M2M Router www.netcommwireless.com...
- Page 95 The Package Manager page is used to provide details of any user installed packages on the router and allow them to be uninstalled. For more information on application development, contact NetComm Wireless about our Software Development Kit. Figure 93 – Software applications manager The Application name, Version number of the application, the architecture type and time of installation are all displayed.
-
Page 96: Administration Settings
The Administration settings page is used to enable or disable protocols used for remote access and configure the passwords for the user accounts used to log in to the router. Figure 94 - Administration page NetComm Wireless 3G M2M Router www.netcommwireless.com... - Page 97 Enter the username and password to login to the router and click Log in. Note: To perform functions like Firmware upgrade, device configuration backup and to restore and reset the router to factory defaults, you must be logged in with the root manager account. www.netcommwireless.com NetComm Wireless 3G M2M Router RouterRouter/...
-
Page 98: Https Key Management
The private key is used to decrypt information and must be secret by its owner. Each NTC-6000 Series router contains a self-signed digital certificate which is identical on all NTC-6000 Series routers. For a greater level of security, the router also supports generating your own unique key. Additionally, you may use third party software to generate your own self-signed digital certificate or purchase a signed certificate from a trusted certificate authority and then upload those certificates to the router. - Page 99 Dominican Republic Cayman Islands Qatar International Algeria Kazakhstan Reunion US Military Ecuador Laos Romania Network Estonia Saint Lucia Serbia Non-Profit Organization Egypt Liechtenstein Russian Federation ARPA Old style Arpanet Western Sahara Sri Lanka Rwanda www.netcommwireless.com NetComm Wireless 3G M2M Router RouterRouter/...
- Page 100 When the certificate has been generated, you are informed that it has been successfully generated and installed. The web server on the router restarts and you are logged out of the router. Click OK to be taken back to the login screen. Figure 96 - New certificate successfully generated message NetComm Wireless 3G M2M Router www.netcommwireless.com...
-
Page 101: Ssh Key Management
Select the types of authentication you want to use by clicking the Enable password authentication and Enable key authentication toggle keys on or off. Note that you may have both authentication methods on but you may not turn them both off. Click the Save button to confirm your settings. www.netcommwireless.com NetComm Wireless 3G M2M Router RouterRouter/... - Page 102 Upload button, browse to the file and click Open. When the file is uploaded, it is examined for validity. If the key file is not a valid public key, it will not be uploaded. NetComm Wireless 3G M2M Router www.netcommwireless.com...
- Page 103 The wait period begins from the time the Save button is clicked. When the wait period expires, the LEDs will turn off. If the router is rebooted, the LED power off timer is reset. The router will boot up and wait for the configured time before turning off again. www.netcommwireless.com NetComm Wireless 3G M2M Router RouterRouter/...
-
Page 104: Logging Out
Note: It can take up to 2 minutes for the router to reboot. Logging out To log out of the router, click the icon at the top right corner of the web user interface. NetComm Wireless 3G M2M Router www.netcommwireless.com... -
Page 105: Appendix A: Tables
Table 27 - Web Interface Default Settings ....................106 Table 28 - Telnet Access ........................106 Table 29 - RS-232 Wiring ................Error! Bookmark not defined. Table 30 - Technical Specifications of the NTC-6000 series routers ............114 www.netcommwireless.com NetComm Wireless 3G M2M Router... -
Page 106: Appendix B: Default Settings
Appendix B: Default Settings The following tables list the default settings for the NTC-6000 Series router. LAN (MANAGEMENT) Static IP Address: 192.168.20.1 Subnet Mask: 255.255.255.0 Default Gateway: 192.168.20.1 Table 26 - LAN Management Default Settings ADMIN MANAGER ROOT MANAGER ACCOUNT... -
Page 107: Restoring Factory Default Settings
Alternatively, you can release the reset button and quickly press it once more. When you have reset your NTC-6000 Series router to its default settings you will be able to access the device’s configuration web interface using http://192.168.20.1... -
Page 108: Appendix C: Recovery Mode
Accessing recovery mode Both systems have web interfaces that can be used to manipulate the other inactive system. The NTC-6000 Series Router starts up by default in the Main system mode, however the router may be triggered to start in recovery mode if desired. -
Page 109: Status
The log page displays the system log which is useful in troubleshooting problems which may have led to the router booting up in recovery mode. The only functionality provided here is the ability to clear the system log, filter by log level and downloading of the log file. Figure 103 - Recovery mode – Log www.netcommwireless.com NetComm Wireless 3G M2M Router RouterRouter/... -
Page 110: Application Installer
Click the Reboot button to reboot the router to the main firmware image. Figure 106 - Recovery mode - Reboot NetComm Wireless 3G M2M Router www.netcommwireless.com... -
Page 111: Appendix D: Https - Uploading A Self-Signed Certificate
Uploading a self-signed certificate If you have your own self-signed certificate or one purchased elsewhere and signed by a Certificate Authority, you can upload it to the NTC-6000 Series router using the Upload page. Note: Your key and certificate files must be named server.key and server.crt respectively otherwise they will not work. - Page 112 Click the Install link next to the server.crt file then click OK on the prompt that is displayed. The certificate file is installed. Repeat this for the key file. When each file is installed it is removed from the list of stored files. Figure 110 - Installing the server.crt file NetComm Wireless 3G M2M Router www.netcommwireless.com...
-
Page 113: Appendix E: Serial Port Wiring
Figure 111 - DE9 Male connector (Pin side view) The NTC-6000 Series router has a serial interface and acts as the data communications equipment (DCE). The wiring tables below indicate the DCE and DTE devices as well as the signal direction. Shielding cable can optionally be soldered to the chassis and connected to ground. -
Page 114: Technical Data
Technical Data The following tables list the hardware specifications of the NTC-6000 Series routers. COMPONENT NTC-6908 NTC-6908-02 NTC-6520 32MB DRAM 256MByte Flash memory storage Memory UMTS bands UMTS/HSDPA/HSUPA: 850/1900/2100 MHz GSM bands GSM/GPRS/EDGE: 850/900/1800/1900 MHz HSDPA/HSUPA data rates: DL: 7.2 Maximum Data Mbps, UL: 5.76 Mbps... -
Page 115: Legal & Regulatory Information
NetComm Wireless Limited’s (or its licensors’) intellectual property rights to you. You are permitted to use this Manual for the sole purpose of using the NetComm Wireless product to which it relates. Otherwise no part of this Manual may be reproduced, stored in a retrieval system or transmitted in any form, by any means, be it electronic, mechanical, recording or otherwise, without the prior written permission of NetComm Wireless Limited. -
Page 116: Product Warranty
Consumer Protection Laws which cannot be excluded, NetComm Wireless’s liability for any breach of that guarantee, condition or warranty is limited to: (i) in the case of a supply of goods, NetComm Wireless Limited doing any one or more of the following: replacing the goods or supplying equivalent goods;... -
Page 117: Contact
Contact Address: NETCOMM WIRELESS LIMITED Head Office PO Box 1200, Lane Cove NSW 2066 Australia Phone: +61(0)2 9424 2070 Fax: +61(0)2 9424 2010 Email: sales@netcommwireless.com techsupport@netcommwireless.com www.netcommwireless.com NetComm Wireless 3G M2M Router RouterRouter/...
Need help?
Do you have a question about the NTC-6000 Series and is the answer not in the manual?
Questions and answers