
Related Manuals for IOGear GUWAVKIT4B


Summary of Contents for IOGear GUWAVKIT4B
- Page 1 User Manual Wireless 1080p Computer to HD Display Kit GUWAVKIT4B PART NO. M1281 www.iogear.com...
- Page 2 IOGEAR, the IOGEAR logo, are trademarks or registered trademarks of IOGEAR. Microsoft and Windows are registered trademarks of Microsoft Corporation. All other brand and product names are trademarks or registered trademarks of their respective holders. IOGEAR makes no warranty of any kind with regards to the information presented in this document.
-
Page 3: Table Of Contents
Introduction Package Contents Requirements Overview Software Installation - Windows Hardware Installation Using the IOGEAR Wireless Software - Windows 1. Introducing the UWB Connection Manager Software 2. Adjusting Video Settings 3. Adjusting Audio Settings Troubleshooting Specifications Federal Communications Commission (FCC) Statement... -
Page 4: Introduction
(along with the video) or via a separate 3.5mm audio jack. The GUWAVKIT4B provides full room coverage, is easy to set up and use, and is an ideal solution for both home and office use. It delivers the best combination of performance and cost in a variety of living room, conference room and classroom environments. -
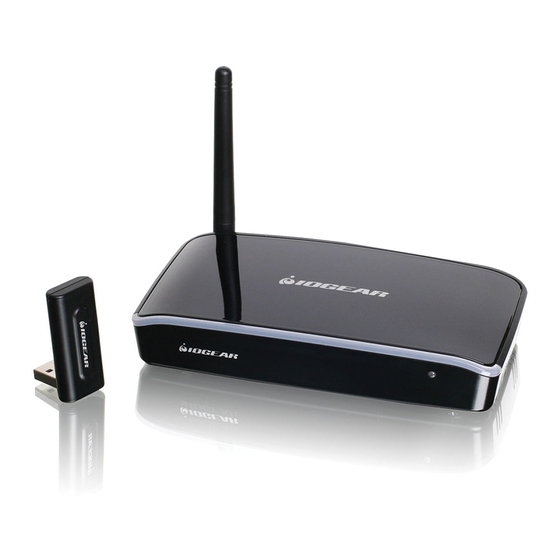
Page 5: Overview
Overview Receiver Base Back View 1. DC Power Input Receiver Base Front View 2. HD Port 1. Signal Indicator Light 3. D-Sub 15Pin (VGA) 2. Wireless Connection LED light 4. 3.5mm Audio Out 5. USB 2.0 Port 6. Antenna PC Adapter 1. -
Page 6: Software Installation - Windows
Software Installation - Windows The installation checks the PC capabilities and compares them to the minimum system requirements of the system. For Windows 7, it is recommended to run WEI (Windows Experience Index) calculation prior to installation. Before you start: Ensure that the PC Adapter is unplugged from the PC. Insert the installation CD into the PC’s CD-ROM drive. - Page 7 In the event that you need to uninstall the software, insert the installation CD. Once the Modify Setup screen appears, click “Uninstall.” Note: The Modify Setup screen will only appear if the GUWAVKIT4B is already installed on your PC. An Operation Progress screen will appear during the Uninstall process.
- Page 8 Method 2 Go to your Control Panel on your PC and then select “Programs and Features” to uninstall the following program: GUWAVKIT4B.
-
Page 9: Hardware Installation
Hardware Installation 1. Connect the Wireless USB PC Adapter 1. Connect the Wireless USB PC Adapter to an available PC USB port. 2. The system will automatically detect and install the drivers. 2. Connect the Power Adapter 1. Plug the AC Adapter cord into the DC- IN on the back of the Receiver Base. - Page 10 1. The Receiver Base provides one USB 2.0 port. 2. Connection can be made to an External HDD’s, wireless keyboard etc. *Webcam’s are not supported. Note: IOGEAR Wireless A / V Multimedia Keyboards with Trackball make a perfect companion: GKM561R, GKM681R, GKM581R and GKM571R.
-
Page 11: Using The Iogear Wireless Software - Windows
3. Adjusting Audio Settings 1. Introducing the UWB Connection Manager Software The UWB Connection Manager is the driver software for the GUWAVKIT4B. This driver is automatically installed when you run the GUWAVKIT4B Installation CD. The GUWAVKIT4B’s PC Adapter contains a radio transmitter that enables your computer to communicate wirelessly with the Receiver Base. - Page 12 “Disconnect”. The device will now move back to “Not Connected” status D. Renaming the GUWAVKIT4B: You can change the name of the each GUWAVKIT4B listed on the Devices tab of the UWB Connection Manager. This is especially useful if you have multiple GUWAVKIT4B’s to differentiate.
- Page 13 Note: It is recommended to leave this setting on Automatic. If you manually select a channel that is being used by another GUWAVKIT4B in the vicinity, the channel bandwidth will be shared by both devices. To maximize performance, there are eight channels to choose from and a separate channel should be used for each GUWAVKIT4B.
-
Page 14: Adjusting Video Settings
2. Adjusting Video Settings A. Selecting Extended mode or Mirror mode You can choose to set the video output signal to Extend mode or Mirror mode. The default setting is Extend mode. Extend mode extends your desktop space across multiple monitors, so that you can display different information on each monitor connected to your computer. - Page 15 B. Configuring the Display 1. Configuring the Display in Windows 7 a. In Windows 7, there is a built in support for external monitor. To use it press the [Windows] key together with the [P] key( + [P]), and then the following menu will appear: 1) For Mirror mode : choose Duplicate 2) For Extend mode : choose Extend...
- Page 16 To change any of the external display settings: Select the appropriate display name in the Display scroll down options. You should select the name of the TV or monitor or projector connected to your Receiver Base. Select the desired value in any of the available settings: - Resolution: your external display resolution.
- Page 17 Select Video Setup to configure screen resolution or any other display options. The following window will appear: To change any of the external display settings: Select the appropriate display name in the Display scroll down options. You should select the name of the TV or monitor or projector connected to your Re- ceiver Base.
-
Page 18: Adjusting Audio Settings
A. Configuring audio ports You can playback audio either through the Receiver Base’s audio port or the PC’s audio port. However, you cannot use the audio ports on the PC and on the GUWAVKIT4B at the same time. By default, the audio ports on the GUWAVKIT4B are automatically enabled each time you connect. - Page 19 2. In Windows 8.x: a. Right click the Volume icon in the System Tray and select Playback devices. b. In the Playback tab, select USB AUDIO speakers. c. Then click Set Default to set it as your default speakers. d. Click OK to save the new setting.
-
Page 20: Troubleshooting
4. Check to make sure that the wireless connection is established between the PC and the GUWAVKIT4B (the UWB Connection Manager icon in the System Tray is green, and when you double-click on it, your TV or Monitor shows connected). - Page 21 IOGEAR Wireless Software. 1. Confirm that the PC meets the minimum system requirements to run the GUWAVKIT4B. You can find the requirements on the packaging, or online in the product pages at www.IOGEAR.com 2. Ensure the PC is within 30ft of the TV / Monitor and the Wireless USB PC Adapter has direct line of site to the Receiver Base.
- Page 22 1. This product does not support 3D programs. 2. Running applications that use certain DirectDraw commands (such as some 2D gaming applications) is also not supported. If you want to play these games in full- screen mode, disconnect the GUWAVKIT4B and use your computer’s display.
- Page 23 Receiver Base and then restart your media player application. 6. The audio port on the GUWAVKIT4B may be disabled. To enable the port, follow the instructions in “Configuring audio ports” on page 20.
- Page 24 4. USB A. USB device does not work. 1. Make sure the GUWAVKIT4B is connected to your computer and the computer is docked (indicator light on GUWAVKIT4B is green). 2. Check that the cable connection between the USB port on the Receiver Base and the USB device is secure.
-
Page 25: Specifications
Specifications Function GUWAVKIT4B Audio Output 2 Channel 16-bit DAC Audio 48KHz, 16-bit either from 3.5mm stereo jack or HDMI Sample Rate connector Console Connectors Audio 1 x 3.5mm Stereo Jack Video Streaming Up to 1080p resolution Video Resolution Up to 2048 x 1152 (SXGA+) -
Page 26: Federal Communications Commission (Fcc) Statement
Federal Communications Commission (FCC) Statement This equipment has been tested and found to comply with the limits for a Class B digital device, pursuant to Part 15 of the FCC Rules. These limits are designed to provide reasonable protection against harmful interference in a residential setting. This product generates, uses, and can radiate radio frequency energy and, if not installed and used as directed, it may cause harmful interference to radio communications. -
Page 27: Limited Warranty
Limited Warranty WE’RE HERE TO HELP YOU! NEED ASSISTANCE SETTING UP THIS PRODUCT? Make sure you: 1. Visit www.iogear.com for more product information 2. Visit www.iogear.com/support for live help and product support Warranty Information This product carries a 1 Year Limited Warranty. For the terms and conditions of this war- ranty, please go to http://www.iogear.com/support/warranty Register online at http://www.iogear.com/register Important Product Information Product Model Serial Number Contact IOGEAR iogear.custhelp.com support@iogear.com www.iogear.com 19641 Da Vinci, Foothill Ranch, CA 92610... - Page 28 © 2014 IOGEAR ®...
Need help?
Do you have a question about the GUWAVKIT4B and is the answer not in the manual?
Questions and answers