
Related Manuals for Extron electronics MP 101 D


Summary of Contents for Extron electronics MP 101 D
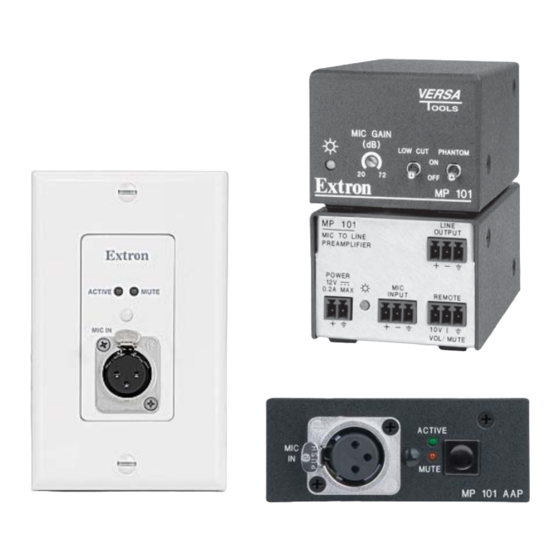
- Page 1 User’s Manual MP 101 Series Microphone to Line Preamplifi ers 68-992-02 Rev. A 05 09...
- Page 2 Precautions Safety Instructions • English Warning Power sources • This equipment should be operated only from the power source This symbol is intended to alert the user of important indicated on the product. This equipment is intended to be used with a main power operating and maintenance (servicing) instructions in system with a grounded (neutral) conductor.
- Page 3 FCC Class A Notice This equipment has been tested and found to comply with the limits for a Class A digital device, pursuant to part 15 of the FCC Rules. Operation is subject to the following two conditions: (1) this device may not cause harmful interference, and (2) this device must accept any interference received, including interference that may cause undesired operation.
-
Page 4: Table Of Contents
Table of Contents Chapter One • Introduction ........... 1-1 About this Manual ..............1-2 About the MP 101, MP 101 AAP, and MP 101 D ....1-2 Features ..................1-2 Chapter Two • MP 101 ............... 2-1 Rear Panel Features .............. - Page 5 Table of Contents Chapter Four • MP 101 D ............4-1 About the MP 101 D ..............4-2 Rear Panel Features ..............4-2 Power input ................4-2 Audio output (line level) ............4-3 Remote connection ..............4-4 Front Panel Features ..............
-
Page 6: Chapter One • Introduction
MP 101 Series Chapter One Introduction About this Manual About the MP 101, MP 101 AAP, and MP 101 D Features... -
Page 7: About This Manual
About the MP 101, MP 101 AAP, and MP 101 D The Extron MP 101, MP 101 AAP, and MP 101 D (the MP 101 Series) are high quality microphone to line level audio preamplifi ers. These products can add microphone capability to most Extron audio and switcher systems. - Page 8 Flexible mounting options — The MP 101 can be mounted on a rack, on a table, or under furniture. The MP 101 AAP mounts into various Extron architectural products. The MP 101 D is wall mountable using standard, off-the-shelf mounting accessories. External international power supply — The autoswitchable, 12 VDC, 1 A external power supply provides worldwide power compatibility (Extron part #70-380-01).
-
Page 9: Chapter Two • Mp 101
MP 101 Series Chapter Two MP 101 Rear Panel Features Front Panel Features Mounting the MP 101 Adjusting the MP 101 Remote Control... -
Page 10: Rear Panel Features
MP 101 The Extron MP 101 is a high performance, microphone to line level audio preamplifi er. Rear Panel Features MP 101 LINE OUTPUT MIC TO LINE PREAMPLIFIER POWER 0.5A MAX INPUT REMOTE VOL/MUTE Power input Power — Plug the external 12 VDC power supply into this 2-pin, 3.5 mm captive screw connector. -
Page 11: Mic Input
Smooth Ridges SECTION A–A Power Supply Tie Wrap Output Cord 3/16" (5 mm) Max Orange Captive Screw Connector Your MP 101 may have shipped with a blue captive screw plug. The blue connector does not have the extended tail or the included tie-wrap. -
Page 12: Remote Connection
MP 101, cont’d Remote connection Remote — An optional 3-pin, captive screw connector allows a wall mounted audio controller or MediaLink product to remotely control volume and mute levels for the MP 101 unit. See “Remote Control”, later in this chapter, for more information. -
Page 13: Mounting The Mp 101
Mounting the MP 101 There are many optional accessories for mounting the MP 101. They include the following: Projector mounting options • PMK 100 Mini Projector (part #70-217-01) • PMK 300 Multi-Product Projector (part #70-374-01 ) • PMK 350 Low Profi le Multi-Product Projector (part #70-563-02/03 ) Rack mounting options •... -
Page 14: Rack Installation
MP 101, cont’d Rack installation The MP 101 can be rack mounted using either the VersaTools 19" 1U rack shelf (part #60-190-20), basic VersaTools rack shelf (part #60-604-20), a standard universal 1U rack shelf (part #60-190-01), or a 1U basic rack shelf (part #60-604-01). The fi... -
Page 15: Back Of The Rack Installation
1U Universal Rack Shelf 1/2 Rack Width Front False Faceplate 1/4 Rack Width Front False Faceplate 1/8 Rack Width Front False Faceplate Both front false faceplates use 2 screws. (2) 4-40 x 3/16" Use 2 mounting holes on Screws opposite corners. Back of the rack installation The MP 101 can be conveniently mounted on the rear of a rack by using the Extron MBB 100 Back of Rack Mounting Kit... -
Page 16: Furniture Mounting
MP 101, cont’d Inside Outside Furniture mounting In addition to using the MP 101 on a rack, you can mount it on furniture using the optional MBU Mini Under-Desk Mount Kit (part #70-212-01). To use this option, do the following: Remove the rubber feet if they were previously installed. -
Page 17: Adjusting The Mp 101
b. At each mark, drill a 3/32" (2 mm) diameter pilot hole approximately 0.25" (6 mm) deep in the mounting surface. c. Insert provided #8 wood screws into the four pilot holes. Tighten each screw into the mounting surface until just less than 0.25" (6 mm) of the screw protrudes. d. -
Page 18: Remote Control
MP 101, cont’d Remote Control The wiring and control options described below pertain to all models in the MP 101 series. Remote connector wiring As shown below, Pin 1 is 10 VDC reference voltage. Pin 2 is volume control DC voltage; range is 0 to 10 V, where 0 V is mute and 10 V provides maximum volume. -
Page 19: Chapter Three • Mp 101 Aap
MP 101 Series Chapter Three MP 101 AAP Rear Panel Features Front Panel Features Adjusting the MP 101 AAP Mounting the MP 101 AAP Remote Control... -
Page 20: Rear Panel Features
MP 101 AAP The Extron MP 101 AAP is a high performance microphone to line level audio preamplifi er. The three models are two-space MP 101 AAPs in black, white, and RAL 9010 (Eurowhite). Rear Panel Features MP 101 AAP MIC TO LINE POWER PREAMPLIFIER... -
Page 21: Audio Output (Line Level)
Phantom power switch — Provides switchable 48 volt phantom power for condenser microphones. Audio output (line level) Line Output — A 3-pin, captive screw connector outputs to audio mixers, amps switchers, or other non-microphone audio equipment. 3/16" CAUTION (5 mm) MAX For unbalanced audio, connect the sleeve(s) to the ground. -
Page 22: Adjusting The Mp 101 Aap
MP 101 AAP, cont’d 3-pin Female Mic Gain — A recessed, adjustable potentiometer defi nes the amount of input signal (between 25 and 72 dB) allowed into the preamp. This potentiometer is covered by a plastic cap to avoid tampering. To adjust the potentiometer, use a small screwdriver to remove the covering, make adjustments, then replace the cap. -
Page 23: Mounting The Mp 101 Aap
level that is free of distortion. If there is a remote control connection, unplug it while adjusting the Mic Gain potentiometer. Replace the remote control when fi nished. If there is minimal distortion, but greater volume is required, turn the Mic Gain potentiometer clockwise (towards the 75 dB mark) to increase the volume, but not past the point where distortion occurs. -
Page 24: Remote Control
MP 101 AAP, cont’d Repeat steps 1 through 3 to mount any other AAPs. Cover any openings in the faceplate with blank plates (provided). If it was not done previously, adjust the MP 101 AAP from its rear panel. See the previous section, “Adjusting the MP 101 AAP”... -
Page 25: Remote Control Options
Remote control options The MP 101 AAP has three remote control options: The Extron VCM 100 volume/mute controller and VC 50 volume controller use a 10 k ohm potentiometer as the main method for controlling volume levels. The VCM 100 includes an illuminated Mute button and operates in sync with the MP 101 AAP. -
Page 26: Chapter Four • Mp 101 D
MP 101 Series Chapter Four MP 101 D About the MP 101 D Rear Panel Features Front Panel Features Adjusting the MP 101 D Mounting the MP 101 D Remote Control... -
Page 27: About The Mp 101 D
MP 101 D About the MP 101 D The Extron MP 101 D provides the same features as the other ® MP 101 models in a convenient, Decora style wallplate. Like the MP 101 and MP 101 AAP, this mic to line preamplifi er can be remotely controlled via a VCM volume/mute control module. -
Page 28: Audio Output (Line Level)
Remote — An optional 3-pin, captive screw connector allows a wall mounted audio controller or MediaLink product to remotely control volume and mute levels for the MP 101 unit. See “Remote Control”, later in this chapter, for more information. MP 101 Series • MP 101 D... -
Page 29: Front Panel Features
This potentiometer is covered by a plastic cap to avoid tampering. To adjust the potentiometer, use a small screwdriver to remove the covering, make adjustments, then replace the cap. XLR mic input — An XLR connector for a standard microphone connection MP 101 Series • MP 101 D... -
Page 30: Adjusting The Mp 101 D
3-pin Female Adjusting the MP 101 D Adjustment options for the MP 101 D are located on its rear panel (see “Rear Panel Features” in this chapter for details). Therefore, you must perform these adjustments before mounting into a wall. - Page 31 To mount the MP 101 D into a Decora faceplate, do the following: Secure all cables and connections onto the MP 101 D. If it was not done previously, adjust the MP 101 D from its rear panel. See the previous section, “Adjusting the MP 101 D”, for detailed instructions.
-
Page 32: Remote Control
REMOTE VOL/MUTE MUTE Remote control options The MP 101 D has three remote control options: The Extron VCM 100 volume/mute controller and VC 50 volume controller use a 10 k ohm potentiometer as the main method for controlling volume levels. -
Page 33: Installation Instructions
MP 101 Series Chapter Five Architectural Installation Installation Instructions Preparing the Site and Installing the Wall Box... -
Page 34: Installation Instructions
“Preparing the Site and Installing the Wall Box`” in chapter 5. Unless otherwise noted, both units (the MP 101 AAP and the MP 101 D) are referred to as the "MP 101" in the following instructions. The MP 101 must be installed into an Underwriters Laboratories (UL) approved electrical wall box. - Page 35 • If the MP 101 will be installed without a wall box (using mud rings or fastening it directly to the wall or furniture), measure and mark the surface for the cutout area indicated in the template. Cut out the material from the marked area. Check the opening size by inserting the wall box (if used) or the MP 101 (if no box is used) into the opening.
- Page 36 Architectural Installation, cont’d • If the MP 101 AAP or MP 101 D are being installed in a two- or four-gang AAP plate, attach the wall box to the wall stud or furniture with nails or screws, leaving the front edge fl ush with the outer wall or furniture surface.
-
Page 37: Appendix A • Specifi Cations, Part Numbers, And Accessories
MP 101 Series A ppendix A Specifi cations, Part Numbers, and Accessories Specifi cations Included Parts Optional Accessories... -
Page 38: Specifi Cations
Number/signal type ....1 mono, balanced Connectors MP 101 ........ (1) 3.5 mm captive screw connector, 3 pole MP 101 AAP, MP 101 D ..(1) female 3-pin XLR Impedance ........2 k ohm balanced Nominal level ........ -60 dBV or -48 dBV Maximum level ...... - Page 39 #70-212-01, or it can be attached to a projector mount with optional kit #70-217-01. MP 101 AAP ....... Yes, with optional faceplate or frame MP 101 D ......No, but wall or furniture mountable in a Decora-style opening Enclosure type ......Metal Enclosure dimensions MP 101 ........
- Page 40 Specifi cations, Part Numbers, and Accessories Shipping weight ......2 lbs (1 kg) Vibration ........ISTA 1A in carton (International Safe Transit Association) Listings..........UL, CUL Compliances ........CE, FCC Class A, VCCI, AS/NZS, ICES MTBF ..........30,000 hours Warranty ........3 years parts and labor All nominal levels are at ±10%.
-
Page 41: Included Parts
Included Parts These items are included with each MP 101 unit: Included parts Part number MP 101 Microphone to Line Preamplifi er 60-718-10 PS 121C: universal 12 VDCm, 1.0A 70-775-01 Three 3-pin, captive screw connectors One 2-pin, captive screw connector Rubber feet (unattached) Setup Guide These items are included with each MP 101 AAP unit:... -
Page 42: Optional Accessories
Specifi cations, Part Numbers, and Accessories These items are included with each MP 101 D unit: Included parts Part number MP 101 D Microphone to Line Preamplifi er (one of the following two): Black or 60-822-12 White 60-822-22 Power supply: universal 12 VDC, 1.0A... -
Page 43: Appendix B • Dimensions And Template For The Mp 101 D
MP 101 Series A ppendix B Dimensions and Template for the MP 101 D Dimensions Template... -
Page 44: Dimensions
2X #6-32 UNC-2B 2X .125 2X .094± .005 .130 THRU 2.610 2.420 Ø.220 2X 1.755 1.455 4.100 1.095 .622 .150 .000 Ø.929 THRU .330 2X Ø .120 THRU MP 101 Series • Dimensions and Template for the MP 101 D... -
Page 45: Template
2.24" (105 cm) SURFACE CUT-OUT 4.13" 4.50" AREA FOR (57 cm) (11.43 cm) MOUNTING Location of MP 101 D Circuit Board Cut Out Line for Installing the Electrical MP 101 Series • Dimensions and Template for the MP 101 D... - Page 46 Extron’s Warranty Extron Electronics warrants this product against defects in materials and workmanship for a period of three years from the date of purchase. In the event of malfunction during the warranty period attributable directly to faulty workmanship and/or materials, Extron Electronics will, at its option, repair or replace said products or components, to whatever extent it shall deem necessary to restore said product to proper operating condition, provided that it is returned within the warranty period, with proof of...
- Page 47 Extron USA - West Extron USA - East Extron Europe Extron Asia Extron Japan Extron China Extron Middle East Headquarters +800.633.9876 +800.3987.6673 +800.7339.8766 +81.3.3511.7655 +400.883.1568 +971.4.2991800 +800.633.9876 +81.3.3511.7656 FAX +971.4.2991880 FAX Inside USA / Canada Only Inside Europe Only Inside Asia Only Inside China Only Inside USA / Canada Only +1.919.863.1794...
Need help?
Do you have a question about the MP 101 D and is the answer not in the manual?
Questions and answers