Table of Contents
Advertisement
Quick Links
Extron Electronics, USA
Extron Electronics, Europe
1230 South Lewis Street
Beeldschermweg 6C
Anaheim, CA 92805
3821 AH Amersfoort
USA
The Netherlands
714.491.1500
+31.33.453.4040
www.extron.com
Fax 714.491.1517
Fax +31.33.453.4050
© 2004 Extron Electronics. All rights reserved.
Extron Electronics, Asia
Extron Electronics, Japan
135 Joo Seng Road, #04-01
Daisan DMJ Building 6F
PM Industrial Building
3-9-1 Kudan Minami
Singapore 368363
Chiyoda-ku, Tokyo 102-0074 Japan
+65.6383.4400
+81.3.3511.7655
Fax +65.6383.4664
Fax +81.3.3511.7656
User's Manual
MPA 122
Mini Power Amplifier
68-943-01 Rev. A
11 04
Advertisement
Table of Contents

Related Manuals for Extron electronics MPA 122


Summary of Contents for Extron electronics MPA 122
- Page 1 Fax +31.33.453.4050 Fax +65.6383.4664 © 2004 Extron Electronics. All rights reserved. User’s Manual Extron Electronics, Japan Daisan DMJ Building 6F 3-9-1 Kudan Minami Chiyoda-ku, Tokyo 102-0074 Japan +81.3.3511.7655 Fax +81.3.3511.7656 MPA 122 Mini Power Amplifier 68-943-01 Rev. A 11 04...
-
Page 2: Fcc Class A Notice
Precautions Safety Instructions • English Warning This symbol is intended to alert the user of important Power sources • This equipment should be operated only from the power source indicated on the product. This equipment is intended to be used with a main operating and maintenance (servicing) instructions power system with a grounded (neutral) conductor. - Page 3 To install and set up an MPA 122 Mini Power Amplifier, follow these steps: Step 1 Turn all of the equipment off and disconnect it from the power source. Step 2 Mount the MPA 122 on a rack, under a desk, or on a projector, as illustrated below. Extron MPA 122 Mini Power...
-
Page 4: Table Of Contents
Adjust the MPA 122 input level, bass and treble. If connecting to a projector, ensure that the volume on the device is at its lowest point, then adjust the level of the MPA 122 fully counterclockwise. b. Set the projector volume to its maximum volume level (no sound should come out). -
Page 5: Chapter 1 • Introduction
Table of Contents, cont’d MPA 122 Chapter One Introduction About this Manual About the MPA 122 Features MPA 122 • Table of Contents... -
Page 6: About This Manual
Digital audio amplifier — The MPA 122 features improved, class D technology for high efficiency and low distortion. Compact size — The MPA 122 is housed in a 1U high, 1/4 rack width, 3" deep, metal enclosure, making this amplifier a powerful product for many unique applications. -
Page 7: Installation Overview
Introduction MPA 122 Chapter Two Installation and Operation Installation Overview Mounting the MPA 122 Rear Panel Features Front Panel Features Setting up the MPA 122 Amplifier MPA 122 • Introduction... -
Page 8: Under-Desk Mounting
Installation and Operation Installation Overview To install and set up an MPA 122, follow these steps: Turn all of the equipment off. Make sure that the input devices (DVD, VCR, PC, etc.), the MPA 122 unit, and the output devices are turned off and disconnected from their power source(s). -
Page 9: Chapter One
Under-desk mounting In addition to using the MPA 122 unit on a rack or projector, it can also be mounted under furniture (or under a desk). Mount the unit by using the optional mounting kit (Extron part #70-... -
Page 10: Power Input
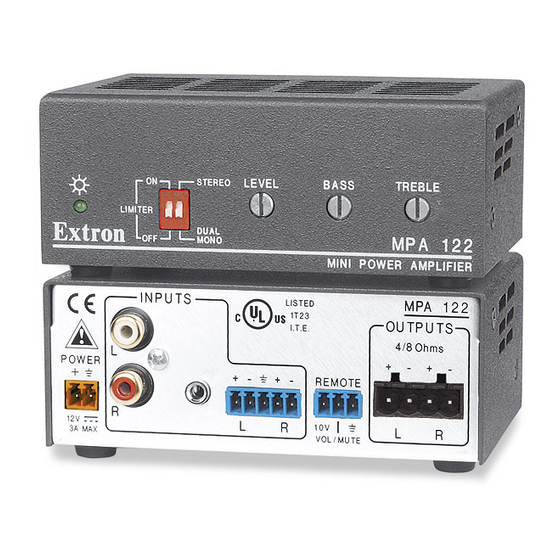
Rear Panel Features INPUTS US US POWER REMOTE 3A MAX VOL/MUTE Figure 2-5 — MPA 122 back panel MPA 122 • Installation and Operation MPA 122 OUTPUTS 4/8 Ohms Power input Power connection — Plug the external 12 VDC power supply into this connector. -
Page 11: Setting Up The Mpa 122 Amplifier
Consult the projector’s user manual for detailed instructions on its calibration. To adjust the MPA 122 input level, bass, and treble, do the following: If connecting to a projector, ensure that the volume on the device is at its lowest point, then adjust the level of the MPA 122 fully counterclockwise. -
Page 12: Remote Connector Wiring
Figure 2-9 — Pinout diagram for optional remote connector See Chapter 3, Remote Operation for more information on the three options (IR remote, MLC series, or DC volume/mute controller) for remote control. MPA 122 • Installation and Operation 2-10 MUTE VOLUME MPA 122... -
Page 13: Appendix A • Specifications , Part Numbers And Accessories
IR Remote IR Remote - (input selection and volume control through projector) VCM 100 Volume/Mute Controller - (direct MPA 122 control) MLC 104 IP Controller - (input selection and volume control through projector) Figure 3-1 — Three remote control options Using the projector’s IR remote —... -
Page 14: Specifications, Part Numbers, And Accessories
4 ohm load and level set to maximum) before clipping 0 dBu = 0.775 Vrms, 0 dBV = 1 Vrms, 0 dBV MPA 122 • Specifications, Part Numbers, and Accessories Audio output Number/signal type ... 1 stereo or 2 mono (2 channels total) Connectors ... -
Page 15: Optional Accessories
Specifications are subject to change without notice. MPA 122 • Specifications, Part Numbers, and Accessories Included Parts These items are included in each order of a MPA 122 unit: Included parts MPA 122 Mini Power Amplifier 12 VDC, 3 A external power supply Female, 3.5 mm, 5-pole captive screw conn. - Page 16 Specifications, Part Numbers, Accessories, cont’d MPA 122 • Specifications, Part Numbers, and Accessories...
Need help?
Do you have a question about the MPA 122 and is the answer not in the manual?
Questions and answers