Table of Contents
Advertisement
Quick Links
Advertisement
Table of Contents
Troubleshooting

Subscribe to Our Youtube Channel
Related Manuals for Nortel 1165E


Summary of Contents for Nortel 1165E
- Page 1 Title page Nortel Communication Server 1000 IP Phone 1165E User Guide...
-
Page 3: Revision History
Standard 01.03. This document is up-issued to support Communication Server 1000 Release 5.5 and Communication Server 1000 6.0 with UNIStim 4.1. October 2009 Standard 01.01. This document is issued to support the IP Phone 1165E for Communication Server 1000 Release 5.5 and 6.0. - Page 4 Revision history...
-
Page 5: Table Of Contents
Contents Contents Basic features ........12 Telephone controls . - Page 6 Contents Enabling OnHook Default Path ....68 Changing feature key labels ..... . . 68 Configuring the name display format .
- Page 7 Contents Making a call using the Corporate Directory ..125 Making a call using the Personal Directory ..126 Making a call using the Callers List ....127 Making a call using the Redial List .
- Page 8 Contents Setting up a conference call ......155 Using Conferee Selectable Display ....157 Using Group Call .
- Page 9 Contents Activating Message Registration ..... 194 Using Maid Identification ......195 Displaying Room Status .
- Page 10 Contents...
- Page 11 (See Note 1). Experience the display capabilities by personalizing the background image of the IP Phone 1165E display, and loading digital pictures into the IP Phone to view a Digital Picture Slideshow when the IP Phone is idle.
-
Page 12: Basic Features
About the Nortel IP Phone 1165E Basic features Your IP Phone 1165E supports the following features: • up to sixteen line/feature keys with indicators using the Shift feature • four soft keys to provide easy access to features and call control •... - Page 13 About the Nortel IP Phone 1165E • hearing aid compatibility • USB port for connecting a USB keyboard, USB mouse, USB headset, USB flash drive and powered hubs • USB access control (USB lock) that controls how the USB port on the IP Phone 1165E can be used •...
-
Page 14: Telephone Controls
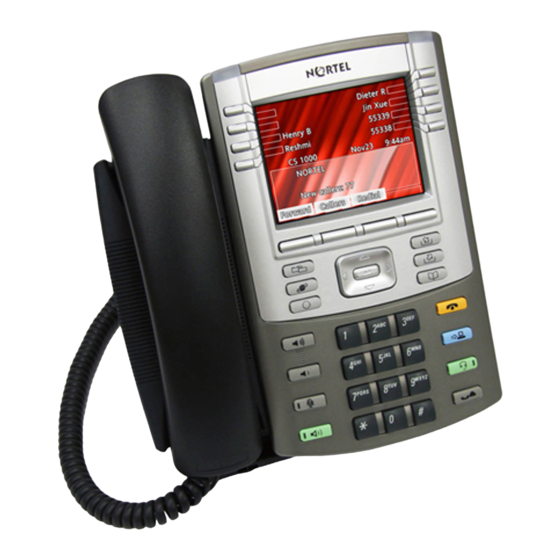
Telephone controls Figure 1 on page 14 shows the IP Phone 1165E. Figure 1: IP Phone 1165E This section describes the controls on your IP Phone 1165E. Context Sensitive Soft keys are located below the display area. The LCD label above each key changes, based on the active feature. - Page 15 About the Nortel IP Phone 1165E When a triangle appears before a soft key label, the feature is active. Press the More... key to access the next layer of soft keys. The keys on either side of the LCD display...
- Page 16 About the Nortel IP Phone 1165E Press the Mute key to listen to the receiving party without transmitting. Press the Mute (Mute) key again to return to two-way conversation. Mute key applies to handsfree, handset, and headset microphones. The Mute LED indicator, located on the...
- Page 17 About the Nortel IP Phone 1165E Use the Expand key to access applications managed through an external application (Expand) server. Note: This feature requires an External Application Server. Press the Headset key to answer a call using the headset or to switch a call from the handset or handsfree to the headset.
- Page 18 About the Nortel IP Phone 1165E When your IP Phone 1165E firmware is being updated, the blue Feature Status Lamp indicator flashes. To find out if additional features are supported for this lamp, contact your administrator. Press the Copy key to copy entries to your...
- Page 19 About the Nortel IP Phone 1165E Press the Services key, and then use the navigation keys to access the following (Services) items: • Telephone Options: — Volume adjustment... — Contrast adjustment — Language... — Date/Time — Display diagnostics — Local Dialpad Tone —...
-
Page 20: Telephone Display
Local Tools menu. Telephone display The IP Phone 1165E provides a 4.1 inch (diagonal measured) color QVGA TFT display, capable of displaying a QVGA 320 x 240 (width by height) image. The graphics controller supports 24-bit color (16 million colors). - Page 21 About the Nortel IP Phone 1165E Figure 2: IP Phone 1165E display area Self-labeled line/programmable feature key labels appear beside the line keys, and context-sensitive soft key labels appear directly above the soft keys. Self-labeled means that the label next to the line/feature key is presented from the call server automatically if a feature is programmed, and can also be edited and changed by the user.
-
Page 22: Usb Support
USB keyboards with built-in hubs. If a hub is involved, use external power. You can plug a USB flash drive into the USB Port of the IP Phone 1165E or on a powered hub connected to the IP Phone, and transfer files to and... -
Page 23: License Notification
Call features and Flexible Feature Codes Some features are not available on all IP Phones. Call features and Flexible Feature Codes (FFC) must be assigned to your IP Phone 1165E, and supported by system software. Contact your system administrator to configure these features and codes on your IP Phone 1165E. -
Page 24: Station Control Password (Scpw)
About the Nortel IP Phone 1165E Station Control Password (SCPW) Your Station Control Password (SCPW) enables the following security features: • Electronic Lock to prevent others from making calls from your IP Phone • password-protected IP Phone features (for example, Personal Directory, Redial List, and Callers List) Your system administrator defines your initial SCPW. - Page 25 Select soft key to accept the new password. If you are locked out of your IP Phone 1165E, or if you forget your SCPW, contact your system administrator. Note: The default configuration for Password Protection is off. To turn Password Protection on or off: 1.
- Page 26 About the Nortel IP Phone 1165E 5. Press the Up/Down navigation keys to scroll and highlight one of the following: — Enable Password Protection — Disable Password Protection 6. Choose one of the following soft keys: — to accept the selection —...
-
Page 27: Entering Text Using The Ip Phone Dialpad
Entering and editing text Entering and editing text You can enter and edit text on your IP Phone 1165E using the following methods: • “Entering text using the IP Phone dialpad” on page 27 • “Entering text using the USB keyboard” on page 28 The use of any of these methods for text entry or editing depends on the application. -
Page 28: Entering Text Using The Usb Keyboard
Entering and editing text Entering text using the USB keyboard You can use the USB keyboard, when connected, to enter text in the tools and graphical applications. For number entry in IP Phone applications (for example, when dialing), you can use the keyboard to enter digits (0 to 9), as well as * and #. Other characters are ignored. -
Page 29: Editing Text Using The Soft Keys
Note: Contact your system administrator to see if USB keyboard function keys are supported on your IP Phone 1165E. Editing text using the soft keys You can use the softkeys, in conjunction with the dialpad, to easily edit... - Page 30 Entering and editing text 5. To add non-alphanumeric symbols, press the Symbol soft key, and perform one of the following:. a. Press the Left/Right navigation keys to move to a specific symbol and press the Choose soft key to select a symbol. b.
-
Page 31: Before You Begin
Phone (if required) and configure the VPN on your IP Phone. An installation wizard helps you perform the necessary steps. Note: The Nortel Phone VPN Configuration Wizard uses the default language of the operating system of your PC. If the language is not supported by the wizard, the default wizard language is English. -
Page 32: Connecting Your Ip Phone
— UDP Port 69 (TFTP) — TCP Port 80 (HTTP) — UDP Port 49000 Note: The Nortel Phone VPN Configuration Wizard.jar file creates a log.txt file during execution. This file is helpful to troubleshoot problems you experience using the Nortel Phone VPN Configuration Wizard.jar. - Page 33 Virtual Private Network Figure 4: IP Phone connected to the modem Figure 5: IP Phone connected to the router...
-
Page 34: Qos Configuration Recommendations
Some network equipment allows you to isolate devices from each other. If you are unsure, it is recommended that you temporarily connect your PC to the IP Phone to run the initial Nortel Phone VPN Configuration Wizard. See Figure 4 on page... -
Page 35: Installing And Configuring Vpn
1. Follow the instructions provided by your system administrator to obtain the required files. 2. Power-down the IP Phone. 3. Run the Nortel Phone VPN Configuration Wizard.jar file on your PC. The Welcome & language selection window of the Wizard appears, as shown in... - Page 36 Virtual Private Network Figure 7: Welcome & language selection window 4. Select your language preference. The following languages are supported: • Arabic • Chinese - simplified • Chinese - traditional • Czech • Danish • Dutch • English • Finnish •...
- Page 37 Virtual Private Network • Italian • Japanese - Katakana • Japanese - Kanji • Korean • Latvian • Norwegian • Polish • Portuguese • Russian • Spanish • Swedish • Turkish 5. Click Next. The Equipment Setup and VPN window appears, as shown in Figure 8 on page...
- Page 38 Virtual Private Network Figure 8: Equipment Setup and VPN window 6. Verify that the modem, IP Phone, and PC are connected properly. 7. Disconnect any VPN connection currently running on your PC. Confirm that your LAN Ethernet Port and PC Ethernet Port on the IP Phone are connected correctly.
- Page 39 Virtual Private Network Figure 9: Locate Data Files 9. Click Browse to locate the provisioning files provided by your system administrator, if the wizard was not able to locate the files. 10. Click Next. The Prepare Phone for Configuration window appears as shown in Figure 10 on page...
- Page 40 “Listening Mode” may not be detected. If your IP Phone does not enter “Listening Mode”, follow the steps below. 12. After you hear the chimes tune and the text NORTEL appears on the IP Phone display screen, quickly press the following keys in order.
- Page 41 Figure 11: The Prepare Phone for Configuration (Try again) a. Power off your IP Phone and power it back on again. 14. After you hear the chimes tune and the text NORTEL appears on the IP Phone display screen, quickly press the following keys in order.
- Page 42 Virtual Private Network to perform a software upgrade on your IP Phone. The Prepare Phone for Configuration window appears as shown in Figure 12 on page Figure 12: Prepare Phone for Configuration c. Double-press the Services key on the IP Phone quickly. Select the Network Configuration menu item.
- Page 43 Virtual Private Network Server IP address) window appears, as shown in Figure 14 on page If you are not able to navigate and edit the address in Provision: or (TFTP IP:) in the Network Configuration menu, or you were not able to edit this field, click No.
- Page 44 Virtual Private Network tool. Use the IP Phone keypad to enter the Provision: or (TFTP IP) address of the provisioning server. Note: To enter a dot (period) when entering an IP address using the IP Phone keypad, press the 1 key repeatedly, or you can double- press the asterisk (*) key.
- Page 45 The text “Searching for connected phones” displays while the connected IP Phones are located. The text “Autodiscovery complete” displays in the Nortel Phone VPN Configuration Wizard tool when the search is finished. If the search is successful, “Listening Mode: Connected” appears in the IP Phone display area.
- Page 46 Virtual Private Network Figure 15: Autodiscover Phone window 16. Click Next. If more than one connected IP Phone was discovered, the Autodiscover Phone (More than one phone was discovered) window appears. See Figure 16 on page...
- Page 47 Virtual Private Network Figure 16: Autodiscover Phone (More than one phone was discovered) a. Obtain the MAC address of the IP Phone for which you are configuring the VPN. The MAC address is printed on a label located on the back of the IP Phone. b.
- Page 48 Virtual Private Network Figure 17: Configure Phone Window The progress bar displays the percent complete of the provisioning file transfer. Configuring phone is displayed during the file transfer. 18. When Phone configuration complete is displayed, click Next. The Confirmation & Finish window appears. See Figure 18 on page...
- Page 49 Virtual Private Network Figure 18: Confirmation & Finish 19. Verify that the IP Phone is successfully configured. Note: You may be prompted to enter a User ID and Password before the IP Phone registers with the system. This information is provided by your system administrator.
- Page 50 Lift the IP Phone handset and listen for a dial tone. If the IP Phone is not configured successfully, ensure that the basic requirements are met; repeat the steps in the Nortel Phone VPN Configuration Wizard or contact your system administrator. For more information about basic requirements, see “Before you begin”...
-
Page 51: Configuring Telephone Options
• Virtual Office Login Test Local Mode (for branch office) menus are listed when an IP Phone 1165E Class of Service is configured for Virtual Office and branch office. (For more information, “Using Virtual Office” on page 180). Note: The... -
Page 52: Using The Telephone Options Menu
Configuring Telephone Options Using the Telephone Options menu Use the Telephone Options menu to access the following: • “Adjusting the volume” on page 53 • “Adjusting the display screen contrast” on page 54 • “Selecting a language” on page 55 •... -
Page 53: Adjusting The Volume
Configuring Telephone Options 4. Press the Up/Down navigation keys to scroll and highlight an option (for example, Language…). 5. Press the Enter key. The display provides information required to adjust your selection. 6. Choose one of the following: Select Cancel —... -
Page 54: Adjusting The Display Screen Contrast
Options, and then select Contrast adjustment. You can also adjust the contrast using the Local Tools menu; Nortel recommends that you use the control in the Telephone Options menu. Note: If you have an Expansion Module for IP Phone 1100 Series... -
Page 55: Selecting A Language
Configuring Telephone Options To adjust the display screen contrast: 1. To increase the display contrast level, press one of the following three keys: — soft key — navigation key — the Right navigation key 2. To decrease the display contrast level, Down press one of the following three keys: —... -
Page 56: Selecting Date And Time Format
Configuring Telephone Options To select a language: 1. Press the Up/Down navigation keys to scroll, and highlight the desired language (for example, German [Deutsche]). Note: Some languages may not be installed on your IP Phone. Contact your system adminstrator for more information about available languages. -
Page 57: Accessing Display Diagnostics
Configuring Telephone Options 2. Choose one of the following: — Press the Select soft key or Enter Select Cancel key to save the format, and return to Telephone Options menu. — Press the Cancel soft key to keep existing configurations. Accessing display diagnostics The Display diagnostics option tests the IP Phone display screen and indicator lights.To access Display diagnostics, press the... -
Page 58: Viewing Ip Phone Information
Configuring Telephone Options To choose a local dialpad tone: 1. Press the Up/Down navigation keys to scroll and highlight one of the following dialpad tones: — None to disable all tones — Short Click to enable a single tone for all keys —... -
Page 59: Diagnostics
Configuring Telephone Options To view IP Phone information: 1. Press the Up/Down navigation keys to scroll through the list to view IP Phone information. Select Press the Select soft key or Enter to view the highlighted information Enter 3. Press the Up/Down navigation keys to scroll through the information. -
Page 60: Configuring Call Log Options
Configuring Telephone Options Configuring Call Log Options The Call Log Options screen displays the following items: • Incoming Calls • Preferred Name Match • Area Code Setup Under Incoming Calls, the following can be selected: • Log Mode • New Call Indication Use the Call Log Options screen to configure the following preferences: •... - Page 61 Configure the Incoming Call – New Call Indication You can configure your IP Phone 1165E to display a message to indicate that a new incoming call was received. The default configuration is On. To configure new call indication, press the...
- Page 62 Configuring Telephone Options To configure New Call Indication: 1. Highlight the Incoming Calls option and press the Select soft key or Enter key. Select Enter 2. Press the Up/Down navigation keys to scroll and highlight New Call Indication. Select 3. Press the Select soft key or Enter...
- Page 63 Enter existing configurations. Configure Preferred Name Match You can configure your IP Phone 1165E to display the name of the caller as defined in your Personal Directory. The default configuration is Off. To configure Preferred Name Match, press the Services...
- Page 64 Configuring Telephone Options Configure Area Code Setup Use the Area Code Setup menu to save up to three area codes. When an incoming call arrives with an area code that matches one of the three stored area codes, the incoming call number is reordered to display the telephone number followed by the area code (as opposed to the area code followed by the telephone number).
- Page 65 Configuring Telephone Options Select 6. Choose one of the following: — Press Enter or the Select soft key to Enter save the configuration. — Press the Cancel soft key to keep Cancel the existing configurations. Note: Refer to Table 3 on page 30 an explanation of other available soft keys.
-
Page 66: Choosing A Ring Type
Configuring Telephone Options 5. Use the dialpad to edit the number. Enter 6. Choose one of the following: — Press the Select soft key or Enter key to save the configuration. — Press the Cancel soft key to keep existing configurations. Select Cancel Note: Refer to... -
Page 67: Enabling Or Disabling Call Timer
Configuring Telephone Options 3. Choose one of the following: Select — Press the Select soft key or Enter key to save the ring type, and return to the Telephone Options menu. Stop — Press the Stop soft key, and then use the Up/Down navigation keys to select a... -
Page 68: Enabling Onhook Default Path
Configuring Telephone Options Enabling OnHook Default Path OnHook Default Path option allows you to choose whether to use a headset or the Handsfree feature to operate your IP Phone while it is on- hook. To enable OnHook Default Path, press the Services key, select Telephone... - Page 69 Configuring Telephone Options Enter Press Enter or the Select softkey. Select 3. Press the feature key that you are 2493 changing. f you press a prime DN key, an error message appears. The error message that appears is Enter Can't chg PrimeDN key In order to return from the menu from this error message you need to press the soft key or the...
-
Page 70: Configuring The Name Display Format
The label configurations must be reentered. Configuring the name display format You can configure your IP Phone 1165E to display the name of the incoming calling party in the following formats: • last name, first name •... -
Page 71: Configuring Live Dial Pad
Configuring Telephone Options To configure name display format: 1. Press the Up/Down navigation keys to scroll and highlight one of the following: — last name, first name — first name, last name Enter 2. Choose one of the following: — Press the Select soft key or Enter... - Page 72 Configuring Telephone Options 2. Choose one of the following: Enter — Press the Select soft key or Enter key to save the configuration. — Press the Cancel soft key to keep Select Cancel existing configurations.
-
Page 73: Configuring Local Menu Options
If this happens, contact your system administrator. Your IP Phone 1165E has both local and server-based options. Press the Services key twice, or right-click the mouse on the idle screen to access... - Page 74 Configuring Local Menu options Table 5: Navigation key functions in the main menu Function Down arrow Moves the highlight bar down through the sub menu items. Enter Select Enter or Select softkey opens the submenu item. softkey Exit soft key Exits the main menu and returns the Display to the Telephony menu.
-
Page 75: Preferences Submenu
Configuring Local Menu options Navigation using the USB mouse If you are using a USB mouse, you can right-click the Telephony screen to open the Local Tools menu, and then click an item to select it. You can navigate through the menu items as follows: •... -
Page 76: Display Settings
Configuring Local Menu options • “1. Display Settings” on page 76 • “2. Language” on page 87 • “3. Headsets” on page 88 • “4. Bluetooth” on page 92 • “5. File Manager” on page 104 • “6. Background” on page 112 1. - Page 77 IP Phones. Note: Changes you make to contrast in this menu are lost if the IP Phone is reset. To avoid losing your changes, Nortel recommends that you use the Contrast Adjustment control in the Telephone Options menu.
- Page 78 Configuring Local Menu options Using the Contrast or Brightness settings: To use the contrast or brightness settings, press the Services key twice to open the Local Tools menu. Press the key on the dialpad to select 1. Display Settings. Note: To increase the service life of the display: –...
- Page 79 Using the Digital Picture Slideshow: The new IP Phone 1165E has a digital picture slideshow feature. You can copy or transfer images into the phone, and view a slideshow of them as a screensaver. For more information, refer “Accessing the files on the IP...
- Page 80 Configuring Local Menu options 1. Select the Slideshow settings using the Up/Down navigation keys or the USB mouse. 2. Click the Left/Right arrow of the indication bar, or use the navigation keys to select the timeout value. The values are as follows: —...
- Page 81 Configuring Local Menu options Setting a theme: To set a theme, press the Services key twice to open the Local Tools menu. Press the key on the dialpad to select 1. Display Settings. 1. Select the Theme setting using the navigation keys or USB mouse. 2.
- Page 82 Configuring Local Menu options 1. Select the Use Font Smoothing setting using the Down navigation keys or USB mouse. 2. Use the Enter key or USB mouse to toggle the check box. 3. Choose one of the following: — Select the Apply soft key to save changes.
- Page 83 Cancel soft key to dismiss the changes. Table 9 compares the new IP Phone 1165E icons to the simple icons. Simple icons are listed under IP Phones 1120E/1140E/1150E graphical grayscale displays column. Table 9: Standard Nortel Icons (Part 1 of 5)
- Page 84 Configuring Local Menu options Table 9: Standard Nortel Icons (Part 2 of 5) IP Phones Free form icon 1120E/1140E/1150E IP Phone 1165E state graphical grayscale icons displays U-Ring I-Active U-Active I-Hold U-Hold I-Group Listen U-Group Listen Feature Active Feature Inactive...
- Page 85 Configuring Local Menu options Table 9: Standard Nortel Icons (Part 3 of 5) IP Phones Free form icon 1120E/1140E/1150E IP Phone 1165E state graphical grayscale icons displays I-Hold Ringing U Hold Ringing Active Audio Hold Audio Home Business Extension Number...
- Page 86 Configuring Local Menu options Table 9: Standard Nortel Icons (Part 4 of 5) IP Phones Free form icon 1120E/1140E/1150E IP Phone 1165E state graphical grayscale icons displays Email Wireless Internet address Set-to-Set Message Secured Trash can Inbox Outbox...
-
Page 87: Language
Configuring Local Menu options Table 9: Standard Nortel Icons (Part 5 of 5) IP Phones Free form icon 1120E/1140E/1150E IP Phone 1165E state graphical grayscale icons displays Video Other/Misc. 2. Language The Language setting in the Preferences menu configures the language used on the IP Phone display. -
Page 88: Headsets
Configuring Local Menu options Exit 3. Press the Exit soft key to exit to the main display. 3. Headsets Use the Headsets tool to select the headset used on your IP Phone. To select the headset used in the local menus, press the Services twice to open the Local Tools menu, and then press the key on the... - Page 89 Enabling a USB headset For a list of supported headsets that provide acceptable audio performance with the IP Phone 1165E, go to www.Nortel.com. Figure 20: Headset menu item display To enable a USB headset Making a change in the Headset menu page takes effect immediately.
- Page 90 • GN2225 (GN Netcom GN2225 NC Binaural Headset) You can select and configure a headset type regardless of whether the headset is plugged in or not to the Nortel USB Headset Adapter. 4. Select the Back Light check box to control the backlight on the Nortel USB Headset Adapters.
- Page 91 The Algo 4900 USB ATA is classified as a high-power device. It can be powered directly by an 1165E IP Phone only if the phone is powered by the AC Adapter. If the IP Phone is powered by PoE then the Algo 4900 USB ATA must be connected through a powered USB hub.
-
Page 92: Bluetooth
The backlight illuminates when you connect your headset to the IP Phone 1165E. 4. Bluetooth Your IP Phone 1165E is equipped with a radio system to support Bluetooth wireless technology enabled headsets. Double-press the Headset key to open the Bluetooth Setup dialog box. You must be familiar with the operation of the navigation keys to work in the Bluetooth Setup dialog box. - Page 93 Configuring Local Menu options Figure 21: Bluetooth Setup screen To pair a wireless headset with your IP Phone: 1. Double-press the Headset key to open the Bluetooth Setup dialog box. (Headset) Enable Bluetooth check box is highlighted. If the Bluetooth Setup menu fails to open when you double press the Headset key, Bluetooth wireless technology feature is not enabled on your phone.
- Page 94 Configuring Local Menu options 3. Put your Bluetooth wireless technology headset in its pairing or search mode. The procedure for doing this can be different for each headset. Refer to the documentation that accompanied your headset, or contact the vendor.
- Page 95 Configuring Local Menu options 4. Search devices. a. Ensure that your headset is in Pairing or Search Mode. b. Press the Right navigation key twice, and highlight the Search button, displayed next to the Search Devices item. c. Press the Enter key.
- Page 96 Configuring Local Menu options Stop 5. When the name of your headset appears in the Found: box, press the Stop soft key or wait for the search to finish. When the search is complete, the message "Search Completed Found Device(s)" appears.
- Page 97 Configuring Local Menu options 7. Press the Right navigation key one or more times to highlight the Pair button (next to the Pair Device item) and press Enter key. a. A dialog box appears, with the prompt "Enter PIN#". b. Use the phone dialpad to enter the PIN for the wireless headset and press the Enter...
- Page 98 Configuring Local Menu options 8. Choose one of the following: • If the headset is successfully paired with your IP Phone, proceed to Step 9. To verify that the pairing was successful, ensure that the headset appears in the list next to the Paired: item. If pairing is successful, the message "Pair completed"...
- Page 99 Configuring Local Menu options 9. Choose one of the following: • If the name of your headset appears in the Paired: box, proceed to Step 10. • If more than one device is paired, and the one you wish to use is not shown in Paired: box, navigate to the one you want, as follows:...
- Page 100 Take special care when using a "dual pairing" type of Bluetooth wireless technology headset, which can be paired to its base as well as to the IP Phone 1165E. If it is paired to both, the IP Phone 1165E is the second device, and the following applies: Press the headset "telephone"...
- Page 101 1165E. Note: Unless you need to dual pair a headset, operating the headset with the IP Phone 1165E is simpler if the headset is only used with its charging-only base. The desktop IP Phone base should be powered off if it is not in use.
- Page 102 Configuring Local Menu options 2. Press the Left/Right navigation key to select the “Use BT Headset” item. 3. Press the Enter key to toggle this option on or off. A check mark indicates that the wireless headset is used. Clear the check mark to use a wired headset.
- Page 103 Configuring Local Menu options 3. Choose one of the following: • If the name of your headset appears in the Paired box, proceed to Step 5. • If more than one device is paired, and your headset is not already displayed in the Paired box, do the following: a.
-
Page 104: File Manager
5. File Manager The File Manager menu item provides access to files on the IP Phone 1165E and access to files on the USB drive, if one is attached. The screen that appears depends on whether a USB drive is attached. - Page 105 Configuring Local Menu options Figure 22: File Manager Device Selection dialog–no USB device 3. Press the Up/Down navigations key to scroll the list, and highlight the folder that you want to access. 4. Do one of the following: — Press the Select soft key to access the selected folder.
- Page 106 File Manager from the Preferences menu of the IP Phone 1165E. The screen shows the device selection dialog with the phone and the USB device. See Figure 23 on page 106. Figure 23: File Manager device selection dialog–with USB device 2.
- Page 107 1. When a file is selected, you are prompted to delete the file. 2. When a folder is selected on the IP Phone 1165E, you are prompted to delete all contents of the folder. If you do not respond to the deletion prompt, deletion is canceled in 15 seconds.
- Page 108 For example, JPG files are sent to the Images folder on the IP Phone 1165E. 2. When a file on the IP Phone 1165E is selected and no USB drive is attached, an error displays on the screen.
- Page 109 File Manager from the Preferences menu of the IP Phone 1165E. The screen shows the folders and the USB devices on the phone. Figure 23 on page 106 2. Browse for and select the file on the phone that you want to send to the USB drive.
- Page 110 Configuring Local Menu options — To move up a directory level on the device,.press the Back soft key or highlight “..”, then press the Select soft key. Send Results When the OK soft key is pressed, the IP Phone attempts to process the selected file.
- Page 111 Configuring Local Menu options Figure 26: Failed send operation Sending an image file from a USB drive to the phone Use the following procedure to send an image file from the USB drive to the phone. 1. Plug the USB flash drive into the phone's USB port. 2.
-
Page 112: Background
“In progress…” appears on the screen for actions that take time to complete. 6. Background The IP Phone 1165E allows the display of user selected background images. This Preferences menu item enables you to browse the currently stored images and select the desired image. -
Page 113: Diagnostics
Configuring Local Menu options To select an image for the background Figure 27: Background Image screen 1. From the Background menu, press the Up/Down navigations key to scroll the list, and highlight the image that you want to appear. As you navigate the list, each file image appears in the background as a preview of how it would look as the background image. -
Page 114: Ip Set Information
5. USB Devices The USB Devices tool provides information about any Universal Serial Bus (USB) devices that you connect to your phone. Your IP Phone 1165E automatically detects USB devices when you connect them to the USB port in the back of the IP Phone. - Page 115 Configuring Local Menu options To check USB device information, press the Services key twice to open the Local Tools menu, press the 2 key on the dialpad to select 2. Local Diagnostics, and press the 5 key on the dialpad to select 5.
- Page 116 IP Phone, even if the device is not supported by the IP Phone 1165E, or if the device type is locked. Locked devices do not function on the IP Phone even if they are enumerated.Your administrator selects what USB devices can be used on the IP Phone.
-
Page 117: Advanced Diag Tools
Configuring Local Menu options Figure 29: USB Devices—locked devices 6. Advanced Diag Tools The Advanced Diag Tools are available to the Nortel support organization to configure the auto recovery function and remote access. This tool is for system administrator use only. -
Page 118: 10. Certificate Information
Configuring Local Menu options 10. Certificate Information The system administrator can use the Certificate Information menu to view certificate information. This menu is for system administrator use only. Configuration To access the Configuration menu, press the Services key twice, and then select the Configuration submenu. -
Page 119: Advanced Diag Tools
Configuring Local Menu options 2. Advanced Diag Tools The Advanced Diagnostics Tool allows you to configure advanced diagnostic tools. This tool is for administrator use only. Locks Your system administrator can use the lock menu tool to protect the Local Tools menu items from accidental or unwanted changes. -
Page 120: Usb Locks
Configuring Local Menu options 2. USB Locks USB Access Control (USB Lock) defines how you can use the USB port on the IP Phone. You can completely disable the USB port, or you can enable the USB port for various devices. If the USB Port is disabled, the USB host controller does not initialize and USB devices are not enumerated. -
Page 121: Using Off-Hook Dialing
Making a call Making a call This section describes features associated with making a call. You can make a call from your IP Phone 1165E using any of the following: • “Using Off-hook dialing” on page 121 • “Using On-hook dialing” on page 122 •... -
Page 122: Using On-Hook Dialing
Making a call 3. To terminate the call, choose one of the following: — Return the handset to the cradle. — Press the Goodbye key. (Goodbye) Using On-hook dialing Use these steps to make a call by dialing before lifting the handset: 1. -
Page 123: Using Handsfree Dialing
Making a call Using handsfree dialing Use handsfree dialing to use a built-in microphone and speaker, or a headset, instead of the handset. While on an active call, you can switch between handset and handsfree mode. 1. Choose one of the following: —... - Page 124 Making a call To mute a handsfree call: 1. Press the Mute key. The LED indicator flashes. (Mute) 2. Press the Mute key again to return to a two-way handsfree conversation. (Mute) To switch from handsfree to handset mode: Lift the handset. To switch from handset mode to handsfree mode: 1.
-
Page 125: Using The Directory Applications
(Goodbye) equipped. Using the Directory applications You can make calls using the following Directory applications available on your IP Phone 1165E. • “Making a call using the Corporate Directory” on page 125 • “Making a call using the Personal Directory” on page 126 •... -
Page 126: Making A Call Using The Personal Directory
Making a call Search 2. Press the Search soft key to find the desired name. If the search is successful, the first match appears on the screen. 3. Choose one of the following: — Press the Dial soft key to dial the Dial resulting number. -
Page 127: Making A Call Using The Callers List
Making a call To make a call using the Personal Directory: 1. Press the Up/Down navigation keys to scroll and highlight a name in the Personal Directory. 2. Choose one of the following: — Press the Dial soft key to dial the Dial Cancel resulting number. -
Page 128: Making A Call Using The Redial List
Making a call Making a call using the Redial List The Redial List feature automatically stores a maximum of 20 previously dialed IP Phone numbers. To use the Redial List, press the Directory and select Redial List. For information on how to configure and use the Redial List, see “Using the Redial List”... -
Page 129: Using Autodial
Making a call 3. Lift the Handset when the called party answers or, if in handsfree mode, begin to speak. To edit a Predial number: 1. Use the dialpad to enter the number. 2. Choose one of the following: — To erase all numbers, press the Clear Delete Clear... -
Page 130: Using Ring Again
Making a call 2. Using the dialpad, dial the phone number (including access code) to be stored on the selected AutoDial key. 3. Press the AutoDial key a second time to Autodial store the number on the selected key. After you store a number, the word Autodial disappears, and the stored number appears. - Page 131 Making a call To activate Ring Again: 1. Dial a number and receive a busy tone or no answer. 2. Choose one of the following: RingAgn — Press the RingAgn soft key. — Enter the Ring Again Activate FFC. To call a Ring Again party when you receive notification: 1.
-
Page 132: Using Last Number Redial
Making a call Using Last Number Redial Use the Last Number Redial feature to automatically redial the last dialed number. To use Last Number Redial: Choose one of the following: — To redial using the handset: a. Lift the handset. b. -
Page 133: Using System Speed Call
Making a call 2. At the prompt: — Enter a one-, two-, or three-digit code (0-999). — If required, dial the access code. — Enter the phone number (internal, external, or long-distance number). SpcCtl 3. Press the Speed Call Controller soft key again to save the code and number. -
Page 134: Using Hotline
Making a call To make a System Speed Call: 1. Lift the handset. 2. Choose one of the following: SScUsr SScCtl — Press the System Speed Call soft key. — Press the System Speed Call Controller (SScCtl) soft key. 3. Dial the Speed Call code to automatically dial the number. - Page 135 Making a call To make an intercom call: 1. Lift the handset. 2. Press the Intercom key. Intrcm 3. Dial the one- or two-digit code for the desired intercom group member. To answer an intercom call while on a line other than your intercom group line: 1.
-
Page 136: Answering A Call
Answering a call Answering a call Each incoming call causes the IP Phone to ring, the LCD indicator beside the line (DN) key to flash, and the Message Indicator lamp to flash. To answer a call: Choose one of the following four options: •... -
Page 137: Placing A Call On Hold
While on an active call While on an active call You can use the following features during an active call: • “Placing a call on hold” on page 137 • “Transferring a call” on page 138 • “Using Timed Reminder Recall” on page 139 •... -
Page 138: Transferring A Call
While on an active call Transferring a call Use the Transfer feature to redirect a call to the appropriate person. To transfer a call to a third party: Trans 1. Press the Transfer soft key. The other party is put on hold and a dial tone sounds. -
Page 139: Using Timed Reminder Recall
While on an active call Using Timed Reminder Recall Use the Timed Reminder Recall feature to receive a reminder tone when a transferred call is not answered. To use Timed Reminder Recall: Trans 1. Press the Transfer soft key. The call is put on hold. -
Page 140: Using Attendant Recall
While on an active call Trans 2. Choose one of the following: — Press the Transfer soft key and repeat the transfer. — If the transfer is picked up while you are on the line, press the Goodbye (Goodbye) key to complete the transfer. Using Attendant Recall Use the Attendant Recall feature to contact an attendant during a call and to connect the caller to the attendant. - Page 141 While on an active call To park a call on the System Park DN or your own DN: During an active call, press the Park soft key twice. Park Park The call is parked on your DN unless a System Park DN is enabled to automatically park calls on the system.
- Page 142 While on an active call 3. To use an alternate DN from the System Park DN or your own DN, dial the DN where you want to park the call. Otherwise, proceed to Step 4. 4. Choose one of the following: Trans Conf —...
-
Page 143: Recording A Calling Party Number
While on an active call Recording a Calling Party Number Use the Calling Party Number feature to record a caller number, or to charge a call to an account number, during an established call. To record a caller number for accounting purposes: More... -
Page 144: Tracing A Malicious Call
While on an active call 2. Press the flashing line (DN) key. The call waiting information appears. If you are using another feature key, you can use the Display key to access information associated with those feature keys. Tracing a malicious call Use the Call Trace feature to trace nuisance calls within your system. -
Page 145: Using Automatic Answerback
Incoming calls Incoming calls You can use the following features when you have an incoming call: • “Using Automatic Answerback” on page 145 • “Using Call Pickup” on page 145 • “Using Call Waiting” on page 147 Using Automatic Answerback When the Automatic Answerback feature is active, your IP Phone automatically answers in Handsfree mode after one ring;... - Page 146 Incoming calls 2. Choose one of the following: Pickup — Press the Pickup key. — Enter the Pickup Ringing Number FFC. To answer an incoming call in another call pickup group: 1. Lift the handset. 2. Choose one of the following: GrpPkp —...
-
Page 147: Using Call Waiting
Incoming calls 3. Dial the DN of the IP Phone that is ringing (and that is not in your call pickup group). If the pickup DN or group number is invalid (an overflow burst tone sounds and the screen displays Goodbye and try again), press the Goodbye key. - Page 148 Incoming calls 2. Press the line (DN) key associated with the first call. If you do not have a Call Waiting key: 1. Press the Goodbye key to end the current call. (Goodbye) 2. Press the line (DN) key beside the flashing status icon to answer the incoming call.
-
Page 149: Using Call Forward
While away from your desk While away from your desk You can use the following features when you are away from your desk: • “Using Call Forward” on page 149 • “Using Internal Call Forward” on page 150 • “Using Remote Call Forward” on page 151 •... -
Page 150: Using Internal Call Forward
While away from your desk To deactivate Call Forward: Forward Choose one of the following: • Press the Forward soft key. • Lift the handset and enter the Call Forward All Calls Deactivate FFC. To reinstate Call Forward to the same number: Forward Forward Press the... -
Page 151: Using Remote Call Forward
While away from your desk 3. Press the Internal Call Forward key. IntForward To deactivate Internal Call Forward: Choose one of the following: IntForward — Press the Internal Call Forward key. — Lift the handset and enter the Internal Call Forward Deactivate FFC. - Page 152 While away from your desk 3. Dial the Remote Call Forward Activate FFC to activate the feature. 4. Dial your Station Control Password. A dial tone sounds. 5. Choose one of the following: — Dial your DN. — To forward calls to the previous call forward phone number, press the key.
-
Page 153: Securing Your Ip Phone
While away from your desk 3. Dial the Remote Call Forward Deactivate FFC. 4. Dial your Station Control Password. 5. After you hear the dial tone, dial your 6. Press the key. Securing your IP Phone Use the Electronic Lock feature to prevent others from making calls from your IP Phone. - Page 154 While away from your desk 4. Choose one of the following: — If dialing locally, press the Goodbye (Goodbye) key. — If dialing the FCC remotely, dial your To unlock your IP Phone: 1. Lift the handset. 2. Dial the Electronic Lock Deactivate FFC.
-
Page 155: Using The Call Join Feature
Talking with more than one person Talking with more than one person Use the following features to enable conversations between more than two people: • “Using the Call Join feature” on page 155 • “Setting up a conference call” on page 155 •... - Page 156 Talking with more than one person To set up a conference call: Conf 1. While on a call, press the Conference soft key to place the party on hold. You hear a dial tone. 2. Dial the number of the person you want to add to the conference call.
-
Page 157: Using Conferee Selectable Display
Talking with more than one person 2. Press the line (DN) key beside the flashing status icon to return to your original call Using Conferee Selectable Display Use the Conferee Selectable Display feature to list active conferees and disconnect a conferee from the conference call. To view active conferees: 1. -
Page 158: Using Group Call
Talking with more than one person 2. Press the key on which the conference call is established. 3. Choose one of the following: — For a single conferee, press the (Goodbye) Goodbye key. If configured, the Conference Count Display returns an updated total count of conferees. - Page 159 Talking with more than one person — When a person in your group is on a conference call or another group call, they are not connected to your group call. — After everyone in the group has answered, only the person who made the group call can put the call on hold.
-
Page 160: Using Make Set Busy
Working without interruption Working without interruption This section describes features that provide uninterrupted work time. Using Make Set Busy Use the Make Set Busy feature to make your IP Phone appear busy to all callers. To activate Make Set Busy: Choose one of the following: MakeSetBsy —... -
Page 161: Using Autodial Transfer
Additional call features Additional call features Contact your system administrator to determine if the following call features are available on your IP Phone. • “Using AutoDial Transfer” on page 161 • “Using the Buzz signal” on page 162 • “Using Call Page Connect to make an announcement” on page 162 •... -
Page 162: Using The Buzz Signal
Additional call features 3. Press the Goodbye key to end the call. (Goodbye) Using the Buzz signal Use the Buzz feature to notify another person of a call, a visitor, or a request. Two IP Phones that are linked together enable one person to signal the other. -
Page 163: Using Centrex/Exchange Line Switchhook Flash
Additional call features 4. Press the Goodbye (Goodbye) Using Centrex/Exchange Line Switchhook Flash Use the Centrex/Exchange Line Switchhook Flash feature during an established call to use a Centrex service, such as Call Transfer or Three- Way Calling. To use Centrex/Exchange Line Switchhook Flash: 1. - Page 164 Additional call features Charge 2. Choose one of the following: — Press the Charge soft key. — Dial the Call Detail Recording FFC. 3. Dial the charge account number. 4. When the dial tone sounds, dial the number. To charge a call in progress: 1.
- Page 165 Additional call features To charge a call to an account when you transfer a call: Trans 1. Press the Transfer soft key. The call is placed on hold. 2. Choose one of the following: Charge — Press the Charge soft key. —...
-
Page 166: Using Enhanced Override
Additional call features 2. Choose one of the following: Charge — Press the Charge soft key. — Dial the Call Detail Recording FFC. 3. Dial the charge account number. 4. Dial the number of the person you want to add to the conference. Conf 5. -
Page 167: Using Forced Camp-On Feature
Additional call features To use Enhanced Override: You receive a busy signal after dialing a phone number. 1. Choose one of the following: — Press the Override key. EnhOvr — Enter the Override FFC to initiate a Forced Camp-on. If either person on the call disconnects at this time, you receive an overflow (fast busy or engaged) signal. -
Page 168: Overriding A Busy Signal
Additional call features To use Forced Camp-on: You receive a busy signal after dialing a phone number. 1. Choose one of the following: — Press the Override key. EnhOvr — Enter the Override FFC to initiate a Forced Camp-on. The person you called receives a tone. You receive a ring signal or a busy signal, depending on the options chosen. -
Page 169: Using Privacy Release
Additional call features To override a busy signal: 1. You receive a busy signal after dialing a phone number. 2. Choose one of the following: — Press the Override key. EnhOvr — Enter the Override FFC. The people in the targeted call receive a tone for approximately 1 second. -
Page 170: Using Radio Page
Additional call features Using Radio Page Use the Radio Page feature to page a person and stay on the line until they answer. The paged person answers the call after entering a special Page Meet-me code from any IP Phone. To use Automatic Preselection (Meet-me page): 1. - Page 171 Additional call features The called party is either busy on the IP Phone or away from their desk. To page the called party, you do not need to redial the number of the called party. RadPag 1. Press the Radio Page soft key.
-
Page 172: Using Voice Call
Additional call features 3. Dial your own DN to connect to the paging caller. If the caller has disconnected, a steady high-pitched (number unavailable) tone sounds. Using Voice Call Use the Voice Call feature to make an announcement through someone else’s IP Phone speaker. -
Page 173: Using The Personal Directory
Additional phone features Additional phone features The following features are described in this section: • “Using the Personal Directory” on page 173 • “Using the Callers List” on page 176 • “Using the Redial List” on page 178 • “Using Virtual Office” on page 180 •... - Page 174 Additional phone features Next 3. Press the Next soft key. 4. Use the dialpad to enter the phone number. 5. Do one of the following: Done Cancel — Press the Done soft key to save the new entry. — Press the Cancel soft key to return to the Add screen.
- Page 175 Additional phone features To delete an entry: 1. Press the Up/Down navigation keys to scroll and highlight the desired entry. Delete 2. Press the Delete soft key. 3. Choose one of the following: Confirm Cancel — Press the Confirm soft key to delete the entry.
-
Page 176: Using The Callers List
Additional phone features Using the Callers List The Callers List feature logs all incoming calls. The Callers List can store up to 100 entries. When the list is full, the system overwrites the oldest entry. Use the Callers List feature to review missed calls and to dial calls. The Callers List contains: •... - Page 177 Additional phone features To dial an entry: 1. Press the Up/Down navigation keys to scroll and highlight the desired entry. Dial 2. Press the Dial soft key. To delete an entry: 1. Press the Up/Down navigation keys to scroll and highlight the desired entry. Delete 2.
-
Page 178: Using The Redial List
Additional phone features To delete the entire Callers List: Delete 1. Press the Delete soft key. 2. Choose one of the following soft keys: — to delete the entire Callers List — to return to the previous screen Using the Redial List The Redial List feature logs all outgoing calls. - Page 179 Additional phone features To dial an entry: 1. Press the Up/Down navigation keys to scroll and highlight the desired entry. Dial 2. Press the Dial soft key. To delete an entry: 1. Press the Up/Down navigation keys to scroll and highlight the desired entry. Delete 2.
-
Page 180: Using Virtual Office
Consult your system administrator to verify if the Virtual Office feature is available for your use. You can use an IP Phone as a Remote phone to connect to your IP Phone 1165E even if it is a different IP Phone model. Table 12 shows the IP Phones on which you can use Virtual Office to connect to your IP Phone 1165E. -
Page 181: Logging In To Virtual Office
IP Phone 1110 Yes, with restrictions IP Phone 1120E Yes, with restrictions IP Phone 1150E IP Phone 1165E Logging in to Virtual Office To activate Virtual Office on your Office IP Phone from your Remote IP Phone: 1. Press the Services key. -
Page 182: Using Virtual Office On Your Remote Ip Phone
Using Virtual Office on your Remote IP Phone Because the display characteristics, including size, vary from one IP Phone model to the next, your Office IP Phone 1165E display is different on each Remote phone. Figure 32 on page 183 shows an IP Phone 1165E logged in as a Remote phone to an IP Phone 1165E Office phone. - Page 183 IP Phone 1120E logged in as a Remote phone to an IP Phone 1165E Office phone. Fewer display lines are available on the 1120E, so the display provides less information. Figure 33: Logged in to an IP Phone 1165E using an IP Phone 1120E 47678 45726...
-
Page 184: Using Virtual Office On Your Office Ip Phone
Additional phone features Figure 34: Logged in to an IP Phone 1165E using an IP Softphone 2050 Regardless of what model of IP Phone you use as a Remote phone, a User information line appears, which lists the number of your Office IP Phone. - Page 185 Additional phone features Figure 35: Office phone displays the message Logged Out When activated for Virtual Office by a remote IP Phone, your Office IP Phone is logged out and no longer operational. If this is the case when you return to your office, you can disconnect the remote login and regain control of your Office phone.
-
Page 186: Logging Out Of Virtual Office
Additional phone features To regain operation of a IP Phone being used for Virtual Office: Choose one of the following: — To completely disconnect your Office IP Phone from the Remote IP Phone: Home a. Press the Home key. b. Enter your User ID and password (this logs the Office IP Phone back on to your office network). -
Page 187: Troubleshooting Virtual Office
Additional phone features Troubleshooting Virtual Office Virtual Office can cause error messages to display on-screen. Table 13 lists error messages and describes actions to correct the causes. Table 13: Troubleshooting Virtual Office (Part 1 of 3) Displayed Probable cause Actions message Busy, try again Remote IP Phone is... - Page 188 IP Phone 1120E, IP IP Phone 1120E, IP Phone 1140E, or Phone 1140E, or IP Softphone 2050 and IP Softphone 2050 from try again, or consult an IP Phone 1165E your local system (some restrictions administrator. apply). Permission Incorrect User ID Enter correct User ID.
-
Page 189: Using Media Gateway 1000B
Additional phone features Table 13: Troubleshooting Virtual Office (Part 3 of 3) Displayed Probable cause Actions message Server Network problem. Notify system Unreachable (1) administrator if the problem persists. Server Network problem. Notify system Unreachable (2) administrator if the problem persists. Using Media Gateway 1000B The Media Gateway 1000B (MG 1000B) provides a means of extending CS1000 features to one or more remotely located branch offices using... -
Page 190: Using Test Local Mode
Additional phone features Using Test Local Mode Use Test Local Mode to check Local Mode functionality (make and receive IP Phone calls). Test Local Mode is useful when provisioning has changed for an IP Phone on an MG 1000B Controller. 1. -
Page 191: Troubleshooting Mg 1000B
Additional phone features Troubleshooting MG 1000B The MG 1000B can cause error messages to display on-screen. Table 14 lists error messages and describes actions to correct the causes. Table 14: Troubleshooting MG 1000B Display message Probable cause Actions Local Mode Test Local Mode. -
Page 192: Configuring Automatic Wake-Up
Using Hospitality features Using Hospitality features Hospitality features are intended for hotel operations. Configuring Automatic Wake-Up Use the Automatic Wake-Up feature to receive a timed reminder call. From your IP Phone, you can program the system to automatically place a call to you at a predetermined time. When you answer the call, recorded music plays for up to 30 seconds, followed by a prerecorded announcement or the attendant. - Page 193 Using Hospitality features To cancel an Automatic Wake-Up call: 1. Lift the handset. 2. Dial the Automatic Wake-Up Quit FFC. 3. Press the Goodbye key. (Goodbye) To verify the time for the Automatic Wake-Up call: 1. Lift the handset. 2. Dial the Automatic Wake-Up Verify FFC.
-
Page 194: Activating Message Registration
Using Hospitality features Activating Message Registration Use the Message Registration feature to read, change, or reset meters that log your hotel phone calls. To read meters: 1. Press the Message Registration key. 2. Dial the room Directory Number (DN). 3. Press the Message Registration key. -
Page 195: Using Maid Identification
Using Hospitality features To reset a meter to zero: 1. Press the Message Registration key. 2. Dial the room Directory Number (DN). 3. Press the key. 4. Press the Message Registration key. Using Maid Identification Use the Maid Identification feature to track the cleaning status of rooms. The maid enters the information from the IP Phone in each room. -
Page 196: Displaying Room Status
Using Hospitality features 3. Dial one of the following cleaning status codes: = Cleaning requested = Cleaning in progress = Room cleaned = Room passed inspection = Room failed inspection = Cleaning skipped The interrupted dial tone sounds. 4. Press the key. - Page 197 Using Hospitality features 2. Dial the Directory Number (DN) for the room. The DN appears followed by a two-digit code. The first digit indicates the occupancy status: = Room vacant = Room occupied The second digit indicates the cleaning status of the room: = Cleaning requested = Cleaning in progress = Room cleaned...
- Page 198 Using Hospitality features 2. Dial the Directory Number (DN) for the room. The DN appears followed by a two-digit code. The first digit indicates the occupancy status: = Room vacant = Room occupied The second digit indicates the cleaning status of the room: = Cleaning requested = Cleaning in progress = Room cleaned...
-
Page 199: Accessing External Server Applications
Depending on what is available on your system, your phone can provide information; for example, local news and weather, stock market information, or traffic reports. For more information about the External Server Applications, consult the Nortel IP Phone External Server Applications User Guide. - Page 200 Flexible Feature Codes (FFCs) Flexible Feature Codes (FFCs) Table 15 to track the FFCs assigned by your system administrator. Table 15: Flexible Feature Codes Feature Feature Automatic Wake-Up Make Set Busy Activate Activate Automatic Wake-Up Make Set Busy Deactivate Deactivate Automatic Wake-Up Malicious Call Trace Verify...
-
Page 201: Regulatory And Safety Information
Consult the dealer or an experienced radio/ TV technician for help. Note: The user should not make changes or modifications not expressly approved by Nortel Networks. Any such changes could void the user’s authority to operate the equipment This Class B digital apparatus complies with Canadian ICES-003. Cet appareil numérique de la classe B est conforme à... - Page 202 Regulatory and safety information and operated with a minimum distance of 20cm between the radiator and your body (excluding the handset). This transmitter must not be colocated or operated in conjunction with any other antenna or transmitter. To prevent radio interference to the licensed service, this device must be operated indoors only and should be kept away from windows to provide maximum shielding.
-
Page 203: Other
EU Countries: This device complies with the essential requirements and other relevant provisions of Directive 1999/5/EC. A copy of the Declara- tion may be obtained from or Nortel www.nortel.com 250 Sidney Street Belleville Ontario Canada K8P 3Z3. Bluetooth wireless technology: This portable device with its antenna complies with FCCs RF radiation exposure limits for an uncontrolled environment. -
Page 204: Denan Regulatory Notice For Japan
Regulatory and safety information DenAn regulatory notice for Japan... - Page 205 Appendix: Connecting the components Appendix: Connecting the components Following figure shows connections on the IP Phone 1165E. Figure 36: IP Phone 1165E connections WARNING Ensure that the protective rubber cap on the Accessory Expansion Module port is in place when the port is not in use.
-
Page 206: Before You Begin
Connecting the components of the IP Phone WARNING Your IP Phone 1165E is shipped with the base locked in position. To avoid damaging your IP Phone, pull up on the wall-mount lever, located just under the Handsfree key, to release the base and gently rotate the base away from the IP Phone. - Page 207 Appendix: Connecting the components Figure 37: 1165E from the stand Release the IP Phone Use the following steps to connect the components of your IP Phone. 1. Remove the stand cover. Pull upward on the center catch as indicated in preceding figure and remove the stand cover. The cable...
- Page 208 Appendix: Connecting the components Figure 38: Remove the stand cover 2. Your IP Phone 1165E can be powered by standard IEEE 802.3af Power over Ethernet or by AC power To use Power over Ethernet, where power is delivered from the Ethernet Switch over the LAN cabling infrastructure to the phone (IEEE 802.3af), additional use of...
- Page 209 6. If you are connecting your PC through the IP Phone, you require a second CAT-5e or CAT6 cable. Only one cable is included with the IP Phone 1165E package. Install the Ethernet cable connecting the PC to the IP Phone (optional). Connect one end of the PC Ethernet...
- Page 210 Appendix: Connecting the components Figure 39: Cable routing tracks and mounting holes 8. Wall-mount your IP Phone (optional). Your IP Phone 1165E can be mounted either by: (Method A) using the mounting holes on the bottom of the IP Phone stand, or (Method B) using a traditional-style wall-mount box with RJ-45 connector and 15-cm (6-inch) CAT5e cable (not provided).
- Page 211 Appendix: Connecting the components screws are snug, install the IP Phone on the mounting screws, and then tighten the top screws. Method B: Attach a 15-cm (6-inch) CAT5e cable (not supplied), position the stand over the mounting rivets, and slide the IP Phone down the wall so that the rivets fit into the slots on the stand.
- Page 212 Appendix: Connecting the components...
-
Page 213: Terms You Should Know
Terms you should know Terms you should know Calling Party Name Display Information appearing on the LCD display screen, such as the caller’s name and phone number. The system must have CPND enabled. Category 5 (Cat5) Cable and associated connecting hardware capable of transmitting at speeds up to 100 MHz, used by 10BaseT, 100BaseT4, 100BaseTX. - Page 214 Terms you should know Directory Number (DN) A number consisting of one to seven digits for an IP Phone, and also known as an extension number. Feature display An area that shows status information about the feature in use. It also displays the name and status of the active session.
- Page 215 Terms you should know Message/Inbox A fixed key on your IP Phone 1165E that connects to your voice messaging system when the key is pressed. Navigation keys Keys used to scroll through menus and lists appearing on the LCD display screen.
- Page 216 Terms you should know Self-labeled line programmable feature keys The keys on either side of the LCD display area are self-labeled line/programmable feature keys, with labels on the LCD. These keys functions as line (DN) keys. Shared Directory Number A DN (extension) that is shared by two or more persons. Special Prefix code (SPRE) Special codes entered using the dialpad, followed by a two-digit access code, that enable features (for example, Call Forward All...
- Page 217 Terms you should know releases the switchhook, and you either answer an incoming call or you receive a dial tone to make a call. User interface Screen displays that interact with the end user as a result of an action or event. Visual Alerter/Message Waiting indicator An LCD or an LED that flashes to indicate that a message is waiting or when the ringer is on.
- Page 218 Terms you should know...
- Page 219 Index Index Centrex/Exchange Line Switch- hook Flash 163 About the IP Phone 2004 11, 205, Change feature key labels 68 Charge a call or charge a forced Active headset device 88 call 163 Advanced Diagnostic Tool 119 Conferee Selectable Display and Answer a call 136 Disconnect 157 Attendant Recall 140...
- Page 220 Mute key 16 Headset key 17 Headsets 88 Hold key 16 Navigation keys 16, 215 Hospitality features 192 Network Configuration 118 Normal Mode 189 Nortel Mobile Headset Adapter 91 Indicator status 214 Information display 214 Intercom call 134 Off-hook 215...
- Page 221 Index Off-hook dialing 121 Self-labeled line/programmable feature keys 15 Onhook Default Path 68 Services key 19, 215 On-hook dialing 122 Shared Directory Numbers 216 Outline Font 82 Shift/Outbox key 18 Override a busy signal 168 Speaker key 16 Special dial tone 216 Special Prefix code (SPRE) 216 Paging tone 215 Speed Call 132...
- Page 222 Index Virtual Office logout 186 Virtual Office on your Remote telephone 182 Voice Call 172 Volume adjustment 53 Volume control bar 15...
-
Page 224: User Guide
Nortel Networks. The Bluetooth word mark and logos are owned by the Bluetooth SIG, Inc. and any use of such marks by Nortel Networks is under license. All other trademarks are the property of their respective owners.
Need help?
Do you have a question about the 1165E and is the answer not in the manual?
Questions and answers